DCS CAD1 Series Installation Manual/User Manual
Professional grill cart
Hide thumbs
Also See for CAD1 Series:
- Installation instructions and user manual (52 pages) ,
- Installation instructions and user manual (44 pages)
Table of Contents
Advertisement
Quick Links
Advertisement
Table of Contents

Related Manuals for DCS CAD1 Series


Summary of Contents for DCS CAD1 Series
- Page 1 PROFESSIONAL GRILL CART CAD1 models INSTALLATION GUIDE / USER GUIDE NZ AU...
-
Page 3: Table Of Contents
The models shown in this user guide may not be available in all markets and are subject to change at any time. For current details about model and specification availability in your country, visit our website listed on the back cover or contact your DCS dealer. -
Page 4: Safety And Warnings
SAFETY AND WARNINGS To reduce the risk of fire, electrical shock, injury to persons, or damage when using the appliance, follow the important safety instructions listed below: hazard or other injury. WARNING! Explosion Hazard Failure to follow this advice may result in injury or death. - Page 5 SAFETY AND WARNINGS Do not allow children or pets to play in or around the cart. To prevent personal injury or damage to the drawers, do not overload them. The maximum rating of each drawer is 15kg. Do not store items of interest to children above or on the inside of any cart. Children could be seriously injured if they should climb onto or into the cart to reach these items.
-
Page 6: Introduction
INTRODUCTION Thank you for selecting this DCS Grill Cart. This installation and user guide contains valuable information on how to properly install, and maintain your new Professional Grill Cart for years of safe and enjoyable use. For your convenience, product questions can be answered by a DCS Customer Care... -
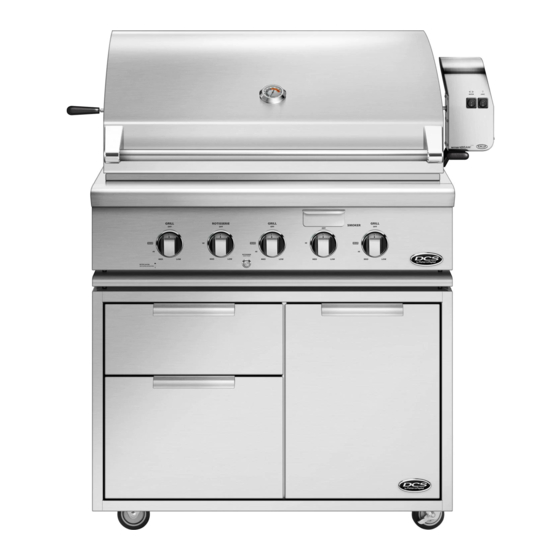
Page 7: Model Identification & Dimensions
MODEL IDENTIFICATION & DIMENSIONS CAD1-48 CAD1-36 Front Front CAD1-36 and CAD1-48 Profile CAD1-36 CAD1-48 PRODUCT DIMENSIONS A Overall width of cart 1219 B Overall height of cart C Height of cart chasis (excluding wheels) D Overall depth of cart (excluding handles) E Depth of cart chasis (excluding doors &... -
Page 8: Shipping Inspection
1 Inspect the Cart to verify that there is no shipping damage. 2 If any damage is detected, call the retail dealer and initiate a damage claim. DCS is not responsible for shipping damage. Operate the drawers to be sure they glide smoothly. -
Page 9: Locating The Cart
INSTALLATION Locating the cart For proper use, this product should be installed/positioned on a flat ground or patio. Unevenness such as bumps, cracks and protrusions should be 6mm or less. Refer to illustration and the below table for required flat area dimensions. CAD1-36 CAD1-48 PRODUCT DIMENSIONS... -
Page 10: Components
INSTALLATION Components Your cart is packaged in one box. The box contains your cart and a universal hardware kit to be used for grill installation and may contain extra hardware for your convenience. Table of quantity of parts CONTENTS MODEL PART NO. -
Page 11: Cart Assembly Instructions
INSTALLATION Cart assembly instructions Linking carts together (optional) To link two or more CAD1 carts, the following instructions must be done first, using the hardware provided, before installing the top modules. IMPORTANT! Once the carts are linked, they cannot be moved. Moving the carts once linked could damage the carts. - Page 12 INSTALLATION Outdoor appliance head preparation IMPORTANT! For the CAD1-48/48 there are two sets of brackets. If you have the BGB48-BQR, use the brackets labeled LEFT-48 BQR and RIGHT-48 BQR. If you have the BGB48-BQAR or BE1-48, use the brackets labeled 48-BQAR First you will need to remove the angle brackets from the side of the unit and replace them with cart mount brackets.
- Page 13 INSTALLATION Head placement onto cart IMPORTANT! Be aware of pinch points and sharp edges to avoid injury to arms and hand. Two persons required to lift head. Remove drip tray/pan and other removable components such as grates, top burner caps and components, and radiant tray and grill burner for easier handling.
- Page 14 INSTALLATION Front end screw installation Install remaining screws (10-24 x 1/2") into the front of head to the cart. Slide drip tray/pan back into place.
- Page 15 INSTALLATION Secure the gas hose and replace the gas compartment hatch cover Undo the screw and remove the gas hose retainer from the hatch cover. BE1 products only: Remove plug from hatch cover and route electrical wiring through supplied strain relief bushing.
- Page 16 INSTALLATION Power Supply installation (for BE1 products only) Your BE1 product comes supplied with a power supply for ignition and internal lighting, which is concealed in a box with an attached power supply cord. It is recommended that the power supply is mounted to the rear panel of the CAD1 cart using the 4 holes provided. VOLTAGE AMPS 50 Hz...
- Page 17 INSTALLATION Gas hook-up – LPG Place your 9kg cylinder (type 1) into the tank retention device as shown. Refer to your product user guide for detailed gas connection guidance. IMPORTANT! To prevent personal injury or damage to the drawers, do not overload them. The maximum rating of each drawer is 15kg.
-
Page 18: Side Shelf Assembly Instructions (Optional)
INSTALLATION Side shelf assembly instructions (optional) Optional attach side shelf accessory on either side Note: side shelf model CAD1-SK can be installed with the head already on the cart. Shoulder bolt screw location Screw two shoulder bolts into the bottom threaded holes on the side of the cart. -
Page 19: Using The Cart
USING THE CART Removing the drawers IMPORTANT! To prevent personal injury or damage to the drawers, do not overload them. The maximum rating of each drawer is 15kg. To remove the drawers, pull them out until their slider latch is visible. Carefully push the latch down on the left side while pulling up on the latch on the right side and pull the drawer completely out of the frame. - Page 20 USING THE CART While holding the drawer up by the handle, pull the glides from the drawer cavity out over the drawer glide until they click. As you push the drawers in, you will encounter moderate resistance. Continue to push the drawer all the way in to complete the engagement process.
-
Page 21: Care And Maintenance
CARE AND MAINTENANCE All parts of the Professional Grill Cart can be cleaned with hot soapy water, rinsed, dried and buffed to a shine with a soft, heavy cloth. Always try this first, as it is the mildest cleaning procedure. 1 Use the mildest cleaning procedure first. -
Page 22: Service & Warranty
SERVICE & WARRANTY For warranty service, please contact your local service provider or DCS Customer Care Representative at www.fisherpaykel.com, please have the following information ready: Model number (can be found on the inside, left wall of the tank drawer). Serial number (can be found on the inside, left wall of the tank drawer). - Page 23 FISHERPAYKEL.COM © Fisher & Paykel Appliances 2022. All rights reserved. The models shown in this guide may not be available in all markets and are subject to change at any time. The product specifications in this guide apply to the specific products and models described at the date of issue.
Need help?
Do you have a question about the CAD1 Series and is the answer not in the manual?
Questions and answers