Advertisement
- 1 Overview
- 2 How to use
- 3 Warnings
- 4 Description and intended use
- 5 Memorising the transmitter
- 6 Transmitter memorisation process
- 7 Memorisation in Mode 1
- 8 Memorisation in Mode 2
- 9 Memorisation process with two transmitters in proximity to the control unit
- 10 Check transmitter function
- 11 Battery replacement
- 12 Technical Characteristics
- 13 Documents / Resources
Overview

This manual applies to ECCO5 transmitters, models ECCO5BO, ECCO5WO, ECCO5BW, ECCO5WP
How to use


Warnings
- Before beginning installation, check that the product is suitable for use, paying particular attention to the data in the "Technical characteristics" chapter.
- NICE declines all liability for damage resulting from improper use of the product and other than as specified in this manual.
- Packaging materials must be disposed of in compliance with local regulations.
- Do not place the transmitter near heat sources or expose it to open flames; this could damage the device and cause malfunctions or other dangers.
![warning]() The batteries, even when drained, could contain poisonous substances so should not be thrown away as general waste but disposed of in compliance with local regulations regarding batteries.
The batteries, even when drained, could contain poisonous substances so should not be thrown away as general waste but disposed of in compliance with local regulations regarding batteries.
Description and intended use
These transmitters are part by Nice Home automation system and are designed to control systems produced using products from the same line, for residential use.
 – Any use other than that specified herein or in environmental conditions other than those stated in this manual is to be considered improper and is strictly forbidden.
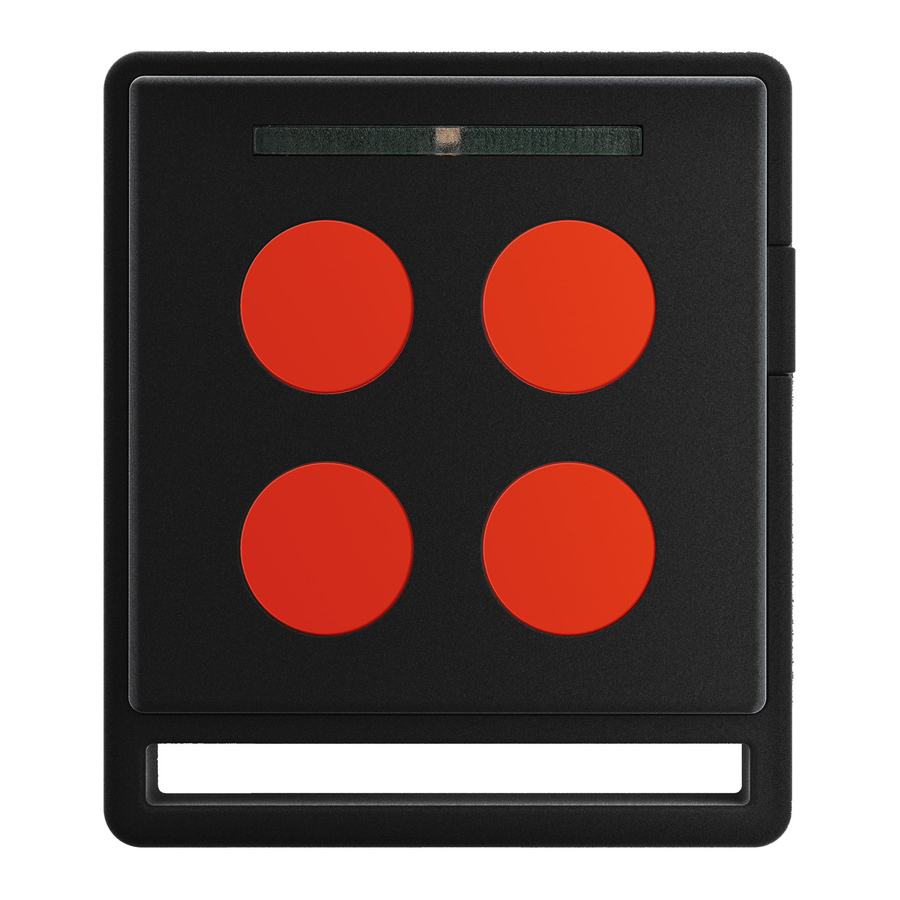
The transmitter features 5 keys that can be used to send 5 types of command to one single automation or to control up to 5 automations or radio receivers. The sending of the command is confirmed when the LED lights up (LED L1 - fig. 1).
Functionality of the innovative 5th key (T5 - fig. 1) depends on the control unit or radio receiver with which it is paired: for example, with the FILO400C/FILO600C product this key is used to program the "Presence" function; see the relevant instruction manual.
Memorising the transmitter
There are two ways to memorise the new transmitter:
- Mode 1: all transmitter keys are memorised simultaneously, automatically paired with the commands shown in Table 1.
A transmitter memorised in Mode 1 can control only one automation. - Mode 2: this procedure is used to memorise one key at a time, pairing it with the command of your choosing as cited in Table 2.
A transmitter memorised in Mode 2 can control several automations (for example: automation 1 controlled by key 1; automation 2 controlled by key 2; and so on...)
| Table 1 Transmitter function in Mode 1 |
||
| ECCO5... transmitter | Command | |
| Control unit | Radio receiver | |
| Key 1 | Step-by-step | Output 1 activation |
| Key 2 | Partial open | Output 2 activation |
| Key 3 | Only opens | Output 3 activation |
| Key 4 | Only closes | Output 4 activation |
| Key 5 | Auxiliary function | Not present |
| Note: Functionality of the 5th key (T5 - fig. 1) depends on the control unit or radio receiver with which it is paired; consult the product instruction manual. | ||
| Table 2 Transmitter function in Mode 2 |
||
| ECCO5... transmitter | Command | |
| Control unit | Radio receiver | |
| Command 1 | Step-by-step | Output 1 activation |
| Command 2 | Partial open | Output 2 activation |
| Command 3 | Only opens | Output 3 activation |
| Command 4 | Only closes | Output 4 activation |
| Note: the T5 key is not suitable for memorisation in Mode 2. | ||
Transmitter memorisation process
The memorisation process depends on the related control unit or radio receiver.
To make the processes easier to read, the keys of the transmitters and control units have been assigned initials:
- transmitter = keys T1, T2, T3, T4, T5 and LED L1 (fig.1)
- control units = key P1 and LED L1 for control unit CL201/2/3/4/5 (fig.2) or key P4 and LED L4 for control unit CL101 (fig. 2)
Before carrying out the memorisation procedures, we recommend you read them and respect the indicated times.
Memorisation in Mode 1
- On the central unit press and hold down the P1 or P4 key (depending on the control unit) for at least 3 seconds; when the L1 or L4 LED (depending on the control unit) lights up, release the key.
- Within 10 seconds of releasing it, press and hold down any key on the transmitter to be memorised for at least 3 seconds.
If the memorisation process is successful, the L1 or L4 LED (depending on the control unit) will flash 3 times. - To memorise other transmitters, repeat step 02 within 10 seconds, otherwise the memorisation phase will end automatically.
Memorisation in Mode 2
- On the Control units and radio receivers (refer to Table 2)
- In Table 2, select the command.
- On the control unit, press and release key P1 or P4 (depending on the control unit) the correct number of times for the command selected (Table 2 - e.g. 3 times for the "Only Opens" command); the L1 or L4 LED (depending on the control unit) should flash quickly the same number of times as the command selected.
- Within 10 seconds, press and hold down the transmitter key to be memorised for at least 2 seconds: if the memorisation process is successful, the L1 or L4 LED (depending on the control unit) will flash 3 times.
- To memorise other transmitters with the same command type, repeat step 03 within 10 seconds; otherwise, the memorisation phase will end automatically.
Memorisation process with two transmitters in proximity to the control unit
This procedure is used to memorise a NEW transmitter using a second transmitter (OLD) that is already memorised and operative, without using the keys on the control unit, but by simply positioning it in proximity to the latter.
During the process, the NEW transmitter is memorised just as the OLD transmitter was memorised (Mode 1 or Mode 2).
- Procedure for OLD transmitter memorised in Mode 1:
- Position the two transmitters in proxi-mity to the control unit: wait 1 second between one step and the next.
- On the NEW transmitter press and hold down any key for at least 8 seconds and then release it.
- On the OLD transmitter press and hold down any key to be copied for at least 2 seconds and then release it.
- On the OLD transmitter press and hold down any key to be copied for at least 2 seconds and then release it.
- On the OLD transmitter press and hold down any key to be copied for at least 2 seconds and then release it.
- On the NEW transmitter press and hold down any key to be memorised for at least 5 seconds and then release it. Repeat the process for every transmitter to be memorised.
- Procedure for OLD transmitter memorised in Mode 2:
- Position the two transmitters in proxi-mity to the control unit: wait 1 second between one step and the next.
- On the NEW transmitter press and hold down the key to be memorised for at least 8 seconds and then release it.
- On the OLD transmitter press and hold down the key to be copied for at least 2 seconds and then release it.
- On the OLD transmitter press and hold down the key to be copied for at least 2 seconds and then release it.
- On the OLD transmitter press and hold down the key to be copied for at least 2 seconds and then release it.
- On the NEW transmitter press and hold down the key to be memorised for at least 5 seconds and then release it.
Repeat the process for every transmitter to be memorised.
Check transmitter function
Simply press one of the keys on the transmitter and check that the red LED flashes and that the automation carries out the expected command.
Battery replacement
(fig. 3)
When battery capacity drops considerably and the LED light becomes dim, it is likely that the battery is drained. The transmitter contains a lithium battery, of type CR2032.
The product functions with batteries that could contain poisonous substances and so they should NOT be thrown away as general waste.

The batteries should instead be disposed of according to separate waste collection methods as envisaged by local regulations.
Technical Characteristics
ECCO5... is manufactured by NICE S.p. A. (TV) Italy. In order to improve its products, NICE S.p. A. reserves the right to modify their technical specifications at any time and without prior notice. In any case, the manufacturer guarantees their functionality and fitness for the intended purposes.
Note: all technical specifications refer to a temperature of 20°C.
- Type: Radio transmitters for controlling automatic gate or door automatisms
- Technology used: AM OOK codified modulation of radio carrier
- Frequency: 433.92 MHz (± 100 kHz)
- Power emitted: 0 dBm (ERP)
- Codification: Rolling code with 64 Bit code (18 trillion combinations)
- Keys: each key sends a command and can be used for different commands on the same control unit or to control various control units
- Power supply: 3V +20% -40% with a lithium battery of type CR2032
- Battery life: 2 years, estimated on the basis of 10 commands/day, each lasting 1s at 20°C (at low temperatures the efficiency of the batteries decreases)
- Operating temperature: -20°C... +55°C
- Protection rating: IP40 (suitable for use indoors or in protected environments)
- Dimensions / weight: 45 x 52 h 11 mm / 20 g
Worldwide Customer Service
customerservice@niceforyou.com
Nice S.p. A.
Via Pezza Alta, 13
31046 Oderzo TV Italy
info@niceforyou.com
www.niceforyou.com

Documents / ResourcesDownload manual
Here you can download full pdf version of manual, it may contain additional safety instructions, warranty information, FCC rules, etc.
Advertisement


Need help?
Do you have a question about the ECCO5 and is the answer not in the manual?
Questions and answers