Table of Contents
Advertisement
Available languages
Available languages
Quick Links
Advertisement
Chapters
Table of Contents

Related Manuals for Nice planotime


Summary of Contents for Nice planotime
- Page 1 Instructions and warnings for the fitter istruzioni e avvertenze per l’installatore Instructions et recommandations pour l’installation Anweisungen und hinweise für den installateur Instrucciones j advertencias para el instalador Instrukcja dla instalatora...
-
Page 2: Table Of Contents
Contents: page page Description How to program PLANOTIME What’s PLANOTIME Selecting the type of programming Is it necessary to program the unit? 5.1.1 Forward and backward for programming What’s an event? Programming the “events” What are “groups”? 5.2.1 Programming: new event What are special commands? 5.2.2... -
Page 3: Description
1.1) What’s PLANOTIME PLANOTIME is a radio transmitter for control of auto- It can operate in “manual” mode, allowing you to control mated awnings and shutters; it allows you to manage up the automations directly;... -
Page 4: What Are "Groups
PLANOTIME is powered by a battery that is already installed but not connected to prevent run down. To switch on PLANOTIME, just pull off the plastic tab that projects from the battery compartment. When PLANOTIME switches on, you will immediately be... -
Page 5: Initial Setting Of The Timer
PLANOTIME’s code. If a group consists of multiple automations, the memorization opera- tion must be repeated for each of them. Since PLANOTIME is capable of controlling up to 6 groups of automations, it will transmit a different code for each of them. Therefore, before you start the memorization procedure you need to select the group to which the automation is to be assigned. - Page 6 All the memorization sequences are timed, which means that they must be executed within the set time limits. 2.3.1) Memorizing PLANOTIME as the first transmitter When the code memory of the automation does not yet contain any codes, you can enter PLANOTIME following the procedure described below:...
-
Page 7: Mounting Planotime
• Do not position it close to or onto metal structures, as these would restrict its range. • Place PLANOTIME where you wish to mount it, then try to control all the automations and make sure they receive the transmitted radio command. -
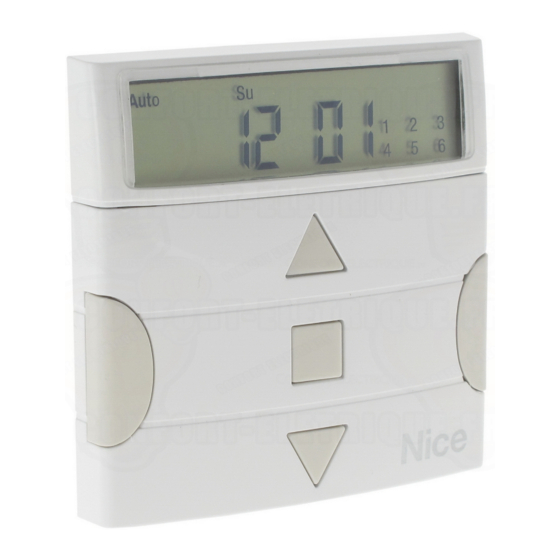
Page 8: Symbol Description
3) Symbol description The symbols on PLANOTIME are distributed over three areas: • Area 1 to the left refers to the operating modes and programming • Area 2 in the centre refers to the weekly timer • Area 3 to the right... -
Page 9: How To Use Planotime
“Nicetime” operating mode (see chapter 4.3) In “Nicetime” mode, PLANOTIME operates just like in “manual” mode, except that it will return to the “automatic” oper- ating mode on a specified day and time. In practice, this enables the interruption of the “automatic” mode for a set peri- od of time. -
Page 10: Automatic" Mode Operation
Press key to confirm the day From this moment PLANOTIME will operate as if it was in “manual” mode, and you will be able to give your commands by pressing any one of these keys: . PLANOTIME will switch back to “automatic” mode on the set day and time. -
Page 11: Operation In "Manual With Recorder" Mode
PLANOTIME to command the daily up and down movement of the automations every day at the desired time. At the beginning of the following week, set PLANOTIME to the “auto- matic”... -
Page 12: How To Program Planotime
Setting the timer (see chapter 5.3) The timer has to be set in order to enable PLANOTIME to execute the events at the established time. If the special “planetary time” command is used, in addition to the hours, minutes and day of the week you also need to set the day of the month, the month and the year and, finally, you must specify whether the current time is winter (sun time) or summer (legal time). -
Page 13: Programming The "Events
5.2) Programming the “events” When programming an event, you need to establish all its properties one by one, as follows: Table 22 Proprietà degli eventi: Example 1 Example 2 Hours and minutes at which a command must be sent 0 0 8 8 . . 3 3 0 0 1 1 8 8 . -
Page 14: Programming: New Event
With the last confirmation the event is memorized and PLANOTIME is ready for programming another new event; you can proceed starting from step N. 5 in this table. - Page 15 With the last confirmation the event is memorized and PLANOTIME is ready for programming another new event; you can proceed starting from step N. 5 in this table.
-
Page 16: Programming: Deleting Events
To exit without deleting, press key and resume the procedure from point 7 in this table. After deleting an event, PLANOTIME is ready for subsequent deletion of another event; in this case proceed from point N°6 of this table. -
Page 17: Timer Settings
(see chapter 5.2.1) in which all properties of the event can be modified or confirmed as required. After modifying and confirming the last parameter, the copied event is saved as a new event and PLANOTIME is ready for copying another event;... -
Page 18: Settings Of Special Command "Holiday" Parameters
5.4) Settings of special command "holiday" parameters To ensure correct operation of the special command “holiday” the maximum admissible deviation value must be set; this can be from 0 to 75 minutes, settable at intervals of 5 minutes. For example, if the value 15 is set, this means that an event programmed for 08.00 can be performed randomly between 7.45 and 8.15. -
Page 19: Battery Replacement
7) Warnings The use of PLANOTIME does not require special proce- dures, but the following facts should be taken into account: • The commands sent via radio from PLANOTIME can- not totally guaranty reception by the relative automat- ic devices. -
Page 20: How To
(preferably perfectly vertical and pointed, 8.1) Error list On vary rare occasions there may be a PLANOTIME malfunction; if this occurs the cause of the error is always spec- ified. The following table lists the errors and possible solutions. -
Page 21: Technical Specifications
9) Technical specifications To improve products, NICE S.p.a. reserves the right to modify the technical specifications at any time without notice, however guaranteeing functionality and the specified intended use. Note: all technical specifications refer to a temperature of 20°C. Power supply... - Page 22 Indice dei capitoli: Descrizione Come programmare PLANOTIME Cos’è PLANOTIME Scelta del tipo di programmazione Si deve proprio programmare? 5.1.1 Avanti e indietro per la programmazione Cos’è un evento? Programmazione “eventi” Cosa sono i gruppi? 5.2.1 Programmazione: nuovo evento Cosa sono i comandi speciali? 5.2.2...
-
Page 23: Descrizione
Può funzionare in modo “manuale” dove sarete voi ad 1.2) Si deve proprio programmare? Purtroppo si! PLANOTIME non conosce le vostre abitu- qualche minuto in più con le tapparelle abbassate. dini; se volete usarlo in modo “automatico” dovrà sapere La logica di programmazione e di funzionamento di PLA- a che ora volete abbassare le tende da sole e dovrà... -
Page 24: Cosa Sono I Gruppi
In nessun caso PLANOTIME si potrà danneg- giare. 2.1) Accendiamo PLANOTIME PLANOTIME funziona con una pila che è già inserita, ma scollegata per evitare che si consumi inutilmente; per accendere PLANOTIME occorre togliere la linguetta di plastica che esce dal vano porta pila. -
Page 25: Regolazione Iniziale Dell'orologio
“codice” diverso da ogni altro trasmettitore; si rende necessaria quindi una fase di “memorizzazione” attraverso la quale si predispone l’automatismo a riconoscere il codice di PLANOTIME. Se un gruppo è composto da più automa- tismi, è necessario ripetere l’operazione di memorizzazione per ognuno di essi. PLANOTIME è in grado di comanda- re fino a 6 gruppi di automatismi e per ognuno di essi trasmetterà... -
Page 26: Mode
Premere ancora una volta il tasto di PLANOTIME Alla fine 3 bip provenienti dall’automatismo segnaleranno che PLANOTIME è stato memorizzato correttamente. Se la memoria codici è piena (14 codici), 6 bip indicheranno che PLANOTIME non può essere memorizzato. -
Page 27: Fissaggio Di Planotime
• Evitare di collocarlo in prossimità, o peggio, su strut- ture di metallo che ne riducono la portata. • Ponendo PLANOTIME sul punto in cui si desidera fis- sarlo, provare a comandare tutti gli automatismi verifi- cando che ricevano il comando radio inviato. -
Page 28: Descrizione Dei Simboli
3) Descrizione dei simboli I simboli visibili su PLANOTIME sono suddivisi in 3 aree: • Area 1 a sinistra indica i modi di funzionamento e le programmazioni • Area 2 al centro indica l’orologio settimanale • Area 3 a destra... -
Page 29: Come Usare Planotime
4.1) Scelta dei modi di funzionamento Per entrare nel modo di funzionamento desiderato occorre sceglierlo e confermarlo nel “menu di scelta”. Il “menu di scelta” si può considerare come il punto di partenza per scegliere le funzioni di PLANOTIME: “Auto”, “Man”, “Man ”... -
Page 30: Funzionamento In Modo
(Su=Domenica; Mo=Lunedì; Tu=Martedì; We=Mercoledì; Th=Giovedì; Fr=Venerdì; Sa=Sabato) Premere il tasto per confermare i minuti Da questo momento PLANOTIME funzionerà come se fosse in modo “manuale” e potete dare i comandi premendo uno qualsiasi dei tasti . PLANOTIME tornerà in modo “automatico” il giorno e all’ora prestabilita. -
Page 31: Funzionamento In Modo "Manuale
Premere il tasto per confermare il modo “manuale” con registratore Da questo momento si può usare PLANOTIME come se fosse in modo “manuale” con la particolarità che tutti i coman- di inviati con i tasti , con il giorno le ore ed i minuti in cui sono stati dati, vengono memorizzati come eventi. -
Page 32: Come Programmare Planotime
Per entrare nel modo “programmazione” occorre sceglierlo e confermarlo nel “menu di scelta”. Il menu di scelta si può considerare come il punto di partenza per tutte le funzioni di PLANOTIME. Da qualsiasi modo di funzionamento o programmazione si trovi PLANOTIME è possibile ritornare al “menu di scelta”... -
Page 33: Programmazione "Eventi
5.2) Programmazione “eventi” Nella programmazione degli eventi si devono regolare, una per una, tutte le proprietà che compongono l’evento, e cioè: Tabella 22 Proprietà degli eventi: Esempio 1 Esempio 2 Ore e minuti in cui deve essere inviato il comando 0 0 8 8 . - Page 34 è al termine del percorso di realizzazione del nuovo evento. Premere il tasto per confermare l’evento oppure premere per tornare indietro. Con l’ultima conferma l’evento viene memorizzato e PLANOTIME si predispone per la programmazione di un altro nuo- vo evento, quindi proseguire partendo dal punto N°5 di questa tabella...
- Page 35 Con l’ultima conferma, l’evento viene memorizzato e PLANOTIME si predispone per la programmazione di un altro nuo- vo evento, quindi proseguire partendo dal punto N°5 di questa tabella Nota: per il corretto funzionamento “dell’orario planetario” è necessario aver regolato i relativi parametri (vedere tabella 30)
- Page 36 Se non si desidera confermare la cancellazione premere il tasto e riprendere dal punto 7 di questa tabella. Dopo aver cancellato un evento, PLANOTIME si predispone per la cancellazione di un altro evento, quindi proseguire partendo dal punto N°6 di questa tabella.
-
Page 37: Regolazione Dell'orologio
“nuovo evento” (vedere capitolo 5.2.1) e si possono modificare o confermare una per una tutte le proprietà dell’even- to. Dopo aver modificato e confermato l’ultimo parametro, l’evento copiato viene memorizzato come nuovo evento e PLANOTIME si predispone per la copia di un altro evento, quindi proseguire partendo dal punto N°6 di questa tabella. 5.3) Regolazione dell’orologio La regolazione dell’orologio viene fatta immediatamente dopo aver inserito la pila ma può... -
Page 38: Regolazione Dei Parametri Del Comando Speciale "In Vacanza
5.4) Regolazione dei parametri del comando speciale “in vacanza” Per il corretto funzionamento del comando speciale “in vacanza” è necessario regolare il valore massimo dello scosta- mento consentito, il valore può essere da 0 a 75 minuti, regolabile in passi da 5 minuti. Come risultato si ottiene, ad esempio, se il valore è... -
Page 39: Sostituzione Della Pila
L’uso di PLANOTIME non richiede particolari attenzioni, vi preghiamo comunque di tenere i considerazione que- sti aspetti: • I comandi inviati via radio da PLANOTIME non posso- no offrire la totale garanzia che vengano ricevuti dagli automatismi. • Alcuni componenti di PLANOTIME possono contene-... -
Page 40: Cosa Fare Se
PLANOTIME. 8.1) Lista errori Ci possono essere rarissime situazioni in cui PLANOTIME potrebbe non funzionare correttamente, se ciò si verifica la causa dell’errore viene sempre indicata. Nella tabella seguente ci sono gli errori e le possibili soluzioni. -
Page 41: Caratteristiche Tecniche
9) Caratteristiche tecniche Allo scopo di migliorare i prodotti, NICE S.p.a. si riserva il diritto di modificare le caratteristiche tecniche in qualsiasi momento e senza preavviso, garantendo comunque funzionalità e destinazione d’uso previste. Nota: tutte le caratteristiche tecniche sono riferite alla temperatura di 20°C. - Page 42 Programmation: copie événements Allumage de PLANOTIME Réglage de l’horloge Réglage initial de l’horloge Réglage des paramètres de la commande 58 Mémorisation de PLANOTIME dans les spéciale “en vacance” récepteurs des automatismes Réglage des paramètres de la commande 58 2.3.1 Mémorisation de PLANOTIME spéciale “heure planétaire”...
-
Page 43: Description
Il peut fonctionner en mode “manuel” où vous intervien- heures programmés. 1.2) Faut-il vraiment le programmer? Oui, c’est indispensable ! PLANOTIME ne connaît pas le dimanche, vous souhaitez garder les volets baissés vos habitudes; si vous voulez l’utiliser en mode “auto- un peu plus longtemps. -
Page 44: Que Sont Les Groupes
PLANOTIME ne risque en aucun cas de s’endommager. 2.1) Allumage de PLANOTIME PLANOTIME fonctionne avec une pile qui est déjà en À l’allumage de PLANOTIME, la première opération place mais qui est déconnectée pour éviter de se demandée est le réglage de l’horloge interne. -
Page 45: Réglage Initial De L'horloge
émetteur; il faut donc procéder à une phase de “mémorisation” à travers laquelle on prépare l’automatis- me à reconnaître le code de PLANOTIME. Si un groupe est composé de plusieurs automatismes, il faut répéter l’o- pération de mémorisation pour chacun d’eux. PLANOTIME est en mesure de commander jusqu’à 6 groupes d’auto- matismes et pour chacun d’eux, il transmettra un code différent, donc, avant de commencer la mémorisation, il faut... -
Page 46: Tableau N° 5: Pour Sortir Du Mode "Manuel
Attention: la mémorisation peut s’effectuer dans tous les émetteurs qui se trouvent dans le rayon de portée de PLANOTIME; il est donc bon de ne garder alimenté que celui que l’on souhaite mémoriser. Toutes les séquences de mémorisation sont temporisées, c’est-à-dire qu’elles doivent être effectuées dans les limites de temps prévues. -
Page 47: Fixation De Planotime
• Éviter de le placer à proximité, ou pire sur des struc- tures en métal qui en réduisent la portée. • Plaçant PLANOTIME sur le point où l’on désire le fixer, essayer de commander tous les automatismes en vérifiant qu’ils reçoivent la commande radio envoyée. -
Page 48: Description Des Symboles
3) Description des symboles Les symboles visibles sur PLANOTIME sont subdivisés en 3 zones: • Zone 1 à gauche indique les modes de fonctionnement et les programmations • Zone 2 au centre indique l’horloge hebdomadaire • Zone 3 à droite indique les groupes et les commandes spéciales... -
Page 49: Comment Utiliser Planotime
“Auto”, “Man”, “Man ” et “Prog”. Quel que soit le mode de fonctionnement ou de programmation dans lequel se trouve PLANOTIME il est possible de revenir au “menu de sélection” en pressant plusieurs fois la touche jusqu’à faire clignoter l’indication “Auto”. -
Page 50: Fonctionnement En Mode "Automatique
Presser la touche pour confirmer le jour. À partir de cet instant PLANOTIME fonctionnera comme s’il était en mode “manuel” et vous pourrez donner les com- mandes en pressant l’une des touches . PLANOTIME reviendra en mode “automatique” le jour et à l’heure pré- établis. -
Page 51: Fonctionnement En Mode
Presser la touche pour confirmer le mode “manuel” avec enregistreur. À partir de cet instant, on peut utiliser PLANOTIME comme s’il était en mode “manuel” avec la particularité que toutes les commandes envoyées avec les touches , avec le jour, les heures et les minutes auxquels elles ont été don- nées sont mémorisées comme événements. -
Page 52: Comment Programmer Planotime
5) Comment programmer PLANOTIME Le fonctionnement de PLANOTIME en mode “programmation” permet de créer les événements, de les modifier, de les copier et de les effacer; il est possible de régler l’horloge et les autres paramètres utiles au fonctionnement de PLANOTIME. Prog Programmation “événements”... -
Page 53: Programmation "Événements
5.2) Programmation “événements” Dans la programmation des événements il faut régler, une par une, toutes les propriétés qui composent l’événement, c’est-à-dire: Tableau 22 Propriétés des événements Exemple 1 Exemple 2 Heures et minutes auxquelles la commande doit être envoyée. 0 0 8 8 . . 3 3 0 0 1 1 8 8 . -
Page 54: Programmation: Nouvel Événement
événement. Presser la touche pour confirmer l’événement ou bien presser pour revenir en arrière. Avec la dernière confirmation, l’événement est mémorisé et PLANOTIME se prépare pour la programmation d’un aut- re nouvel événement, continuer ensuite en partant du point N°5 de ce tableau. - Page 55 Avec la dernière confirmation, l’événement est mémorisé et PLANOTIME se prépare pour la programmation d’un aut- re nouvel événement, continuer ensuite en partant du point N°5 de ce tableau. Note: pour le fonctionnement correct de “l’heure planétaire” il faut avoir réglé les paramètres correspondants (voir tableau 30).
- Page 56 (voir chapitre 5.2.1) et l’on peut modifier ou confirmer une par une toutes les propriétés de l’événement. Après avoir modifié et confirmé le dernier paramètre, l’événement est mémorisé de nouveau et PLANOTIME se prépare pour la modification d’un autre événement, continuer ensuite en partant du point N°6 de ce tableau 5.2.3) Programmation: effacement événements DEL...
-
Page 57: Réglage De L'horloge
Après avoir modifié et confirmé le dernier paramètre, l’événement copié est mémorisé comme nouvel événement et PLANOTIME se prépare pour la copie d’un autre événement, continuer ensuite en partant du point N°6 de ce tableau. 5.3) Réglage de l’horloge Le réglage de l’horloge est fait immédiatement après avoir inséré... - Page 58 5.4) Réglage des paramètres de la commande spéciale “en vacance” Pour le fonctionnement correct de la commande spéciale “en vacance”, il faut régler la valeur maximum de l’écart consenti, la valeur peut être de 0 à 75 minutes, réglables par pas de 5 minutes. Comme résultat on obtient, par exem- ple, si la valeur est réglée à...
-
Page 59: Remplacement De La Pile
L’utilisation de PLANOTIME ne demande pas d’atten- tions particulières, nous vous prions dans tous les cas de considérer les aspects suivants: • Les commandes envoyées par radio par PLANOTIME ne peuvent pas offrir la garantie totale qu’elles soient reçues par les automatismes. -
Page 60: Que Faire Si
8.1) Liste des erreurs Il peut y avoir des circonstances, très rares, dans lesquelles PLANOTIME pourrait ne pas fonctionner correctement. Si cela se vérifie, la cause de l’erreur est toujours indiquée. Le tableau qui suit indique les erreurs et les solutions possibles. -
Page 61: Caractéristiques Techniques
9) Caractéristiques techniques Dans le but d’améliorer les produits, NICE S.p.a. se réserve le droit d’en modifier les caractéristiques techniques à tout moment et sans préavis, en garantissant dans tous les cas le bon fonctionnement et le type d’utilisation prévus. - Page 62 PLANOTIME als ersten Sender Recorder” zu wählen zu speichern Tabelle N° 22: Eigenschaften der Vorgänge Tabelle N° 7: um PLANOTIME als weiteren Sender 66 Tabelle N° 23: Programmierung eines einfachen zu speichern “neuen Vorgangs” Tabelle N° 8: Liste der Symbole in Bereich 1 Tabelle N°...
-
Page 63: Beschreibung
Sonntag ein bisschen länger mit heruntergelassenen wenn Sie ihn im “automatischen” Modus benutzen wol- Jalousien ruhen wollen. len, muss PLANOTIME wissen, um wie viel Uhr Sie die Die Programmierungs- und Betriebslogik von PLANOTI- Markisen herunterlassen wollen, und auch, dass Sie am ME im “automatischen”... -
Page 64: Was Sind Die Gruppen
1.4) Was sind die Gruppen? Unter “Gruppe” versteht man einen einzelnen Automa- PLANOTIME ist imstande, bis zu 6 Gruppen einzeln tismus oder ein Ganzes an Automatismen, die immer oder mehrere, untereinander kombinierte Gruppen (Viel- alle zusammen betätigt werden; zum Beispiel kann die fachgruppen) gleichzeitig zu steuern. -
Page 65: Anfängliche Einstellung Der Uhr
Sender anders ist. Es ist daher eine “Speicherungsphase” erforderlich, durch die der Automa- tismus auf die Erkennung des Codes von PLANOTIME vorbereitet wird. Wenn die Gruppe aus mehreren Automatis- men besteht, muss die Speicherung für jede Gruppe wiederholt werden. PLANOTIME kann bis zu 6 Automatismus- gruppen steuern und wird für jede dieser Gruppen einen anderen Code senden, daher muss vor Beginn der Speiche-... -
Page 66: Tabelle N° 5: Um Den "Manuellen" Modus Zu Verlassen
Senders drücken Noch einmal Taste von PLANOTIME drücken Am Ende werden 3 Bieptöne des Automatismus angeben, dass PLANOTIME korrekt gespeichert worden ist. Falls der Codespeicher voll ist (14 Codes), werden 6 Bieptöne angeben, dass PLANOTIME nicht gespeichert werden kann. -
Page 67: Befestigung Von Planotime
• Nicht in der Nähe oder, noch schlimmer, auf Metallstruk- turen anbringen, da sie seine Reichweite reduzieren. • PLANOTIME an der Stelle auflegen, an der man ihn befestigen will, versuchen, die Automatismen zu steu- ern und prüfen, dass sie die gesendeten Funkbefehle empfangen. -
Page 68: Beschreibung Der Symbole
3) Beschreibung der Symbole Die auf PLANOTIME sichtbaren Symbole sind in 3 Bereiche aufgeteilt: • Bereich 1 links zeigt die Betriebsarten und die Programmierungen an • Bereich 2 Mitte zeigt den Wochentimer an • Bereich 3 rechts zeigt die Gruppen und die Sonderfunktionen an... -
Page 69: Benutzung Von Planotime
Tag und zur programmierten Stunde allein auf den Betriebsmodus “automatisch” zurückkehren wird. Praktisch wird damit der Modus “automatisch” eine bestimmte Zeit lang unterbrochen. Betriebsmodus “manuell” (siehe Kapitel 4.4) Im Modus “manuell” wird PLANOTIME nur die Befehle zu den gewählten Gruppen senden, die infolge der direkten Betätigung der Tasten gegeben werden. -
Page 70: Funktionsweise Im Modus "Automatisch
(Su=Sonntag; Mo=Montag; Tu=Dienstag; We=Mittwoch; Th=Donnerstag; Fr=Freitag; Sa=Samstag) Taste drücken, um den Tag zu bestätigen Ab diesem Augenblick wird PLANOTIME wie im Modus “manuell” funktionieren, und Sie können die Befehle durch Druck auf eine beliebige der Tasten erteilen. PLANOTIME wird am programmierten Tag und zur program- mierten Uhrzeit auf den Modus “automatisch”... -
Page 71: Funktionsweise Im Modus "Manuell
Vorgang einzeln programmiert werden muss. Um die Vorgänge der ganzen Woche zu registrieren, in Modus “manuell mit Recoder” zum Beispiel am Anfang der Woche gehen, dann mit PLANOTIME jeden Tag zur gewünschten Uhrzeit die Befehle zum An- oder Abstieg der Automatismen erteilen. PLANOTIME am Anfang der nächsten Woche auf “automatisch”... -
Page 72: Wie Wird Planotime Programmiert
Prog Einstellung der Uhr (siehe Kapitel 5.3) Die Einstellung der Uhr ist notwendig, damit PLANOTIME die Vorgänge zur vorgegebenen Uhrzeit ausführen kann. Wenn die Sonderfunktion “planetare Uhrzeit” benutzt wird, müssen neben den Stunden, Minuten und dem Wochentag auch der Tag des Monats, das Monat und das Jahr eingestellt werden, und als letztes, ob die aktuelle Uhrzeit die Winterzeit (Son- nenzeit) oder die Sommerzeit (gesetzliche Zeit) ist. -
Page 73: Programmierung Von "Vorgängen
5.2) Programmierung von “Vorgängen” Bei der Programmierung der Vorgänge müssen alle Eigenschaften, die dieser Vorgang hat, einzeln eingestellt werden: Tabelle 22 Eigenschaften der Vorgänge: Beispiel 1 Beispiel 2 Stunden und Minuten, zu denen der Befehl gesendet werden muss 0 0 8 8 . . 3 3 0 0 1 1 8 8 . - Page 74 Vorgang zu bestätigen, oder Taste , um rückwärts zu gehen. Mit der letzten Bestätigung wird der Vorgang gespeichert und PLANOTIME stellt sich auf die Programmierung eines anderen neuen Vorgangs ein; daher ab Punkt Nr. 5 dieser Tabelle weitermachen...
- Page 75 Vorgang zu bestätigen, oder Taste , um rückwärts zu gehen. Mit der letzten Bestätigung wird der Vorgang gespeichert und PLANOTIME stellt sich auf die Programmierung eines anderen neuen Vorgangs ein; daher ab Punkt Nr. 5 dieser Tabelle weitermachen.
-
Page 76: Programmierung: Löschen Von Vorgängen
Löschen des ausgewählten Vorgangs zu bestätigen. Will man das Löschen nicht bestätigen, Taste drücken und ab Punkt 7 dieser Tabelle weitermachen. Nachdem ein Vorgang gelöscht ist, stellt sich PLANOTIME auf das Löschen eines anderen Vorgangs ein, daher ab Punkt Nr. 6 dieser Tabelle weitermachen. -
Page 77: Programmierung: Kopieren Von Vorgängen
Kapitel 5.2.1), und alle Eigenschaften des Vorgangs können einzeln geändert und bestätigt werden. Nach Änderung und Bestätigung des letzten Parameters wird der kopierte Vorgang neu gespeichert und PLANOTIME stellt sich auf das Kopieren eines anderen Vorgangs ein, daher ab Punkt Nr. 6 dieser Tabelle weitermachen. -
Page 78: Einstellung Der Parameter Der Sonderfunktion "Urlaub
Durchgang durch 0° (Äquator) regelbar. Um den annähernden Wert “ ” zu finden, der in Planotime einzugeben ist, beziehen Sie sich bitte auf die Abbil- dung auf der nächsten Seite oder auf eine beliebige vereinzeltere Landkarte. • Differenz zwischen von der Uhr angezeigter Uhrzeit und wahrer Sonnenuhrzeit “... -
Page 79: Auswechseln Der Batterie
Batterie muss das Batterieabteil geöffnet werden, dann nungen entsorgen. wie auf den Abbildungen gezeigt vorgehen. 7) Wichtige Hinweise Für den Gebrauch von PLANOTIME sind keine beson- deren Hinweise erforderlich, berücksichtigen Sie aber bitte, dass: • die von PLANOTIME per Funk gesendeten Befehle nicht mit 100%iger Garantie von den Automatismen empfangen werden. -
Page 80: Was Tun, Wenn
Funktionsweise von PLANOTIME unbedeutend. 8.1) Fehlerliste Es kommt sehr selten vor, dass PLANOTIME nicht korrekt funktioniert; die Fehlerursache wird in solchen Fällen immer angezeigt. Die hier folgende Tabelle enthält eine Liste der Fehler mit den möglichen Lösungen. Tabelle 31: Fehlerliste Fehler N°... -
Page 81: Technische Merkmale
9) Technische Merkmale Für eine Verbesserung der Produkte behält sich NICE S.p.a. das Recht vor, die technischen Merkmale jederzeit und ohne vorherige Benachrichtigung zu ändern, wobei aber vorgesehene Funktionalitäten und Einsätze garantiert bleiben. Bitte beachten: alle technischen Merkmale beziehen sich auf eine Temperatur von 20°C. - Page 82 Programación: copiado de eventos Encendido de PLANOTIME Ajuste del reloj Ajuste inicial del reloj Regulación de los parámetros del mando Memorización de PLANOTIME en los especial “en vacaciones” receptores de los automatismos Regulaciones de los parámetros del 2.3.1 Memorización de PLANOTIME mando especial “horario planetario”...
-
Page 83: Descripción
PLANOTIME es un transmisor para accionar automatis- modo “automático” en el los automatismos son accio- mos de persianas y toldos; permite accionar hasta 6 nados por PLANOTIME en los días y en los horarios pro- grupos de automatismos. Puede funcionar en modo gramados. -
Page 84: Qué Son Los Grupos
PLANOTIME no se podrá averiar por ningún motivo. 2.1) Encendido de PLANOTIME PLANOTIME funciona con una pila instalada pero que no está conectada para evitar que se gaste inútilmente; para encender PLANOTIME quite la lengüeta de plástico que sale del compartimiento de la pila. -
Page 85: Ajuste Inicial Del Reloj
“memorización” a tra- vés de la cual se prepara el automatismo para que reconozca el código de PLANOTIME. Si un grupo está formado de varios automatismos, es necesario repetir la memorización para cada uno de ellos. PLANOTIME puede accionar hasta 6 grupos de automatismos y para cada uno de estos transmitirá... -
Page 86: Memorización De Planotime
PLANOTIME Al final, 3 tonos de aviso que provienen del automatismo indicarán que PLANOTIME ha sido memorizado correcta- mente. Si la memoria de códigos está llena (14 códigos), 6 tonos de aviso indicarán que PLANOTIME no puede ser memorizado. -
Page 87: Fijación De Planotime
PLANOTIME con • PLANOTIME es idóneo para se usado sólo en entor- los tornillos y tacos, tal como se muestra en la figura.. nos protegidos y no puede instalarse al aire libre o en zonas a la intemperie. -
Page 88: Descripción De Los Símbolos
3) Descripción de los símbolos Los símbolos visibles en PLANOTIME se subdividen en 3 zonas: • Zona 1 a izquierda indica los modos de funcionamiento y las programaciones • Zona 2 en el centro indica el reloj semanal • Zona 3... -
Page 89: Cómo Usar Planotime
Modo de funcionamiento “Nicetime” (véase capítulo 4.3) En el modo “Nicetime” PLANOTIME funciona igual que en modo “manual” con la particularidad que volverá por sí solo al modo de funcionamiento “automático” en el día y a la hora predeterminada, es decir que permite interrumpir el modo “automático”... -
Page 90: Funcionamiento En Modo "Automático
Presione el botón para confirmar el día A partir de este momento PLANOTIME funcionará como si estuviera en modo “manual” y Ud. podrá accionar los man- dos presionando cualquiera de los botones . PLANOTIME volverá al modo “automático” el día y a la hora pre- determinada. -
Page 91: Funcionamiento En Modo
Presione el botón para confirmar el modo “manual” con registrador A partir de este momento PLANOTIME puede usarse como si estuviera en modo “manual” con la particularidad de que todos los mandos enviados con los botones , con el día, las horas y los minutos en que han sido dados, serán memo- rizados como eventos. -
Page 92: Cómo Programar Planotime
Ajuste del reloj (véase capítulo 5.3) El ajuste del reloj es necesario para que PLANOTIME realice los eventos a la hora predeterminada. Si se usa el man- do especial de “horario planetario” es necesario ajustar las horas, los minutos, el día de la semana, el día del mes, el mes y el año y, por último, el horario actual, es decir la hora de invierno (solar) o de verano (oficial). -
Page 93: Programación De "Eventos
5.2) Programación de “eventos” Durante la programación de los eventos hay que regular, una a una, todas las propiedades que componen el evento, es decir: Tabla 22 Propiedades de los eventos Ejemplo 1 Ejemplo 2 Horas y minutos en que debe enviarse el mando 0 0 8 8 . - Page 94 Con la última confirmación, el evento queda memorizado y PLANOTIME se prepara para la programación de otro even- to nuevo; por lo tanto, continúe comenzando desde el punto N°5 de esta tabla.
- Page 95 Con la última confirmación, el evento queda memorizado y PLANOTIME se prepara para la programación de otro even- to nuevo; por lo tanto, continúe comenzando desde el punto N°5 de esta tabla. Nota: para el funcionamiento correcto...
- Page 96 Si no se desea confirmar la cancelación, presione el botón y comience desde el punto 7 de esta tabla. Tras haber cancelado un evento, PLANOTIME se prepara para la cancelación de otro evento; por lo tanto, continúe comenzando desde el punto N°6 de esta tabla.
- Page 97 Tras haber modificado y confirmado el último parámetro, el evento copiado queda memorizado como un evento nuevo y PLANOTIME se prepara para el copiado de otro evento; por lo tanto, continúe comenzando desde el punto N°6 de esta tabla.
- Page 98 5.4) Regulación de los parámetros del mando especial “en vacaciones” Para el funcionamiento correcto del mando especial “en vacaciones” es necesario regular el valor máximo de la diferen- cia admitida, el valor puede ser de 0 a 75 minutos, ajustable en pasos de 5 minutos. Por ejemplo, si el valor está ajusta- do en 15, el resultado que se obtiene para un evento programado para la hora 08:00 podrá...
- Page 99 7) Advertencias Para usar PLANOTIME no es necesario tomar grandes medidas; sin embargo, le aconsejamos tener en cuenta los siguientes aspectos: • Los mandos enviados por radio desde PLANOTIME no pueden ofrecer la garantía total de que sean reci-...
- Page 100 PLANOTIME. 8.1) Lista de los errores Existen rarísimas situaciones en que PLANOTIME podría funcionar mal; si esto sucediera, siempre se visualiza la cau- sa del error. En la siguiente tabla se mencionan los errores y las posibles soluciones.
- Page 101 9) Características técnicas Con la finalidad de mejorar los productos, NICE S.p.a. se reserva el derecho de modificar las características técnicas en cualquier momento y sin previo aviso, garantizando la funcionalidad y el destino de uso previstos. Nota: todas las características técnicas se refieren a una temperatura de 20°C.
- Page 102 Spis rozdziałów Opis Jak zaprogramować PLANOTIME Co to jest PLANOTIME Wybór typu programowania Czy naprawdę trzeba zaprogramować? 103 5.1.1 Do przodu i do tyłu do programowania Co to jest zdarzenie? Programowanie “zdarzeń” Co to są grupy? 5.2.1 Programowanie: nowego zdarzenia Co to są...
-
Page 103: Opis
“automatyczny”, sterowania automatyką rolet i markiz; służy do w którym PLANOTIME będzie kierował urządzeniami zarządzania 6 grupami automatyki. Może pracować w w dniach i godzinach uprzednio zaprogramowanych. sposób “ręczny”; wówczas właśnie wy będziecie 1.2) Czy naprawdę... -
Page 104: Co To Są Grupy
Unikniemy możliwości uszkodzenia PLANOTIME. 2.1) Włączamy PLANOTIME PLANOTIME pracuje przy zasilaniu z baterii, która jest Zaraz po włączeniu PLANOTIME będzie wymagał już włożona ale nie jest podłączona, aby jej ustawienia wewnętrznego zegara. -
Page 105: Wstępna Regulacja Zegara
Niezbędne jest więc wykonanie “zapisywania”, którym dostosowuje się automatykę do rozpoznawania kodu PLANOTIME. Gdy grupa złożona jest z wielu urządzeń, należy powtórzyć zapisywanie dla każdego z nich. PLANOTIME będzie mógł sterować 6 grupami automatów i do każdej wyśle inny kod, dlatego też przed fazą zapisywania należy wybrać... -
Page 106: Tabela 5
Po sekundzie nacisnąć jeszcze raz na sekundę przycisk na PLANOTIME 3 sygnały pochodzące z odbiornika zasygnalizują, że PLANOTIME został prawidłowo zapisany. Gdy pamięć odbiornika jest pełna (14 kodów) to wydanie 6 sygnałów oznaczać będzie, że PLANOTIME nie może być zapisany. -
Page 107: Mocowanie Planotime
• Powinien być zamocowany na wysokości 1,5m od ziemi tak, aby można było patrzeć na PLANOTIME lekko od góry. • Nie umieszczać go w pobliżu, lub, co gorzej, na strukturach metalowych, które zmniejszają... -
Page 108: Opis Symboli
3) Opis symboli Symbole widoczne na PLANOTIME podzielone są na trzy pola: • Pole 1 po lewej stronie wskazuje sposoby funkcjonowania i programowania • Pole 2 po środku wskazuje zegar tygodniowy • Pole 3 po prawej stronie wskazuje grupy funkcji specjalnych... -
Page 109: Jak Używać Planotime
Auto Sposób funkcjonowania “Nicetime” (patrz rozdział 4.3) W trybie “Nicetime” PLANOTIME funkcjonuje tak jak w sposobie “ręcznym”, z tym wyjątkiem, że powróci automatycznie do sposobu funkcjonowania “Automatycznego” w ustalonym dniu i o określonej godzinie. W praktyce służy do przerwania sposobu “Automatycznego” na pewien okres czasu. -
Page 110: Funkcjonowanie W Sposób Działania
(Su=Niedziela; Mo=Poniedziałek; Tu=Wtorek; We=Środa; Th=Czwartek; Fr=Piątek; Sa=Sobota) Nacisnąć przycisk aby potwierdzić dzień Od tej chwili PLANOTIME będzie funkcjonował w trybie “ręcznym” i można przesyłać sygnały sterujące naciśnięciem jednego z przycisków: . PLANOTIME powróci do działania “Automatycznego” w ustalonym dniu i godzinie. -
Page 111: Funkcjonowanie W Trybie "Ręcznym Z
Man Nacisnąć przycisk aby potwierdzić tryb “ręczny z rejestracją” Od tego momentu można używać PLANOTIME jakby to był sposób “ręczny”, a dodatkowo wszystkie sygnały wysyłane przyciskami , z dniem i czasem, kiedy zostały wydane, zostaną zapisane jako zdarzenia. -
Page 112: Jak Zaprogramować Planotime
5) Jak zaprogramować PLANOTIME Funkcjonowanie PLANOTIME w trybie “programowania” służy do tworzenia zdarzeń, do ich modyfikacji, do kopiowania i do kasowania; można tu również ustawić zegar i inne parametry użyteczne dla funkcjonowania PLANOTIME. Prog Programowanie “zdarzeń” (patrz rozdział 5.2) Przy programowaniu “zdarzeń” można: wprowadzić... -
Page 113: Programowanie "Zdarzeń
5.2) Programowanie “zdarzeń” W programowaniu zdarzeń należy ustawić pojedynczo wszystkie cechy, z których złożone jest zdarzenie, czyli Tabela 22 Właściwości zdarzenia: Przykład 1 Przykład 2 Godzina i minuta, o której będzie wysłany sygnał zadania 0 0 8 8 . . 3 3 0 0 1 1 8 8 . -
Page 114: Programowanie: Nowego Zdarzenia
że jest to końcowa faza tworzenia nowego zdarzenia. Nacisnąć przycisk aby potwierdzić zdarzenie lub nacisnąć aby wrócić do tyłu. Ostatnim potwierdzeniem zdarzenie zostanie zapisane i PLANOTIME ustawi się do programowania nowego zdarzenia, co można kontynuować począwszy od punku nr 5 niniejszej tabeli. - Page 115 Po ostatnim potwierdzeniu zdarzenie zostanie zapisane i PLANOTIME ustawi się do programowania nowego zdarzenia, kontynuować więc począwszy od punku nr 5 niniejszej tabeli. Notatka: w celu prawidłowego funkcjonowania “godzin słonecznych” należy ustawić właściwe parametry (patrz tabela 30)
-
Page 116: Programowanie: Modyfikacja Zdarzeń
5.2.1), można również modyfikować lub potwierdzić pojedynczo lub wszystkie cechy razem. Po wykonaniu modyfikacji i po potwierdzeniu ostatniego parametru zdarzenie zostanie ponownie zapisane i PLANOTIME dostosuje się do wykonania modyfikacji następnego zdarzenia, należy więc wykonać procedurę począwszy od punktu NR6 niniejszej tabeli. -
Page 117: Programowanie: Kopiowanie Zdarzeń
“nowego zdarzenia” (patrz rozdział 5.2.1) i można zmodyfikować lub potwierdzić pojedynczo wszystkie cechy zdarzenia. Po wykonanej modyfikacji i po potwierdzeniu ostatniego parametru skopiowane zdarzenie zostanie zapamiętane jako nowe i PLANOTIME ustawi się kopiowania następnego zdarzenia, można więc kontynuować począwszy od punktu nr 6 niniejszej tabeli. -
Page 118: Regulacja Parametrów Funkcji Specjalnej
5.4) Regulacja parametrów funkcji specjalnej “na wakacjach” Mając na uwadze prawidłowe działanie funkcji specjalnej “na wakacjach” należy wyregulować wartość maksymalnie dozwolonego przesunięcia; od 0 do 75 minut w odstępach 5 minutowych. Na przykład: gdy wartość jest wyregulowana na 15, to zdarzenie zaprogramowane na godzinę 08.00 może być wykonane przypadkowo o godzinie 7.45 lub 8.15. Modyfikacja tego parametru ma wpływ na pozostałe zdarzenia, które tym specjalnym sygnałem zostały włączone. -
Page 119: Wymiana Baterii
7) Ostrzeżenia PLANOTIME nie wymaga specjalnej troski, prosimy jednak aby mieć na uwadze poniższe aspekty: • nie dajemy całkowitej gwarancji na to, że sygnały wysłane drogą radiową z PLANOTIME zostaną... -
Page 120: Co Robić Gdy
Prostym sposobem do zmierzenia tej PLANOTIME. wartości jest obserwacja cienia przedmiotu 8.1) Spis błędów Rzadko zdarza się, że PLANOTIME funkcjonuje nieprawidłowo; każda anomalia zostanie natychmiast wyświetlona. W poniższej tabeli przedstawione są błędy i możliwe rozwiązania. Tabela 31 spis błędów Błąd Nr... -
Page 121: Dane Techniczne
9) Dane techniczne Firma NICE S.p.a. rezerwuje sobie prawo do zmiany parametrów technicznych produktu, w każdej chwili i bez uprzedzenia, celem poprawy jakości produktu gwarantując jego funkcjonowanie w przewidzianych warunkach dla jego użytkowania. Notatka: wszystkie dane techniczne odnoszą się do temperatury +20°C. - Page 122 R&TTE 1999/5/CE, per l’uso cui l’apparecchio è destinato, essendo stati applicati i seguenti Standard: NICE S.p.a. declares that the products PLANOTIME comply with the essentials requirements of article 3 of the R&TTE 1999/5/EC Directive, if used for its intended use and that the following standards has been applied: 1 Salute (articolo 3.1.a della Direttiva R&TTE) / Healt (article 3.1.a of R&TTE Directive)
Need help?
Do you have a question about the planotime and is the answer not in the manual?
Questions and answers
I've recently bought a house which has blinds which are operated with the Nice Planotime system. The first few weeks this worked fine, but all of a sudden, it doesn't respond to pressing the keys, for instance when I want to lower the blinds manually. The blinds still go down in the evening and up in the morning automatically. The display is working fine, and there is no error message on the display. Does anyone know what the problem might be? Will it start working again properly if I change the batteries? Thanks!
The issue could be due to several factors:
1. Battery Low: If the battery is low, the radio signal range may be reduced by 20-30%, which could affect communication with the automation system. Changing the batteries may help restore proper operation.
2. Interference: Other transmitting devices or electromagnetic disturbances may be interfering with the signal, preventing the commands from being received.
3. Placement Issues: If PLANOTIME is placed near metal structures, its range may be reduced, affecting its ability to control the blinds.
4. Programming Mode: If the device is in a specific mode (e.g., "Automatic" or "Nicetime"), manual commands might not work as expected.
Changing the batteries could help if the issue is due to low power, but if interference or placement issues are the cause, repositioning the device or reducing interference sources may be necessary.
This answer is automatically generated