Advertisement
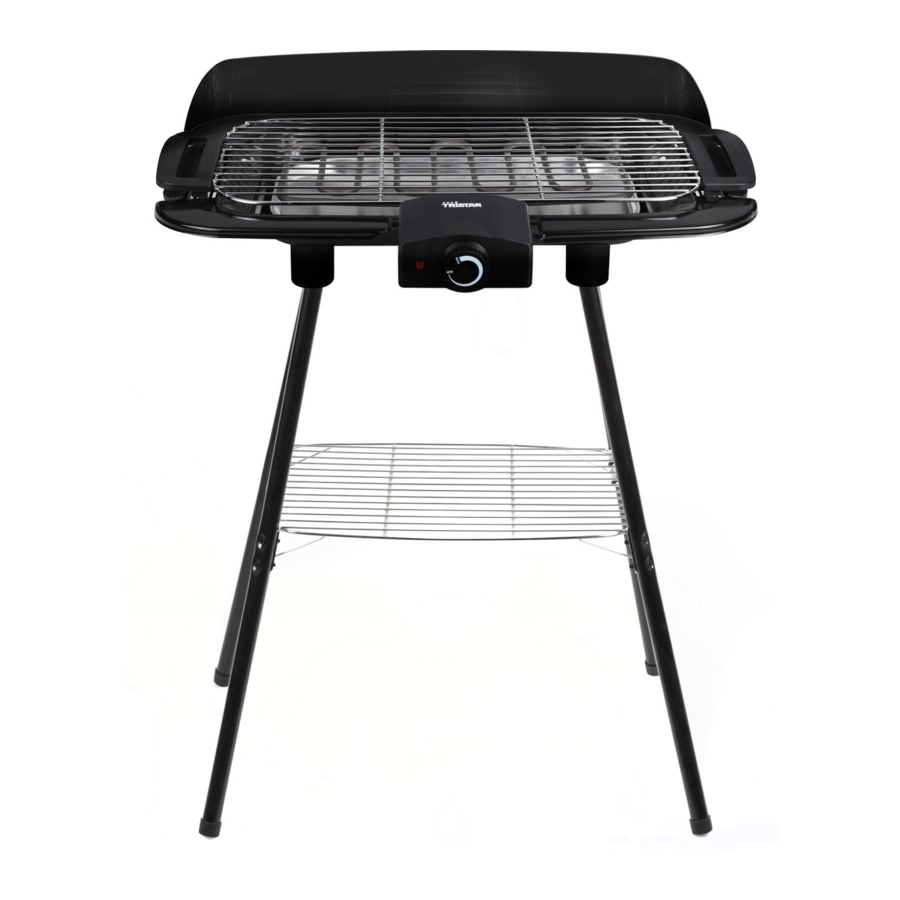
PARTS DESCRIPTION

- Power indicator
- Thermostat knob
- Base
- Drip tray
- Windshield
- Grill rack
- Storage rack
- Metal pipes
- Feet of the base
- Small plastic caps
- Bigger plastic caps
- Long screws
- Short screws

SAFETY INSTRUCTIONS
- By ignoring the safety instructions the manufacturer can not be hold responsible for the damage.
- If the supply cord is damaged, it must be replaced by the manufacturer, its service agent or similarly qualified persons in order to avoid a hazard.
- Never move the appliance by pulling the cord and make sure the cord can not become entangled.
- The appliance must be placed on a stable, level surface.
- The user must not leave the device unattended while it is connected to the supply.
- This appliance is only to be used for household purposes and only for the purpose it is made for.
- Keep the appliance and its cord out of reach of children less than 8 years.
- The appliance can be used by children aged from 8 years and above and persons with reduced physical, sensory or mental capabilities or lack of experience and knowledge if they have been given supervision or instruction concerning use of the appliance in a safe way and understand the hazards involved. Children shall not play with the appliance. Cleaning and user maintenance shall not be made by children unless they are older than 8 and supervised.
- The temperature of accessible surfaces may be high when the appliance is operating.
- This appliance is not intended to be operated by means of an external timer or separate remote-control system.
- The appliance is to be connected to a socket-outlet having an earthed contact (for class I appliances).
- The appliance must be connected to an outlet that is protected by a residual current device (RCD) with a rated residual current of not more than 30 mA.
![]()
Charcoal or similar combustible fuels must not be used with this appliance.- To protect yourself against an electric shock, do not immerse the cord, plug or appliance in the water or any other liquid.
- The appliance is suitable for outdoor use.
- Silver paper must not be used with this appliance.
- In order to avoid overheating, this appliance shall not be covered by any solid or flexible material such as an aluminum tray, aluminum foil or trays made of other heat resistant material. The use of such items or materials on the grille would impair the safety of your product and could lead to serious damage.
- Always fill the base with water before you switch on the appliance. The water helps to cool down the grill pan, reduces the build-up of smoke, and also facilitates cleaning. Ensure that the water level is kept between the 'Min.' and 'Max.' markings at all times during use. The water level indicator can be found inside the grill pan. Make sure that the water does not come into contact with the heating element. Take care of not pour water on the heating element.

BEFORE THE FIRST USE
- Take the appliance and accessories out the box. Remove the stickers, protective foil or plastic from the device.
- Before using your appliance for the first time, wipe off all removable parts with a damp cloth. Never use abrasive products.
Assembly
- Put the plastic caps on the metal pipes (8), on each pipe one small (10) and ond bigger (11) cap.
- Mount the pipes one by one onto the storage rack (7) by using the longest screws, make sure the bigger caps are pointed to the middle. - Mount the plastic feet (9) under the base, make sure the nothces will fit into the recesses and turn the feet until it clamps. Now fasten the feet for surence with the supplied short screws.
- Place the base onto the support, make sure the bigger plastic caps from the support fall into the feet of the base (9).
- Place the windshield in the recesses on the base, first fit the right side then fit the left side and finally fit it in the middle.
- Fill the base with water up to the 'Max.' marking.
- Let the grill heat up for a moment without any food on the rack. This will reduce the smell when first switching on a new grill (a slight smell and a little smoke may be emitted-ensure sufficient ventilation).
USE
- The base must be filled with water up to the 'Max.' marking.
- Fix the heating element; then ensure that the grill rack is placed correctly on the element.
- Insert the plug into the mains supply socket.
- Set the thermostat control knob to its 'Max.' position. The indicator light turns on, and the heating element is permanently switched on.
- After approximately 5-10 minutes, the heating element reaches the right temperature for grilling. When you grilling the food stuffs, you can turn the thermostat control knob back to a lower position and/or adjust the grill rack to the middle or upper position.
- The grill can also be used to keep the food warm: by turning the thermostat control knob back to a lower position, the intervals between the heating element switching on and off can be reduced to a minimum.
- The water in the base will evaporate during use. So you must to fill up water from time to time. Be careful not to pour water on the heating element.
- When grilling is finished, turn the thermostat to "0" (off position) and disconnect the grill from the mains supply socket.
CLEANING AND MAINTENANCE
- Unplug the appliance and allow it to cool down. Use a soft, slightly damp cloth to wipe appliance surfaces. Do not allow water or any other liquid to get into the unit.
- Do not use any abrasive detergent or steel wool to clean the iron, as it may scratch the surfaces.
- Empty any remaining water from the base, do not allow water to stay overnight in the base.
GUARANTEE
- This product is guaranteed for 24 months granted. Your warranty is valid if the product is used in accordance to the instructions and for the purpose for which it was created. In addition, the original purchase (invoice, sales slip or receipt) is to be submitted with the date of purchase, the name of the retailer and the item number of the product.
- For the detailed warranty conditions, please refer to our service website: www.service.tristar.eu
GUIDELINES FOR PROTECTION OF THE ENVIRONMENT

This appliance should not be put into the domestic garbage at the end of its durability, but must be offered at a central point for the recycling of electric and electronic domestic appliances. This symbol on the appliance, instruction manual and packaging puts your attention to this important issue. The materials used in this appliance can be recycled. By recycling of used domestic appliances you contribute an important push to the protection of our environment. Ask your local authorities for information regarding the point of recollection.
SUPPORT
You can find all available information and spare parts at service.tristar.eu!

service.tristar.eu
Tristar Europe B.V. | Jules Verneweg 87
5015 BH Tilburg | The Netherlands

Documents / ResourcesDownload manual
Here you can download full pdf version of manual, it may contain additional safety instructions, warranty information, FCC rules, etc.
Advertisement


Need help?
Do you have a question about the BQ-2820 and is the answer not in the manual?
Questions and answers