Advertisement
Available languages
Available languages
Table of Contents
Para Español, vea páginas 4-6.
Pour le français, consulter les pages 7-9.
H-10001
1-800-295-5510
uline.com
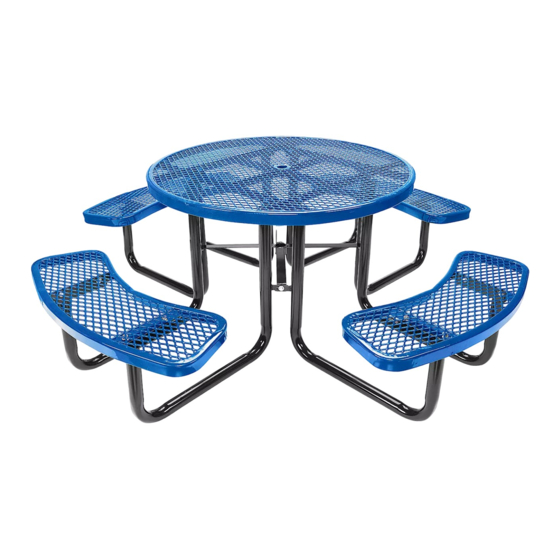
ROUND PICNIC
TABLE
TOOLS NEEDED
Socket Wrench
1/2" Socket Bit
1/2" Wrench
Level
PARTS
Mounting Hardware
Screw x 8
Drill Bit x 1
Bracket x 4
(Mounting Optional, See Page 3)
Tabletop x 1
Bench Seat x 4
5/16" Nut x 28
5/16" Hex
5/16"
Cross Brace with
Left Leg x 4
Right Leg x 4
Head Bolt x 28
Washer x 56
Umbrella Holder x 1
PAGE 1 OF 9
0222 IH-10001
Advertisement
Table of Contents

Related Manuals for U-Line H-10001


Summary of Contents for U-Line H-10001
- Page 1 Para Español, vea páginas 4-6. Pour le français, consulter les pages 7-9. H-10001 1-800-295-5510 uline.com ROUND PICNIC TABLE TOOLS NEEDED Socket Wrench 1/2" Socket Bit 1/2" Wrench Level PARTS Mounting Hardware Screw x 8 Drill Bit x 1 Bracket x 4...
- Page 2 ASSEMBLY 1. Verify all parts are present before beginning. Figure 1 Right Leg Hardware is located in a white box. Left Leg 2. Flip the tabletop upside down. Take one leg at a time and loosely attach the end of the leg to the tabletop using one bolt, two washers and one nut.
- Page 3 MOUNTING Using provided drill bit, drill hole into the concrete, 4. Secure screw flush with bracket into drilled hole. block or stone to a depth of 2½". (See Inset A) (See Inset B) 2. Blow out the dust in the hole. 5.
-
Page 4: Herramientas Necesarias
H-10001 800-295-5510 uline.mx MESA REDONDA PARA PÍCNIC HERRAMIENTAS NECESARIAS Llave de Dado Dado de 1/2” Llave de 1/2" Nivel PARTES Tornillería de Instalación 8 Tornillos 1 Broca 4 Soportes 4 Asientos de Banca 1 Cubierta (Instalación Opcional, Vea Pagina 6) 28 Tuercas de 5/16"... - Page 5 ENSAMBLE 1. Verifique que estén todas las partes antes de Diagrama 1 Pata Derecha comenzar. La tornillería viene en una caja blanca. Pata Izquierda 2. Voltee la cubierta de la mesa boca abajo. Tome una pata a la vez y fije sin apretar el extremo de la pata a la cubierta usando un perno, dos rondanas y una tuerca.
-
Page 6: Instalación
INSTALACIÓN Utilizando la broca incluida, taladre un orificio 3. Coloque el soporte sobre el tubo. en el concreto, bloque o piedra a una profundidad 4. Inserte el tornillo en el orificio taladrado de forma de 6.4 cm (2½"). (Vea Figura A) que quede a ras con el soporte. -
Page 7: Outils Requis
H-10001 1-800-295-5510 uline.ca TABLE DE PIQUE-NIQUE CIRCULAIRE OUTILS REQUIS Clé à douille Douille de 1/2 po Clé de 1/2 po Niveau à bulles PIÈCES Matériel de fixation Vis x 8 Mèche de Support x 4 perceuse x 1 Siège de banc x 4... - Page 8 ASSEMBLAGE 1. Assurez-vous que toutes les pièces sont présentes Figure 1 Pied droit avant de commencer. Le matériel d'installation se trouve dans une boîte blanche. Pied gauche 2. Placez la surface de table à l'envers. Prenez un pied à la fois et fixez sans serrer l'extrémité du pied à la surface de table avec un boulon, deux rondelles et un écrou.
-
Page 9: Installation
INSTALLATION Percez un trou de 6,3 mm (1/4 po) de diamètre dans 3. Placez le support sur le tube. du béton, une dalle ou une pierre à une profondeur 4. Enfoncez le piquet à travers les trous sur la base du de 6,4 cm (2 ½ po). (Voir Encadré A) support et dans le trou percé.
Need help?
Do you have a question about the H-10001 and is the answer not in the manual?
Questions and answers