Advertisement
The bumper molding, head lights and lower rock guards need to be removed for the
baseplate installation. It will also be necessary for holes to be drilled. Trimming of
rock guards is necessary.
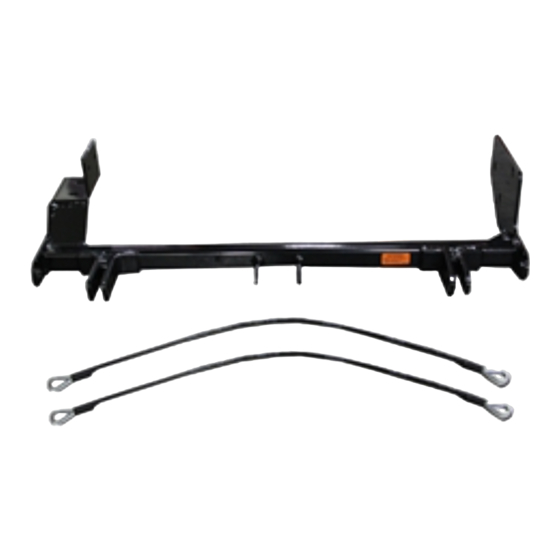
1. The baseplate mounts to the bumper shock mounts under the headlights and the engine sub-frame using
seven bolts supplied with the baseplate.
2. With a 10mm wrench remove the headlights and their mounts. Remove the electrical connectors and the
bulbs and set the headlights aside.
3. There are plastic push pins that hold a rubber pieces in place between the radiator and the area under
the headlights. Remove these pins and the rubber pieces. These will be trimmed and replaced after the
upper cross bar is installed.
4. Remove the bottom plastic molding which is attached to the bumper.
5. Remove the two bolts that connect the tubular shock to the frame. Do this one side at a time so the
bumper will stay in the same position on the car. Bolt the attachment end plate (Item 3) as shown in the
diagram (Items 8, 11 14 and 10). Do not tighten completely. Repeat for the opposite side.
6. Bolt the upper attachment tube (Item 4) to the lower holes of the attachment end plate (Item 3) using
Items 7, 12 and 9. To align the holes, you can loosen the end plates and slide them in or out as needed.
When all the bolts are started, apply Loctite and tighten completely. Tighten the bumper shock mount
bolts completely.
7. Bolt the front upper mounts on the baseplate to the attachment tube (Items 7, 9 and 12). The two braces
will extend back to the engine frame. Drill the mounting holes in the frame for these braces. Notch the
plastic belly pan around the braces to allow contact. Do not "sandwich" the plastic belly pan between the
brace and the frame. If you do, you may not be able to keep the bolt tight.
8. With the plastic notched, mark and drill the holes in the sub frame. If you use the baseplate as a tem-
plate, tighten the upper mount bolts completely before drilling. When the holes are drilled. Bolt the
braces to the frame (Items 2, 13 and 6). You will have to "fish" the wire nut plates (Item 2) into the frame
from the front for the outside braces. Use Loctite on each bolt and tighten completely.
9. With the baseplate completely secure, the plastic molding can be returned. The bottom molding needs to
be notched where the braces meet the molding. The braces may cover existing bolt holes for the mold-
ing. If so, the remaining bolts will hold the molding sufficiently.
10. Notch and replace the rubber pieces beside the radiator. Replace the headlights and their mounts.
Check all bolts to make sure they are tight.
11. Install the tow bar and safety cables according to the instructions included in their packages.
12. Do not substitute other devices if the tow bar pin and clip are lost.
13. DEALER OR INSTALLER: BE CERTAIN THE USER RECEIVES THE INSTRUCTION SHEET.
BX3216 Installation Instruction
1999 Pontiac Bonneville SE
Automatic Equipment Mfg. Co.
One Mill Road, Industrial Park
Page 1 of 2
Pender, Nebraska 68047
Serial No.
292-5563 Rev. B 2/28/11
Advertisement
Table of Contents

Related Manuals for Blue Ox BX3216


Summary of Contents for Blue Ox BX3216
- Page 1 BX3216 Installation Instruction Serial No. 1999 Pontiac Bonneville SE The bumper molding, head lights and lower rock guards need to be removed for the baseplate installation. It will also be necessary for holes to be drilled. Trimming of rock guards is necessary.
- Page 2 202-0118 ........................8mm-1.25 Hex Nut 203-0003........................8mm Flat Washer 203-0010........................3/8" Lock Washer 203-0012.........................1/2' Lock Washer 203-0102........................8mm Lock Washer 102-5750....................Brace, Passenger Side, BX3216 102-5751...................... Brace, Drivers Side, BX3216 202-0005...........................1/2"-13 Hex Nut 226-0046.................Baseplate Safety Cable, 36" CL III (Not Shown) 229-0359....................Quicklink, 3/8, ZP (Not Shown) ©...
- Page 3 The illustrations below show the possible arrangements recommended by Blue Ox®. Each permanent baseplate safety cable must have an adequate weight rating for the towing system. The weight rating of the two (2) cables together will not qualify.
Need help?
Do you have a question about the BX3216 and is the answer not in the manual?
Questions and answers