
Subscribe to Our Youtube Channel
Related Manuals for Cookworks XJ-10302


Summary of Contents for Cookworks XJ-10302
- Page 1 SEMI PROFESSIONAL FRYER Model No. XJ-10302(2000W) Care & Instruction Manual Please read and retain these instructions for future reference ISSUE 1b 04/12/2018...
- Page 2 Electrical safety You should only plug the appliance into a 220V‐240V AC, 50Hz supply. Connecting it to other power sources may damage the appliance and will invalidate the guarantee. This deep fat fryer is designed for domestic use. Don’t use it in wet or damp locations.
- Page 3 Warning This appliance is intended exclusively for use in domestic households. It is not suitable for commercial use. Do not operate this appliance with the storage lid fitted. Cooking appliances should be positioned in a stable situation with handles positioned to avoid spillage of hot liquids.
- Page 4 Food Safety Thoroughly defrost frozen meat, poultry, fish and seafood in the refrigerator before cooking unless cooking from frozen advice is provided by the food packaging. Keep raw meat and poultry separate from cooked foods. Always wash hands after handling raw meat and poultry, before handling any ready to eat foods.
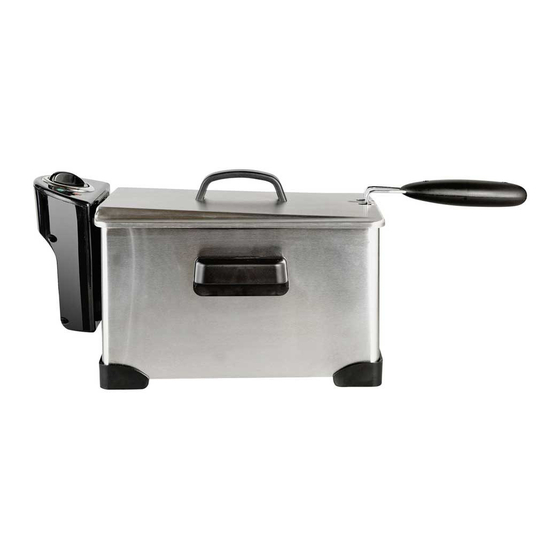
- Page 5 Parts 1. Storage lid (see fig. 7) 8. Maximum & Minimum 2. Control housing marks 3. Oil tank 9. Power indicator 4. Outer casing 10. Heating (working) 5. Frying basket handle indicator 6. Frying basket 11. Reset point 7. Heating element 12.
- Page 6 Assembly 1. Place the fryer on a stable, flat, heat resistant surface, away from flammable materials and surfaces that may be damaged by steam or hot oil. 2. Check that the plug will reach a socket and that it can be accessed without reaching over the fryer.
- Page 7 5. Unfold the handle (fig 3) until it clicks in to position with the wire handle sitting either side of the wire bracket (fig 4 & 5). 6. Fit the basket into the oil tank (fig.6). 7. For storage fit the lid, the smaller pair of grooves should be towards the front and when correctly fitted the lid will be flush with edge tank...
- Page 8 Before first use 1. Clean all detachable parts in accordance with the cleaning section of these instructions. 2. Become familiar with - The parts of the fryer – See page 4 How to open frying basket handle – See figs. 3,4 & 5 ...
- Page 9 11. When frying is complete, lift the frying basket and hook onto the end of the oil tank to permit the oil to drain back into the oil tank for a short while (fig. 10). 12. If the food requires further Fig.
- Page 10 Tips for successful frying (continued) Smaller pieces will cook quicker than larger pieces. For best results, ensure pieces of food are similar in size. Arrange the food with spaces between the pieces to allow even frying. Cook foods with a lighter flavour before those with stronger flavours to help prevent flavour taint.
- Page 11 Frying Chart (continued) Food Quantity Frying Time temp. (min) (°C) Fresh foods French fries / Chips* 600g * 180* 7 – 11 Potato croquettes 4 - 5 pieces 3 - 4 Mushrooms (button) Single layer 4 – 5 Aubergine slices 350g 3 –...
- Page 12 Safety cut / reset point The fryer is equipped with a safety cut out, which will switch off the fryer if it overheats, for example if there is insufficient oil in the tank. If this occurs it may be necessary to manually reset the fryer. In the event that the fryer cuts out - 1.
- Page 13 Plug / Wiring advice The wires in this mains lead are coloured in accordance with the following UK electrical code: BLUE = NEUTRAL BROWN = LIVE GREEN + YELLOW = EARTH Non-rewireable plug This appliance may be fitted with a “non‐rewireable” plug. If you need to change the fuse in a “non‐rewireable”...
- Page 14 ISSUE 1b 04/12/2018...
Need help?
Do you have a question about the XJ-10302 and is the answer not in the manual?
Questions and answers