Morningstar SureSine 150 W Installation And Operation Manual
Hide thumbs
Also See for SureSine 150 W:
- Quick start manual (2 pages) ,
- Quick start manual (2 pages) ,
- Quick start manual (2 pages)
Table of Contents
Advertisement
Quick Links
MORNINGSTAR
World's Leading Solar
Controllers
&
Inverters
Installation and Operations Manual
150 W, 300 W, & 700 W (12 V, 24 V, & 48 V) Models,
1,000 W & 1,250 W, (24 V & 48 V) Models,
2,500 W (48 V Only) Models
(120 V / 60 Hz, 230 V / 50 Hz,
127 V / 60 Hz, and 220 V / 60 Hz)
October 2022 (Rev 0 Draft 10)
Advertisement
Table of Contents

Related Manuals for Morningstar SureSine 150 W


Summary of Contents for Morningstar SureSine 150 W
- Page 1 MORNINGSTAR World’s Leading Solar Controllers & Inverters Installation and Operations Manual 150 W, 300 W, & 700 W (12 V, 24 V, & 48 V) Models, 1,000 W & 1,250 W, (24 V & 48 V) Models, 2,500 W (48 V Only) Models...
- Page 2 Corporation can truly claim to be “the leading supplier of solar controllers and inverters.” That success is why Morningstar has had staying power and stable management for over 27 years, along with the lowest employee turnover rate.
- Page 3 IMPORTANT SAFETY INSTRUCTIONS SAVE THESE INSTRUCTIONS - This manual contains important safety, installation, and operating instructions for the Morningstar SureSine Inverter. The SureSine produces voltages and currents capable of causing severe injury or death. Extreme caution must be taken when installing and using the SureSine.
- Page 4 MORNINGSTAR World’s Leading Solar Controllers & Inverters WIRE AND CABLE SAFETY Proper wire type and size is required for all installations. Use only UL-listed Class B or Class C wire rated for 300 volts and 75ºC or higher. Use stranded wire for the battery circuit and solid or stranded wire for the AC and Ground circuits.
- Page 5 MORNINGSTAR World’s Leading Solar Controllers & Inverters CAUTION: HOT SURFACE/BURN HAZARD The SureSine inverter models 700 Watts to 2,500 W can become very hot. Install the SureSine so that it cannot be accidentally touched by anyone or anything. BATTERY SAFETY INFORMATION WARNING: SHOCK HAZARD •...
- Page 6 MORNINGSTAR World’s Leading Solar Controllers & Inverters BATTERY SAFETY INFORMATION (Continued) CAUTION: EQUIPMENT DAMAGE • Ensure the battery voltage matches the DC voltage requirements of the model of SureSine inverter to be installed. • Ensure the battery bank consists of batteries of the same type, make and age.
-
Page 7: Table Of Contents
To Connect the SureSine Inverter to an EIA-485 Device ......37 USB Port ......................39 4.4.1 To Connect to the USB Port..............39 MS-CAN (Future Feature) ..................40 4.5.1 To Connect the SureSine to another Morningstar Device ......40 4.5.2 To Connect the SureSine to a Morningstar Network ......41 MS-003650... - Page 8 MORNINGSTAR World’s Leading Solar Controllers & Inverters Firmware Update Procedure ..................42 Specifi cations ......................43 Appendix A: DC Battery Wire Sizing .................47 Appendix B: DC Voltage Drop Tables ................49 Voltage Drop Chart for 75°C or 90ºC Stranded Copper Wire (Feet), 12 Volt System .....................49 Voltage Drop Chart for 75°C or 90ºC Stranded Copper Wire (Meters),...
- Page 9 MORNINGSTAR World’s Leading Solar Controllers & Inverters List of Figures Figure 1: SureSine Inverters Series ....................1 Figure 2: SureSine Inverter Features (150 W & 300 W Models) .............2 Figure 3: SureSine Inverter Features (700 W Models) ..............3 Figure 4: SureSine Inverter Features (1,000 W to 2,500 W Models) ..........4 Figure 5: Dimensions - 150 W to 300 W Models ................5...
- Page 10 MORNINGSTAR World’s Leading Solar Controllers & Inverters List of Tables Table 1: DIP Switch Confi guration ....................12 Table 2: Low Voltage Disconnect Settings (DIP 4 & 5) ..............12 Table 3: Terminal Torque Requirements ..................16 Table 4: DC Battery Circuit Breaker/Fuse Size ................17 Table 5: AC Circuit Breaker/Fuse Size ..................18...
-
Page 11: Introduction
• Multiple communication options. – Mobile devices can connect through Bluetooth – Other network devices can connect through Ethernet and/or EIA-485 – FUTURE FEATURE: The SureSine Inverter can pair with other Morningstar products that feature MS-CAN Communication for control, adjustments, and monitoring performance... -
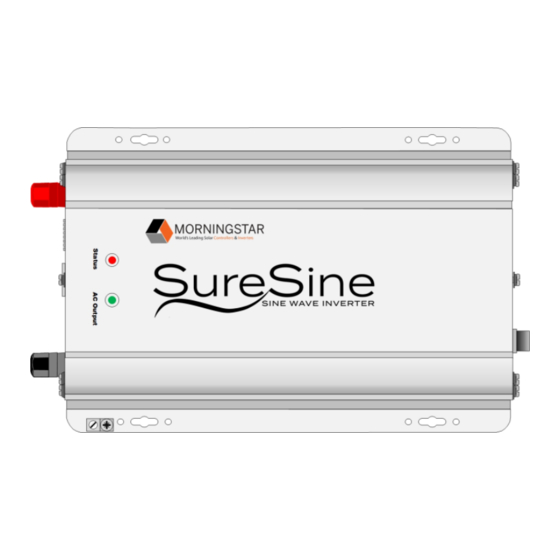
Page 12: Components Of The 150 W & 300 W Models
INTRODUCTION Components of the 150 W & 300 W Models Figure 2 shows the components included with the 150 and 300 W models. Figure 2: SureSine Inverter Features (150 W & 300 W Models) MS-003650 (Rev 0 Draft 10) -
Page 13: Components Of The 700 W Models
INTRODUCTION Components of the 700 W Models Figure 3 shows the components included with the 700 W models. Figure 3: SureSine Inverter Features (700 W Models) MS-003650 (Rev 0 Draft 10) -
Page 14: Components Of The 1,000 W To 2,500 W Models
INTRODUCTION Components of the 1,000 W to 2,500 W Models Figure 4 shows the components included with the 1,000 W to 2,500 W models. Figure 4: SureSine Inverter Features (1,000 W to 2,500 W Models) MS-003650 (Rev 0 Draft 10) -
Page 15: Dimensions Of The 150 W & 300 W Models
INTRODUCTION Dimensions of the 150 W & 300 W Models Figure 5: Dimensions - 150 W to 300 W Models MS-003650 (Rev 0 Draft 10) -
Page 16: Dimensions Of The 700 W To 2,500 W Models
INTRODUCTION Dimensions of the 700 W to 2,500 W Models Figure 6: Dimensions - 700 W to 2,500 W Models MS-003650 (Rev 0 Draft 10) -
Page 17: Installation
INSTALLATION INSTALLATION Included in the box: • Mounting Screws (#10 x4) • CAN Terminal resistor • Terminal block connector (for Modbus, Remote Switch, Auxiliary Power) Required Tools WARNING: SHOCK HAZARD This product can produce hazardous voltage. Use insulated tools while working with this equipment. -
Page 18: Mounting
INSTALLATION Mounting The SureSine may be mounted horizontally on a fl at surface (like a table) or vertically (on a wall). If mounted vertically (on a wall), the inverter can be mounted either portrait style or landscape style. Ensure that there is enough space inside the enclosure for the wiring and ventilation. -
Page 19: Safety Considerations For Mounting
INSTALLATION 2.3.1 Safety Considerations for Mounting WARNING: EXPLOSION/FIRE HAZARD Do not install in a confi ned area where battery gases can accumulate. Battery gases can create an explosion or fi re hazard if ignited by a spark. Ensure the enclosure is ventilated well enough to disperse any accumulated gases. Do not install over an easily combustible surface, since the heat sink may get hot under certain operating conditions. -
Page 20: Mounting Procedure
INSTALLATION 2.3.2 Mounting Procedure To secure the inverter to the mounting surface: 1. Place the SureSine on the surface where it will be mounted and determine where the wires will enter/exit. • Be sure there is suffi cient bending room for the wires and other auxiliary connections, as required by local code. -
Page 21: Adjusting Settings
INSTALLATION Adjusting Settings The SureSine has eight (8) DIP Switches that allow for adjusting specifi c operational parameters for the inverter. Each switch has an ON/OFF position. See Section 2.4.2 on page 12 for details on specifi c settings. IMPORTANT: Check that the DIP Switches are properly confi gured for the designed installation prior to installing the inverter. -
Page 22: Dip Switch Confi Guration Options
INSTALLATION 2.4.2 DIP Switch Confi guration Options DIP Switches control the operational functions of the inverter as follows. The default position for these switches is OFF. Table 1: DIP Switch Confi guration Function Status Control Content Switch Operational AC Output is controlled by the Remote ON/OFF Switch Control AC Output is controlled by the communication command (digital command). -
Page 23: Terminal Block Installation For Remote Switch Or Communications Wiring
INSTALLATION Terminal Block Installation for Remote Switch or Communications Wiring If the site application includes using a Remote Switch or a method of communication, the terminal block that is included in the box will need to be installed. This will either be an 4-pin (150 W or 300 W models) or two 8-pin (700 to 2,500 W models) pluggable terminal block(s). -
Page 24: Remote Switch Installation (Optional)
INSTALLATION Remote Switch Installation (Optional) IMPORTANT: Check the AC Output Mode Switch on the AC end of the inverter and ensure it is in the REMOTE position before wiring. See Figure 24 on page 31. If the site application requires a Remote ON/OFF Switch or relay dry contact, the following illustration shows where to connect the wires. -
Page 25: Auxiliary Power (Optional)
INSTALLATION Auxiliary Power (Optional) Auxiliary Power for 1 W (Maximum), 12 Vdc applications is available on the 700 W to 2,500 W Models only. These types of applications include: • EIA-485 Communication Bus. • Small DC devices (e.g., LEDs). Figure 15: Auxiliary Power Terminals on 700 W to 2,500 W Models MS-003650 (Rev 0 Draft 10) -
Page 26: Inverter Wiring
INSTALLATION Inverter Wiring This section provides general instructions for connecting all the wiring for the inverter. This includes DC, AC, Neutral, and all Ground connections (system and chassis). Ensure all connections are made as required by local regulatory code. WARNING: SHOCK HAZARD •... -
Page 27: Over-Current Protection Requirements
INSTALLATION 2.8.2 Over-current Protection Requirements WARNING: RISK OF FIRE Fuses or circuit breakers are required in the DC battery circuit (all models) and AC output circuit (700-2,500 W models) and shall be provided by the installer. Locate battery breakers or fused disconnects for easy access and free from hydrogen gas/sulfuric acid fumes. -
Page 28: Dc And Ac Conductor Sizing Requirements
INSTALLATION 2.8.2.2 Recommended AC Over-current Protection Device Sizing Use Table 5 to determine the size of the over-current protection device required for the AC conductor. Table 5: AC Circuit Breaker/Fuse Size AC Output Maximum Continuous Current AC Circuit Breaker/Fuse Ratings Model Power Rating 120 Vac Model... -
Page 29: Grounding And Bonding Requirements
INSTALLATION Table 6: Minimum Battery Cable Size - 75°C rated Copper Wire in a Raceway, Cable, or Earth @30°C Model Power Rating 12 Vdc Model 24 Vdc Model 48 Vdc Model 1,250 W 3 AWG 8 AWG 2,500 W 3 AWG Use Table 7 to determine the minimum size for the AC output wires. -
Page 30: Figure 16: Internal Grounded Neutral Vs. External Grounded Neutral (Internal Neutral Ground Bond Removed)
INSTALLATION 2.8.4.1 Removing the Internal Neutral-Ground Bond for External Grounded Neutral (Hardwired AC models only) SureSine models that require AC wiring be hardwired include an internal neutral-ground jumper that can allow for the choice between an internal grounded neutral or an external grounded neutral. The default is set as an internal grounded neutral with the bond in place at the factory. -
Page 31: Grounding Connections
INSTALLATION Removing the internal neutral ground should only be implemented for applications which require an external Neutral-Ground bond. Two applications where this is required are: • Inverter as AC grid backup power using a single-pole AC transfer switch • Integration with AC Generator using a single-pole AC transfer switch These applications can use a single-pole AC transfer switch with another AC power source and share the same neutral-ground bond at all times. -
Page 32: Table 8: Minimum Wire Sizes For Copper Ground Cable
INSTALLATION 2.8.5.1 Chassis Ground The SureSine chassis grounding terminal is located on the outside of the case as shown in the DC wiring diagrams in Section 2.8.6. Use copper wire to connect the chassis grounding terminal, and other dead metal, to earth ground. -
Page 33: Dc Connections
INSTALLATION 2.8.6 DC Connections DC Connections will vary by site application. The SureSine Inverter can support 12-volt, 24-volt, and 48-volt battery systems. WARNING: HAZARDOUS CURRENT, RISK OF FIRE OR EXPLOSION • Do NOT allow the positive (+) DC cable to touch the Negative (–) DC cable. Allowing these cables to touch can create dangerous current or a possible fi... - Page 34 INSTALLATION 2.8.6.1 Negative Grounding For wiring diagrams showing NEGATIVELY grounded DC Wiring: • For 150 W & 300 W Models: See Figure 17 on page 25 • For 700 W, 1,000 W, 1,250 W & 2,500 W Models: See Figure 19 on page 26 2.8.6.2 Positive Grounding For wiring diagrams showing POSITIVELY grounded DC Wiring:...
-
Page 35: Figure 17: Dc Connections On 150 W & 300 W Models With Negative Grounding
INSTALLATION Figure 17: DC Connections on 150 W & 300 W Models with Negative Grounding Figure 18: DC Connections on 150 W & 300 W Models with Positive Grounding MS-003650 (Rev 0 Draft 10) -
Page 36: Figure 19: Dc Connections On 700 W To 2,500 W Models With Negative Grounding
INSTALLATION Figure 19: DC Connections on 700 W to 2,500 W Models with Negative Grounding Figure 20: DC Connections on 700 W to 2,500 W Models with Positive Grounding MS-003650 (Rev 0 Draft 10) -
Page 37: Ac Connections
INSTALLATION 2.8.7 AC Connections WARNING: SHOCK HAZARD This unit is not provided with a GFDI device. This inverter must be used with an external GFDI device as required by the Article 690 of the National Electrical Code for the installation location. CAUTION: EQUIPMENT DAMAGE •... -
Page 38: Ac Wiring
INSTALLATION 2.8.8 AC Wiring The 150 W, 300 W, and 700 W Models comes either factory-wired or have the option of being hardwired. The 1,000 W , 1,250 W, and 2,500 W Models require permanent, hardwired connections. Wiring must comply with local regulatory code for the specifi... -
Page 39: Figure 22: Ac Wiring For 150 W Or 300 W Models
INSTALLATION Figure 22: AC Wiring for 150 W or 300 W Models Figure 23: AC Wiring for 700 W, 1,000 W, 1,250 W or 2,500 W Models MS-003650 (Rev 0 Draft 10) -
Page 40: Check Wiring And Power Up
OPERATION Check Wiring and Power Up 1. Review wiring steps and double-check all wiring and connections. 2. Verify that the battery is wired with correct polarity to the SureSine. 3. Connect the ungrounded battery cable to the ungrounded battery post. WARNING: RISK OF EXPLOSION Connecting the battery to the SureSine with the breaker or disconnect closed will cause a spark at the point of connection. -
Page 41: Ac Output Mode Switch Operation
OPERATION AC Output Mode Switch Operation The AC Output Mode Switch will always turn the inverter on directly in the ON (up) position. To enable ON/OFF control with a wired remote switch or a communication command (digital command), the switch must be in the REMOTE position. Select remote switch or digital command using DIP Switch # 1. -
Page 42: High Voltage Disconnect (Hvd)
OPERATION 3.3.2 High Voltage Disconnect (HVD) The SureSine will shut down and disconnect AC Output if battery voltage exceeds 15.5 V. It will automatically reconnect when the battery voltage decreases to 14.5 V. 3.3.3 High Temperature Disconnect (HTD) If the SureSine heat sink temperature rises above 95°C, an HTD fault will occur and the SureSine will disconnect the AC Output. -
Page 43: Communication Options
SureSine inverters, Morningstar products, and 3rd-party equipment – (Future Feature Improvement) MS-CAN (Morningstar Communication Area Network) for a wired communication connection to other Morningstar products • 700 W to 2,500 W Models – Bluetooth for wireless communication to a mobile device –... -
Page 44: Bluetooth
COMMUNICATION OPTIONS Bluetooth Bluetooth is for connecting a mobile device to the SureSine Inverter. DIP Switch #8 must be enabled (ON) for this feature to function. See Section 2.4 on page 11 for details on enabling this feature. 4.1.1 To Connect the SureSine using Bluetooth 1. -
Page 45: Suresine Utility App
COMMUNICATION OPTIONS 4.1.2 SureSine Utility App The SureSine inverter has a Utility App available for monitoring and settings adjustments. This app is designed for Android and Apple devices and connects using Bluetooth. The SureSine Utility App is available at Google Play and Apple App stores. Download and install the App and follow the instructions from the App for set up and operation. -
Page 46: Ethernet (For Modbus™ Tcp/Ip)
COMMUNICATION OPTIONS Ethernet (for Modbus™ TCP/IP) The Ethernet port is for communicating by Modbus TCP/IP. The Modbus specifi cation document is available at www.morningstarcorp.com. The Modbus specifi cation document details on register locations, scaling, and variable defi nitions. Use a CAT5, CAT6, or CAT7 cable with an RJ-45 plug for connections. 4.2.1 To Connect to the Internet using Modbus Protocols 1. -
Page 47: Eia-485 Device Communication
The TriStar-MPPT Charge Controller and RSC Serial adapters require an external 12 V power source to enable the EIA-485 communications. The 12 Vdc Auxiliary Power feature of 700 W to 2,500 W models can be used, therefore, to power Morningstar EIA-485 devices in an EIA-485 Network. -
Page 48: Figure 31: Auxiliary Power Connections (700 W, 1,000 W, 1,250 W Or 2,500 W Models Only)
COMMUNICATION OPTIONS 3. If using the Auxiliary Power feature of a SureSine 700 W to 2,500 W model to power Morningstar EIA-485 devices in an EIA-485 Network: • connect the Ground (GND) terminal wire from the EIA-485 device(s) to the –12 V terminal of the SureSine inverter •... -
Page 49: Usb Port
COMMUNICATION OPTIONS USB Port A USB port is available on the 700 W, 1,000 W, 1,250 W, and 2,500 W models. The USB port is used for connecting a USB device for fi rmware updating. This port requires a USB-A plug. This feature works with the following USB devices: •... -
Page 50: Ms-Can (Future Feature)
COMMUNICATION OPTIONS MS-CAN (Future Feature) MS-CAN is for communicating with other Morningstar components within the network. This feature is not available at this time. Check the Morningstar website (www.morningstarcorp.com) for updates. Note: The Morningstar component must be MS-CAN enabled. 4.5.1 To Connect the SureSine to another Morningstar Device 1. -
Page 51: To Connect The Suresine To A Morningstar Network
Morningstar device in the network. 5. Insert a 120 Ohm CANBUS terminator resister into the MS-CAN OUT port on the fi nal device, if no other Morningstar devices are to be connected. Figure 34: Communication Using MS-CAN with Multiple Devices... -
Page 52: Firmware Update Procedure
FIRMWARE UPDATE PROCEDURE FIRMWARE UPDATE PROCEDURE To update the SureSine fi rmware, perform the following procedure. 1. Go go to www.morningstarcorp/support and copy the fi rmware update program to a USB data storage device (such as a fl ash drive). 2. -
Page 53: Specifications
SPECIFICATIONS SPECIFICATIONS This section provides the specifi cations for the SureSine Inverter Industrial Line. Table 10: Specifi cations for the SureSine 150 and SureSine 300 Model Specifi cation SureSine 150 SureSine 300 24 V 48 V Rated Battery Voltage 12 V 24 V 48 V 12 V... -
Page 54: Table 11: Specifi Cations For The Suresine 700 And Suresine 1000
SPECIFICATIONS Table 11: Specifi cations for the SureSine 700 and SureSine 1000 Model Specifi cation SureSine 700 SureSine 1000 Rated Battery Voltage 12 V 24 V 48 V 24 V 48 V 40.0 to Battery Operational Voltage Range 10.0 to 20.0 to 40.0 to 20.0 to... -
Page 55: Table 12: Specifi Cations For The Suresine 1250 And Suresine 2500
SPECIFICATIONS Table 12: Specifi cations for the SureSine 1250 and SureSine 2500 Model Specifi cation SureSine 1250 SureSine 2500 Rated Battery Voltage 24 V 48 V 48 V Battery Operational Voltage Range 20.0 to 33.0 V 40.0 to 66.0 V 40.0 to 66.0 V Maximum Continuous DC Input Current 68 A... -
Page 56: Table 13: Common Specifi Cations For All Models
Table 13: Common Specifi cations for all Models Features Waveform - Pure Sine Wave Galvanically Isolated Cooling - Fanless natural convection Electronic Protections AC Output Short Circuit AC Output Overload High Heat Sink Temperature - Load Disconnect Battery Reverse Polarity - Replaceable internal fuse Heat Sink Temperature: Warning 90°C;... -
Page 57: Appendix A: Dc Battery Wire Sizing
DC BATTERY WIRE SIZING APPENDIX A: DC BATTERY WIRE SIZING Wire sizing requirements are based on the ampacity (or current carrying capacity) of conductors. The NEC includes Ampacity Tables which are used to determine the ampacity for a given wire size as indicated in Section 310.15. The battery wire ampacity must be greater than or equal to 125% of maximum continuous battery current of the SureSine inverter. -
Page 58: Table 15: Minimum Battery Wire Sizes - 90°C Rated Stranded Copper
DC BATTERY WIRE SIZING Table 15: Minimum Battery Wire Sizes - 90°C Rated Stranded Copper Wire Size in a raceway, Wire Size in Free Air Max Battery Model cable, or earth (NOTE: 1) (NOTE 2) Continuous Current Watts Volts @30°C 30° - 60°C @30°C 30°-45°C 150 W... -
Page 59: Appendix B: Dc Voltage Drop Tables
DC VOLTAGE DROP TABLES APPENDIX B: DC VOLTAGE DROP TABLES Good system design generally requires large conductor wires that limit voltage drop losses to 2% or less. Table 17 and Table 18 provide wire sizing for a maximum of 2% voltage drop. -
Page 60: Voltage Drop Chart For 75°C Or 90ºc Stranded Copper Wire (Meters), 12 Volt System
DC VOLTAGE DROP TABLES B.2 Voltage Drop Chart for 75°C or 90ºC Stranded Copper Wire (Meters), 12 Volt System For 24- or 48-volt systems multiply the values in Table 18 by: • 2 for 24-volt systems • 4 for 48-volt systems Table 18: Maximum 1-way Distance (Meters), 2% Voltage Drop Chart for 75°C or 90ºC Stranded Copper Wire, 12-Volt System Wire Amps... -
Page 61: Appendix C: Warranty
Return Material Authorization (RMA) number. An RMA number must be issued by Morningstar prior to return of any unit(s) under this warranty. Required RMA information: (A) purchase location - business or company name - and date... - Page 62 ANY AND ALL IMPLIED WARRANTIES, INCLUDING, WITHOUT LIMITATION, WARRANTIES OF MERCHANTABILITY AND FITNESS FOR A PARTICULAR PURPOSE. No Morningstar distributor, agent or employee is authorized to make any modifi cation or extension to this warranty. MORNINGSTAR IS NOT RESPONSIBLE FOR INCIDENTAL OR CONSEQUENTIAL DAMAGES OF ANY KIND, INCLUDING BUT NOT LIMITED TO LOST PROFITS, DOWN-TIME, GOODWILL OR DAMAGE TO EQUIPMENT OR PROPERTY.
- Page 63 Index Index DC System Ground ........22 DC Voltage Drop ........... 49 DC Voltage Requirements ....... 7 DC Wiring ............24 Dimensions AC circuit breaker/fuse ratings ...... 28 150 W & 300 W Models ........ 5 AC Connections ..........27 700 W to 2,500 W Models ......
- Page 64 Index Negative Grounding ........24 Voltage Drop ........... 49, 50 Neutral-Ground Bond ......20, 22 Neutral-Ground Jumper ........ 20 Warranty ............51 Claim Procedure ......... 51 Output Mode ..........31 Exclusions And Limitations ......51 Output Voltages ..........1 RMA ............51 Over Current Fault .........
- Page 65 Index Notes: MS-003650 (Rev 0 Draft 10)
- Page 66 MORNINGSTAR World’s Leading Solar Controllers & Inverters MS-003650 Rev 0 Draft 10 © 2022 Morningstar Corporation. All rights reserved.
Need help?
Do you have a question about the SureSine 150 W and is the answer not in the manual?
Questions and answers