Advertisement
Introduction

- Settings button – (press briefl y) and to go back or cancel (press and hold)
- Settings button + (press briefl y) and OK button for confirmation of settings (press and hold)
Short press on A+B = menu access
Specifications
Power supply: 4 AA LR6 1.5V batteries
Battery lifespan: 4 years
Setting range
- Comfort mode temperature: +5°C to +30°C
- Night setpoint mode temperature: +5°C to +30°C
Room temperature display range: 0°C to +40°C
Operating temperature: +0°C to +50°C
Storage temperature: -20°C to +70°C
Ball pressure test temperature 75°C
Humidity: max 93% at 40°C
IP: 20
IK: 04
Degree of pollution: 2
Action type: 1.L
Software structure: class A
Dimensions (l x h x d): 74.7 x 48 x 63.1 mm
Emission frequency: 868-870MHz/25mW
Transmitter duty cycle: 0.1
Receiver category: 2
Typical range: >150 m in free range and 50 m (2 slabs).
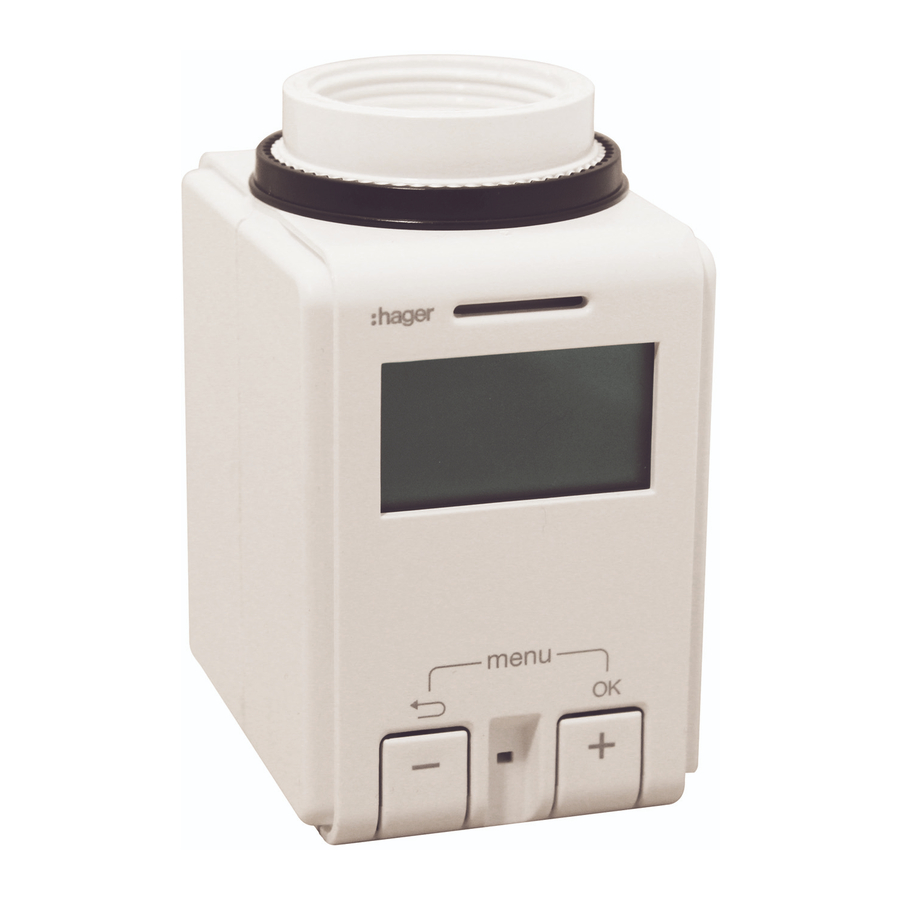
Description of the thermostat
The EK760 thermostat is designed to provide comfort and energy savings, and is easily installed on thermostatic radiator valves. It regulates the ambient temperature and works in association with a home automation controller, such as TKP100A and/or with radio transmitters in the TRMxxx range, allowing you to benefi t from the associated functions of programming, check and visualization.
It allows the heating device to regulate according to 3 temperature levels:
- Comfort
![]() : The desired temperature when you are present within the room.
: The desired temperature when you are present within the room. - Night setpoint
![]() : The desired temperature during short absences or at night.
: The desired temperature during short absences or at night. - Frost Protection
![]() : The minimum temperature ensured during extended periods of absence. It protects your house from the risk of frost.
: The minimum temperature ensured during extended periods of absence. It protects your house from the risk of frost.
 : The desired temperature when you are present within the room.
 : The desired temperature during short absences or at night.
 : The minimum temperature ensured during extended periods of absence. It protects your house from the risk of frost.
- Display (temperature / text)
- Ongoing temperature bypass indicator
- Open window
- Ongoing presetting indicator
- Frost protection mode activated
- Night setpoint heating mode activated
- Comfort heating mode activated
- Temperature indicator in °C
- Low battery level indicator
- Safety locking activated
- Radio link configuration indicator
Installation and replacement of batteries
Remove the cover of the battery box by pressing the cover upwards at the marked location (1) and picking it up (2).

Then, place the batteries in the direction indicated at the base of the product.

Changing the batteries has no infl uence on the confi guration of the product.
 Never use new and old batteries together;
nor should batteries of different brands be used together.
Do not use rechargeable batteries!
Respect the correct polarity!
Initial configuration
Once the batteries are fi tted, you can select the language used on the EK760 (English, French, German, Italian). The default language used is English, however you can change this selection by pressing on the " + " / " - " keys briefl y, then confi rm the selected language by pressing and holding on the "OK" key.
Installation
After the batteries are inserted, the motor is completely pushed upwards in order to facilitate installation. The screen will display INST (INST may also be selected from the menu, at all times). Ensure installation only in this position. Do not press the other keys, and the thermostat is ready to be fi tted.
Withdraw the head of the original thermostatic valve (caution: only the thermostatic valves can be controlled by the EK760 thermostat). The installation process is to be carried out without contact with dirt or water as the valve body remains in place.

The EK760 is fully compatible with existing thermostatic valves using M30x1.5 threading (Honeywell, Landis & Gyr, TA, Heimeier, etc.) using the white coupling ring provided.

In case of Danfoss valves, it is necessary to use an adapter provided in addition to the white ring (please refer to the correspondence table below).
| Heimeier, Junkers Landys + Gyr, MNG, Honeywell, Braukmann measured thread: M30x1,5 | No adapter needed |
| Danfoss RAV (The pin joint must be attached to the valve tappet) |  |
| Danfoss RA |  |
| Danfoss RAVL |  |
Before installing the adapters, fully remove the protection pins marked in grey on the drawing.

If the model of the valve is different from those listed above, you must use an optional adapter listed below:
- EK771 for COMAP M28x1.5 valve
- EK772 for Oventrop M30x1.0 valve
- EK773 for Vaillant valve
- EK774 for Herz M28x1.5 valve
- EK775 for Giacomini valve

Press and hold on the "OK" key until INST disappears so that EK760 can start its installation process. The device adapts to the operating range of the valve. In some cases, this procedure may take several minutes. Once the adaptation is completed, the EK760 goes back to the normal operating mode.
- If a new adaptation is necessary (for example if your radiator does not cool down while in summer mode), select INSTALLATION from the menu until adaptation starts.
- If error ERR2 appears on the screen, fi t the EK760 on the radiator valve and then briefly remove the batteries to reinitialize.
Removal
To remove EK760, set the device in INST position (Please refer to the above chapter), wait for a brief moment and then press on the release lock located in the groove in the lower part with the fork tool delivered to disconnect.

Subsequently, remove EK760 from the valve body.
Radio Link configuration
The next step is to confi gure the radio link of EK760, to do so there are 2 options:
- Using a house automation controller such as TKP100A, place TKP100A in product append mode, and cfg will appear on the EK760 screen and RF confi guration will be displayed subsequently. Press and hold on "OK" to start the link process. At the end of the process, it is carried out correctly if the display indicates "OK", on the other hand the operation must be repeated if it indicates "NOK" (For more information, see instructions for TKP100A).
- Using micromodules of type TRM69x or TRM702A, place the micromodule in confi guration mode, and cfg will appear on the EK760 display screen subsequently. Press and hold on "OK" to start the link process. You can select the desired function by navigating with the "+" / " - " key then confi rming the function selected by pressing and holding on the "OK" key.
| Heating |  |
| Function on the EK760 display | |
 | Comfort |
 | Night setpoint |
| Heating pause | Heating pause* |
| S1 | Scenario 1 |
| S2 | Scenario 2 |
| | Temporary |
| / | Comfort / Night setpoint |
 | Priority |
 | Priority |
 | Window* |
 | Room temperature* |
| del | Delete |
* Function not available with TRMxxx radio transmitters.
While setting up the radio link, the display will fi rst indicate "Link". Then, it displays "OK" if the radio link has been successfully established or "NOK" if it has not been successfully established. In this case, repeat the radio link confi guration process.
If you have selected the timer comfort function, you can also set the timer in comfort mode (default is set to 3 hrs.). Select the desired time with the "+" / "-" keys, then confi rm the selection by pressing and holding on the "OK" key.
You can exit the confi guration process at any time by pressing and holding on the cancellation key. For "Radio link elimination" and "reset ", see § 4.
Standard operation
In standard operation, the screen will be switched off to conserve battery power (it is possible to change this setting and leave the screen continuously on, please refer to chapter "EK760 setting"). Pressing on the "+" / "-" buttons briefl y will display the measured temperature, and the 6th and 7th icons (indicated at the "Overview of the Thermostat") will indicate if the thermostat is in comfort ![]() mode or in Night setpoint
mode or in Night setpoint ![]() mode.
mode.
From this screen, several options are available:
- Consultation of the existing setpoint temperature
You can check the current temperature setpoint by pressing on the "+" or "-" keys briefl y. The current temperature setting (Comfort or Night setpoint) will fl ash and display for 10 sec, before the measured temperature will be displayed again. - Ongoing setpoint temperature bypass
To temporarily change the current temperature setpoint, press on the "+" or "-" key to increase or reduce the temperature.
The setpoint temperature will blink, and automatically validated after 10 sec or by pressing and holding on the "OK" key. This bypass is valid until the next mode adjustment (next step of the heating schedule initiated by the house automation controller TKP100A, for example).
The icon " ongoing temperature bypass indicator" will be displayed on the screen to indicate that the bypass is in progress.
![]() To cancel this bypass: press and hold on the "return" key, and the icon "
To cancel this bypass: press and hold on the "return" key, and the icon "![]() ongoing temperature bypass indicator" will disappear.
ongoing temperature bypass indicator" will disappear. - Product safety locking
To avoid unintentional activation, you can lock the EK760. For this, press and hold the + /- keys at the same time keys simultaneously until the "![]() " icon appears on the screen. To deactivate the function, repeat the process until the "
" icon appears on the screen. To deactivate the function, repeat the process until the "![]() " icon disappears.
" icon disappears. - EK760 settings
To access the product settings, it is necessary to press on the "+" and "–" keys to enter the menu, then navigate in the menu by pressing on the "+" and "-" buttons briefl y. To enter one of the settings, press and hold on the "OK" key. To exit a setting or the menu, press and hold on the "Return" key.
 To cancel this bypass: press and hold on the "return" key, and the icon "
 " icon appears on the screen. To deactivate the function, repeat the process until the "
Different settings are accessible:
- "Mode": Change of heating mode
There are 2 heating modes on the product (comfort and economy). It is possible to change the heating mode by selecting the "Mode" setting. By pressing on the "+" button briefl y, you can select "Conf" (for Comfort mode) or "Night" (for night setpoint mode). The selection can be confi rmed by pressing and holding on the "OK" key. - " Priority": Forcing of the thermostat heatin mode
The priority mode allows you to maintain a constant temperature in your house in comfort or economy mode, but does not take into account some programming profi les (for example, profi les available on the house automation controller TKP100A). To select the "Priority" mode in the menu, confi rm selection by pressing and holding on the "OK" key and select the desired mode with the "+" / "-" keys: - Comf. : To enter comfort mode
- Night : To enter night setpoint mode
- DIS : to disable the priority mode
Confirm your selection by pressing and holding on the "OK" key.
- "Temperatures": Adjustment of the temperature setpoint for the different heating modes
The "Temperature" mode allows you to adjust the temperature setpoint of the different heating modes according to the range described in the table below.
| Mode | Default value | Min | Max | Interval |
| Comfort | 20°C | 5°C | 30°C* | 0,5°C |
| Night setpoint | 16°C | 5°C | 30°C* | 0,5°C |
| Frost protection | 6°C | Non-confi gurable on the value but through the house automation controller (for example, TKP100A) | ||
*The maximum adjustable temperature may be limited by remote setting.
Select the "Temperature" mode in the menu and confi rm selection by pressing and holding on the "OK" key:
- When the "Comfort" temperature setpoint blinks, you can change it by pressing on the "+" / "-" keys briefl y, then confi rm selection by pressing and holding on the "OK" key.
- When the "Night" temperature setpoint blinks, you can change it by pressing on the "+" / "-" keys briefl y, then confirm selection by pressing and holding on the "OK" key.
- "Heating pause": Stop heating
The "Heating pause" mode allows you to turn the heater off (for example, during summer). This helps to increase the battery lifespan.
In this mode, only the frost protection and the antiscaling functions (1x per week) remains active.
Select the "Heating pause" mode in the menu and confi rm selection by pressing and holding the "OK" key, then select "Yes" or "No" by pressing on the " + " and " - " keys briefl y to activate or deactivate the function, then subsequently confi rm by pressing and holding on the "OK" key.
In "Heating pause" mode, the "Mode" and "Priority" modes will not be accessible.
EK760 ensures anti-scaling protection of your valve through the complete opening/closing of the valve per week.
- "Window": Window opening detection
The EK760 has an integrated window opening detection function. If a window opens leading to a drastic fall in temperature, the EK760 will automatically close the radiator valve to save energy. The screen will display icon " ", and subsequently resumes its normal operation.
To configure this function, select the "Window" mode in the menu and confi rm selection by pressing and holding on the "OK" key, then select "Yes" or "No" with a brief press on the " + " and " - " keys to activate or deactivate the function then confi rm your selection by pressing and holding the "OK" key.
Now, adjust the sensitivity of the device to temperature changes. This can be selected with a brief press on the " + " and " - " keys ("High"= high sensitivity, "Medium" = medium sensitivity (default setting), "Low"= low sensitivity), then confi rm by pressing and holding on the "OK" key.
Now, select the time (ranging from 10 minutes to 60 minutes at an interval of 5 minutes) during which the valve must remain in frost protection mode by pressing on the "+" and "-" keys briefl y, then confi rm your selection by pressing and holding on the "OK" key.
It is also possible to exit the frost protection mode due to an open window pressing and holding on the "enter" key.
- " Temp Offset": Temperature calibration
This setting adjusts the measured value by the thermostat if you are measuring a different room temperature.
To do so, select the "Temp Offset" mode in the menu and confi rm selection by pressing and holding on the "OK" key. You can change the temperature within a limit of -5 to +5°C with a short press on the "+" / "-" keys, then confi rm your selection by pressing and holding on the "OK" key.
The temperature offset is canceled in "Heating pause" mode (summer period)
- "LCD Standby": Putting the screen in standby
Putting the screen in standby helps to increase battery lifespan. This setting provides you with the options of permanently activating the screen or to put it on standby after 30 sec if no key is pressed.
To do so, select the "LCD Standby" mode in the menu and confi rm by pressing and holding on the "OK" key. With a brief press on the "+" / "-" keys, you can select "Yes" to activate the screen standby function (default confi guration) or "No" to deactivate the function (the screen remains permanently on), then confi rm your selection by pressing and holding on the "OK" key.
- "Installation": Installation mode
This function enables the EK760 to enter installation mode.
For this, select the "Installation" mode in the menu and confirm by pressing and holding on the "OK" key. Once the "INST" fl ashes on the screen, the motor is pushed upwards and you can install the EK760 on the thermostatic valve. Once installed, you can exit the installation process by pressing and holding on the "OK" key.
- "Del radio link": Clearing of the radio links
This function allows you to clear the existing radio links on the EK760.
To delete radio links, select the "Del radio link" mode in the menu and confi rm selection by pressing and holding on the "OK" key, and a blinking "OK" message will be displayed. You can confi rm the clearing by pressing and holding on the "OK" key or cancel the operation by pressing and holding on the "Return" key.
- "Reset": restore factory settings
This parameter resets the parameters to the factory settings and causes the elimination of the radio links.
To do so, select the "Reset" mode in the menu and confi rm selection by pressing and holding on the "OK" key, and a blinking " OK?" message will be displayed. You can confi rm the clearing by pressing and holding on the "OK" key, or cancel the operation by pressing and holding on the "return" key.
- "Language": Language configuration
This setting allows you to select the language used on the EK760 (English, French, German, and Italian).
To do so, select the "Language" mode in the menu and confi rm selection by pressing and holding on the "OK" key, change the language with a brief press on the " + " / " - " keys then confi rm your selection by pressing and holding on the "OK" key.
- "Software version": Version of software installed on the product
This setting allows you to know which software version has been installed on your EK760.
To do so, select the "Software version" mode in the menu and confi rm selection by pressing and holding on the "OK" key, and the software version will be displayed. You can exit this display by pressing and holding on the "OK" or "Return" key.
What should I do if... ?
The "Low battery" symbol is displayed: please change the batteries (4 batteries of type AA LR6 1.5V) immediately.
The application does not detect EK760 during confi guration: It is possible that EK760 is out of range of the house automation controller TKP100A. Please bring the TKP100A closer to the EK760. The screen does not light up when the "+" or "–" keys are pressed: Ensure that the batteries are correctly positioned. Use only batteries of type AA LR6 1.5V (provided with the product). If the problem persists, replace the batteries.
I pressed the "+" or "–" keys before installing the EK760 on the valve: Remove and reinsert the batteries, or select the "Installation" mode in the menu and confi rm by pressing and holding on the "OK" key. Once a blinking "Inst" message is displayed, the motor is placed in high position, you can install the EK760 on the thermostatic valve. Once installed, you can exit the installation process by pressing and holding on the "OK" key.
The screen displays the code ERR1 (adaptation impossible):
- The EK760 is not assembled correctly. Please repeat the assembly steps.
![]()
- The adjustment screw could have fallen. In this case, replace the adjustment screw and then remove the batteries briefl y to reset the device. The motor should be positioned completely at the top to facilitate assembly. The screen indicates "Inst" ("Inst" can also be selected in the menu). The continuous threading turns and tightens the new adjustment screw. Proceed with the assembly of EK760 on the thermostatic valve again.

The screen displays one of the following codes ERR2 (Piston stroke too short) or ERR3 (Motor movement impossible): Remove EK760 from the valve and press on the piston of the thermostatic valve body. Repeat the assembly steps.
Simplified EU Declaration of Conformity:
As per the present document, Hager Controls declares that the radio equipment of the Radio thermostat for thermostatic radiator valves EK760 type is compliant with the 2014/53/UE guidelines.
The complete text of the EU Declaration of Compliance is available at the following link
www.hagergroup.net
 Correct Disposal of this product (Waste Electrical & Electronic Equipment).
Applicable in the European Union and other European countries with separate collection systems).
This marking shown on the product or its literature indicates that it hould not be disposed with other household wasted at the end of its working life. To prevent possible harm to the environment or human health from uncontrolled waste disposal, please separate this from other types of wastes and recycle it responsibly to promote the sustainable reuse of material resources.
Household users should contact either the retailer where they purchased this product, or their local government offi ce, for details of where and how they can take this item for environmentally safe recycling. Business users should contact their supplier and check the terms and conditions of the purchase contract. This product should not be mixed with other commercial wastes of disposal.

Documents / Resources
References
Download manual
Here you can download full pdf version of manual, it may contain additional safety instructions, warranty information, FCC rules, etc.
Download Hager EK760 - Radio Thermostat For Thermostatic Valves Manual
Advertisement


Need help?
Do you have a question about the EK760 and is the answer not in the manual?
Questions and answers