Corsair K55 RGB Gaming Keyboard Manual
- User manual ,
- Manual (12 pages) ,
- Quick start manual (10 pages)
Advertisement
SETTING UP YOUR KEYBOARD
> Turn on your computer
> Connect the keyboard to a USB 2.0 or USB 3.0 port
iCUE SOFTWARE
CORSAIR iCUE software connects all your CORSAIR iCUE compatible products together in a single interface, giving you complete control of everything from RGB lighting and powerful macros to system monitoring and cooling control. Download iCUE from www.corsair.com/downloads.

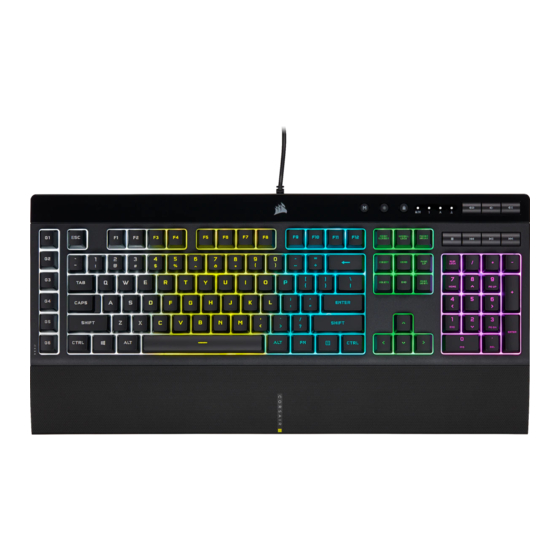
GETTING TO KNOW YOUR KEYBOARD

A — SIX PROGRAMMABLE MACRO KEYS
B — MACRO RECORD KEY
C — BACKLIGHT BRIGHTNESS KEY
D — WINDOWS KEY DISABLE
E — MUTE KEY
F — VOLUME DOWN KEY
G — VOLUME UP KEY
H — DEDICATED MULTIMEDIA KEYS
I — MACRO STATUS LED INDICATOR
J — NUM LOCK LED INDICATOR
K — CAPS LOCK LED INDICATOR
L — WINDOWS KEY DISABLE LED INDICATOR
M — USB CONNECTION CABLE
MACRO FUNCTIONS
K55 RGB gaming keyboard has dedicated G1-G6 macro keys. Those keys can be assigned to perform certain single or multi-key press actions for quick access during the game or everyday computing.
TO RECORD MACRO
> Press MR key. The macro status LED indicator will start blinking to indicate macro recording mode is now on.
> Select G-key you want the macro assigned to. The macro status LED indicator will start blinking rapidly to indicate macro recording is now in progress.
> Every keypress will now be recorded.
> Press MR key to stop recording. The macro status LED indicator will stop blinking and turn off.
TO EXECUTE MACRO
> Press any G1-G6 key to play previously recorded macro.
SPECIAL MACRO KEY FUNCTIONS
Press and hold MR key for 5 seconds to enter Special Macro Key Functions mode. The macro status LED indicator will turn solid white to confirm the new mode of operation. While in this mode, you have access to three macro key functions.
ENABLING, DISABLING, AND REMOVING MARCOS
Once you're in this mode, press one of the G1–G6 macro keys to check the respective macro's status.
A rapidly blinking LED light will indicate the macro's status:
> it blinks once to confirm that the G key is enabled,
> and twice to confirm that the G key is disabled.
All of the G1–G6 macro keys are enabled by default. You can keep pressing the G key to enable or disable the macro; the LED light will always reflect the macro's current status.
TO DISABLE ANY G1-G6 MACRO KEY
> Press any G1-G6 key to disable the macro key without deleting action (if previously assigned). The macro status LED indicator will blink rapidly twice to confirm selected key is now disabled.
TO ENABLE ANY G1-G6 MACRO KEY
> Press any G1-G6 key again to enable the macro key. The macro status LED indicator will blink rapidly once to confirm selected key is now disabled.
TO DELETE MACRO ASSIGNED TO G1-G6 MACRO KEY
> Press and hold any G1-G6 key for 3 seconds to delete macro previously assigned to the key. The macro status LED indicator will blink rapidly three times to confirm macro has been deleted.
To exit Special Macro Key Functions mode, press and hold MR key for 5 seconds. The macro status LED indicator will turn off to confirm.
BACKLIGHTING MODES
K55 RGB features 3-zone RGB backlighting and comes with 12 preconfigured lighting modes. Those modes can be accessed with Fn key. Below table outlines available lighting modes and keyboard shortcuts to access them.

| MODE | FN KEY COMBO | ZONE A | ZONE B | ZONE C |
| 1 | FN + 1 | RED | GREEN | BLUE |
| 2 | FN + 2 | YELLOW | CYAN | PURPLE |
| 3 | FN + 3 | BLUE | CYAN | RED |
| 4 | FN + 4 | PURPLE | GREEN | YELLOW |
| 5 | FN + 5 | ORANGE | PURPLE | CYAN |
| 6 | FN + 6 | GREEN | BLUE | WHITE |
| 7 | FN + 7 | CUSTOM (DEFAULT: OFF) | CUSTOM (DEFAULT: OFF) | CUSTOM (DEFAULT: OFF) |
| 8 | FN + 8 | CYCLE THROUGH THE SAME COLOR ON ALL 3 ZONES: RED / GREEN / BLUE / YELLOW / CYAN / PURPLE / ORANGE / WHITE | ||
| 9 | FN + 9 | COLOR PULSE, ALL 3 ZONES: RED / GREEN / BLUE / YELLOW / CYAN / PURPLE / ORANGE / WHITE | ||
| 10 | FN + 0 | COLOR SHIFT, ALL 3 ZONES: RED / GREEN / BLUE / YELLOW / CYAN / PURPLE / ORANGE / WHITE | ||
| 11 | FN + - | COLOR PULSE, ALL 3 ZONES AT A TIME, MOVES FROM RIGHT TO LEFT: RED / GREEN / BLUE / YELLOW / CYAN / PURPLE / ORANGE / WHITE | ||
| 12 | FN + = | RAINBOW WAVE | ||
Dynamic lighting modes 9 through 12 can be further customized with various speed and /or direction modes.
| MODES | FN KEY COMBO | FUNCTION | |||
| 9 | 10 | 11 | 12 | ||
| Y | Y | Y | Y | FN + UP ARROW | INCREASE SPEED (FAST -> MEDIUM -> SLOW) |
| Y | Y | Y | Y | FN + DOWN ARROW | INCREASE SPEED (SLOW -> MEDIUM -> FAST) |
| N | N | Y | Y | FN + LEFT ARROW | CHANGE DIRECTION FROM LIGHT TO LEFT |
| N | N | Y | Y | FN + RIGHT ARROW | CHANGE DIRECTION FROM LEFT TO RIGHT |
CUSTOMIZE BACKLIGHTING
Each of three RGB backlighting zones on K55 RGB can be individually customized with one of the 8 predefined colors and saved as custom lighting mode (FN+7). After making selection for all three zones separately, press and hold FN + 7 key combination for 3 seconds. All 3 zones will blink rapidly twice in selected colors to confirm custom static mode has been saved.
| FN KEY COMBO | FN KEY COMBO |
| FN + F1 | ZONE A - RED / GREEN / BLUE / YELLOW / CYAN / PURPLE / ORANGE / WHITE / OFF |
| FN + F2 | ZONE B - RED / GREEN / BLUE / YELLOW / CYAN / PURPLE / ORANGE / WHITE / OFF |
| FN + F3 | ZONE C - RED / GREEN / BLUE / YELLOW / CYAN / PURPLE / ORANGE / WHITE / OFF |
FACTORY RESET
Press and hold FN + F4 for 5 seconds. All 3 zones will blink rapid 2 times in white color to confirm all lighting modes and macro assignments have been reset to defaults.
 NOTE ON ENVIRONMENTAL PROTECTION
After the implementation of the European Directive 2012/19/EU in the national legal system, the following applies:
- Electrical and electronic devices may not be disposed of with domestic waste.
- Consumers are obligated by law to return electrical and electronic devices at the end of their service lives to the public collecting points set up for this purpose of point of sale. Details to this are defined by the national law of the respective country. This symbol on the product, the instruction manual or the package indicates that a product is subject to these regulations. By recycling, reusing the materials or other forms of utilizing old devices, you are making an important contribution to protecting our environment.

The manufacturer is not responsible for any radio or TV interference caused by unauthorized modifications to this equipment. Such modifications could void the user authority to operate the equipment.
 FCC STATEMENT
This equipment has been tested and found to comply with the limits for a Class B digital device, pursuant to Part 15 of the FCC Rules. These limits are designed to provide reasonable protection against harmful interference in a residential installation. This equipment generates, uses and can radiate radio frequency energy and, if not installed and used in accordance with the instructions, may cause harmful interference to radio communications. However, there is no guarantee that interference will not occur in a particular installation. If this equipment does cause harmful interference to radio or television reception, which can be determined by turning the equipment off and on, the user is encouraged to try to correct the interference by one of the following measures:
- Reorient or relocate the receiving antenna.
- Increase the separation between the equipment and receiver.
- Connect the equipment into an outlet on a circuit different from that to which the receiver is connected.
- Consult the dealer or an experienced radio/TV technician for help. This device must not be co-located or operating in conjunction with any other antenna or transmitter. Operation is subject to the following two conditions:
- this device may not cause harmful interference, and
- this device must accept any interference received, including interference that may cause undesired operation.
This Class B digital apparatus meets all requirements of the Canadian Interference-Causing Equipment Regulations. CAN ICES-3(B)/NMB-3(B).
WEB: corsair.com
PHONE: (888) 222-4346
SUPPORT: support.corsair.com
BLOG: corsair.com/blog
FORUM: forum.corsair.com
YOUTUBE: youtube.com/corsairhowto
© 2019 CORSAIR MEMORY Inc. All rights reserved. CORSAIR and the sails logo are registered trademarks in the United States and/or other countries. All other trademarks are the property of their respective owners. Product may vary slightly from those pictured. 49-001882 AA

VideosCorsair Gaming K55 RGB Keyboard Review Video
Documents / Resources
References
CORSAIR Downloads | CORSAIR iCUE Software
http://corsair.com
http://corsair.com/blog
Home - Corsair Community
![youtube.com]() CORSAIR LAB - YouTube
CORSAIR LAB - YouTube
Download manual
Here you can download full pdf version of manual, it may contain additional safety instructions, warranty information, FCC rules, etc.
Advertisement


Need help?
Do you have a question about the K55 RGB and is the answer not in the manual?
Questions and answers