
Related Manuals for DS18 HYDRO NXL-X8TP.NS


Summary of Contents for DS18 HYDRO NXL-X8TP.NS
- Page 1 OWNER'S MANUAL NXL-X8TP.NS MANUAL DE USUARIO MARINE TOWER POD FOR 8" SPEAKERS WITH GRILL AND RGB LED LIGHTS INCLUDED CAPSULA DE TORRE MARINA PARA ALTAVOCES DE 8" CON MALLA Y LUCES LED RGB INCLUIDOS ENGLISH | ESPAÑOL...
-
Page 2: Packaging Includes
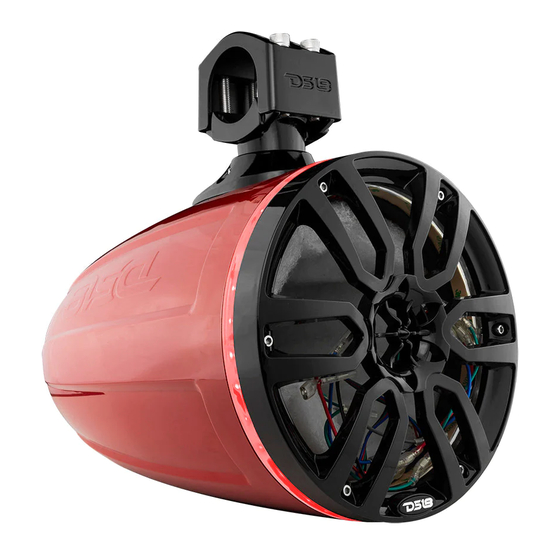
• Pair of empty enclosures to use with your • Par de Gabinetes Vacios para usar con su favorite DS18 8” Speakers altavoz de 8” favorito de DS18 • IP65 Marine Grade Compliant • Especificaciones que cumplen con el Grado... -
Page 3: Installation / Instalación
INSTALLATION / INSTALACIÓN READ BEFORE INSTALLATION LEER ANTES DE LA INSTALACIÓN 1. Be sure to carefully read and understand the 1. Asegúrese de leer detenidamente y entender instructions before attempting to install these las instrucciones antes de intentar instalar speakers. estos altavoces. - Page 4 INSTALLATION / INSTALACIÓN BEGINNING MOUNTING COMENZANDO EL MONTAJE Step 1: Install your preferred speaker on the Paso 1: instale su altavoz preferido en la torre tower by connecting the speaker cables conectando en su interior los cables para el inside and then securing it with the supplied altavoz y luego asegurelo con la malla y los mesh and screws.
- Page 5 INSTALLATION / INSTALACIÓN 6 mm Hex 304 M8 Blot with Wrench Spring Stop 3.0” Washer Llave hexagonal 2.75” 304 pernos M8 con de 6 mm arandela de tope 2.5” de resorte 2.25” Step 3 6 Core Wires Paso 3 2.0” 6 hilos de núcleo 1.75”...
- Page 6 INSTALLATION / INSTALACIÓN Step 8: Push the wire into the tube, press on Paso 8: Empuje el cable en el tubo, presione the rubber pad, and lock the top clamp. la almohadilla de goma y bloquee la abraza- dera superior. Step 9: Take down the safety rope and hang it on the pipe, lock the screw gasket safety Paso 9: Retire la cuerda de seguridad y...
- Page 7 INSTALLATION / INSTALACIÓN TIE-WRAP ACROSS TOWER TUBE EMPATE A TRAVÉS DEL TUBO DE LA TORRE FRONT LOGO CAR ROTATION / EL LOGO FRONTAL PUEDE GIRAR Step 13: When you want to install a flat mounting, remove the clamp and take out the 6 core through it into the flat mounting bracket, then assemble it, see depiction below.
- Page 8 WIRING / CABLEADO INSTALLATION & CONNECTION OPTIONS OPCIONES DE CONEXIÓN E INSTALACIÓN If you have an LED Control Module (LED-BTC), Si tiene un módulo de control LED (LED-BTC), Connect as Shown in the Following Diagram: conéctelo como se muestra en el siguiente diagrama: BATTERY Blue LED (-) / LED Azul (-) BATERÍA...
-
Page 9: Specifications / Especificaciones
SPECIFICATIONS / ESPECIFICACIONES BODY FEATURES / CARACTERISTICAS DEL CUERPO Nominal Diameter / Diametro Nominal ................... 8" / 203mm Marine Grade / Grado Marino ........................ IP65 UV Compliant / Cumple con los Rayos UV ........Yes, 100% Stable / Si, 100% Estable RGB LED / LED RGB..Integrated RGB-LED Speaker Lighting, Integrated RGB-LED Acrylic Ring Lighting Iluminación de altavoz LED-RGB integrada, iluminación de anillo de acrílico LED-RGB integrada Wiring/Connections / Cableado/Conexiones ...... - Page 10 MEASUREMENT / MEDIDAS 2.40”/60.9mm 8.59” / 218.1mm...
-
Page 11: Warranty
MEASUREMENT / MEDIDAS 4.29” / 109.1mm 13.5” / 342.9mm WARRANTY GARANTÍA Please visit our website DS18.com for more Visita nuestra pagina web DS18.com para information on our warranty policy. obtener mas informacion sobre nuestra garantia We LIKE IT LOUD... - Page 12 FOR MORE INFORMATION PLEASE VISIT DS18.COM We LIKE IT LOUD...
Need help?
Do you have a question about the HYDRO NXL-X8TP.NS and is the answer not in the manual?
Questions and answers