Table of Contents
Advertisement
Advertisement
Table of Contents

Related Manuals for dji O3 Air Unit


Summary of Contents for dji O3 Air Unit
- Page 1 User Manual v1.0 2022.11...
- Page 2 Searching for Keywords Search for keywords such as “battery” and “install” to find a topic. If you are using Adobe Acrobat Reader to read this document, press Ctrl+F on Windows or Command+F on Mac to begin a search. Navigating to a Topic View a complete list of topics in the table of contents.
-
Page 3: Table Of Contents
Goggles Home Screen and Menu Home Screen Menu Canvas Mode Maintenance Parts Replacement After-Sales Information Supported DJI Goggles and Remote Controller DJI Goggles 2 DJI FPV Goggles V2 DJI FPV Remote Controller 2 Appendix Specifications © 2022 DJI All Rights Reserved. -
Page 4: Using This Manual
Watch all the tutorial videos on the DJI™ official website and read the in-box product documents first, then read this user manual carefully to ensure correct and safe usage of this product. Contact DJI or a DJI authorized dealer if you have any questions or issues during installation and use of this product. -
Page 5: Warning
DO NOT use the same frequency band as other devices. Otherwise, the transmission performance will be affected. Make sure you fully understand and abide by local laws and regulations before using this product. This product is not intended for children. © 2022 DJI All Rights Reserved. -
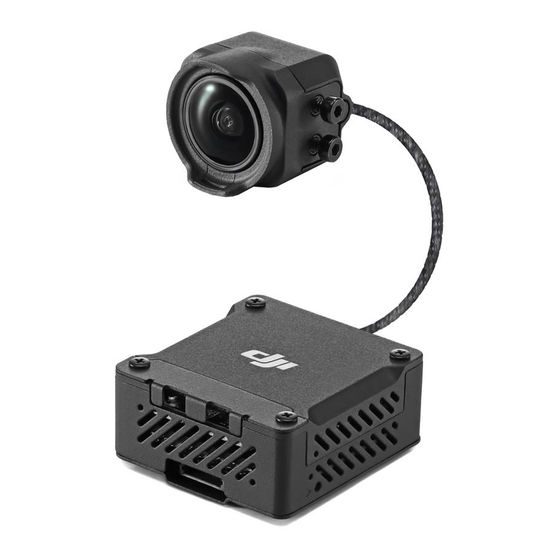
Page 6: Dji O3 Air Unit
DJI O3 Air Unit is an advanced video transmission device featuring DJI long-range low-latency HD transmission O3+ technology. The air unit can be mounted on a racing drone and used with DJI goggles and a remote controller to transmit video, control signals, and flight controller information wirelessly. - Page 7 WHITE: UART RX (Connects to Flight Controller OSD TX, 0-3.3 V) PIN 4 GRAY: UART TX (Connects to Flight Controller OSD RX, 0-3.3 V) PIN 5 BROWN: Signal GND PIN 6 YELLOW: DJI HDL (Connects to Flight Controller S.Bus, 0-3.3 V) © 2022 DJI All Rights Reserved.
- Page 8 [1] DJI O3 Air Unit has two sets of temperature control strategies for the standby state and the flight state: In the standby state, the protection system will be activated to automatically shut down the air unit after overheating.
- Page 9 Usually, aircraft frames with TPU or vibration absorbing rubber are not prone to the IMU resonance issue. [2] Video stabilization application: refers to either the DJI O3 Air Unit EIS function or a third-party video stabilization software. Rolling Shutter Effect...
-
Page 10: Activation
DJI O3 Air Unit User Manual Activation Connect the air unit to a computer using the USB-C port, and run DJI Assistant 2 (Consumer Drones Series) for activation. Make sure to activate the device before using for the first time. Otherwise, some functions will be unavailable: If the air unit is not activated, its transmission power will be limited (≤25 mW), and the menu... -
Page 11: Operating Channel
Some channels may not be available in some countries due to local legal restrictions. Power on and connect the air unit to a computer and run DJI Assistant 2. The air unit will update to the radio mode of the current region automatically. When the goggles or remote controller are connected to the air unit,the region of their radio modes will also update automatically. -
Page 12: Video Recording
DJI O3 Air Unit User Manual Video Recording Make sure the air unit, the goggles, and the remote controller are connected with the racing drone and both the air unit and goggles have microSD cards inserted. If you have enabled Auto Record on Takeoff in the goggles menu, the air unit and the goggles will start video recording automatically after takeoff, and will stop recording when the motors stop. -
Page 13: Goggles Home Screen And Menu
Displays the remote controller signal strength between the aircraft and remote controller and the video downlink signal strength between the aircraft and the goggles. 3. Goggles Battery Level 4. Camera Displays the shooting mode and the recording time remaining. © 2022 DJI All Rights Reserved. -
Page 14: Menu
More 1. Status Displays the information of prompts or alerts. Use the switch function to change the aircraft used (only available on DJI Goggles 2). 2. Album Manage or view the photos or videos stored on the microSD card. 3. Transmission The transmission menu includes the following settings: Enable or disable the broadcast mode. -
Page 15: Canvas Mode
2) Specify the MSP serial port number. The number here should be the MSP UART TX serial port number minus 1. In this example, it should be 3. set displayport_msp_serial = 3 3) Save and exit: save Canvas Mode initial setup is complete. © 2022 DJI All Rights Reserved. -
Page 16: Maintenance
After replacing the camera, use an external power supply to power on the air unit. Connect the air unit to a computer and launch DJI Assistant 2 to update the camera calibration file. 1. Loosen the two screws that secure the 2. -
Page 17: After-Sales Information
After-Sales Information Visit https://www.dji.com/support to learn more about after-sales service policies, repair services, and support. © 2022 DJI All Rights Reserved. -
Page 18: Supported Dji Goggles And Remote Controller
Supported DJI Goggles and Remote Controller DJI O3 Air Unit supports the following DJI goggles and remote controller: Goggles: DJI Goggles 2 DJI FPV Goggles V2 DJI FPV Remote Controller 2 DJI Goggles 2 Diagram 1. Antennas 7. microSD Card Slot 2. - Page 19 DJI O3 Air Unit User Manual Installation and Wearing 1. Unfold the antennas. Fold the antennas to avoid damage when the goggles are not in use 2. Remove the screen protector. Re-attach the screen protector after use to protect the lens and prevent damage caused by direct sunlight.
- Page 20 DJI O3 Air Unit User Manual 5. Rotate both the knobs in the direction as shown to unlock them. Once unlocked, the knobs will pop out. 56 - 72 mm 6. Toggle the knobs left and right to adjust the distance between the lenses until the images are properly aligned.
- Page 21 Use the power cable provided to connect the power port of the goggles to the goggles battery. Only use the DJI goggles battery provided. DO NOT use non-DJI batteries. DO NOT use the goggles battery to power other mobile devices.
- Page 22 DJI O3 Air Unit User Manual Using the Touch Panel 15min 15min 10min 10min The touch panel enables you to operate with only one hand: 15min 15min Swipe up from the bottom: enter Camera Settings 10min 10min 20.5km/h 1.8km/h 20.5km/h 1.8km/h...
- Page 23 20.5km/h 1.8km/h 500m 1024.4m 500m 1024.4m 12'59'' 12'59'' 500m 1024.4m 500m 1024.4m 12'59'' 12'59'' DJI O3 Air Unit User Manual Status 15min 15min Album 10min 10min Transmission Setting More Swipe up/down/right/left: navigate the menu Single tap: confirm/select 15min 15min 15min...
-
Page 24: Dji Fpv Goggles V2
DJI O3 Air Unit User Manual DJI FPV Goggles V2 Diagram 1. Antennas 2. Front Cover 3. Channel Adjustment Buttons 4. Channel Display 5. USB-C Port 6. microSD Card Slot 7. Air Intake 8. Interpupillary Distance (IPD) Slider 9. Headband Attachment 10. - Page 25 DJI O3 Air Unit User Manual 2. Attach the strap to the headband attachment on the top and sides of the goggles. 3. Align the lenses over your eyes and pull the headband down. Adjust the headband size until the goggles fit securely and comfortably on your face and head.
- Page 26 DJI O3 Air Unit User Manual Power Supply Use the included goggles power cable (USB-C) to connect the power port of the goggles to the goggles battery. Press the power button once to check the current battery level. Press once then press again and hold to power the goggles on or off.
- Page 27 DJI O3 Air Unit User Manual Operation 5D Button Toggle the button to scroll through the menu. Press the button to confirm. On the home screen, press the button to enter the menu. Toggle left or right to adjust the screen brightness.
-
Page 28: Dji Fpv Remote Controller 2
DJI O3 Air Unit User Manual DJI FPV Remote Controller 2 Diagram 1. Control Sticks 2. Power Button 3. USB-C Port 4. Control Sticks Storage Slot 5. Battery Level LEDs 6. Lanyard Attachment 7. Antennas 8. Shutter/Record Button The functions of the dial and other buttons on the remote controller need to be customized by the user. - Page 29 DJI O3 Air Unit User Manual Charging the Battery Connect the USB-C port of the remote controller to an AC power adapter to charge the remote controller. 5 V, 2 A Optimal Transmission Zone The signal between the aircraft and the remote controller is most reliable when the antennas are positioned in relation to the aircraft as shown below.
- Page 30 DJI O3 Air Unit User Manual 2. Use an H1.5 hex key to adjust the resistance of the stick and recenter the stick vertically. The control resistance increases when the F1 screw is tightened, and the control resistance decreases when the F1 screw is loosened.
-
Page 31: Appendix
Appendix Specifications Visit the DJI official website for the latest specifications: https://www.dji.com/o3-air-unit/specs M1.6 × L6 mm 40.00 mm 85.00 mm 100.00 mm 14.50 mm 25.50 mm 115.00 mm 30.50 mm M2 × L4 mm 21.20 mm 10.04 mm Air Unit... - Page 32 DJI O3 Air Unit User Manual Supports auto mode and manual mode Manual mode: 40 MHz: 1 channel: 5794.5 MHz 20 MHz: 3 channels: Channel 1: 5768.5 MHz Channels Info Channel 2: 5804.5 MHz Channel 3: 5839.5 MHz 10 MHz: 3 channels Channel 1: 5768.5 MHz...
- Page 33 RTH. Please pay attention to the RTH prompts during actual flight. DJI is a trademark of SZ DJI TECHNOLOGY CO., LTD. (abbreviated as “DJI”) and its affiliated companies. Names of products, brands, etc., appearing in this document are trademarks or registered trademarks of their respective owner companies.
Need help?
Do you have a question about the O3 Air Unit and is the answer not in the manual?
Questions and answers