Advertisement
Tabletop Gas Pizza Oven
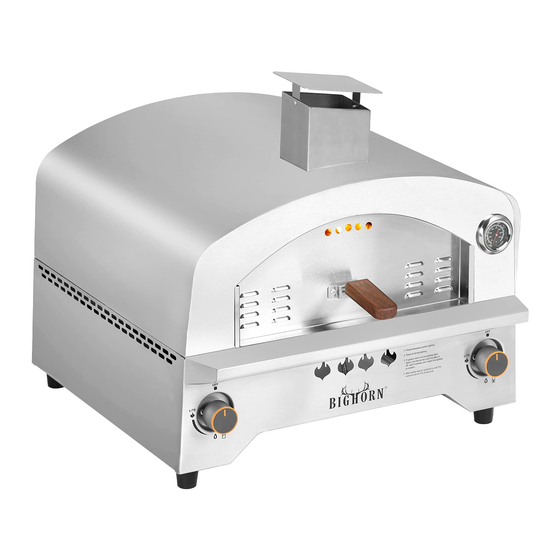
Model# J-626
#
R
Keep this manual for future reference
Warning:
READ INSTRUCTION MANUAL BEFORE ATTEMPTING TO ASSEMBLE OR
OPERATE THIS PRODUCT.
Adult assembly required.
Keep screws and parts out of reach of children.
Questions, problems, missing parts?
Please call our customer
service
department at 1-888-909-3888, 7:30AM - 4:30PM PST, Mon. - Fri.
or e-mail to
@shinerich
Advertisement

Subscribe to Our Youtube Channel
Related Manuals for BIGHORN J-626


Summary of Contents for BIGHORN J-626
- Page 1 Tabletop Gas Pizza Oven Model# J-626 Keep this manual for future reference Warning: READ INSTRUCTION MANUAL BEFORE ATTEMPTING TO ASSEMBLE OR OPERATE THIS PRODUCT. Adult assembly required. Keep screws and parts out of reach of children. Questions, problems, missing parts?
-
Page 2: Warnings
WARNINGS FOR YOUR SAFETY FOR OUTDOOR USE ONLY! Never use this appliance in a building, garage or any other enclosed area. This appliance is not intended to be installed in or on a boat or recreational vehicle. The appliance is not intended for commercial use. This appliance is for use with liquid propane (LP) gas only. - Page 3 Use only max 20 lb LP gas supply cylinder. 20 lb LP gas supply cylinder: 18-1/4” (45.6 cm ) high, 12-1/4” ( 32 cm ) diameter. LP gas supply cylinder must be placed in upright position for vapor withdrawal. not store a spare LP gas cylinder under or near this appliance.
-
Page 4: Table Of Contents
TABLE OF CONTENTS Warnings ..................2-3 Table of Contents................4 Exploded View...................5 Parts List & Hardware................6 Assembly Instructions ................7-9 Installation Instructions...............10 Lighting Instructions................11 Maintenance Instructions..............12 Trouble Shooting.................12 ............ -
Page 5: Exploded View
EXPLODED VIEW... -
Page 6: Parts List & Hardware
PARTS LIST Description Quantity Picture Chimney Lid Chimney Oven Body Assembly Foot Pad Regulator & Hose Assembly Door Door Handle Pizza Stone Control Knob Pizza Peel HARDWARE Please check the contents of the packaging to ensure all parts are included. Parts Description Quantity... -
Page 7: Assembly Instructions
ASSEMBLY INSTRUCTIONS The installation must conform with local codes or, in the absence of local codes, with the National Fuel Gas Code, ANSI Z223.1/NFPA 54. Storage and Handling of Liquefied Petroleum Gases, ANSI/NFPA 58; or Natural Gas and Propane Installation Code, CSA B149.1; Propane Storage and Handling, CSA B149.2. - Page 8 Step 2 Install flue gas vent assembly (2) to the firebox – outside shell (3) with (2) M5 x 12 bolts (AA) as illustrated. Hardware Used M5 x 12 bolt 2 pcs Step 3 Remove the igniter cap by turning it counter-clockwise. Insert one AA battery (not included) into the igniter body with Positive (+) end facing out.
- Page 9 Step 4 Tighten regulator & hose assembly (29) to main body assembly with two wrenches (not included) as illustrated. (two wreches are not included) Step 5 Place the pizza stone (6) to oven cavity as illustrated. Step 6 Place the appliance at a tabletop with a height: Min.
-
Page 10: Installation Instructions
INSTALLATION INSTRUCTIONS CONNECTING LP GAS CYLINDER 1. Turn the burner control knob to “OFF” position. 2. Remove the protective cap from LP gas cylinder valve. 3. Make sure the cylinder valve will properly and safely mate with the pressure regulator. 4. -
Page 11: Lighting Instructions
LIGHTING INSTRUCTION 1. Read Instruction before lighting. 2. Make sure control knob is in OFF position. 3. Open the door (6) during lighting. 4. Open LP gas cylinder valve by turning counterclockwise. 5. Push and turn on control knob counterclockwise to LITE position. 6. -
Page 12: Maintenance Instructions
MAINTENANCE INSTRUCTION Keep appliance area clear and free of any combustible materials, gasoline and other flammable vapors and liquids. Not obstructing the flow of combustion and ventilation air. Checking and cleaning burner/venturi tubes for insects and insect nests. A clogged tube can lead to a fire beneath the appliance. - Page 13 Need help? call our toll free number at:...
Need help?
Do you have a question about the J-626 and is the answer not in the manual?
Questions and answers
How do I replace the ignition switch on your J6 26 Pizza oven?
To replace the ignition switch on a BIGHORN J-626 pizza oven, follow these steps:
1. Remove the igniter cap by turning it counterclockwise.
2. Insert one AA battery (not included) into the igniter body with the positive (+) end facing out.
3. Replace the igniter cap by turning it clockwise.
If the igniter is faulty, you may need to change the electrode, wire igniter, or the entire igniter assembly.
This answer is automatically generated