
Related Manuals for golmar S5110ART 7W


Summary of Contents for golmar S5110ART 7W
- Page 1 All manuals and user guides at all-guides.com Soul kit Instructions manual G2+ 2 wire installation Art 7W monitor with Wi-Fi connectivity TS5110 ART 7W ES REV.0119 Cód. 50122126...
-
Page 2: Table Of Contents
All manuals and user guides at all-guides.com SOUL S5110/ART 7W VIDEO INTERCOM KIT INDEX Index..................................2 Recommendations..............................3 System operation ...............................3 FA-G2+ power supply ..............................4 Description ..............................4 Installation ...............................4 Soul door panel ..............................5 to 8 Description ..............................5 Installation ...............................6 Wiring connectors ............................6 Configuration switches.............................7 Audio level adjustment .............................7 Proximity reader programming.........................8... -
Page 3: Recommendations
SOUL S5110/ART 7W VIDEO INTERCOM KIT RECOMMENDATIONS - Use, preferably, Golmar RAP-GTWIN / HF cable (2x1mm²). - Installation wires must be at least 40cm away of any other installation. - When modifications are made to the installation, do so without power. -
Page 4: Fa-G2+ Power Supply
All manuals and user guides at all-guides.com SOUL S5110/ART 7W VIDEO INTERCOM KIT FA-G2+ POWER SUPPLY Description A. Operating light indicator. B. Mains protection cover. C. Mains input terminals without protection cover. BUS(M) BUS(PL) D. DIN rail fixing clip. E. Wiring connectors. Installation The installation and manipulation of the power supply must be carried out by authorized personnel and in the absence of electric current. -
Page 5: Soul Door Panel
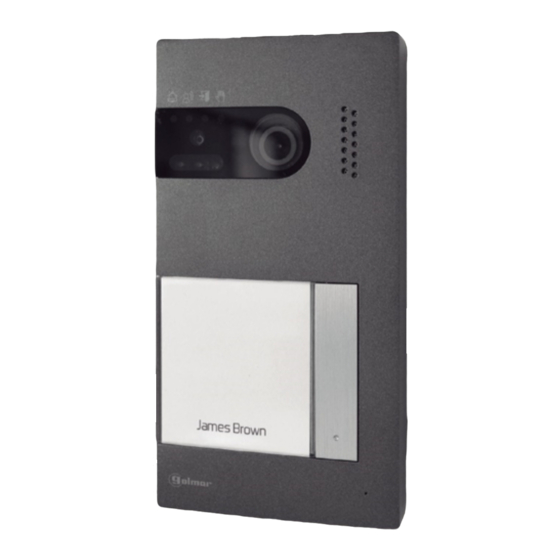
All manuals and user guides at all-guides.com SOUL S5110/ART 7W VIDEO INTERCOM KIT SOUL DOOR PANEL Description A. System status icons: Call is in progress. In communication. Lock release activated. System is busy. B. System status light indicators. C. Light sensor. D. -
Page 6: Installation
All manuals and user guides at all-guides.com SOUL S5110/ART 7W VIDEO INTERCOM KIT SOUL DOOR PANEL Installation The door panel has been designed to withstand various environmental conditions. However, we recommend taking additional precautions to extend its life, such as to place it in a protected place. To obtain optimum image quality, avoid backlighting caused by light sources (sun, lampposts, ...). -
Page 7: Configuration Switches
All manuals and user guides at all-guides.com SOUL S5110/ART 7W VIDEO INTERCOM KIT SOUL DOOR PANEL Configuration switches (R) Configuration changes must be made with the equipment switched off. If they are carried out with the equipment on, disconnect it for 10 seconds after any modification. All switches are factory-set to the OFF position. -
Page 8: Proximity Reader Programming
All manuals and user guides at all-guides.com SOUL S5110/ART 7W VIDEO INTERCOM KIT SOUL DOOR PANEL Proximity reader programming (L) Make sure the equipment is powered and the reader connected to the door panel (Q). To be able to add user keys (up to 60) in the memory of the proximity reader, it is necessary to create a programming key and a user registration key. -
Page 9: Art 7W/G2+ Monitor
All manuals and user guides at all-guides.com SOUL S5110/ART 7W VIDEO INTERCOM KIT ART 7W/G2+ MONITOR Description UID: mnvx8d8uskpv A. Speaker. D. Orientation dots for blind people. B. Notification icons: E. Touch screen. Power on indication. F. Hidden push button to activate the lock. Do not disturb. -
Page 10: Installation
All manuals and user guides at all-guides.com SOUL S5110/ART 7W VIDEO INTERCOM KIT ART 7W/G2+ MONITOR Installation Avoid locations near heat sources, dusty or with a lot of smoke. For a correct installation, use the supplied template (page 38). 1. Locate the top of the template at a height of 1.65m. 2. -
Page 11: Main Menu
All manuals and user guides at all-guides.com SOUL S5110/ART 7W VIDEO INTERCOM KIT ART 7W/G2+ MONITOR Main menu 31-01-2019 09:27 Door panel Intercom Recordings Settings If the monitor is on standby mode (screen off), touch anywhere on the screen to activate it and the main menu will appear. -
Page 12: Settings Menu
All manuals and user guides at all-guides.com SOUL S5110/ART 7W VIDEO INTERCOM KIT ART 7W/G2+ MONITOR Settings menu Settings Language Time & Date Ringtone Background Do not disturb Storage WiFi About icon to return to the main menu. It allows you to choose one of the 16 available languages for the user interface. Once chosen, confirm your selection with the icon, returning the monitor to the settings menu. - Page 13 All manuals and user guides at all-guides.com SOUL S5110/ART 7W VIDEO INTERCOM KIT ART 7W/G2+ MONITOR Settings menu It allows to adjust the date and time of the system, as well as the presentation format. Change the values by sliding up or down, and use the arrows to change the formats. Validate the changes made with the icon, returning the monitor to the settings menu.
- Page 14 All manuals and user guides at all-guides.com SOUL S5110/ART 7W VIDEO INTERCOM KIT ART 7W/G2+ MONITOR Settings menu In the "Do Not Disturb" settings you can set a time period in which the monitor will not ring when receiving calls. To do this, activate the timer function and choose the time period. From the main menu you can activate and deactivate the "Do not disturb"...
- Page 15 Call forwarding delay 05 s vPKs0d9tvru SSID Golmar WiFi The "About" screen provides information about the equipment, such as the monitor version and its address. Click on the icons to display the QR code that will take you to the updated downloads of this instruction manual and the G2Call application for your mobile phone.
-
Page 16: Communication Screen
All manuals and user guides at all-guides.com SOUL S5110/ART 7W VIDEO INTERCOM KIT ART 7W/G2+ MONITOR Communication screen 02-02-2222 11:17:10 Door panel 1 This screen is displayed when you receive a call or when you press icon from the main menu. The date and time are shown in the top center of the screen, and the source of the image (door panel 1, door panel 2, camera 1 or camera 2) is shown on the right. -
Page 17: Picture And Communication Adjustments
All manuals and user guides at all-guides.com SOUL S5110/ART 7W VIDEO INTERCOM KIT ART 7W/G2+ MONITOR Picture and communication adjustments 02-02-2222 11:17:10 Door panel 1 02-02-2222 11:17:10 Door panel 1 During the visualization or communication process, it is possible to adjust the parameters of the image (brightness, contrast and color), the volume of the ringing tone (during visualization) and the audio level of the speaker (during communication). -
Page 18: Intercom Menu
All manuals and user guides at all-guides.com SOUL S5110/ART 7W VIDEO INTERCOM KIT ART 7W/G2+ MONITOR Intercom menu From this menu you can communicate with other monitors of your apartment (internal intercom) or your building (external intercom). To do this, your monitor and the called one must have activated the intercom function from the "Do not disturb"... - Page 19 All manuals and user guides at all-guides.com SOUL S5110/ART 7W VIDEO INTERCOM KIT ART 7W/G2+ MONITOR Intercom menu Intercom External intercom. Enter the code of the apartment with which you wish to communicate using the keypad. To make the call, press on the icon, the message "Calling ..."...
-
Page 20: Recordings Menu
All manuals and user guides at all-guides.com SOUL S5110/ART 7W VIDEO INTERCOM KIT ART 7W/G2+ MONITOR Recordings menu Displays the list of pictures saved on the monitor or on the SD card, if installed. The icon allows us to access the video recordings stored on the SD card, and can return to the list of images using the icon. - Page 21 All manuals and user guides at all-guides.com SOUL S5110/ART 7W VIDEO INTERCOM KIT ART 7W/G2+ MONITOR Recordings menu To view a recording, click on it in the list. The recording will be displayed in full screen. Use the scroll arrows to show the next ( ) or previous ( ) recording.
-
Page 22: G2Callapp
All manuals and user guides at all-guides.com SOUL S5110/ART 7W VIDEO INTERCOM KIT G2Call APP Initial registration of a monitor to a Wi-Fi network To register the monitor in the Wi-Fi network of your home, it will be necessary to download and install the G2Call ®... - Page 23 All manuals and user guides at all-guides.com SOUL S5110/ART 7W VIDEO INTERCOM KIT G2Call APP Initial registration of a monitor to a Wi-Fi network Enter the password for accessing the network. If you are registering on a device with an iOS operating system, manually enter the SSID identifier of the network.
-
Page 24: Registration Of An Already Network Connected Monitor
All manuals and user guides at all-guides.com SOUL S5110/ART 7W VIDEO INTERCOM KIT G2Call APP Registration of an already connected monitor Make sure your phone has connectivity, either Wi-Fi or through your telephone network provider. Click on the "Add monitor" option or on the icon to add a new monitor. -
Page 25: Advanced Settings Of A Registered Monitor
All manuals and user guides at all-guides.com SOUL S5110/ART 7W VIDEO INTERCOM KIT G2Call APP Advanced settings of a registered monitor To access the advanced settings of a monitor registered in the application, click on the preview screen of that monitor and then on the icon on the top right of the screen. - Page 26 All manuals and user guides at all-guides.com SOUL S5110/ART 7W VIDEO INTERCOM KIT G2Call APP Advanced settings of a registered monitor Wi-Fi. It allows you to change the Wi-Fi network to which the monitor is connected by another one available in your environment.
-
Page 27: Main Screen
By clicking on the icon you can view the version of this application as well as Golmar's privacy policy. In the case of Android devices, exit the application using the icon or force its closure: it will continue to receive calls and the application will not consume battery. -
Page 28: Communication Screen
All manuals and user guides at all-guides.com SOUL S5110/ART 7W VIDEO INTERCOM KIT G2Call APP Communication screen If you have activated the call transfer on the monitor and the notifications are activated in the application, you will receive the calls made on the entrance panel. A pop-up screen will show you the origin of the call. You can accept the call through the icon, or reject it by pressing . - Page 29 All manuals and user guides at all-guides.com SOUL S5110/ART 7W VIDEO INTERCOM KIT G2Call APP Communication screen Villa 2018-06-13 17:45:39 Door panel 1 Activates the door opener or device connected to the CV output of the displayed door panel or camera.
-
Page 30: Installation Diagrams
All manuals and user guides at all-guides.com SOUL S5110/ART 7W VIDEO INTERCOM KIT INSTALLATION DIAGRAMS Wiring sections and distances - The maximum number of monitors per apartment is 4. - The maximum number of monitors connected in daisy chain configuration is 12. Cable type 2 x 0,75mm²... -
Page 31: One Apartment With Two Access Doors And Up To Four Monitors Daisy Chain Connected
All manuals and user guides at all-guides.com SOUL S5110/ART 7W VIDEO INTERCOM KIT INSTALLATION DIAGRAMS One apartment with two access doors and up to four monitors daisy chain connected Mains 100~240Vac DOOR PANEL 2 DOOR PANEL 1 APARTMENT 1 APARTMENT 1 APARTMENT 1 MASTER MONITOR SLAVE 1 MONITOR... -
Page 32: Four Apartments With Two Access Doors And Up To Four Monitors Daisy Chain Connected
All manuals and user guides at all-guides.com SOUL S5110/ART 7W VIDEO INTERCOM KIT INSTALLATION DIAGRAMS Four apartments with two access doors and up to four monitors daisy chain connected Mains 100~240Vac APARTMENT 2 APARTMENT 2 APARTMENT 2 APARTMENT 2 MASTER MONITOR SLAVE 1 MONITOR SLAVE 2 MONITOR SLAVE 3 MONITOR... -
Page 33: Lock Release Connection
The drawing shows the connection of a 12Vd.c. lock release, with a maximum consumption of 270mA. The use of the Golmar CV-14 / DC, CV-24 / DC, CV-14P / UNI or CV-24P / UNI models is recommended. Activation is done through the icon. -
Page 34: Exit Button Connection
All manuals and user guides at all-guides.com SOUL S5110/ART 7W VIDEO INTERCOM KIT INSTALLATION DIAGRAMS Exit button connection The exit button allows the remote activation of the lock release connected between the CV- and CV + terminals (by default) or the relay output (see page 36). The delay time for activation is 3 seconds, it being possible to adjust it between 0.5 and 10 seconds (see page 36). -
Page 35: Special Codes
All manuals and user guides at all-guides.com SOUL S5110/ART 7W VIDEO INTERCOM KIT SPECIAL CODES The activation of some functions, as well as to modify some factory parameters, can be carried out by entering special codes. To do this you must access the installer menu from the monitor. Go to the "About" screen in the settings menu (page 15) and press five consecutive times on the icon at the top right of the screen, appearing a keyboard for entering the codes. - Page 36 All manuals and user guides at all-guides.com SOUL S5110/ART 7W VIDEO INTERCOM KIT SPECIAL CODES Outputs activation time. Factory value Lock release From *200 (0,5s) up to *219 (10s) *203 (3s) Relay From *300 (0,5s) up to *319 (10s) *303 (3s) Remote activation input configuration.
-
Page 37: Soul Door Panel Installation Template
All manuals and user guides at all-guides.com SOUL S5110/ART 7W VIDEO INTERCOM KIT SOUL DOOR PANEL INSTALLATION TEMPLATE... -
Page 38: Art 7 Monitor Installation Template
All manuals and user guides at all-guides.com SOUL S5110/ART 7W VIDEO INTERCOM KIT ART 7 MONITOR INSTALLATION TEMPLATE... -
Page 39: Notes
All manuals and user guides at all-guides.com SOUL S5110/ART 7W VIDEO INTERCOM KIT NOTES... - Page 40 C/ Silici, 13 08940- Cornellá de Llobregat SPAIN Golmar se reserva el derecho a cualquier modificación sin previo aviso. Golmar se réserve le droit de toute modification sans préavis. Golmar reserves the right to make any modifications without prior notice.
Need help?
Do you have a question about the S5110ART 7W and is the answer not in the manual?
Questions and answers