Advertisement
Quick Links
Advertisement

Related Manuals for Kogan KAS8C4W1TBB


Summary of Contents for Kogan KAS8C4W1TBB
- Page 1 8 CHANNEL 1080P 1TB SECURITY SYSTEM (WITH 4 WIRELESS CAMERAS) KAS8C4W1TBB...
- Page 3 OVERVIEW ① ① ④ ③ ⑥ ② ⑤ Wi-Fi Antenna Port WAN Port (video in) VGA Port HDMI Port USB Port Power Input (DC 12V 2A)
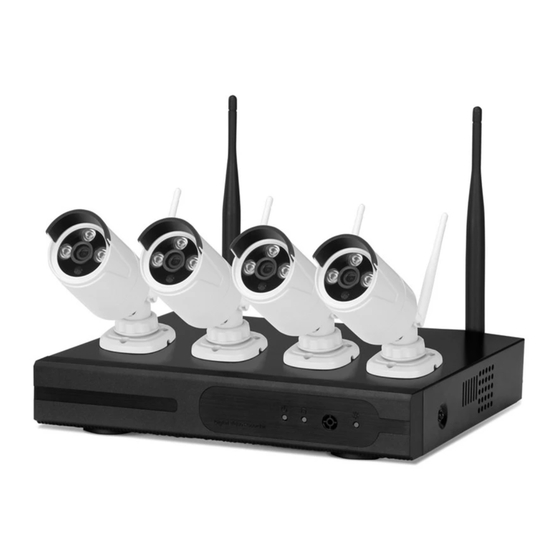
- Page 4 Camera ① ② ③ ④ ⑤ Antenna Camera Mount Lens & Sensors Ethernet Port (RJ-45) Power Input (DC 12V 2A)
-
Page 5: Installation
INSTALLATION System Overview Power adapter Display device Camera VGA Output Power adapter USB Interface Router Video in Mouse Notes: • Camera connection to NVR is wireless: the NVR connection to the router is wired. • It is recommended to place the NVR in the centre of the monitoring area and to avoid obstacles between the cameras and NVR as much as possible. - Page 6 Adding Camera The supplied cameras are matched at the factory. Re-adding or adding an additional camera can be done in the Video Management settings on the NVR using either “auto add” (cameras will be detected automatically) or “match code”. Cameras’ antennas should be positioned parallel to the Wi-Fi signal transmission and not angled directly at the router.
- Page 7 System Setup The system is a standalone unit with an embedded Linux operating system in the NVR. To configure the operating system, connect a keyboard, mouse and monitor with HDMI or VGA input. Install antennas for cameras and NVR. Connect a monitor via HDMI or VGA. Connect the NVR to power (use the larger 12V 2A power adaptor).
-
Page 8: Operation
OPERATION Mouse Function Button Action Effect Function Option button, drop down menu, list, Single click Select check box, radio button Switch between single and multi- interface in preview Double click Window zoom Left Add device Set motion detection area Drag Set the area Select electronic amplification area Change contents of the drop-down... - Page 9 FUNCTIONS Right click to access the following options: • Split screen: single/multiple camera live feed • Video management: manage IP & NVR channels • System setup: change system settings • Video playback: play back recordings • Video backup: back up recordings •...
- Page 10 Recording Video • Timed Recording: Right click System Setup > Record Setup > Record Plan. You can set a schedule to record. The default mode is 24/7. • Manual Recording: Right click Manual Record. Individual channels can be enabled/disabled. • Motion Recording: Right click System Setup >...
- Page 11 Local Viewing With the PC and the NVR connected to the same Local Area Network (LAN), Find the IP address and port number of the NVR (through System Setup > Network Setup). Enter the IP address in the browser (e.g., http://192.1.17). If the default port number has changed from 80, enter the port number as well in the format (e.g., if the port number was changed to 100 e.g., http://192.1.1.100) Remote Viewing...
- Page 12 Device ID is shown at the right bottom corner of the monitor. The status should show as “online”. The default username is admin and the default password is empty. Mobile Access Download the IP PRO app from the App Store, Play Store or by scanning the QR code below.
- Page 13 EXTENDING WIFI RANGE A wireless network is inherently susceptible to range limitations and interference from obstacles, etc. To improve the reliability and stability of a Wi-Fi connection, refer to the following setup tips and configuration options. Antenna Extension Antenna Extension Cord IP Camera Window Wall...
- Page 14 As below, IPC1 is connected to the NVR through IPC2 and IPC3. IPC2 is connected to NVR through IPC3. IPC3 is connected to NVR directly. Click Apply > Refresh to confirm the setup is successful.
- Page 15 NOTES...
- Page 16 Need more information? We hope that this user guide has given you the assistance needed for a simple set-up. For the most up-to-date guide for your product, as well as any additional assistance you may require, head online to help.kogan.com...
Need help?
Do you have a question about the KAS8C4W1TBB and is the answer not in the manual?
Questions and answers