
Related Manuals for Phoenix Contact FL NAT SMN 8TX


Summary of Contents for Phoenix Contact FL NAT SMN 8TX
- Page 1 User manual UM EN FL NAT SMN 8TX User manual for the NAT router with integrated switch...
- Page 2 User manual User manual for the NAT router with integrated switch 2016-02-05 Designation: UM EN FL NAT SMN 8TX Revision: Order No.: — This user manual is valid for: Designation Version Order No. FL NAT SMN 8TX 2989365 FL NAT SMN 8TX-M...
- Page 3 How to contact us Internet Up-to-date information on Phoenix Contact products and our Terms and Conditions can be found on the Internet at: www.phoenixcontact.com Make sure you always use the latest documentation. ...
- Page 4 The receipt of technical documentation (in particular user documentation) does not consti- tute any further duty on the part of Phoenix Contact to furnish information on modifications to products and/or technical documentation. You are responsible to verify the suitability and intended use of the products in your specific application, in particular with regard to observ- ing the applicable standards and regulations.
-
Page 5: Table Of Contents
Dimensions of the FL NAT SMN 8TX(-M) ...........1-3 Status and diagnostic indicators................. 1-3 Mounting and installation ......................2-1 Mounting and removing the FL NAT SMN 8TX(-M) ..........2-1 Installing the FL NAT SMN 8TX(-M) ..............2-3 2.2.1 Connecting the 24 V DC supply voltage ..........2-3 2.2.2... - Page 6 FL NAT SMN 8TX Simple Network Management Protocol (SNMP)..........4-35 4.3.1 General function ................4-35 4.3.2 Schematic view of SNMP management ..........4-35 Management via local RS-232 communication interface ........4-39 4.4.1 General function ................4-39 4.4.2 User interface functions ..............4-40 (Rapid) Spanning Tree ......................5-1 (R)STP startup....................
-
Page 7: Fl Nat Smn 8Tx(-M)
(IT) functions are available, such as redundancy, port mirroring or LLDP. The FL NAT SMN 8TX(-M) can be configured via a web server and via SNMP (Simple Network Management Protocol). A serial terminal interface is also available for initial startup. - Page 8 Port mirroring Port mirroring can be used to monitor data traffic on the network connections or as an important service function. Features and fields of application of the FL NAT SMN 8TX(-M) – Use of different routing modes - Virtual NAT, ...
-
Page 9: Dimensions Of The Fl Nat Smn 8Tx(-M)
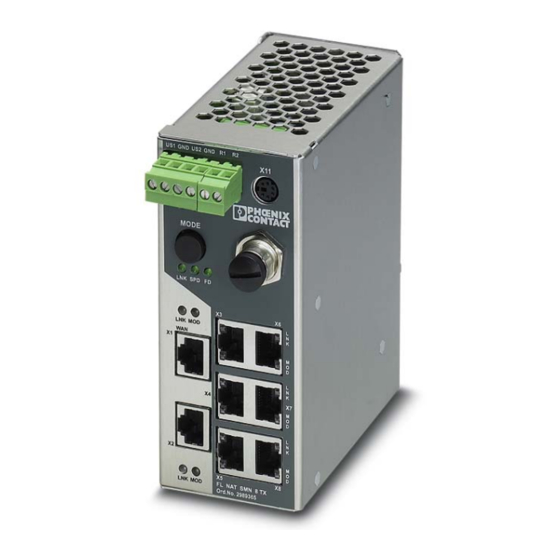
FL NAT SMN 8TX(-M) 1.1.1 Dimensions of the FL NAT SMN 8TX(-M) Figure 1-2 Housing dimensions of the FL NAT SMN 8TX(-M) in millimeters Depth from top edge of DIN rail including MEM PLUG: 175 mm Status and diagnostic indicators Des. - Page 10 An additional LED is located on the front of the FL NAT SMN 8TX(-M) for each port. The function of the second LED (MOD) for each port can be set using the MODE switch (see also example below). There are three options (during the boot process...
-
Page 11: Mounting And Installation
Mounting and installation Mounting and removing the FL NAT SMN 8TX(-M) Mount the FL NAT SMN 8TX(-M) on a clean DIN rail according to DIN EN 50022 (e.g., NS 35... from Phoenix Contact). To avoid contact resistance, only use clean, corrosion-free DIN rails. - Page 12 Pull down the positive latch using a suitable tool (e.g., screwdriver). The positive latch remains snapped out. Then swivel the bottom of the module away from the DIN rail slightly (A). Next, lift the module upwards away from the DIN rail (B). Figure 2-2 Removing the FL NAT SMN 8TX(-M) PHOENIX CONTACT 7966_en_04...
-
Page 13: Installing The Fl Nat Smn 8Tx(-M)
2.2.1 Connecting the 24 V DC supply voltage The FL NAT SMN 8TX(-M) is operated using a 24 V DC voltage, which is applied via COMBICON. If required, the voltage can also be supplied redundantly (see Figure 2-4). If redundant power supply monitoring is active (default setting), an error is indicated if only one voltage is applied. -
Page 14: Alarm Contact
FL NAT SMN 8TX(-M) 2.2.2 Alarm contact The FL NAT SMN 8TX(-M) has a floating alarm contact. When opening the contact, an error is reported. 67842015 Figure 2-5 Basic circuit diagram for the alarm contact The indicated error states are configured in web-based management or via SNMP. For a list of error states that can be configured, please refer to Section ““Diagnostics/Alarm Contact”... -
Page 15: Rs-232 Interface For External Management
When mounting on a DIN rail, the DIN rail must be connected to protective earth ground via grounding terminal blocks. The module is connected to protective earth ground via the metal base element. 7966_en_04 PHOENIX CONTACT... - Page 16 FL NAT SMN 8TX(-M) PHOENIX CONTACT 7966_en_04...
-
Page 17: Startup And Functions
NAT router and a PC (e.g., HyperTerminal under Windows) and thus enables access to the user interface. The IP parameters of the WAN port can now be modified via the RS-232 interface using the password. 7966_en_04 PHOENIX CONTACT... -
Page 18: Assigning Ip Parameters At The Lan Interface
FL NAT SMN 8TX(-M) Assigning IP parameters at the LAN interface 3.1.2 (port 2 to port 8) By default upon delivery, the NAT router starts without an IP configuration at the LAN port. It sends BootP requests cyclically, which are answered by a BootP server with a corresponding BootP reply. - Page 19 Adjust the IP parameters according to your requirements. If inconsistencies are no longer detected, a message appears indicating that a valid IP address has been set. • Click on “Next”. Step 5: “Assign IP Address” The program transmits the parameters set to the device. 7966_en_04 PHOENIX CONTACT...
-
Page 20: Frame Switching At Ports 2 - 8
Devices in the company network (WAN) can access IP addresses of machines (at ports 2 - 8) in the production cell (LAN) without additional configuration. The FL NAT SMN 8TX(-M) operates in store-and-forward mode. When receiving a data packet, the switch analyzes the source and destination addresses. -
Page 21: Multi-Address Function
(if the address could be learned beforehand). The FL NAT SMN 8TX(-M) can learn up to 4000 addresses and store them in its table. The switch monitors the age of the learned addresses. The switch automatically deletes from its address table address entries that have exceeded a specific age (default: 40 seconds, adjustable from 10 to 825 seconds, aging time). -
Page 22: Network Connection
FL NAT SMN 8TX(-M) Processing rules The switch controller in the FL NAT SMN 8TX(-M) forwards received packets to one of the receive queues according to the following decisions: – BPDU packets are always assigned to the high-priority queue. –... -
Page 23: Using Smart Mode
The mode button can be used to reset the NAT router to the settings default upon delivery. Use Smart mode as described in Section 3.5 on page 3-7. The NAT router takes a few seconds to restart automatically. 7966_en_04 PHOENIX CONTACT... - Page 24 FL NAT SMN 8TX(-M) PHOENIX CONTACT 7966_en_04...
-
Page 25: Configuration And Diagnostics
Configuration and diagnostics Configuration and diagnostics The FL NAT SMN 8TX(-M) offers several user interfaces for accessing configuration and diagnostic data. The preferred interfaces are the web interface and SNMP interface. These two interfaces can be used to make all necessary settings and request all information.... -
Page 26: Functions/Information In Wbm
FL NAT SMN 8TX(-M) 4.1.2.1 Password concept After having entered the valid password, no further entry of the password is necessary for a period of 300 s (default). After this period of time has elapsed or after clicking on “Logout”, the password must be re-entered. - Page 27 Contains a brief description of WBM (information) and a navigation tree (site map), which is linked to every page of WBM. The site map can be used to jump directly to the desired page. Figure 4-2 "Sitemap" web page for the FL NAT SMN 8TX(-M) 7966_en_04 PHOENIX CONTACT...
- Page 28 FL NAT SMN 8TX(-M) 4.1.3.3 Device Information “General” menu This page contains a range of static information about the device and the manufacturer, as well as some user-specific settings. Figure 4-3 “Device Information/General” web page PHOENIX CONTACT 7966_en_04...
- Page 29 Configuration and diagnostics “Technical Data” menu This page lists the main technical data. Figure 4-4 “Technical Data” web page 7966_en_04 PHOENIX CONTACT...
- Page 30 FL NAT SMN 8TX(-M) “Hardware Installation” menu Here you will find a diagram that lists all the elements of the device. Figure 4-5 “Hardware Installation” web page PHOENIX CONTACT 7966_en_04...
- Page 31 “Local Diagnostics” menu This page describes the meaning of the switchable diagnostic and status indicators. Figure 4-6 “Local Diagnostics” web page “Serial Port” menu This page lists the transmission parameters for serial communication. Figure 4-7 “Serial Port” web page 7966_en_04 PHOENIX CONTACT...
- Page 32 FL NAT SMN 8TX(-M) 4.1.3.4 General Configuration This page displays the set IP parameters and addressing mechanism. This page displays the parameters of both the WAN port and the LAN port. To change the IP parameters via WBM, “Static” assignment must be selected.
- Page 33 Configuration and diagnostics “System Identification” menu This menu is used to display or modify user-specific device data, e.g., location, device name or function. This device data is also available in SNMP. Figure 4-9 “System Identification” menu 7966_en_04 PHOENIX CONTACT...
- Page 34 FL NAT SMN 8TX(-M) “SNMP Trap Configuration” menu SNMP Agent The “Sending traps” function can be globally enabled/disabled here. Figure 4-10 “SNMP Configuration” web page Trap Destination This part of the table is used to view or modify the IP addresses of the two trap receivers.
- Page 35 If necessary, reset the device to the default state upon delivery. NOTE: A voltage failure during a firmware update results in the destruction of the firmware on the FL NAT SMN 8TX(-M). 4-11 7966_en_04 PHOENIX CONTACT...
- Page 36 FL NAT SMN 8TX(-M) “Change Password” menu By default upon delivery, the password is “private”. Figure 4-12 “Change Password” web page The password must be between four and twelve characters long. Note that the password is always transferred via the network in unencrypted format.
- Page 37 (by entering a valid password). It can also be used to restart the system with the relevant configuration or to reset the FL NAT SMN 8TX(- M) to the default state upon delivery.
- Page 38 FL NAT SMN 8TX(-M) Figure 4-14 “Configuration Management” web page Possible states for “Status of current configuration”: – The configuration has been modified but not saved (also indicated by the flashing floppy disk icon). – Saving the current configuration. –...
- Page 39 If the new configuration was not activated by a reset after a configuration download, the “Save current configuration” command overwrites the previously loaded configuration and instead saves the active configuration of the FL NAT SMN 8TX(-M). Set default upon delivery This option can be used to reset the switch to its default settings (default upon delivery) by entering a valid password.
- Page 40 Figure 4-18 “File Transfer” web page When a configuration is uploaded from the FL NAT SMN 8TX(-M) to a PC (device to host), the last saved version is transmitted. If you want to transmit the active configuration, first save it again (“Save current configuration” function).
- Page 41 Configuration using a configuration file is used when replacing devices. To duplicate devices using a configuration file, observe the following: – Create a point-to-point connection between an FL NAT SMN 8TX(-M) and the management station. – Load the configuration file on the FL NAT SMN 8TX(-M).
- Page 42 FL NAT SMN 8TX(-M) Configuration comparison Here you can compare the configuration on the memory plug with the configuration in the FL NAT SMN 8TX(-M) memory. The result is displayed in text format. Figure 4-20 “Configuration comparison” web page If you replace a memory plug with another memory plug within a few seconds, the configuration comparison must be updated manually.
- Page 43 Router + 1:1 NAT - Block-by-block address translation with adjustable number of devices – Virtual NAT Routing - Address translation on a virtual network Please note that some of the configuration pages in WBM depend on the settings made under “Services”. 4-19 7966_en_04 PHOENIX CONTACT...
- Page 44 FL NAT SMN 8TX(-M) “Ports/Port Table” menu Overview of all available ports. Clicking on the relevant port number opens a port-specific page (“Port Configuration”). Figure 4-23 “Port Table” web page “Ports/Port Cfg Table” menu This menu provides an overview of the important configuration settings for all ports and also offers the option of setting the status, transmission mode, and link monitoring function for all existing ports.
- Page 45 When setting the transmission mode, make sure that the same settings have been made at both ends of the connection. If the settings are not the same, this can result in increased collisions or CRC errors and can adversely affect network performance. 4-21 7966_en_04 PHOENIX CONTACT...
- Page 46 FL NAT SMN 8TX(-M) “Ports/Port Configuration” menu Offers individual configuration options for each port. Figure 4-25 “Port Configuration” web page 4-22 PHOENIX CONTACT 7966_en_04...
- Page 47 “Ports/Port Statistics” menu This menu provides detailed statistical information about the volume of data for each individual port. On this page, counter states can also be set to zero for all ports. Figure 4-26 “Port Statistics” web page 4-23 7966_en_04 PHOENIX CONTACT...
- Page 48 FL NAT SMN 8TX(-M) “Ports/Port Mirroring” menu Activation/deactivation and setting of port mirroring. Port mirroring is used to passively read input or output data that is being transmitted via a selected port. To do this a measuring instrument (PC) is connected to the destination port, which records the data, yet must not itself be activated.
- Page 49 Configuration and diagnostics “Diagnostics/Display” menu The “Display” web page contains status information about the firmware, the alarm contact, and the power supply. Figure 4-28 “Display” web page 4-25 7966_en_04 PHOENIX CONTACT...
- Page 50 FL NAT SMN 8TX(-M) “Diagnostics/Alarm Contact” Menu Here, you can set whether and for which events the alarm contact can be used. Figure 4-29 “Alarm Contact” web page 4-26 PHOENIX CONTACT 7966_en_04...
- Page 51 The configuration has been modified the first time after the last storing. – Configuration File Transfer successfully executed. – Configuration File Transfer was not successfully executed. – Firmware Update was successfully executed. – Firmware Update was not successfully executed. 4-27 7966_en_04 PHOENIX CONTACT...
- Page 52 FL NAT SMN 8TX(-M) – Link up at port xy. – Link down at port xy. – Enabling port xy. – Disabling port xy. – RSTP enabled. – RSTP disabled. – RSTP topology changed. – RSTP elected this switch as new root.
- Page 53 The Rapid/Spanning Tree Protocol (RSTP) is a standardized method (IEEE 802.1w/IEEE 802.1d). For information, please refer to Section 5 “(Rapid) Spanning Tree”. 4.1.3.8 Media Redundancy For information, please refer to Section 6 “Media Redundancy Protocol (MRP)”. 4-29 7966_en_04 PHOENIX CONTACT...
-
Page 54: Routing - Smart Router
FL NAT SMN 8TX(-M) Routing - SMART Router 4.2.1 Static routing 4.2.1.1 "SMART Router/Static Routing" menu Select the desired router mode on the “Services” web page, see also Section ““Services” menu” on page 4-19. Then set the desired router configuration. -
Page 55: 1:1 Nat Routing
(the IP addresses must not be used by another device in the WAN network). – The length of the address area can be specified in the selection box by the number of devices. By combining several address areas, any address areas can be defined. 4-31 7966_en_04 PHOENIX CONTACT... -
Page 56: Virtual Nat Routing
– So that a connection can be established to the devices in the LAN, the LAN IP address of the FL NAT SMN 8TX(-M) must be set as the gateway address on the devices in the LAN network. Devices in the LAN network that are not mapped via the 1:1 NAT configuration cannot communicate with devices from the WAN network. - Page 57 So that a connection can be established between the devices in the LAN and WAN, the LAN IP address of the FL NAT SMN 8TX(-M) must be set as the gateway address on the devices in the LAN network. For the devices in the WAN network, the WAN IP address of the FL NAT SMN 8TX(-M) must be set as the route to the virtual network.
- Page 58 FL NAT SMN 8TX(-M) “Broadcast Limiter” menu The “Broadcast Limiter” function can be used to limit broadcast and multicast traffic to an adjustable level in order to prevent a loss in performance on termination devices. If the configurable bandwidth limit is reached, further broadcast or multicast packets are rejected.
-
Page 59: Simple Network Management Protocol (Snmp)
The devices can be configured by writing data from the manager to the MIB. In the event of an emergency, the agents can also send messages (traps) directly to the manager. All configuration modifications, which are to take effect after an FL NAT SMN 8TX(-M) restart, must be saved permanently using the “flWorkFWCtrlConfSave” object. - Page 60 Management Information Base II (MIB 2) according to RFC1213, RMON MIB, bridge MIB, If MIB, Etherlike MIB, SNMPv2 MIB, SNMP FRAMEWORK MIB, P bridge MIB, Q bridge MIB, RSTP MIB, LLDP MIB, and private SNMP objects from Phoenix Contact (FL SWITCH M MIB).
- Page 61 DHCP relay agent, settings and parameters FL-NAT-Router-V320-MIB.mi2 flSwitchRelayAgentDhcp Delete switch MAC address table FL-NAT-Router-V320-MIB.mi2 flSwitchCtrlMacTableErase Setting and parameterization for IGMP snooping FL-NAT-Router-V320-MIB.mi2 flSwitchIgmpSnoop Setting for port mirroring FL-NAT-Router-V320-MIB.mi2 flSwitchPortMirr Broadcast limiter - settings, activation/deactivation FL-NAT-Router-V320-MIB.mi2 flSwitchRateCtrlBroadcast 4-37 7966_en_04 PHOENIX CONTACT...
- Page 62 FL NAT SMN 8TX(-M) Table 4-1 Overview of the MIB structure of the MIBs [...] What information? In which MIB file? For which objects? Router - selection of the operating mode, router, FL-NAT-Router-V320-MIB.mi2 flWorkSecurityCtrlDevMode NAT, bridge, etc. Router - mode settings: router and masquerading FL-NAT-Router-V320-MIB.mi2...
-
Page 63: Management Via Local Rs-232 Communication Interface
Connect the PC and the switch using a suitable cable (PRG CAB MINI DIN, Order No. 2730611). Once you have established the connection, select the Ctrl+L key combination on the PC. The switch then requests the screen contents. 4-39 7966_en_04 PHOENIX CONTACT... -
Page 64: User Interface Functions
FL NAT SMN 8TX(-M) 4.4.2 User interface functions 4.4.2.1 Functions during the boot process after a restart If you open the user interface in the first five seconds immediately after an FL NAT SMN 8TX(-M) restart, you have the option of triggering a firmware update. - Page 65 In order for the switch to perform its function, it requires an IP address, which can be assigned via the serial interface. If the switch already has an IP address, it uses this existing IP address following a restart if it does not receive another address via BootP or RS-232. 4-41 7966_en_04 PHOENIX CONTACT...
- Page 66 FL NAT SMN 8TX(-M) 4-42 PHOENIX CONTACT 7966_en_04...
-
Page 67: Rapid) Spanning Tree
5.1.1 Enabling (R)STP on all switches involved (R)STP can be activated via web-based management, via the SNMP interface or via the serial interface. While learning the network topology, the switch temporarily does not participate in network communication. 7966_en_04 PHOENIX CONTACT... - Page 68 FL NAT SMN 8TX(-M) Now switch to the “(R)STP General” page in the “Switch Station” menu. Here, you will find various information about the Spanning Tree configuration. Figure 5-1 “(R)STP General” web page The web page displays the parameters with which the switch is currently operating.
- Page 69 “Large Tree Support” option must first be enabled on all devices. – It is recommended that large tree support is not activated in networks with less than seven switches along the relevant path. 7966_en_04 PHOENIX CONTACT...
- Page 70 FL NAT SMN 8TX(-M) Maximum Age of STP Information The parameter is set by the root switch and used by all switches in the ring. The parameter is sent to make sure that each switch in the network has a constant value, against which the age of the saved configuration is tested.
- Page 71 (R)STP State Indicates the current (R)STP state of the relevant port. Possible states: – “Forwarding” The port is integrated in the active topology and forwards data. – “Discarding” The port does not take part in data transmission. 7966_en_04 PHOENIX CONTACT...
- Page 72 FL NAT SMN 8TX(-M) “Learning” – The port does not take part in data transmission of the active topology, however, MAC addresses are learned. – Blocking/Discarding The port has a link, but has not been set to the “Discarding” state by RSTP.
- Page 73 The last six bytes contain the MAC address and thus ensure the uniqueness of the switch ID in the event of identical priority values. The switch with the lowest numerical switch ID becomes the root. It is recommended that the root port and alternate port are specified using the priority. 7966_en_04 PHOENIX CONTACT...
- Page 74 FL NAT SMN 8TX(-M) Port identifier The port ID consists of four bits for the port priority and twelve bits for the port number. The port ID is interpreted as an unsigned integer value. When comparing two port IDs, the one with the lowest numeric value is of higher, i.e., “better”, priority.
- Page 75 Protocol compatibility If a port receives STP BPDUs, it switches automatically to STP mode. Automatic switching to (R)STP mode does not take place. Switching to (R)STP mode can only be forced via “ForceRSTP” or via a restart. 7966_en_04 PHOENIX CONTACT...
- Page 76 FL NAT SMN 8TX(-M) RSTP fast ring detection The “RSTP Fast Ring Detection” function can be activated on the “RSTP Configuration” web page (see page 5-3). This function speeds up the switch-over to a redundant path in the event of an error and provides easy diagnostics.
-
Page 77: Connection Failure - Example
Address FL SWITCH MM HS 00.A0.45.06.04.02 Mode Ord. No. 28 32 32 6 US1 GND US2 GND R1 R2 V.24 Reset 00A0451BDD Address Fail US1 GND V.24 74710017 Figure 5-8 Connection failure with RSTP ring detection 5-11 7966_en_04 PHOENIX CONTACT... -
Page 78: Mixed Operation Of Rstp And Stp
FL NAT SMN 8TX(-M) 5.1.3 Mixed operation of RSTP and STP If a device with STP support is integrated into the network, only switch ports that receive STP BPDUs are set to STP mode. All other ports that receive RSTP BPDUs remain in RSTP mode. - Page 79 Switches to the “Forwarding” state immediately after establishing the data link. Termination devices connected to this port can be accessed immediately. “Port STP Status” in WBM on the “STP Port Configuration” page must be set to “Disabled” to activate fast forwarding. 5-13 7966_en_04 PHOENIX CONTACT...
- Page 80 FL NAT SMN 8TX(-M) Frame duplication Due to the fast switch-over times of RSTP, frames may be duplicated and the order of frames may be changed. 5.1.4.4 Enabling via serial interface Establish a connection to the switch. The procedure is described in Section “Management via local RS-232 communication interface”...
-
Page 81: Configuration Notes For Rapid Spanning Tree
All infrastructure components used in your network that do not actively support Spanning Tree must be transparent for Spanning Tree messages (BPDUs) and must forward all BPDUs to all ports without modifying them. When Spanning Tree is disabled, the switch is transparent for BPDUs. 5-15 7966_en_04 PHOENIX CONTACT... - Page 82 FL NAT SMN 8TX(-M) Rule 2: At least one active Spanning Tree component per loop – An active Spanning Tree component supports the Spanning Tree protocol, sends/receives and evaluates BPDUs, and sets its ports to the relevant STP states. ...
- Page 83 Ord. No. 28 32 70 0 MODE 74710019 US1 US2 FAIL Address 00.A0.45.1B.D2.1D 10 11 12 13 14 15 US1 GND US2 GND R1 R2 V.24 ACT 100 FD Figure 5-12 Redundant coupling of network segments 5-17 7966_en_04 PHOENIX CONTACT...
- Page 84 FL NAT SMN 8TX(-M) Example with fast ring detection MODE FL SWITCH SMSC 8GT Ord. No. 2891123 SPD FD LINK US2 FAIL Address 00.A0.45.06.04.02 Mode US1 GND US2 GND R1 R2 V.24 FL SWITCH MCS 16TX Ord. No. 28 32 70 0...
- Page 85 ID is saved. – If the root ID and the costs are the same, the ID of the sender is checked. If the ID is lower than the switch's own ID, it is saved. 5-19 7966_en_04 PHOENIX CONTACT...
- Page 86 The port costs can be set according to two different standards, 802.1D (STP) or 801.1W (RSTP). If, in addition to Phoenix Contact devices, devices from other manufacturers are also used, it is recommended that the port costs are set according to a uniform standard.
- Page 87 The root port and designated port are always the ports with the lowest path costs. If the costs are the same, the priority is the decisive criterion. If the priorities are also the same, the port number is the decisive criterion. Specify an appropriate combination of costs and 5-21 7966_en_04 PHOENIX CONTACT...
- Page 88 FL NAT SMN 8TX(-M) priority on the “STP Port Configuration” page in WBM for the port specified as the root port or designated port. Make sure that all the other network switches either have higher costs or a lower priority (higher value).
- Page 89 LNK MODE LNK MODE LNK MODE LNK MODE ACT 100 MODE FL SWITCH MM HS Ord. No. 28 32 32 6 Reset 00A0451BDD Address Fail 7471020 US1 GND V.24 Figure 5-15 Example 1 for the “relevant path” 5-23 7966_en_04 PHOENIX CONTACT...
- Page 90 FL NAT SMN 8TX(-M) LNK MODE LNK MODE LNK MODE LNK MODE ACT 100 MODE FL SWITCH MM HS Ord. No. 28 32 32 6 Reset Address 00A0451BDD Fail US1 GND V.24 MODE MODE FL SWITCH SMSC 8GT FL SWITCH SMSC 8GT Ord.
-
Page 91: Media Redundancy Protocol (Mrp)
(FL MEM PLUG/MRM, Order No. 2891275). You will require one license key for each MRP manager (for the configuration of the MRP manager, see 6.3 “Configuration of MRP”). Please note that MRP is disabled by default upon delivery. 7966_en_04 PHOENIX CONTACT... -
Page 92: Network Examples
FL NAT SMN 8TX(-M) 6.1.1 Network examples MRP-Manager LNK MODE LNK MODE LNK MODE LNK MODE ACT 100 MODE FL SWITCH MM HS Ord. No. 28 32 32 6 Reset 00A0451BDD Address Fail US1 GND V.24 MODE FL SWITCH SMSC 8GT Ord. -
Page 93: Enabling Web Pages For Using Mrp In Wbm
“User Interfaces” page. Activate “Redundancy” and confirm by entering your password. Activating “Redundancy” under “General Configuration/User Interfaces” does not activate a redundancy mechanism. In the WBM menu, the “Media Redundancy” page - under which the function can be configured and activated - is enabled. 7966_en_04 PHOENIX CONTACT... -
Page 94: Configuration Of Mrp
FL NAT SMN 8TX(-M) Configuration of MRP 6.3.1 MRP General The “MRP General” web page shows the current parameters set for using the protocol. The following information is displayed: – Operating mode (Disabled or MRP Client) – License key (Present or Missing) –... -
Page 95: Lldp (Link Layer Discovery Protocol)
If the TTL elapses, the neighbor information is deleted. An FL NAT SMN 8TX(-M) manages a maximum of 50 items of neighbor information, all other information is ignored. If several neighbors are displayed on one switch port, then there must be at least one other switch/hub, which does not support or has not activated LLDP, installed between this switch and the neighbor indicated. - Page 96 FL NAT SMN 8TX(-M) Table 7-1 Event table for LLDP Event Activity of the individual Response of the LLDP agent neighboring LLDP agent Activate LLDP agent or Transmit LLDP BPDUs to all Include sender in the list of device startup...
- Page 97 “Link Layer Discovery Protocol” web page The “Message Time To Live” is determined by multiplying the “Message Transmit Interval” with the “Message Transmit Hold Multiplier”. The “Message Transmit Hold Multiplier” can only be modified via SNMP. The default value is four. 7966_en_04 PHOENIX CONTACT...
- Page 98 Indicates the port number of the neighboring switch that is used to connect the neighbor to the local switch. If the neighbor is identified as a Phoenix Contact switch, the port number is implemented as a link to the “Port Configuration” web page for the neighbor.
-
Page 99: Technical Data And Ordering Data
100 Mbps: 148800 pps Supported MIBs MIB II and private SNMP objects from Phoenix Contact Housing dimensions (width x height x depth) in mm 56 x 133 x 120 (depth from top edge of DIN rail) 56 x 133 x 172 (depth from top edge of DIN rail) ... - Page 100 FL NAT SMN 8TX(-M) Interfaces on the switch [...] Floating alarm contact Voltage 24 V DC Current carrying capacity 100 mA Ethernet interfaces Properties of RJ45 ports Number 7+1 with autocrossing and auto negotiation Connection format 8-pos. RJ45 socket on the switch Connection medium Twisted pair cable with a conductor cross section of 0.14 mm...
-
Page 101: Ordering Data
Order No. Pcs. / Pkt. Smart Managed Narrow Switch and router with eight TX ports in RJ45 format FL NAT SMN 8TX 2989365 Smart Managed Narrow Switch and router with eight TX ports in RJ45 format FL NAT SMN 8TX-M... - Page 102 FL NAT SMN 8TX(-M) Description [...] Order designation Order No. Pcs. / Pkt. Color marking for FL CAT5/6 PATCH ..., black FL PATCH CCODE BK 2891194 Color marking for FL CAT5/6 PATCH ..., brown FL PATCH CCODE BN 2891495 Color marking for FL CAT5/6 PATCH ..., blue...
Need help?
Do you have a question about the FL NAT SMN 8TX and is the answer not in the manual?
Questions and answers