Table of Contents
Advertisement
Quick Links
Advertisement
Table of Contents

Subscribe to Our Youtube Channel
Summary of Contents for Berkel BS+2020T
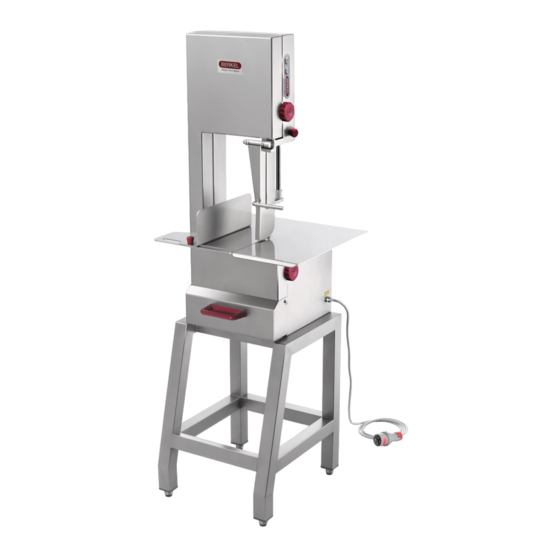
- Page 1 BS+2020T BS+2020F OPERATING AND MAINTENANCE MANUAL BONE SAW...
-
Page 5: Table Of Contents
TABLE OF CONTENTS s l i c i f 2.3 - Maximum dimensions of machined piece 2.5 - Noise level 2.6.2 - Single-phase wiring diagram 230 V 2.6.3 - 3-phase wiring diagram 400 V with mushroom push-button 2.6.4 - Single-phase wiring diagram 230 V with mushroom push-button 3. - Page 6 6.4 - Using the sliding meat grinder surface (optional) 7.3 - Check-up performed at our manufacturing facilities 7.4 - Inspections and checks to be performed when installing 7.6.3 - Type of blade n i l 7.7 - Cleaning the machine 7.1.1 - Overview 7.7.2 - Cleaning the machine 7.8 -...
- Page 7 1 Delivery and warranty 1.1 - Introduction These symbols are meant to draw the attention of the reader to machine parts and tasks that are dangerous to the operator’s personal safety or that may potentially cause damage to the machine itself. Do not operate the machine if you are not sure you have fully understood the cautions the symbols refer to.
- Page 8 1.4 - Machine description The bone saw you have purchased is a safe and reliable machine that is simple to use. The pulleys are in aluminum while its body and accessories are in stainless steel type AISI 304. The bone saw has guards installed that are both mechanical (housing, doors, etc.) and electrical (micro-switch, stop button, etc.), which are meant to reduce the operator’s exposure to risks during its use to a bare minimum.
- Page 9 that any hazardous and potentially threatening condition has been thoroughly eliminated. If you notice any abnormal condition, stop the machine and immedi- ately inform staff in charge of maintenance. - Do not allow unauthorized personnel to perform tasks on the machine. The emergency procedure to follow, should the machine operator suffer an accident involving electrically conductive parts, is to first of all pull the operator away from the power source (since usually the operator loses consciousness in this type of...
- Page 10 Even if the machine accidentally stops, as for in- stance due to a power outage, if electrical power is supplied again to the machine, it will not cause the machine to restart, but the operator will instead have to press the start button (Picture 1.8.1). 3 Sliding blade protection, it allows the adjustment of cutting height according to the product thickness Fig.1.8.1...
- Page 11 1.10 - Work station Fig.1.10.1 The correct position the operator must assume to ideally control the bone saw is shown in Picture 1.10.1. 1.11 - Environmental conditions The machine is designed to work in the following environmental conditions: - minimum room temperature: -5 °C; - maximum room temperature: +40 °C;...
- Page 12 2 - Technical characteristics 2.1 - Main components In order to help the operator understand the contents of this manual, Picture 2.1.1 below lists and depicts the main components of the machine. 1 - Pulleys protection casing in stainless steel AISI 304 2 - Control panel.
- Page 13 2.3 - Maximum dimensions of cut piece (Picture 2.3.1) Maximum height Pic. 2.3.1 Maximum width 2.4 - Machine dimensions and weight BS+ 2020T BS+ 2020F Fig. 2.4.1 Net weight BS+ 2020T BS+ 2020F 2.5 - Noise level The noise level of this machine results to be 73 dB. We recommend that the operator utilises ear defenders when operating the bone saw.
- Page 14 2.6 - Wiring diagrams 2.6.1 - 3-phase wiring diagram (400V) Fig.2.6.1...
- Page 15 2.6.2 - Single-phase wiring diagram (230 V) Fig. 2.6.2...
-
Page 16: 3-Phase Wiring Diagram 400 V With Mushroom Push-Button
2.6.3 - 3-phase wiring diagram (400V) with mushroom push-button Fig. 2.6.3... -
Page 17: Single-Phase Wiring Diagram 230 V With Mushroom Push-Button
2.6.4 - single-phase wiring diagram (230V) with mushroom push-button Fig. 2.6.4... -
Page 18: Testing, Transportation, Delivery And Installation
3 Testing, transportation, delivery and installation 3.1 - Testing The machine you have purchased has been tested at our facilities to ensure that it works properly and is properly adjusted. Trial sawing drills have also been per- formed as part of the tests, on the same type of material for which the machine is normally used to cut. - Page 19 Moreover, be sure to leave a wide space around the machine when laying it onto the surface, considering the dimensions indicated in Picture 2.4.1. The space will help operators to perform maneuvers more easily and will facilitate access to the machine for service tasks.
- Page 20 3.4.1- 3-phase machine (400 Volt-50Hz) and 3-phase machine (220 Volt-50 Hz) These machine versions include a power cable with a diameter of 4 x 1 mm. The power cable is plugged into a quadripolar 3-phase socket. Hook the cable to the 3-phase power grid, interposing a 16 ampere di erential circuit breaker.
- Page 21 Emergency mushroom push-button (optional) - Press this button to stop the motor that controls motion of the cutting blade. To restart the machine, turn the button head counter-clockwise until you hear a clicking sound. Engaging the button does not of itself allow the operator to restart the machine; the start button must be pressed (ref.
- Page 22 A - Checking efficiency of micro-switch “4” (Pic. 5.2.1) With the machine hooked to the power grid with the blade running, work on the spring-return closure “2”, thereby unlocking housing “1”. This operation is meant to stop the machine, in order to prevent obj ects or hands from making contact, even accidentally, with the moving pulleys and blades.
- Page 23 6 Using the bone saw 6.1 - Regulations CAUTION Only authorized staff can operate the machine. Before using the bone saw, the operator must check that all its guards are in place and that the safety devices are installed and efficient. If they are not, turn the machine off and contact staff in charge of maintenance.
- Page 24 TYPE OF SAFETY INSTRUCTIONS CUT PRODUCT FOOD SAWING Cutting the Adjust the blade guard, leaving only the segment ossobuco in that you need to cut the veal shank exposed. Turn slices the machine on and saw the knee, keeping your hands far from the blade.
- Page 25 Chopping off Adjust the blade guard, leaving only the segment sirloin steak tips that you need to cut the piece exposed. Turn the machine on and push the sirloin steak against the blade, keeping your hands at a safe distance from the blade.
- Page 26 7.3 - Check-up performed at our manufacturing facilities The machine you have purchased has been tested by the manufacturer to ensure its proper commissioning and the due adjustments. More specifically, the checks performed by the manufacturer include: Prior to co mmissioning: - Check that the operating vo ltage of the machine is in line with the customer’s requirements.
- Page 27 CAUTION! If the braking time exceeds 4 seconds or in the case of a fault, contact customer service for assistance. At the end of every work shift: - Thoroughly clean the machine, getting rid of any bone chip or food residues. - Slip off, clean and reassemble the blade guides.
- Page 28 - Assemble the new blade. - Tension the blade by turning the gear to position “A” (Picture 7.6.1). - Check the position of the blade on the two pulleys: the blade must lay on the two pulleys, except for the sharpened segment, which must stick out from the pulleys (Picture 7.6.3).
- Page 29 Grab the blade packet with one hand protect- ed by the glove, as shown in the picture to the right... … and with the other hand, also protected by a glove, loosen the clamp that fastens the blades, until it comes off.
- Page 30 With both hands, grab the blade packet again and stretch them out on the table. Now that the blades are fully loosened, grab one in the middle and fold it upwards, making it slide on the table, Immediately after this, grab the two ends and move them close to the center;...
- Page 31 7.7.2 - Cleaning the machine - Wear a pair of gloves that are suitable to handle sharp objects Pic. 7.7.1 - Loosen the blade’s tensioning by loweing gear “1”. - Grab blade “2” and slip it off the pulley as shown in Pic.
- Page 32 1.4 - Machine description 7.8. Cleaning the blade-guide plug (Pic. 7.6.6) The bone saw you have purchased is a safe and reliable machine that is simple to At the end of the work shift, clean the blade-guide plug “1”. use. The pulleys are in aluminum while its body and accessories are in stainless - With the machine off, turn the differential circuit breaker to “0”...
- Page 33 8 Troubleshooting Problem, cause and solution Problem 1 - The machine does not start. 2 - The blade does not cut in a straight line. 3 - The blade drops off from its support pulleys. 4 - The blade overheats. Cause 1 - The differential circuit breaker is in position “0”.
- Page 34 9 Exploded views 6.4 - Using the sliding meat grinder surface (optional) 7.3 - Check-up performed at our manufacturing facilities 7.4 - Inspections and checks to be performed when installing 7.6.3 - Type of blade n i l 7.7 - Cleaning the machine 7.1.1 - Overview 7.7.2 - Cleaning the machine...
- Page 35 BS+ 2020F tav. 1...
- Page 36 BS+ 2020T - 2020F tav. 2...
-
Page 37: T S N I C A N I I L E E V
TABLE OF CONTENTS s l i c i f 2.3 - Maximum dimensions of machined piece 2.5 - Noise level 2.6.2 - Single-phase wiring diagram 230 V 2.6.3 - 3-phase wiring diagram 400 V with mushroom push-button 2.6.4 - Single-phase wiring diagram 230 V with mushroom push-button 3. - Page 39 39 39...
- Page 40 Van Berkel International S.r.l. via Ugo Foscolo, 22 21040 Oggiona S. Stefano (VA) - ITALY T +39 0331 214311 info@berkelinternational.com www.theberkelworld.com AUTHORIZED DEALER...
Need help?
Do you have a question about the BS+2020T and is the answer not in the manual?
Questions and answers