Table of Contents
Advertisement
Quick Links
Advertisement
Table of Contents

Subscribe to Our Youtube Channel
Related Manuals for ACLAS KP7 Series


Summary of Contents for ACLAS KP7 Series
- Page 1 KP7X PRINTER USER MANUAL...
-
Page 3: Table Of Contents
Printer Driver Installation Instruction ........................ 8 8.1. Printer Driver Installation ........................8 8.2. How to Config Connect Port ......................9 Contact Us ............................... 14 Important Note For driver, user manual and other information, please visit the website: https://www.aclas.tw/products/kp7x/ to download or consult. -
Page 4: Introduction
Data receiving buffer 128KByte Warning light Flash and sound Interface Ethernet 150km (recommend using high quality thermal paper, such as Printer head life DJ03 Aclas paper.) Paper-cutter life 1,000,000 times Work Temperature 0℃ ~ 40℃ Work Humidity 5%R.H. ~ 85%R.H. Driver... -
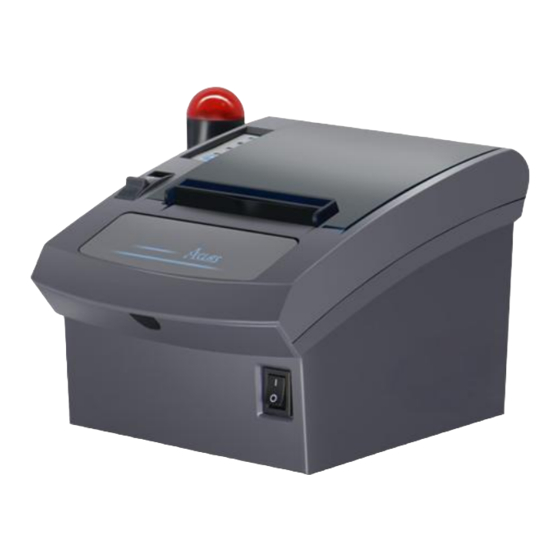
Page 5: Appearance
1.2 Appearance Warning light Upper cover switch Power switch 1.3 Accessories AC power cord AC adapter User manual Disk Paper roll... -
Page 6: Paper Installation
2 Paper Installation Note: Make sure that the printer is not receiving data; otherwise, data may be lost. A. Open the printer upper cover by pressing the cover button. B. Insert the paper roll to the printer. C. Pull out a small amount of paper, and then close the upper cover. D. -
Page 7: Setting The Printer
3 SETTING THE PRINTER 3.1 Using the Printer Power indicator light To prompt error To prompt the paper is run out Press this key once to feed a piece of paper. Press and hold this key to do continuous feeding. Normal state: the power light is on, and there is no alarm. -
Page 8: Self Test
4 SELF TEST Press key ‘Feed’ and hold it and then power on the machine at the same time, it will print a piece of Test Page. The information of this Test Page includes the printer’s model, version, ID and the default setting of the dip switch when leave factory. - Page 9 DIP-8 Function SW-1 Select cutter SW-2 Kitchen beeper SW-3 Reserve SW-4 Print Width 72mm 48mm SW-5 Select print density Bit Used to set print density SW-6 Select print density Bit SW-7 Select baudrate Bit Used to control baud rate SW-8 Select baudrate Bit a) SW-5 and SW-6 are used to set print density, the on/off status of SW-5 and SW-6 is able to compose different density.
-
Page 10: Maintenance
6 MAINTENANCE Paper dust inside the printer may lower the printer quality. The thermal printer head is probably dirty, if part of letters is not printed distinctly. Please follow steps below to clean the printer head. (1) Open the printer cover and remove the paper if exists. (2) Clean the printer head with a cotton swab moistened with alcohol solvent. -
Page 11: Printer Driver Installation Instruction
This driver is suitable for Windows XP system, Windows 7, Windows 8 and Windows 10. 8.1. Printer Driver Installation Connect the printer to PC, and double click “Setup.exe” in the file “Aclas Printer” to install the printer driver. Choose “TCP”... -
Page 12: How To Config Connect Port
PC has been installed, the goal is to find the location of “Printer properties”.) If your PC is installed with WIN7 system, please follow the below steps to enter “Printer properties” interface. Click “Devices and Printers” in start menu. Right click “Aclas Printer”, choose “Printer properties”. - Page 13 If your PC is installed with WIN10 system, please follow the below steps to enter “Printer properties” interface. Right click “This PC” icon on the desktop, and choose “Properties”. Click “Control Panel Home”.
- Page 14 Click “View devices and printers”. Right click “Aclas Printer”, choose “Printer properties”.
- Page 15 Step 2: Choose connecting port Choose this item. Select the connecting port. Click it. Step 3: Configure port Click it.
- Page 16 Input IP address. Click here. Click “OK”. Step 4: Finish port configuration Choose the item “General”. Click it to print test page, and then click “Close”.
-
Page 17: Contact Us
It's our honor to offer the best solution and attention for you. You can contact us as following ways: Website: www.aclas.tw Email: osa@aclas.com Facebook: @Pinnacle Aclas Twitter: @ArmPos We will response within one business day. Thank you so much for your time and patience :-)... - Page 20 DKP7M01USV0-A-01...
Need help?
Do you have a question about the KP7 Series and is the answer not in the manual?
Questions and answers