Table of Contents
Advertisement
Available languages
Available languages
Quick Links
Advertisement
Chapters
Table of Contents

Related Manuals for JUNO JCF178F0S1


Summary of Contents for JUNO JCF178F0S1
- Page 1 Benutzerinformation Kühlschrank User Manual Refrigerator JCF178F0S1...
-
Page 2: Table Of Contents
BESUCHEN SIE UNSERE WEBSITE, UM: Anwendungshinweise, Prospekte, Informationen zu Fehlerbehebung, Service und Reparatur zu erhalten: www.juno.de/support INHALTSVERZEICHNIS 1. SICHERHEITSHINWEISE.................2 2. SICHERHEITSANWEISUNGEN............... 4 3. MONTAGE......................7 4. BEDIENFELD....................9 5. TÄGLICHER GEBRAUCH................11 6. TIPPS UND HINWEISE...................14 7. REINIGUNG UND PFLEGE................17 8. PROBLEMBEHEBUNG................... 18 9. - Page 3 Gerät sicher zu bedienen ist und welche Gefahren bei nicht ordnungsgemäßer Bedienung bestehen. Kinder zwischen 3 und 8 Jahren dürfen das Gerät be- und • entladen, vorausgesetzt, sie wurden ordnungsgemäß eingewiesen. Dieses Gerät kann von Personen mit schweren und • komplexen Behinderungen benutzt werden, vorausgesetzt, sie wurden ordnungsgemäß...
-
Page 4: Sicherheitsanweisungen
WARNUNG: Halten Sie die Lüftungsöffnungen im • Gerätegehäuse oder in der Einbaunische frei von Hindernissen. WARNUNG: Versuchen Sie nicht, den Abtauvorgang durch • andere als vom Hersteller empfohlene mechanische oder sonstige Hilfsmittel zu beschleunigen. WARNUNG: Achten Sie darauf, den Kältekreislauf nicht zu •... - Page 5 • Warten Sie nach der Montage oder dem Kundendienst oder einen Elektriker, um Wechsel des Türanschlags mindestens 4 die elektrischen Bauteile auszutauschen. Stunden, bevor Sie das Gerät an die • Das Netzkabel muss unterhalb des Stromversorgung anschließen. So kann Netzsteckers verlegt werden. das Öl in den Kompressor zurückfließen.
- Page 6 2.6 Wartung • Nehmen Sie keine Gegenstände aus dem Gefrierfach und berühren Sie diese nicht, • Wenden Sie sich zur Reparatur des falls Ihre Hände nass oder feucht sind. Geräts an den autorisierten Kundendienst. • Frieren Sie aufgetaute Lebensmittel nicht Dabei dürfen ausschließlich wieder ein.
-
Page 7: Montage
3. MONTAGE WARNUNG! WARNUNG! Siehe Kapitel „Sicherheitshinweise“. Befestigen Sie das Gerät gemäß der Montageanleitung, um das Risiko eines instabilen Geräts zu vermeiden. WARNUNG! Lesen Sie zur Installation des Geräts die Montageanleitung. 3.1 Abmessungen ¹ Höhe, Breite und Tiefe des Geräts ohne Griff Gesamtabmessungen ¹... - Page 8 Platzbedarf während des Betriebs ² Der ordnungsgemäße Betrieb des Geräts wird nur innerhalb des angegebenen Temperaturbereichs gewährleistet. 1780 Bei Fragen zum Aufstellungsort des Geräts wenden Sie sich an den Verkäufer, unseren Kundendienst oder nächstgelegenen autorisierten ² Höhe, Breite und Tiefe des Geräts Kundendienst.
-
Page 9: Bedienfeld
VORSICHT! VORSICHT! Lesen Sie die Montageanleitungen für Wenn Sie den Türanschlag wechseln, die Installation. schützen Sie den Boden mit einem strapazierfähigem Material vor Verkratzungen. 3.5 Wechseln des Türanschlags Informationen zu Montage und zum Wechseln des Türanschlags finden Sie in einer separaten Anleitung. 4. - Page 10 Informationen zur Auswahl einer anderen Sie können die Funktion Shopping vor ihrer eingestellten Temperatur finden Sie unter automatischen Abschaltung ausschalten, „Temperaturregelung“. indem Sie das Verfahren wiederholen oder eine andere Kühlschranktemperatur Wenn auf dem Display "dEMo" erscheint, einstellen. siehe „Problembehebung“. 4.6 FastFreeze-Funktion 4.3 Ausschalten des Geräts Die FastFreeze-Funktion dient dazu, das 1.
-
Page 11: Täglicher Gebrauch
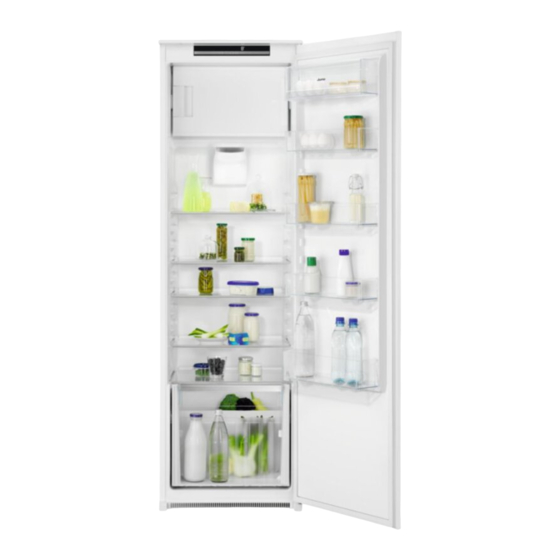
Die Anzeige Ventilator blinkt. schnellere Kühlung in den Gefrierraum gelegt 2. Drücken Sie die Taste OK zum haben, nicht vergessen möchten. Bestätigen. 1. Drücken Sie die Functions Taste, bis das Die Anzeige Ventilator wird angezeigt. entsprechende Symbol angezeigt wird. Wiederholen Sie zum Ausschalten der Die Anzeige DrinksChill blinkt. - Page 12 2. Positionieren Sie diese neu wie 1. Ziehen Sie die Schublade heraus und erforderlich. heben Sie sie an. 2. Schieben Sie die Schienen in das Gehäuse, um eine Beschädigung des Geräts beim Schließen der Tür zu verhindern. 5.2 Verstellbare Ablagen Die Wände des Kühlschranks sind mit einer Reihe von Führungsschienen ausgestattet, die verschiedene Möglichkeiten für das...
- Page 13 5.5 Ventilator 2. Setzen Sie den hinteren Teil der Schublade (1) auf die Schienen. Das Kühlfach ist mit einer Vorrichtung ausgestattet, die das schnelle Abkühlen von Lebensmitteln ermöglicht und eine gleichmäßigere Temperatur im Fach aufrechterhält. Diese Vorrichtung schaltet sich bei Bedarf automatisch ein.
-
Page 14: Tipps Und Hinweise
5.8 Abtauen Weitere Informationen finden Sie unter „Tipps zum Einfrieren“. Tiefgefrorene oder gefrorene Lebensmittel können vor dem Verzehr im Kühlschrank 5.7 Lagerung von Tiefkühlgerichten oder in einem Plastikbeutel unter kaltem Lassen Sie das Gerät vor der ersten Wasser aufgetaut werden. Inbetriebnahme oder nach einer Zeit, in der Dieser Vorgang hängt von der verfügbaren das Gerät nicht benutzt wurde, mindestens... - Page 15 • Die Lebensmittel sollten beim Einfrieren • Der gesamte Gefrierraum ist für die frisch sein, um eine gute Qualität zu Lagerung von Tiefkühlprodukten geeignet. bewahren. Besonders Obst und Gemüse • Lassen Sie ausreichend Platz um die sollte direkt nach der Ernte eingefroren Lebensmittel herum, damit die Luft frei werden, um alle Nährstoffe zu erhalten.
- Page 16 Lebensmittel Lagerdauer (Mona‐ Butter 6 - 9 Weichkäse (z. B. Mozzarella) 3 - 4 Hartkäse (z. B. Parmesan, Cheddar) Meeresfrüchte: Fetthaltiger Fisch (z. B. Lachs, Makrele) 2 - 3 Fettarmer Fisch (z. B. Dorsch, Flunder) 4 - 6 Shrimps Muscheln und Miesmuscheln ohne Schale 3 - 4 Gekochter Fisch 1 - 2...
-
Page 17: Reinigung Und Pflege
• Flaschen: Sie sollten mit Deckel in der Ventilator wird eine gleichmäßigere Flaschenablage in der Tür oder im Innentemperatur erzielt. Flaschenhalter (falls vorhanden) • Achten Sie auf das Haltbarkeitsdatum der aufbewahrt werden. Lebensmittel, damit Sie wissen, wie lange • Es wird empfohlen für eine schnellere sie gelagert werden können. -
Page 18: Problembehebung
Auf den Ablagen des Gefriergeräts und um Entfernen Sie bereits während des das obere Fach bildet sich immer eine Abtauprozesses vorsichtig Eisstücke, die gewisse Menge Reif. sich lösen lassen. 5. Wenn der Gefrierraum vollständig Tauen Sie das Gefriergerät ab, wenn die abgetaut ist, wischen Sie das Innere Reifschicht eine Stärke von etwa 3 bis 5 mm sorgfältig trocken. - Page 19 Störung Mögliche Ursache Lösung Es wird ein akustisches oder opti‐ Das Gerät wurde vor kurzem ein‐ Siehe „Alarm - Tür offen“ oder sches Alarmsignal ausgelöst. geschaltet. „Hochtemperaturalarm“. Die Temperatur im Gerät ist zu Siehe „Alarm - Tür offen“ oder hoch. „Hochtemperaturalarm“.
- Page 20 Störung Mögliche Ursache Lösung Die Dichtung ist verzogen oder Siehe Abschnitt „Schließen der verschmutzt. Tür“. Die Lebensmittel sind nicht richtig Verpacken Sie die Lebensmittel verpackt. besser. Die Temperatur ist falsch einge‐ Siehe Kapitel „Bedienfeld“. stellt. Das Gerät ist voll von Lebensmit‐ Stellen Sie eine höhere Tempera‐...
- Page 21 Störung Mögliche Ursache Lösung Die Tür ist nicht richtig geschlos‐ Siehe Abschnitt „Schließen der sen. Tür“. Die Temperatur der Lebensmittel Lassen Sie die Lebensmittel auf ist zu hoch. Raumtemperatur abkühlen, bevor Sie diese in das Kühlgerät legen. Viele Lebensmittel werden gleich‐ Legen Sie weniger Lebensmittel zeitig in das Kühlgerät gelegt.
-
Page 22: Geräusche
9. GERÄUSCHE SSSRRR! BRRR! CLICK! HISSS! BLUBB! 10. TECHNISCHE DATEN Die technischen Daten befinden sich auf dem Es ist auch möglich, die gleichen Typenschild innen im Gerät sowie auf der Informationen in EPREL zu finden, indem Sie https://eprel.ec.europa.eu sowie den Energieplakette. -
Page 23: Informationen Zur Entsorgung
erhalten Sie vom Hersteller, einschließlich Beladungspläne. 12. INFORMATIONEN ZUR ENTSORGUNG Ihre Pflichten als Endnutzer Hausmüll sondern über die bereitgestellten Recyclingbehälter oder die entsprechenden örtlichen Sammelsysteme. Recyceln Sie zum Umwelt- und Gesundheitsschutz auch elektrische und elektronische Geräte. Rücknahmepflichten der Vertreiber in Deutschland Wer auf mindestens 400 m²... - Page 24 unentgeltliche Abholung von Elektro- und die im Wesentlichen die gleichen Funktionen Elektronikgeräten ist dann aber auf wie die Neugeräte erfüllen, kostenlos vom Wärmeüberträger (z. B. Kühlschrank), Endverbraucher zurückzunehmen. Dies gilt Bildschirme, Monitore und Geräte, die auch bei der Lieferung von neuen Elektro- Bildschirme mit einer Oberfläche von mehr und Elektronikgeräten oder beim Fernabsatz.
-
Page 25: Safety Information
VISIT OUR WEBSITE TO: Get usage advice, brochures, trouble shooter, service and repair information: www.juno.de/support CONTENTS 1. SAFETY INFORMATION.................25 2. SAFETY INSTRUCTIONS................27 3. INSTALLATION....................29 4. CONTROL PANEL..................32 5. DAILY USE...................... 34 6. HINTS AND TIPS.................... 37 7. CARE AND CLEANING...................39 8. - Page 26 This appliance may be used by persons with very extensive • and complex disabilities provided that they have been properly instructed. Children of less than 3 years of age should be kept away • from the appliance unless continuously supervised. Children should be supervised to ensure that they do not •...
-
Page 27: Safety Instructions
Do not use water spray and steam to clean the appliance. • Clean the appliance with a moist soft cloth. Only use neutral • detergents. Do not use abrasive products, abrasive cleaning pads, solvents or metal objects. When the appliance is empty for long period, switch it off, •... - Page 28 mains cable, compressor). Contact the • Follow the storage instructions on the Authorised Service Centre or an packaging of frozen food. electrician to change the electrical • Wrap the food in any food contact material components. before putting it in the freezer •...
-
Page 29: Installation
sources, door handles, door hinges, trays • Cut off the mains cable and discard it. and baskets. Please note that some of • Remove the door to prevent children and these spare parts are only available to pets to be closed inside of the appliance. professional repairers, and that not all •... - Page 30 3.1 Dimensions Overall dimensions ¹ Space required in use ² 1772 ² the height, width and depth of the appliance including the handle, plus the space necessary for free circulation of the cooling ¹ the height, width and depth of the appliance without the handle * including the width of the bottom hinges (8 * including the width of the bottom hinges (8...
- Page 31 necessary for free circulation of the cooling contact for this purpose. If the domestic air, plus the space necessary to allow door power supply socket is not earthed, opening to the minimum angle permitting connect the appliance to a separate earth removal of all internal equipment in compliance with current regulations, consulting a qualified electrician.
-
Page 32: Control Panel
4. CONTROL PANEL Display Fridge Temperature colder button Freezer Temperature warmer button ON/OFF Freezer Temperature colder button It is possible to change predefined sound of buttons by pressing together Functions and temperature colder button for a few seconds. Functions Change is reversible. Fridge Temperature warmer button 4.1 Display A. - Page 33 You can deactivate the FastFreeze function before its automatic end by repeating the The set temperature will be reached procedure until the FastFreeze indicator turns within 24 hours. off or by selecting a different set temperature. After a power failure the set temperature remains stored.
-
Page 34: Daily Use
It is also useful when a reminder is needed in order not to forget the bottles or cans placed It is possible to change the time at in the freezer for fast cooling. any time during the countdown and at the end by pressing the Temperature colder 1. - Page 35 To reassemble: 1. Pull out the rails. Do not move the glass shelf above the vegetable drawer to ensure correct air circulation. 5.3 Vegetable drawer The drawer is suitable for storing fruit and vegetables. 2. Place the rear part of the drawer (1) on the rails.
- Page 36 If it is still not OK (B), adjust the setting Store the fresh food evenly distributed in all control to a colder setting. compartments or drawers. The maximum amount of food that can be frozen without adding other fresh food during 24 hours is specified on the rating plate (a label located inside the appliance).
-
Page 37: Hints And Tips
6. HINTS AND TIPS 6.1 Hints for energy saving temperature before placing it inside the compartment. • Fridge: Most efficient use of energy is • To avoid increase in temperature of ensured in the configuration with the already frozen food, do not place fresh drawers in the bottom part of the unfrozen food directly next to it. - Page 38 • Respect the expiry date and the storage information on the package. 6.5 Shelf life for freezer compartment Type of food Shelf life (months) Bread Fruits (except citrus) 6 - 12 Vegetables 8 - 10 Leftovers without meat 1 - 2 Dairy food: Butter 6 - 9...
-
Page 39: Care And Cleaning
• It is advisable not to keep the exotic fruits • Bottles: close them with a cap and place like bananas, mangos, papayas etc. in the them on the door bottle shelf, or (if refrigerator. available) on the bottle rack. •... -
Page 40: Troubleshooting
A certain amount of frost will always form on 5. When defrosting is complete, dry the the freezer shelves and around the top interior thoroughly. compartment. 6. Switch on the appliance and close the door. Defrost the freezer when the frost layer 7. - Page 41 Problem Possible cause Solution The temperature in the appliance Refer to "Door open alarm" or is too high. "High temperature alarm". The door is left open. Close the door. The compressor operates contin‐ Temperature is set incorrectly. Refer to "Control panel" chapter. ually.
- Page 42 Problem Possible cause Solution Appliance is fully loaded and is Set a higher temperature. Refer set to the lowest temperature. to "Control panel" chapter. Temperature set in the appliance Set a higher temperature. Refer is too low and the ambient tem‐ to "Control panel"...
- Page 43 Problem Possible cause Solution The door has been opened often. Open the door only if necessary. The FastFreeze function is Refer to "FastFreeze function" switched on. section. The Shopping function is switch‐ Refer to "Shopping function" sec‐ ed on. tion. There is no cold air circulation in Make sure that there is cold air the appliance.
-
Page 44: Noises
9. NOISES SSSRRR! BRRR! CLICK! HISSS! BLUBB! 10. TECHNICAL DATA The technical information is situated in the It is also possible to find the same information https:// rating plate on the internal side of the in EPREL using the link eprel.ec.europa.eu and the model name and appliance and on the energy label. -
Page 45: Environmental Concerns
12. ENVIRONMENTAL CONCERNS appliances marked with the symbol with Recycle materials with the symbol . Put the the household waste. Return the product to packaging in relevant containers to recycle it. your local recycling facility or contact your Help protect the environment and human municipal office. - Page 48 222378482-C-122022...
Need help?
Do you have a question about the JCF178F0S1 and is the answer not in the manual?
Questions and answers