Table of Contents
Advertisement
Advertisement
Table of Contents

Related Manuals for Atomos SHOGUN STUDIO 2


Summary of Contents for Atomos SHOGUN STUDIO 2
- Page 1 S H O G U N S T U D I O 2 U S E R MA N U A L...
- Page 2 Apple ProRes and Avid DNx edit ready codecs. This user manual will get you up to speed with all the amazing features packed into the SHOGUN STUDIO 2 that will assist you during a shoot and speed up your workflow on set and in post production.
-
Page 3: Safety Instructions
Safety Instructions The SHOGUN STUDIO 2 is designed to a high standard but there are some things you should be aware of to prolong the life of the unit and for your own safety. Using the SHOGUN STUDIO 2 safely Although the SHOGUN STUDIO 2 is very lightweight compared to all the devices it replaces, it is still a solid object that could cause injury if misused. - Page 4 SDI Cables Please remember that SDI cables use locking connectors and will not simply pull out if they are jerked or tripped over. They are therefore a significant trip hazard to your equip- ment, which may be damaged if the cables are misused.
-
Page 5: Software License Agreement
Software. By installing, copying or otherwise using the Software, you agree to be bound to the terms of this EULA. If you do not agree to the terms of this EULA, ATOMOS is unwilling to license the Software to you. - Page 6 ATOMOS. ATOMOS reserves the right to terminate this license without prejudice to any addi- tional recourse ATOMOS may have against you if you violate any of its terms and con- ditions. Notice Copyright © 2022 ATOMOS Global Pty Ltd (‘referred to as ATOMOS’). All rights reserved.
-
Page 7: Registering Your Product
Registering your product Register your SHOGUN STUDIO 2 at my.atomos.com within twelve months of purchase to upgrade to a 3 year warranty. Registering your product ensures you receive com- munication on all future updates. -
Page 8: Warranty Exclusions
Paying the cost of having the goods repaired; The customer must notify ATOMOS of any defect in the goods in writing prior to the expiry of the warranty periods set out above. The customer will be solely responsible for return- ing the goods to ATOMOS or its authorized distributor. - Page 9 ATOMOS does not warrant that the goods will operate in a manner that is error free, or uninterrupted. The goods are not intended to be the primary or only data storage device for data –...
- Page 10 User Manual Conventions To keep things simple but clear, we’ve only adopted two conventions in this manual A helpful tip, suggestion or something to note because it’s not obvious at first. An important note or warning...
-
Page 11: What's Included
What’s included Your SHOGUN STUDIO 2 includes the equipment listed below. Additional Master Caddy II, Spyder Calibrator and HDMI cables are available from your local Atomos Reseller. What's in the box: 1 x SHOGUN STUDIO 2 2x Rack ears with screws... - Page 12 Attaching Rack Ears and Feet SHOGUN STUDIO 2 can be configured for both rack mount and desktop use. Included in the box are 4 x small feet, 2 x large feet and rack ears along with all the mounting screws for these accessories.
- Page 13 for the feet. The 4 small feet can be attached and used during rack mount operation. The 2 x larger feet are designed to raise the front of the unit to an angle to allow for easier desktop viewing. It is advised to remove these larger feet during rack mount operation.
-
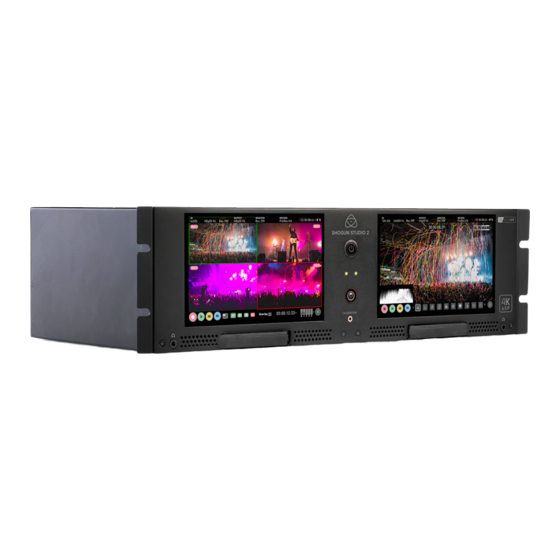
Page 14: Physical Features
Physical Features Looking at SHOGUN STUDIO 2 from the front, recorder channel 1 is on your left side and recorder channel 2 is on your right side. Some screen printing/labelling on the front and rear of unit as illustrated above may differ from actual unit. When connecting any input or other device please ensure you are connecting to the correct connection by refer- ring to the labelling on your actual unit. - Page 15 Atomos Cal- ibration software. This software will be available via www.atomos.com/support Headphone Ports Both channels have an independent 3.5mm headphone jacks for monitoring audi-...
- Page 16 HDMI In/Out HDMI input connection used to record to the SHOGUN STUDIO 2 supports up to 4Kp60. HDMI output connection provides a live loop out or play out when in Playback mode.
- Page 17 SHOGUN STUDIO 2. A list of supported devices and RS422 commands are defined in the user manual. AC Power inputs AC1 and AC2 inputs with IEC C14 sockets. Refer to SHOGUN STUDIO 2 User Manual for more information. Units purchased in Japan will have a different power input con- figuration, as pictured below.
- Page 18 RJ45 connection For SERVICE ONLY and should only be used if instructed to do so as part of firmware updates.
-
Page 19: Solid State Drives (Ssds)
There are quite a large number of drives available on the market, and newer models appear all the time. To avoid potential data loss and/or write/read errors, ATOMOS only recommends the use of AtomX SSDmini and approved SSD media only. For the most up- to-date information on compatible drives, please visit: www.atomos.com/drives... -
Page 20: Secure Erase
It fits directly into the SHOGUN STUDIO 2 with the addition of an extension handle (SSDmini adapter) and is compatible with all ATOMOS recorders and docking stations. AtomX SSDmini is backward compatible with previous ATOMOS devices by adding the SSDmini adapter to the drive. -
Page 21: Backing Up And Archiving
31 File Recovery Your SHOGUN STUDIO 2 is able to detect when the drive is under stress and it will recover from any break in a recording by waiting until the drive is ready to continue, and then resuming from that point. If frames have been dropped because of shock or vibration, a “Skippy”... - Page 22 SHOGUN STUDIO 2 2 includes the ATOMOS USB-C 3.1 Powered Docking Station, which allows you to efficiently offload the drive contents direct to your computer.
- Page 23 For the most up-to-date information on compatible drives, please visit: www.atom- os.com/drives Master Caddy 1 drives can connect to a Master Caddy Docking Station, but are NOT compatible with the SHOGUN STUDIO 2.
-
Page 24: Hdmi Cables
ATOMOS makes a range of professional HDMI cables which are ideal for connecting between your camera and SHOGUN STUDIO 2. For 4Kp50/60p and RAW recording we advise the use of ATOMOS HDMI 2.0 cables. For more information and to purchase... - Page 25 What you also need - SDI Cables SDI cables are robust physically and electrically; you should rarely have problems with signal transmission unless your cables are either damaged or too long. Please remember that SDI cables use locking connectors and will not simply pull out if they are jerked or tripped over.
-
Page 26: Connecting And Powering Up
/ strip to an uninterruptible power supply in your rack. The SHOGUN STUDIO 2 has 2 x AC inputs and we advise using both where possible. These inputs provide you with a a Dual Redundant AC Power Supply. - Page 27 Once this has happened the power button can be used to turn on the device. The SHOGUN STUDIO 2 does not feature a software off function in the menu and can only be powered down from the physical switch on the front of the unit.
-
Page 28: Mounting Disks In The Master Caddy
Master Caddy III. A Master Caddy III and screws is included in the box with your SHOGUN STUDIO 2. If you have used Master Caddy II before with other ATOMOS products, you will notice that Master Caddy III has a slim- mer, lighter weight design to ensure compatibility with the CONNECT range of hardware products. - Page 29 It is important to properly align the drive correctly with this gap in the Master Caddy III, so that the drive can connect to the SATA connectors on SHOGUN STUDIO 2 when inserted. SSDs are very sensitive to damage from static electricity. Please observe all the usual precautions when handling them and NEVER touch the exposed SATA connector as static electricity may be harmful to your disk.
- Page 30 Inserting the Master Caddy III into the media slot When inserting the Master Caddy III into the media slot on your SHOGUN STUDIO 2, ensure that the SATA connectors on the disk line up with the SATA connectors on your device.
-
Page 31: Inserting And Removing Media
Inserting and Removing Media Master Caddy II Slot On the front of the SHOGUN STUDIO 2 a drive slot is located under the centre of each of the 7.1” SuperATOM IPS monitors. To insert a drive make sure it is mounted correctly in the Master Caddy II and push the drive in to the slot. -
Page 32: Best Practice
Date & Time It is vital you set the correct date and time on your SHOGUN STUDIO 2 to ensure that the metadata for your files is correct. To access the Date Time tab, tap the input indicator from the home screen Information bar. -
Page 33: Format Media
Swipe left to reveal more tabs that contain settings. If you cannot find the menu you are looking for, swipe left or right. Use the -+ icons for each setting to set the time zone, time and date used on the SHOGUN STUDIO 2. - Page 34 The Media menu provides information on the drive currently inserted. To format the drive tap the Format Drive button (below).
- Page 35 Secure Erase Format For drives that carry the ATOMOS Logo such as the G-Technology 4K SSD, Angelbird 4KRAW, AtomX SSDmini by Angelbird and Sony, an option for Secure Erase is also presen- ted. For more information refer to Secure Erase Format in the "Media Menu" on page 85.
- Page 36 Unit Name You can also modify the unit name for your SHOGUN STUDIO 2. Creating a unique name for each SHOGUN STUDIO 2 you are using can be very useful when using multiple devices or with multicam shoots. Practicing good file management during production will save you valuable time in post production.
-
Page 37: File Naming
AtomOS Updates (Firmware) From time to time we will issue AtomOS (firmware) updates for your SHOGUN STUDIO 2. This is the software that runs inside your SHOGUN STUDIO 2 and is available from our support page, along with the release notes for each AtomOS release. - Page 38 SHOGUN STUDIO 2 from the left side of the screen. check the current AtomOS ver- sion for SHOGUN STUDIO 2 which will be listed at the top of the page. If the listed AtomOS version number is greater than the AtomOS version number displayed on the SHOGUN STUDIO 2, a firmware update is required.
- Page 39 Insert a compatible, formatted drive into your Docking Station and connect it to your computer. Always format your drives in the SHOGUN STUDIO 2 first. It formats the drive for optimal performance for video Unzip the downloaded zip file and copy the ATOMST2.FW file to the root of the drive in the docking station.
- Page 40 Insert the drive with the ATOMST2.FW file into the SHOGUN STUDIO 2. It is very important that your SHOGUN STUDIO 2 does not lose power during a firmware update. Press the Power Button to power the SHOGUN STUDIO 2 on. The AtomOS update pro- cess will begin automatically.
- Page 41 All you have to do is press and hold the on/off button for 10 seconds. If you do this your SHOGUN STUDIO 2 will revert to its factory condition, and you will be able to retry the firmware update later (taking...
- Page 42 AtomOS 10 Operating System With the AtomOS 10 Operating System, you get the ultimate touch interface for mon- itoring and recording and an operating system that has a clean, intuitive and elegant design. It’s simple and straightforward, but at the same time it provides access to the complete range of features.
- Page 43 The Main Screen - Home Screen The ATOMOS 10 home screen is designed for unobstructed monitoring at all times. The clean and uncluttered design of ATOMOS 10 concentrates the attention on the image, not on the device’s operation. From the muted main button controls through to flexible his- togram size and positioning, all on-screen controls are non-obtrusive and incredibly intu- itive to use.
- Page 44 LUMA WAVEFORM: Luma Waveform is a constant on your home screen, to allow for greater control over monitoring without compromising the subject. AUDIO: Audio Meters. Touching the Audio meter will open the Audio Menu. TIME REMAINING: Time Remaining on Disk (at current record settings). Changing Recording Format will change Time Remaining.
- Page 45 The Main Screen - Information Bar At the top of the SHOGUN STUDIO 2 screen is the area referred to as the Information Bar. It displays the input source as SDI or HDMI, the settings of your input device/camera, cur- rent settings of your SHOGUN STUDIO 2, media, audio, disk capacity and more.
- Page 46 MONITORING MODE: Displays the monitoring display mode that has been selected. Native, Rec709, HLG, PQ or the name of the 3D LUT selected. Touch to change settings. CODEC (RECORDING FORMAT): Shows the recording format. Touch to change set- tings. METERS: (Audio Meters): Touching the audio meters will open the Audio Menu. MEDIA : This shows the remaining recording time based on the chosen codec and remain- ing capacity of the drive.
- Page 47 The Main Screen - Monitoring Features At the bottom of the Monitoring screen are the Monitoring Features, accessible by tog- gling the MON icon. Monitoring Features do not affect your recorded file and can be turned on and off, or adjusted whilst recording (unless you choose to burn a LUT into your foot- age).
- Page 48 Any Monitoring functions you have enabled will remain active until deac- tivated. EDIT: Press to show Editing Features and Information Bar. Press again to return to home. Any Monitoring functions you have activated will remain active until they are turned off. SETTINGS (yellow): Touch to access Monitoring Feature Settings.
- Page 49 The button is dimmed because you cannot record. PLAY Touch this icon to play previously recorded clips and touch it again to pause playback. When you press the green Play button the SHOGUN STUDIO 2 will switch to playback mode and automatically play the last recorded clip.
- Page 50 Touching the folder icon will reveal the available playlist. SHOGUN STUDIO 2 2 uses a unit name, scene, shot and take convention to name the clips. Select the clip you want to play by touching the file name and this will start to play- back.
-
Page 52: Playlist Options
Close Screen Tap to close the screen. Folder level up Tap to navigate one level up in the folder structure. Playlist Options Tap to enable Playlist options. For more information on using playlists, refer to "Playlists" on page 137 No disk / disk not secure The Play button will be dimmed and disabled if there is no disk, where there is a poor connection or the disk is not correctly formatted and during record- ing. - Page 53 MON (Monitor) Pressing MON reveals Monitor Assist icons as shown in "The Main Screen - Monitoring Features" on page 46 section. These features are explained in detail in the Monitoring Features section. EDIT You can use the edit tools during recording and playback. Pressing EDIT takes you into a number of options.
-
Page 54: The Menu System
The Menu system Tap on the Input, Output, Codec, Media or Battery indications in the Information bar at the top of the home screen to open the menu related to that item. Menu pages contain information as well as settings that can be adjusted. Across the top of the menu page that opens are menu tabs that link to the other menu pages. -
Page 55: Input Menu
Input Menu The source section allows you to select the input signal connection type, and related set- tings. SOURCE Input To switch between different sources, tap on Input to open the source selection screen. By default, SDI sources will use a single input signal, however you can configure the device for dual or quad link as well as four separate inputs for switching. -
Page 56: Hdmi Standard
• Quad link 3G-SDI • Switching 4x3G-SDI When an option is selected on the left, the image on screen will display the cable con- figuration. This helps to ensure that you are selecting the correct input type and have the correct number of cables connected to the SDI inputs. - Page 57 When connected to an SDI source, the Input menu will have an additional section called SDI MULTILINK. The SHOGUN STUDIO 2 supports dual and quad link SDI input. By default, SDI sources will use a single input signal, to switch to Dual or Quad link, tap Mode under SDI MULTILINK.
- Page 58 Single (Single Link) mode When you have selected Tap 12G SDI 1 to select the SDI channel Source – 12G-SDI 1 or 12G-SDI 2.Select channel Source – 1 or 2. Dual (Dual Link) mode To monitor or a record a dual link SDI signal, connect the SDI inputs to the 12G inputs IN1 and IN2, 3G IN3 and IN4 are unused in Dual Link mode.
- Page 59 Quad (Quad Link) mode When the device set to Quad Link mode, a 4x 3G or 4 x HD SDI signal can be received. SDI input signals must be connected in the correct order to input IN1, IN2, IN3, and IN4 to use Quad Link.
- Page 60 4x ISO (Switching 4x3G SDI) mode When the device is set to Switching 4x3G SDI mode, you can connect up to four separate 1080p60 signals to the SDI inputs for switching between those inputs to create one video output. This means that you can do a multicamera production where you can easily switch between multiple camera angles, as well as pre-recorded content and presentations that are running on a computer.
-
Page 61: Channel Source
The indicators for channels 1-4 will be green and yellow. For more information, refer to the Switching section. When connecting sources to the inputs for switching, you must ensure the following: All sources must be connected to your device via SDI to be available for switching. To use HDMI cameras and other HDMI sources, convert the signal to SDI first with an HDMI to SDI signal converter. - Page 62 TRIGGER The SHOGUN STUDIO 2 can be remotely triggered to record from your camera. Select the correct triggering option for your camera and set Trigger to ON. Source The SHOGUN STUDIO 2 can be remotely triggered to record from your camera. For HDMI...
- Page 63 A green tick on Source indicates the SHOGUN STUDIO 2 has locked signal on this input, a red cross indicates a signal or lock issue with the attached device, double check your cable and camera output settings. CAMERA OUTPUT For the best image processing results it is essential to match the SHOGUN STUDIO 2 set- tings to the camera/input settings.
- Page 64 HDMI HDR Auto HDR is detected when there is a compatible input signal. It is important that this is OFF if the camera is not outputting HLG or PQ. It should not be used for regular Log. About Log/HDR A better understanding of Log and HDR will enhance your workflow and ultimately allow you to capture maximum amount of detail during recording, and save you time in post production.
-
Page 65: Output Menu
VIDEO OUT This section displays the resolution of the Input. When processing options are applied below it will be adjusted accordingly. HDMI Output Displays the resolution and frame rate of the HDMI Output from your SHOGUN STUDIO 2. - Page 66 SDI OUTPUT Displays the resolution and frame rate of the SDI Output from your SHOGUN STUDIO 2. SDI 3G Type Allows you to specify the ‘SDI 3G Type’ for compatibility with equipment that expects a specific type of 3G-SDI video. Tap to cycle through the options:...
- Page 67 display standard for BT2020, DCI-P3 or Rec709. HDR Out Enable or disable HDR on the output. HDR Type Allows you to select the HDR type to output. Tap to cycle through PQ, HLG and Dolby. Dolby Vision play out Engage the HDR Out switch if you are feeding HDR footage to the device from a camera or games console that supports HLG or PQ HDR output using the appropriate metadata flags.
- Page 68 Switcher Menu The switcher menu will appear in the menu system after you have selected ‘Switching 4x3G SDI’ as the input source. In this mode, you can connect up to four video inputs and 'switch' between those inputs to create one video output. This means that you can do a multicamera production where you can easily switch between multiple camera angles, as well as pre-recorded content and presentations that are running on a computer.
- Page 69 AUDIO In this menu you can set how the analog and digital audio channels are allocated to your recording. Whilst in switcher mode you can record an embedded digital stereo pair for each input, and also embed the analog input within each ISO recording as well as the Pro- gram recording.
- Page 70 • None No embedded digital sources will be recorded in the program file. Only the ana- logue inputs, if armed, will be recorded in the program file. Embedded digital sources will only be recorded in the ISO files. • Follow Switched Source Audio will follow video, so when you switch to a different input, the source for audio will come from the input you switched to.
-
Page 71: Record Menu
Record Menu Space Remaining Indicates the expected recording time remaining on the inserted media at the current set- tings. Changing your recording settings may extend or decrease your available recording times. Pre-Roll (On/Off) Whilst enabled, the input is constantly being recorded, with approximately the last 8 seconds in HD and 2-3 seconds in 4K being cached into memory. - Page 72 After selecting a codec, you will be prompted to tap Confirm to switch to that codec. If you select an optional codec like Avid DNx, ProRes RAW or H.265, you will be prompted to activate the codec at my.atomos.com as these codecs must be activated before use.
-
Page 73: Record Format
Compression Tapping on this setting allows you to toggle the compression for the following codecs: Apple ProRes Apple ProRes is built in to the SHOGUN STUDIO 2 and offers three levels of compression (HQ, 422 & LT). Avid DNx Avid DNx requires free activation via my.atomos.com... - Page 74 1080p30 1080i60 You will of course want the SHOGUN STUDIO 2 to record the actual frame rate such as 1080p23.98, not the1080i59.94 to disk. In many cases, it is not possible for the SHOGUN STUDIO 2 to detect when pulldown has been applied to the video, so you will have to set the correct mode of removal on the SHOGUN STUDIO 2 to match the setup of your cam- era.
- Page 75 1080p23.98 or 1080p24 If you have set 1080p23.98 or 1080p24 in your camera and your SHOGUN STUDIO 2 dis- plays 1080i59.94 or 1080i60, then you can easily remove the pulldown by following these steps: Select the Input Menu from the top Left and toggle the blue arrow underneath Record repeatedly until you see 1080p23.98 (or 1080p24) displayed.
- Page 76 Some cameras use a variant of pulldown removal, for example Panasonic Advanced pulldown. The SHOGUN STUDIO 2 does NOT support this format, and it will not be detected. Standard Panasonic pulldown is supported, ensure in the Panasonic camera settings that pulldown is not set to Advanced.
- Page 77 File Menu This menu allows you to change the unit name for your SHOGUN STUDIO 2. It also gives you the ability to dictate the scene and shot number that will be recorded. Unit Name Creating a unique name for each SHOGUN STUDIO 2 you are using can be very useful when using multiple devices or with multicam shoots.
- Page 78 Letter - / +: Use these icons to move forward or backwards through the letters of the alphabet. Doing so will update the letter you selected with the arrows in the Unit Name setting. Scene Allows you to adjust the Scene number that will form part of the recorded clip filename: _ S001_S001_T001.MOV - / +: Use these icons to increase or decrease the numerical value for the Scene number up to...
- Page 79 Red/ Arri file naming is only supported when the signal is connected via SDI.
-
Page 80: Audio Menu
To monitor the audio, tap the headphone icon next to the channel you wish to monitor from the headphone output. Only one channel (stereo pair) may be monitored at any time using headphones connected to the 3.5 mm headphone jack on your SHOGUN STUDIO 2. - Page 81 You can record multiple channels of audio by tapping multiple REC buttons. Orientation Allows you to select the orientation for audio meters on the SHOGUN STUDIO 2 display at the bottom of the screen. Tap to cycle through the options: Horizontal: Displays the 2 channels you are actively monitoring.
-
Page 82: Audio Embed
The available options will depend on how many channels of audio are coming in. Tap to cycle through the options. With SDI inputs, your SHOGUN STUDIO 2 can record 12 embedded audio channels, instead of the usual 8 channels of audio when using HDMI. -
Page 83: Analog Menu
Headphone icon Tap the headphone icon to monitor the analog audio from the 3.5 mm headphone output on your SHOGUN STUDIO 2. For more information on meters and monitoring, refer to "Audio Menu" on page 79 Left Gain / Right Gain - / +: Use these icons to adjust the gain applied to the left and right analog audio channels. - Page 84 You can usu- ally adjust this from the camera, please see your camera manual for operational details. SHOGUN STUDIO 2 Mic input supports dynamic and powered microphones only. When using these, audio must be set as Mic Level Audio during Playback Mode...
-
Page 85: Phantom Power
Phantom Power You can choose to deliver phantom power over the XLR/MIC input. Tap Off to toggle Phantom Power On. -
Page 86: Media Menu
Displays the total capacity of inserted media. Format Tap to format the media inserted in your SHOGUN STUDIO 2. A confirmation screen will ask you to confirm that you want to format the media, and gives you an option to cancel if you pressed the button by mistake. - Page 87 Secure Erase Format For drives that carry the ATOMOS Logo such as the G-Technology 4K SSD, Angelbird 4KRAW, AtomX SSDmini by Angelbird and Sony, an option for Secure Erase is presented. This allows for the entire drive including the drive cache to be formatted. This will erase ALL content on the drive meaning nothing can be recovered.
-
Page 88: Timecode Menu
Timecode Menu Timecode Display: Displays the current timecode. The position of the timecode display will depend on the screen mode you are using. In monitoring mode it appears in the cen- ter top, below the info bar. In home screen mode the timecode display sits on the bottom near the REC PLAY MON EDIT icons. - Page 89 To enable rolling Timecode Start/Stop functions, simply set the HDMI Timecode switch to on. When enabled, pressing the camera Record Stop/ Start button will make the SHOGUN STUDIO 2 start and stop recording simultaneously as the timecode starts and stops.
- Page 90 With this setting, each new clip that is created will contain embedded Timecode starting with the time of day when the recording is started. Please check that SHOGUN STUDIO 2 clock has been set correctly. This can be set in the "Date Menu" on the next page...
- Page 91 Tap to cycle between 12H and 24H time formats. Hour/Minute/Second - / +: Use these icons for each setting to set the time used on the SHOGUN STUDIO 2. This will also change the time of day Timecode. DATE Month/Day/Year - / +: Use these icons for each setting to set the date on the SHOGUN STUDIO 2.
-
Page 92: Battery Menu
STUDIO 2. Battery When a battery is attached to your SHOGUN STUDIO 2, the Battery icon on the Power menu screen indicates the remaining power in the attached battery. The numerical figure above the battery icon will indicate the remaining power in volts whilst the shading inside the battery icon provides a visual indication of the current power level. - Page 93 Power Priority Mode This setting allows you to select which power source to use when you have both DC power and a battery attached to your SHOGUN STUDIO 2. Tap Power Priority Mode to toggle between the following options: DC : When DC (Power plug icon) is selected, the plug icon will be white.
-
Page 94: Factory Reset
Activation Menu. You can also check on the ATOMOS website to ensure you are running the latest firmware: www.atomos.com/support Factory Reset Allows you to revert your SHOGUN STUDIO 2 to it’s factory condition. All user settings will be lost. Before performing a factory reset, unpair your device from the cloud... -
Page 95: Setting Up For Recording
Setting up for recording As soon as you connect a supported signal to the SHOGUN STUDIO 2 input and have inser- ted a formatted drive the following will happen: The REC icon will be illuminated (red) The input source & format will be shown in the top left corner of the information bar (in monitor mode) Audio input meters will be responding to the source. - Page 96 Ready to Record (monitor mode/features) No Input / No Disk / No Disk Formatted...
- Page 97 SmartControl is a versatile set of functions used to control the starting and stopping of recording by automatic or external means. This section outlines the different methods to start and stop recording. SHOGUN STUDIO 2 2 Start and Stop record control can be triggered by the following methods: Home Page Touch Screen...
- Page 98 HDMI Rolling Timecode Trigger Record If the camera is in Record Run mode, recording can be stopped or started by a moving Timecode via HDMI. When enabled the camera and the SHOGUN STUDIO 2 will start and stop recording simultaneously.
- Page 99 SHOGUN STUDIO 2 to start/ stop recording at the same time as the camera.
-
Page 100: Monitoring Features
Monitoring Features At the bottom of the Monitoring screen are the Monitoring Features, accessible by tog- gling the yellow MON icon. Monitoring Features do not affect your recorded file and can be turned on and off, or adjusted whilst recording. Not all Monitoring features are available at first glance. - Page 101 Monitoring Features Activation Icons The Monitor Features will only be illuminated and available if there is an input signal detected.
- Page 102 Zoom Zoom mode enables you to punch in and check critical focus 1:1 Toggle to display 1:1 pixel mapping. The indicator box shows the loc- ation of the screen you are viewing. 4K 1:1 shows 1/4 of the 4K UHD image. 2:1 Toggle to magnify the screen.
- Page 103 Waveform (WFM) and Vectorscope These traditional scopes provide a visual representation of your image. You can cus- tomize the settings for Waveform Monitoring in the "Waveform tab" on page 111 of the settings menu. Luma Waveform The Luma or Luminance Waveform is a great way to visualize the dynamic range of your image, allowing you to protect exposure of both your highlights and shadow detail.
- Page 104 The Waveform Monitor will remain on screen when hiding the overlays ensuring the focus remains on calibrating your image. If the MON button is pressed the WFM will move in to the bottom icon line up. Vectorscope The Vectorscope display shows color information of hue (shown as a phase vector), and saturation (measured by outward distance from the center).
-
Page 105: Focus Peaking
Focus Peaking, Zebra and False Color ATOMOS 10 features monitoring tools that help with making your shot picture perfect. Easily access Focus Peaking, Zebra, False Color and Blue Only Exposure to check image is in focus, noise free and correctly exposed. Options for safe area/ title area markers along with aspect ratio markers and anamorphic de-squeeze functions are also available. -
Page 106: False Color
False Color The False Color feature allows you to quickly expose your image by seeing an overall rep- resentation of brightness grouped into meaningful colors. False Color Scale The False Color Scale on the left-hand side of the screen is a legend that correlates bright- ness values in the image with specific colors. - Page 107 Blue Only Exposure Blue only displays a greyscale image based on the blue channel of the input signal. This is useful to observe the noise content of a video image as sensor noise is most visible in this channel.
- Page 108 Frame Guides, Safe Areas & Anamorphic De- Squeeze ATOMOS 10 has advanced frame guides and safe areas. You can select from common cine, social or TV frame guides. The aspect ratio markers are very useful with the Ana- morphic De-Squeeze tool to preview crops that could be made in post.
- Page 109 Allows you to de-squeeze images when monitoring content filmed with anamorphic lenses. Tap the de-squeeze icon to cycle through the options to select the amount of de- squeeze required, so that the image on your SHOGUN STUDIO 2 is not distorted. The options include:...
- Page 110 1.8x, 1.5, 1.33x, 1.25x Scopes are not available when anamorphic de-squeeze is activated.
-
Page 111: Settings Menu
Settings Menu This menu allows you to adjust the settings and behaviors of the Monitoring Tools that will be used when each monitoring tool is enabled. It also provides settings for LUTs, the dis- play and monitor modes. To access these settings, tap on MON in the Information Bar across the top of the screen. Alternatively, tap on the yellow settings icon in monitoring mode and then select the desired tab across the bottom of the page. -
Page 112: Waveform Tab
Waveform tab To access Waveform Monitoring settings simply tap on the Settings icon and select the Waveform Tab. To change the size of the waveform, press on the corner icon, lower screen icon or full Screen icon. The display will update immediately. The size settings for the Vectorscope are limited to corner and full Screen. - Page 113 Focus Peaking tab To access the focus peaking settings, simply tap the Settings icon and select the Focus Peaking Tab. These settings allow you to customize how peaking is displayed. There are multiple display modes and you can select the color and width of peaking indicators. Mode Tap on these icons to switch between the focus peaking modes: Focus Peaking Color...
- Page 114 Focus Assist Outline This option overlays the focus peaking indicators on top of an outline of the image. Outline Color Adjusts the color used for peaking. It can be helpful to adjust this color so that areas in focus stand out from the color of the background.
- Page 115 Outline Width Adjusts the width used focus peaking indicators on screen. Tap to select the desired width.
- Page 116 Zebra tab To access the Zebra settings, tap the Settings icon and select the Zebra Tab. Zebra Threshold These settings allow you to select an exposure level in your image where you want the Zebra indicators to appear. A setting of 95-100% is commonly used to indicate areas of the image that are close to overexposure or that are overexposed.
- Page 117 Davinci Resolve, Photoshop or dedicated applications like LUTCalc. To cre- ate you own custom Looks that can then be imported to your ATOMOS device. They can provide a great base or primary grade that allow you to apply an instant look to your foot- age.
- Page 118 Tap on the folder icon to access your media. If you select a slot that already has a LUT loaded, you will be asked to confirm the fact that you want to overwrite the loaded LUT when you tap on the folder. Navigate through the disk file system to the LUT file to be uploaded, and tap on the name of a LUT to select it.
- Page 119 The LUT has now been loaded and will be selected by default. Repeat the process to store up to 8 LUTs on your SHOGUN STUDIO 2. Once a LUT is loaded into your SHOGUN STUDIO 2, it cannot be deleted.
- Page 120 During recording During Output Compare During Record If this option is selected, your SHOGUN STUDIO 2 will bake the LUT look into the record- ing. When enabled, a CUSTOM LOOK icon will flash in the top corner of the monitor and...
- Page 121 OUTPUT LOOK – With this option, the selected LOOK is also applied to the HDMI loop out of the SHOGUN STUDIO 2. This will allow for instant preview on a larger monitor or to be used with a wireless sender. This function can also be combined with the down convert option that can be found in the input menu.
- Page 122 Remember that you can remove all overlays by simply tapping in the center of the screen. Tap again to reveal the overlays.
- Page 123 Using Standards - Native / Rec.709 / HLG / PQ ATOMOS 10 uses predefined settings to display your video when viewing in HDR. On the left side of the screen are buttons that correspond with Native, Rec.709 (SDR), HLG and PQ (HDR) levels.
- Page 124 Rec.709 image or a Log image etc. A standard Rec.709 image will look correct and a Log image will look flat. Rec.709 With this mode selected the SHOGUN STUDIO 2 will map from the camera gamma/gamut so that 100% linear IRE maps the panel’s white (1000nits). Everything above is clipped. HLG (Hybrid Log Gamma) With this mode selected the SHOGUN STUDIO 2 will map from the camera gamma/gamut so that 1200% linear IRE maps the panel’s white (1000nits).
-
Page 125: Monitor Options
With PQ mode selected the SHOGUN STUDIO 2 will map from the camera gamma/gamut so that 2000% linear IRE maps the panel’s white (1000nits). Highlights have more com- pression and look similar to HLG, but closer inspection will reveal more detail is visible in specular highlights. - Page 126 Tally The Tally light on the rear of the unit will still display red for record and the idle (green) status will be displayed on the front screen LED. Flip Screen The Flip screen option allows you to invert the screen to meet your needs of operation. Whilst the screen is inverted, take note to respect the air flow and not to obstruct the cooling vents of the unit.
- Page 127 Settings Menu - Display tab To enter this menu, tap on MON in the Information Bar across the top of the screen or tap on the yellow settings icon in monitoring mode. Then select the Display tab on the bottom of the page.
- Page 128 Lift Increasing lift will brighten the image and lessen the shadows Gamma Gamma control allows you to create darker and richer shadows. This may be useful when monitoring in bright daylight conditions. Gain Gain will boost the image brightness and affect the highlights Reset Quickly return all values to default (Apart from the Backlight setting)
- Page 129 Secondly ensure you are sending a Log signal into the SHOGUN STUDIO 2 so that you are recording the HDR Log information. For more information refer to the Camera Output sec- tion.
- Page 130 ATOMOS 10 HDR uses an in depth understanding of each Log curve and combines it with the control of the panel processing and backlight in order to apply an increased brightness to the highlight areas of the scene. Alongside the physical light in the scene, the faster your lens the greater the level of brightness you’ll have to play with.
-
Page 132: Playback Mode
Playback mode Pressing the Play button switches the device into playback mode and the last clip recor- ded on to the drive will instantly begin to playback. Playback allows you to instantly ana- lyze the content. This is key for establishing if takes are correctly focused, lighting has changed, or previewing recorded content with LUTs applied. -
Page 133: Main Controls
Main Controls REC (Record): Jump to Record Home Screen PLAY: Play and pause the current clip MON (Monitor): Reveal/hide monitoring tools. Toggle on/off EDIT: Reveal/hide edit tools. Toggle on/off... -
Page 134: Playback Controls
Settings Touch to access Playback settings and tools. Recorded Files Browse recorded files Playback Controls These controls become available during playback. Scrub bar Scrub forward and back through the clip. Speed/direction control The percentage slider allows for you to set the playback direction and speed. This is per- fect for previewing high frame rate at half or quarter speed such as 60p at 30p in either forward or reverse directions. - Page 135 2x/4x Playback at 2x or 4x speeds both forward and in reverse. Next/Previous Jump to next or previous take. Advance Whilst a clip is Paused these buttons have the ability to step the clip by 1 frame either for- ward or reverse to give you chance to analyze the clip in more detail, this is especially use- ful when combined with the 2:1 zoom function.
- Page 136 Playback One of the key elements of the SHOGUN STUDIO 2 is the ability to utilize the monitor recorder as a playback and playout device for the content that has been recorded whilst maintaining the same visually lossless high quality images. SHOGUN STUDIO 2 2’s play- out capability also allows you to send the live and recorded footage out to a larger mon- itor or switcher.
-
Page 138: How To Create A Playlist
Playlists To increase the functionality and flexibility of the playback mode there is also the ability to create a Playlist. How to create a Playlist To build a Playlist, open the Recorded Files folder, then press the Playlist button which will turn green and reveal the options available. - Page 139 Playlist Options Order This icon lets you adjust the order in which clips playback. By default the order of recor- ded clips is based on their file names, with the last clip recorded at the top of the list. Tap Order to toggle the order that clips will be played back in.
-
Page 140: Favorite Playlist
Favorites Plays only the clips that are tagged as favorites. Combined Plays only the clips that are tagged with favorite and the selected clips The duration of each clip in the playlist is combined together and are shown on the scrub bar in playback controls. A white vertical line indicates the start and end points and clips will seamlessly playback across those selec- ted to be in the playlist. - Page 141 More information about using the In and Out points, tagging and XML Export is available in the "Using Edit tools during recording, playback and monitoring" on page 158 section.
- Page 142 Playback - Video Format menu This menu appears when you tap on VIDEO in the Information bar across the top of the screen whilst in Playback mode. It contains information about the settings used in record- ing the clip. VIDEO OUT Format: Displays the resolution and frame rate used in recording the selected clip.
- Page 143 Log/HDR (On/Off) Tap to enable/disable HDR image processing inside the SHOGUN STUDIO 2. Camera Tap to scroll through to the manufacturer of the camera providing the input. Options include: Sony, Fujifilm, Canon, Panasonic, ARRI, RED, JVC, Leica, Nikon, ZCAM, Olympus, OMSYSTEM and Rec.2100.
- Page 144 Gamut options are not applicable to all cameras / devices Playback Auto HDR (On/Off) Engage this switch if you are feeding HDR images to the SHOGUN STUDIO 2 from a cam- era or games console that supports HLG or PQ HDR output directly, using the appropriate metadata flags.
- Page 145 This menu provides information and settings for the signal that is being output from your SHOGUN STUDIO 2 over HDMI and SDI. The Output menu that appears whilst in Playback mode is similar to the Output menu that appears whilst in the Recording and Monitoring modes.
- Page 146 Level A, Level B or Auto. GENLOCK SIGNAL Genlock Tap to toggle Genlock On or Off. When On, your device will embed an external Genlock signal into the output. OUTPUT OPTIONS 4K to 2K Output Allows you to scale 4K or UHD inputs for output. This will scale 4K to 2K and UHD will be scaled to HD 1080p.
- Page 147 Here you are able to set a conversion from your LOG input to a HDR display standard such as HLG or PQ. You can also define the output color gamut from your camera’s gamut to a display standard for BT2020, DCI-P3 or Rec709. HDR Out Enable or disable HDR on the output.
- Page 148 Playback - Audio menu The Audio menu that appears whilst in Playback mode is almost identical to the one that appears whilst in the Recording and Monitoring modes. For more information on these set- tings refer to "Audio Menu" on page 79 section. Some of the settings that are present in the Audio menu whilst in Recording and Monitoring modes, will not appear in the Audio menu whilst in Playback mode.
- Page 149 Playback - Date The Date menu that appears whilst in Playback mode is identical to the one that appears whilst in the Recording and Monitoring modes. For more information on these settings refer to the "Date Menu" on page 90 section.
- Page 150 Playback - Battery The Battery menu that appears whilst in Playback mode is identical to the one that appears whilst in the Recording and Monitoring modes. For more information on these set- tings refer to the "Battery Menu" on page 91 section.
- Page 151 Playback - Info The Info menu that appears whilst in Playback mode is almost identical to the one that appears whilst in the Recording and Monitoring modes. For more information on these set- tings refer to the "Info Menu" on page 93 section. Some of the settings that are present in the Info menu whilst in Recording and Monitoring modes, will not appear in the Info menu whilst in Playback mode.
-
Page 152: Edit Mode
For more information refer to the "Playlists" on page 137 section. ATOMOS 10 has also introduced extended tags to allow you to apply more specific tags that can help facilitate the edit. For more information refer to the "Using Extended Tags"... - Page 153 Main Controls REC (Record): Press record to start recording PLAY: Play and pause the current clip MON (Monitor): Reveal/hide monitoring tools. Toggle on/off EDIT: Reveal/hide edit tools. Toggle on/off...
- Page 154 Settings There are no user accessible settings available for Edit functions in the current ATOMOS firmware. This may change with future firmware updates.
- Page 155 Using Markers and Tags you can quickly start the editing and review process right here on your SHOGUN STUDIO 2, avoiding delays incurred when importing inferior and unwanted footage. You can review and tag immediately on-set with your client or director, or work through your takes without having to dump the recorded files to another work- station/NLE.
- Page 156 Reject Mark the take/section as a reject Talent 1 Tag talent or assign another meaning Talent 2 Tag talent number 2, or assign another meaning, event etc. Over Exposed Tag clip as over exposed or out of focus...
-
Page 157: Color Correction
Color Correction Tag clip as ‘color’. Use tag to indicate a problematic image or even use for another pur- pose Noise Tag clip as containing background noise or interference Cut Away Tag clip as a cut away scene Close Up Tag clip as close up for use in edit and post... - Page 158 Wide Shot Tag clip as wide shot Export XML Once your clips have been tagged you can capture all the information and utilize the XML data to speed up edit and post production time. SmartLog is compatible with FCP XML (.fcpxml). RESET Pressing the reset button will remove all tags and XML data from a clip.
- Page 159 Using Edit tools during recording, playback and monitoring To access edit tools simply tap the Edit icon during recording, monitoring or playback. In and Out points Set in and out points easily during playback. Use the scrub control to accurately find the correct moment while the footage is paused.
- Page 160 Favorite/Reject Press Play and when you see the section of the footage you would like to mark as good or bad, press Favorite or Reject and then press again to stop marking that section. Multiple tags can be applied to your clips to provide Timecode accurate meta tags that can be exported to Apple FCP XML.
- Page 161 Reset Tapping the reset button will remove all tags and XML data from a clip. This is useful when dealing with multiple takes or if a clip is tagged incorrectly. Reset will not remove or affect in-point and out-point settings. To remove markers you will need to reset the in and out- points...
- Page 162 Using Extended Tags Aside from Favorite and Reject tagging options, ATOMOS 10 includes extended tags that will greatly assist your edit and workflow processes. Careful consideration and use of tags during monitoring and review can be highly beneficial when you are ready to begin post production.
- Page 163 Exporting Tags Once your files have been reviewed you are ready to export the .xml file that contains all information from tags, In/Out points, Favorites and Extended Tags. It is essential to export the .xml file information from each clip will be ready for use in Final Cut Pro and other compatible NLEs Exporting Tags Tap the Export icon to export the tags you have created to an FCP XML file.
-
Page 164: Connecting Media
Never force the media into the docking station, just in case something isn’t set up or aligned properly The SHOGUN STUDIO 2 disk slot does NOT have a release latch for media. It is a friction-fit system. To remove simply pull the media out using the top... -
Page 165: Transferring Files
(ctrl+c copy, ctrl+v paste). Mac OS: Your SHOGUN STUDIO 2 disk will show in Finder. Select the files you wish to transfer, drag the files to your desired location or use the copy and paste commands. (COMMAND + C to copy, COMMAND + V to paste). - Page 166 Importing clips Video Codecs - Supported Applications We have chosen the Apple ProRes®, Avid DNxHD® and Avid DNxHR+ codecs as our main video codecs since they are visually lossless, as well as being edit-ready formats. Generally speaking, all major non linear editing applications support Apple ProRes and Avid DNxHD/DNxHR.
- Page 167 Importing SHOGUN STUDIO 2 footage into Final Cut Pro You can import SHOGUN STUDIO 2 footage into Final Cut Pro (FCP) in just a few simple steps. Connect the Docking Station to your Mac. For information on connecting the Docking Station refer to the "Connecting media"...
- Page 168 You’ll see the folders in the SHOGUN STUDIO 2 drive. Select the folder containing the foot- age you want to import. Click on Import All or Import Selected. Individual clips can also be selected.
- Page 169 Choose the Event you wish to import the footage into, or create a new event. Click on Import.
- Page 170 Your Scene, Shot and Take files now appear in the project window, ready for use in your FCP project.
- Page 172 Prior to importing the XML files into Final Cut Pro, ensure that: You have exported the XML file whilst the drive is in your SHOGUN STUDIO 2 You have connected your Master Caddy Docking Station and inserted your media into...
- Page 173 Create a New Project (or you can use an existing project). In this example it is called XML Import Select File> Import> XML Select the SHOGUN STUDIO 2 drive under Devices Choose the unitname.FCPXML, select Import The XML will import...
- Page 174 You can also filter the view to only see specific tags e.g.. favorite, etc.
- Page 175 ISO, exposure offset and color temperature in the Inspector tab. The settings that can be adjusted will depend on the camera used with your SHOGUN STUDIO 2 to record ProRes RAW clips. For information on the cameras that record ProRes RAW and the settings that...
- Page 176 Click on the Info button in the Inspector to show the Info Inspector Click on the word Basic at the bottom of the Info Inspector tab to open the Metadata View pop-up menu, and select Settings. The Info Inspector will now display the camera settings of the ProRes RAW clip(s).
- Page 177 Camera ISO Displays the ISO setting selected in camera during the recording of the selected ProRes RAW clip(s). This is for information purposes only and is not adjustable. This drop-down menu allows you to adjust the ISO setting for the selected clip(s).
- Page 178 Exposure Offset Adjusts the ISO setting up or down by as much as one stop. Camera Color Temperature: Displays the color temperature setting selected in camera during the recording of the selected ProRes RAW clip(s). This is for information purposes only and is not adjustable. Temperature Adjusts the color temperature setting for the selected clip(s).
-
Page 179: Technical Specifications
Technical Specifications Physical Specifications Without batteries & 5.0kg / 11lb media 447 x 152 x 280mm, 17.6 x 6.0 x 11.0”(without Dimensions (W x H x rack ears), 490 x 152 x 280mm, 19.3 x 6.0 x D mm) 11.0” (with rack ears) Mounting points Removable rack ears and desktop feet Dual Screen... - Page 180 1500 / 3000 Peak HDR brightness nits) Aspect ratio 16:9 Color Gamut Rec. 709 Atomos Calibrator with Xrite i1 Display Pro / Plus Calibration support (Retail) Color Pipeline AtomHDR Sony SLog / SLog2 / SLog3, Canon CLog / CLog2 / Clog3, Arri Log CEI160 / LogCEI200 /...
- Page 181 SDI RAW Apple ProRes RAW up to 6K RJ45 / Network Service only Bit Depth 8/10-bit Video / RAW up to 16 -bit Video Chroma Sub- 4:2:2 sampling HDCP copy protection Not supported Yes with Auto detection Metadata RAW - white balance, exposure index, shutter HDMI speed/angle, iris F stop, ISO, gamma, gamut File name from Arri, RED.
- Page 182 HDMI 8ch 24-bit, input dependent 12ch 24-bit, input dependent Analog Audio in 2 x XLR Per recorder channel Analog Audio out 2 x XLR Per recorder channel Headphone out 3.5 mm jack 2ch Timecode / Sync Embedded HDMI and SDI Time of day Yes, Time and Date LTC via BNC in/out Record mode...
- Page 183 Playback Playlist Yes, Selected, Favorites or Combined Loop playback Yes, with custom in and out points Apple ProRes RAW Yes, with linear PCM audio ProRes HQ / 422 / LT Yes, with Linear PCM audio Avid DNx HD/HR Yes, with Linear PCM audio Recording Functions Pre Roll Yes (HD 8s, 4K 2s) - Not available in RAW...
- Page 184 Pulldown Removal 24p (3:2 pulldown) 4K UHD Downscale Loop out - 4K UHD to FHD for HD DCI Crop Loop out - 17:9 to 16:9 Crop Remote control Auto HDMI Trigger, Supported Protocols - HDMI Canon, Sony, ATOMOS Open Standard...
- Page 185 1 year. Extended to 3 years on product regis- Standard tration Construction note: Your SHOGUN STUDIO 2 is designed to operate in ambient tem- peratures up to 40°C/104°F. Please note: Specifications are subject to change without notice. All information assumed correct at time of publishing.
Need help?
Do you have a question about the SHOGUN STUDIO 2 and is the answer not in the manual?
Questions and answers