Advertisement
Introduction
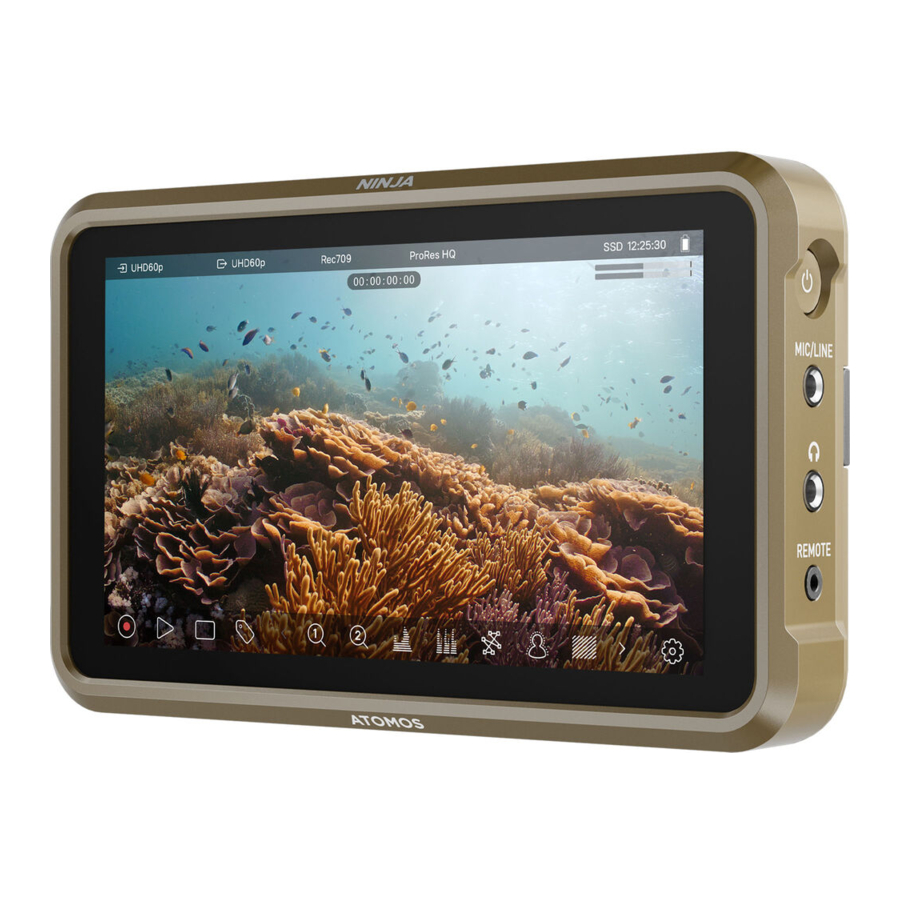
Experience unmatched flexibility thanks to its expansion port, the built-in HDMI 2.0 I/O, and its extensive recording capabilities in various industry-standard codecs. The daylight-viewable 1000 Nit screen allows you to confidently monitor your shots while showcasing the redesigned Atomos 11 interface in all its glory. Combining Ninja with the optional Atomos Connect accessory allows you to access a range of advanced cloud-based workflows, while AtomX CAST turns it into a compact 4-input HDMI switcher. Please take the time to read through this Quick Start Guide and register your product for free updates.
What's in the box
1 x Ninja
1 x Battery Eliminator
1 x USB-C PD to DC Adapter Cable
1 x Master Caddy III
1 x Quick Start Guide
You will also need (sold separately)
- HDMI Cable
Atomos have a range of HDMI cables with die cast connectors and coiled cables in a range of lengths and connections (sold separately).
Connect and power-up
Battery
The Ninja has a single battery slot. To connect a compatible battery, place the battery in front of the retaining lug, align with the connectors and slide the battery into the lock position.
 We recommend using Atomos NP-F series batteries.
To connect the supplied Battery Eliminator, follow the same procedure and lock it into position. Once the Battery Eliminator is in place, attach the supplied USB-C PD to DC Adapter cable to it via the DC Barrel connector and plug the USB-C connector into a compatible USB PD power adapter or power bank (Output: 30W minimum).
Alternatively, the Ninja can also be powered from a compatible D-Tap power source by using the optional D-Tap battery cable (ATOMDTPCB1).
Touching the battery icon in the top right of your screen will allow you to accurately see remaining battery life. Refer to the User Manual for more information.
Expansion Port
The Ninja features a built in Expansion Port that provides added functionality when paired with the optional Atomos Connect, AtomX CAST, AtomX SDI, and AtomX SYNC accessories.
Hardware Features
- On/Off and Screen Lock
To turn the Ninja on, press the power button on the side of the unit. To shut down, hold the button for at least 4 seconds (until unit turns off). - Remote Control/LANC and Calibration
The Ninja screen can be calibrated using the X-Rite i1DisplayPro. To connect you will need a USB to serial cable serial cable (ATOMCAB004). The remote port can also be used for remote camera control of Z Cam E2 cameras via the optional USB-C to serial cable (ATOMCAB018). - HDMI In/Out
The HDMI input connection used to record to the Ninja supports up to 4Kp60 video and 6Kp30 RAW inputs. The HDMI Output connection provides a live loop out or play-out when in Playback mode up to 4Kp60 video. - Battery Release Button
Press and slide the battery away from unit to remove. - Tally Light
The Red Tally Light on the rear of the unit indicates active recording. The Tally Light can be turned off in the menu options. - Disk Slot
Compatible with Master Caddy II & III media and AtomX SSDmini. - Screw Mounts + Locking Pin Holes (Arri)
3/8" screw hole with 1/4" adapter. Top and bottom. - Expansion Port
Provides added functionality when paired with the optional Atomos Connect, AtomX CAST, AtomX SDI, and AtomX SYNC accessories.
Parts&Buttons Overview

- On/Off and Screen Lock
- Remote
- HDMI In/Out
- Battery Release A
- Tally Light
- Disk Slot
- 3/8" Screw hole + 1/4" Adapter
- Expansion Port
Notifications

USA WARNING: This product contains the chemical lead (Pb) which is known to the State of California to cause cancer. For more information, visit p65warnings.ca.gov
Support
If you experience any issues using Ninja, or have an unanswered question don't hesitate to reach out.
Atomos.com/support
Safety Instructions
The Ninja is designed to a high standard, but there are some things you should be aware of that will prolong the life of the unit and for your own safety.
Using the Ninja safely
Although the Ninja is very lightweight compared to all the devices it replaces, it is still a solid object that could cause injury if misused.
- Always make sure that the Ninja is mounted securely and is unable to fall onto anyone nearby. This is especially important when there are children present who might be tempted to pull on cables.
- Always ensure that cables that run to the Ninja are clearly visible and do not present a trip hazard.
- Do not place on uneven or unstable surfaces.
- Do not insert anything but a Ninja Master Caddy II/III or AtomX SSDmini in the drive slot on the rear of the Ninja.
- Don't touch the Ninja screen with sharp, metallic or abrasive objects.
- Do not expose it to strong electrical or magnetic fields.
- Do not expose it to liquids, rain or moisture.
- Do not dispose of the Ninja in municipal waste and do not incinerate it, always follow local regulations for safe disposal.
Documents / Resources
References

Download manual
Here you can download full pdf version of manual, it may contain additional safety instructions, warranty information, FCC rules, etc.
Advertisement


Need help?
Do you have a question about the NINJA and is the answer not in the manual?
Questions and answers