Advertisement
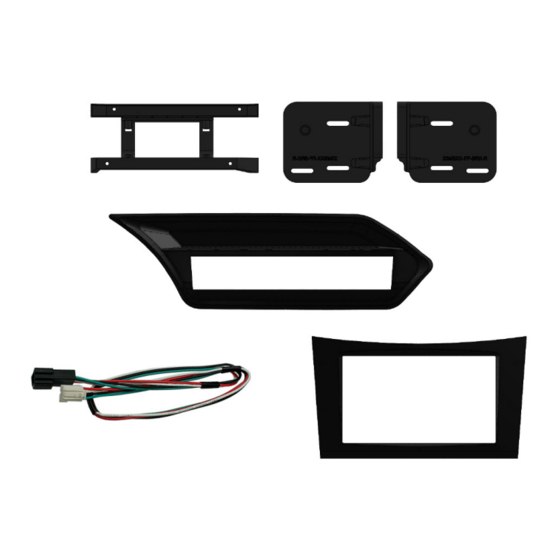
i.
ii.
iii.
iv.
v.
APPLICATION
Mercedes Benz E Class (W212)
Compatible with Left Hand Drive Vehicles Only
RECOMMENDED TOOLS
• Panel Removal Tool
FEATURES
• Allows for the installation of a double DIN aftermarket stereo
• Includes panel for relocation of OEM buttons
• Includes mounting brackets and fitting accessories
• Finished in black to match vehicle dashboard
The information provided in this document is subject to change without notice due to manufacturer changes and/or improvements to the product/s. This
instruction manual is based on documented data and research. The manufacturer of this product cannot be held responsible for any changes made to the
vehicle by the manufacturer or damages that may occur through the installation of this product in accordance with the steps outlined herein.
Button Relocation Panel
Relocation Panel Bracket
Button Retention Cable
Double DIN Fascia Panel
Left/Right Radio Brackets
2009 - 2012
• Screwdriver
DISCLAIMER
Double DIN Fitting Kit for
Mercedes Benz Vehicles
vi.
Screws
- 1/4" Self Tapping (x2)
- M5 8mm (x4)
- 3.8" Self Tapping (x6)
Note: Application data is subject to change at any time
CT23MB26L
CT23MB26L_IG_en-GB_v1
Advertisement
Table of Contents

Subscribe to Our Youtube Channel
Related Manuals for Connects2 CT23MB26L


Summary of Contents for Connects2 CT23MB26L
- Page 1 CT23MB26L Double DIN Fitting Kit for Mercedes Benz Vehicles Button Relocation Panel Screws Relocation Panel Bracket - 1/4” Self Tapping (x2) iii. Button Retention Cable - M5 8mm (x4) Double DIN Fascia Panel - 3.8” Self Tapping (x6) Left/Right Radio Brackets...
- Page 2 Please ensure that the correct tools are using during the installation to avoid damage to the vehicle or product. Connects2 can not be held responsible for the installation of this product. Included in this kit:...
- Page 3 8. Insert the head unit and wiring assembly into the dashboard. The head unit can be guided into place via the rails as a reverse of Step 3. Test the head unit for correct operation and move on to button relocation panel assembly. Fig.H Need help? Visit support.connects2.com/tickets/technical CT23LR08_IG_en-GB_v1...
- Page 4 INSTALLATION GUIDE BUTTON RELOCATION PANEL ASSEMBLY 9. Assemble the button relocation panel. Insert the buttons into the panel and insert the assembly below the top lip and click into place. Screw the bracket to the panel using the four holes on the back (Fig. I). 10.
Need help?
Do you have a question about the CT23MB26L and is the answer not in the manual?
Questions and answers