
Related Manuals for KitchenAid KSBC1B0CU


Summary of Contents for KitchenAid KSBC1B0CU
- Page 1 Orion Blender KSBC1B0 W11593908B.indb 1 W11593908B.indb 1 9/19/2022 9:47:19 AM 9/19/2022 9:47:19 AM...
-
Page 2: Parts And Features
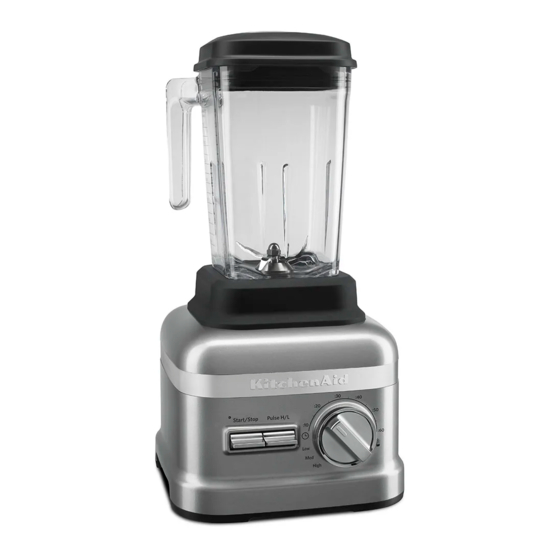
PARTS AND FEATURES On/Off Switch (not shown) Ingredient Cap with Measuring Cup Base Open Handle for Easy Stackability Cord Cleat (not shown) Removable Blender Jar Pad Power Cord Socket and Removable Control Dial Power Cord (not shown) Pulse Toggle Switch Talon Blade Start/Stop Toggle Switch Blender Jar... -
Page 3: Product Safety
PRODUCT SAFETY IMPORTANT SAFEGUARDS When using electrical appliances, basic safety precautions should always be followed, including the following: 1. Read all instructions. 2. To protect against risk of electrical shock, do not put Blender in water or other liquid. 3. This appliance is not intended for use by persons (including children) with reduced physical, sensory, or mental capabilities, or lack of experience and knowledge, unless they are closely supervised and instructed concerning use of the appliance by a person responsible for their safety. -
Page 4: Electrical Requirements
11. Blades are sharp. Handle carefully. 12. The use of attachments, including canning blender jars, not recommended by KitchenAid may cause a risk of injury to persons. 13. Do not use appliance for other than intended use. 14. Always operate Blender with cover in place. -
Page 5: Product Usage
PRODUCT USAGE BLENDER FUNCTION GUIDE The Blender has a preset recipe program: Icy Drinks. It also features Variable Times and Pulse functions that allow you to customize your blending for any recipe you make. BLENDING TIME SETTING DESCRIPTION (in min:sec) Gradually ramp up to full power to completely blend hard foods such as ice, whole fruits or vegetables, or 0:22... - Page 6 PRODUCT USAGE PREPARING THE COMMERCIAL BLENDER FOR USE Before first use Before using your Blender for the first time, wipe the blender base with a warm damp cloth, then wipe clean with a damp cloth. Dry with a soft cloth. Wash the Blender Jar, Lid, and ingredient cup in warm, sudsy water (see “Care and Cleaning”...
- Page 7 PRODUCT USAGE ASSEMBLING AND RUNNING THE COMMERCIAL BLENDER Make sure that the Lid is fully secured on Put the items to blend into the Blender the Blender Jar; next, place the Blender Jar. Add liquids first, then soft foods, then Jar on the base, making sure that it is fully leafy greens, and ice or frozen items last.
- Page 8 PRODUCT USAGE Utilize the Flex Edge tamper accessory as needed for optimal blending If desired, use the Pulse function for performance. Remove the a momentary boost of speed while Ingredient-measuring Cap only, and leave blending on the variable speed settings. the Lid in place.
-
Page 9: Care And Cleaning
CARE AND CLEANING CLEANING THE BLENDER AND ACCESSORIES IMPORTANT: Allow the appliance to cool completely before putting on or taking off parts, and before cleaning the appliance. NOTE: To avoid damaging the Blender, do not immerse the blender base or cord in water. -
Page 10: Troubleshooting
CARE AND CLEANING SANITIZING THE BLENDER 1. Remove any remaining contents from the Blender Jar. 2. Prepare a 200 ppm sodium hypochlorite solution* using 1.75 L of hot water in the Blender Jar. Place the Lid on the Blender Jar, and make sure the Blender Jar is fully in place on the Blender Base. - Page 11 TROUBLESHOOTING PROBLEM SOLUTION After 6 minutes of run time, the Blender will automatically shut off and go into Sleep mode, and the LED light will turn off. You can wake the Blender back up using the toggle switches If the Blender stops while blending: (START/STOP or Pulse High/Pulse Low).
-
Page 12: Warranty And Service
IF THIS PRODUCT FAILS TO WORK AS WARRANTED, CUSTOMER’S SOLE AND EXCLUSIVE REMEDY SHALL BE REPAIR OR REPLACEMENT ACCORDING TO THE TERMS OF THIS LIMITED WARRANTY. KITCHENAID AND KITCHENAID CANADA DO NOT ASSUME ANY RESPONSIBILITY FOR INCIDENTAL OR CONSEQUENTIAL DAMAGES. This warranty gives you specific legal rights and you may also have other rights which vary from state to state or province to province. -
Page 13: Hassle-Free Replacement Warranty - 50 United States And District Of Columbia
Authorized KitchenAid products meets the exacting standards Service Centre. In the carton include your of the KitchenAid brand that, if your name and complete shipping address Commercial Blender Base should fail along with a copy of the proof of purchase within the first three years of ownership, (register receipt, credit card slip, etc.). - Page 14 Authorized KitchenAid Service products meets the exacting standards Centre. In the carton include your name of the KitchenAid brand that, if your and complete shipping address along Commercial Blender Jar should with a copy of the proof of purchase fail within the first one year of ownership, (register receipt, credit card slip, etc.).
- Page 15 Consult your local KitchenAid dealer or the store where you purchased the Commercial Blender for information on how to obtain service. ®/™ ©2022 KitchenAid. All rights reserved. Used under license in Canada. W11593908B.indb 15 W11593908B.indb 15 9/19/2022 9:47:22 AM 9/19/2022 9:47:22 AM...
-
Page 16: Pièces Et Caractéristiques
PIÈCES ET CARACTÉRISTIQUES Interrupteur On/Off (dissimulé) Poignée ouverte du récipient pour l’empiler-capacité facile Socle Capuchon inférieur de récipient Support isolant du cordon (dissimulé) amovible Prise du cordon d’alimentation et Bouton de commande amovible cordon d’alimentation Interrupteur d’impulsion (dissimulé) à bascule Lames Interrupteur marche/arrêt à... -
Page 17: Sécurité Du Mélangeur
SÉCURITÉ DU MÉLANGEUR Votre sécurité est très importante, au même titre que celle d’autrui. Plusieurs messages de sécurité importants apparaissent dans ce manuel ainsi que sur votre appareil. Lisez-les attentivement et respectez-les systématiquement. Ce symbole est synonyme d’avertissement. Il attire votre attention sur les risques potentiels susceptibles de provoquer des blessures mortelles ou graves à... -
Page 18: Spécifications Électriques
11. Les lames sont aiguisées. Manipuler avec précaution. 12. L’utilisation d’accessoires (y compris de bocaux de mise en conserve pour mélangeur) non recommandés par KitchenAid peut causer des blessures corporelles. 13. Ne pas utiliser l’appareil pour un autre usage que celui pour lequel il est conçu. -
Page 19: Utilisation Du Mélangeur
UTILISATION DU MÉLANGEUR GUIDE DES FONCTIONS DU MÉLANGEUR Le mélangeur possède un programme de recettes préréglé : Boissons glacées. Le mélangeur possède les fonctions Minuterie variable et Impulsion qui permettent de personnaliser le mélange selon la recette préparée. DURÉE RÉGLAGE DESCRIPTION (en min:s) Augmentation graduelle de la vitesse jusqu’à... - Page 20 UTILISATION DU MÉLANGEUR PRÉPARATION DU MÉLANGEUR COMMERCIAL POUR UTILISATION Avant la première utilisation AVERTISSEMENT Avant d’utiliser le mélangeur pour la première fois, essuyer le socle avec un chiffon humide tiède, puis avec un autre chiffon humide. Sécher avec un chiffon doux.
- Page 21 UTILISATION DU MÉLANGEUR ASSEMBLER ET FAIRE FONCTIONNER LE MÉLANGEUR COMMERCIAL Introduire les articles à mélanger dans l’appareil. Commencer en ajoutant les Vous assurer que le couvercle est bien ingrédients liquides, après les aliments positionné sur le récipient; placer ensuite tendres, puis les légumes-feuilles et le récipient sur le socle en vérifiant qu’il terminer par les glaçons ou les articles est bien aligné...
- Page 22 UTILISATION DU MÉLANGEUR Utiliser au besoin le poussoir Flex Edge Au besoin, utiliser la fonction Impulsion pour un rendement optimal. Enlever pour temporairement augmenter la le bouchon de couvercle avec tasse à vitesse de mélange pendant l’utilisation mesurer en laissant le couvercle en place. des réglages de vitesses variables.
-
Page 23: Entretien Et Nettoyage
ENTRETIEN ET NETTOYAGE NETTOYAGE DU MÉLANGEUR ET DES ACCESSOIRES IMPORTANTE: Attendre que l’appareil ait refroidi complètement avant d’installer ou de retirer des pièces, et avant de nettoyer l’appareil. REMARQUE : Afin d’éviter d’endommager le mélangeur, ne pas immerger le socle ou le cordon du mélangeur dans l’eau. - Page 24 ENTRETIEN ET NETTOYAGE Laver le récipient du mélangeur, le Faire tourner le bouton de commande sur capuchon inférieur, le couvercle, le 30 secondes. Faire basculer l’interrupteur poussoir Flex Edge, et le bouchon de START/STOP (mise en marche/arrêt) couvercle avec tasse à mesurer à la main vers le haut ou le bas.
-
Page 25: Guide De Dépannage
GUIDE DE DÉPANNAGE AVERTISSEMENT Risque de choc électrique Brancher sur une prise à 3 alvéoles reliée à la terre. Ne pas enlever la broche de liaison à la terre. Ne pas utiliser un adaptateur. Ne pas utiliser un câble de rallonge. Le non-respect de ces instructions peut causer un décès, un incendie ou un choc électrique. - Page 26 GUIDE DE DÉPANNAGE Problème Solution Débrancher le mélangeur. Enlever le récipient et le capuchon inférieur. Nettoyer la surface souillée, le capuchon inférieur et l’extérieur du récipient. Sécher chacune des parties, puis S’il y a débordement : réinstaller le capuchon inférieur. Pour éviter tout dommage aux indications qui figurent sur l’appareil, ne pas appliquer trop de force lors du nettoyage ou ne pas utiliser des nettoyants...
-
Page 27: Garantie Et Service
L’intervention de dépannage doit être effectuée par un centre de dépannage KitchenAid agréé. Voir la garantie du mélangeur commercial KitchenAid pour Porto Rico pour plus de détails concernant la procédure à suivre pour un dépannage. - Page 28 La base du mélangeur service doivent être effectuées par un commercial réparée vous sera retournée centre KitchenAid agréé. Apporter la base port payé et assurée. du mélangeur commercial ou la retourner, GARANTIE DE REMPLACEMENT SANS DIFFICULTÉ — POUR LES 50 ÉTATS DES ÉTATS-UNIS ET LE DISTRICT FÉDÉRAL DE COLUMBIA...
- Page 29 Si le récipient de votre mélangeur la qualité de nos produits satisfait aux commercial cesse de fonctionner durant normes exigeantes de KitchenAid que, si le la première année suivant son acquisition, récipient du mélangeur commercial cesse il vous suffit d’appeler notre Centre de de fonctionner au cours de la première...
- Page 30 Consulter le revendeur KitchenAid local ou le détaillant auprès duquel le mélangeur commercial a été acheté pour savoir comment obtenir un dépannage. ®/™ ©2022 KitchenAid. Tous droits réservés. Utilisé sous licence au Canada. W11593908B.indb 30 W11593908B.indb 30 9/19/2022 9:47:24 AM...
-
Page 31: Piezas Y Características
PIEZAS Y CARACTERÍSTICAS Boton de I/O (Encendido y Tapa para ingredientes con taza medidora Apagado) (No se muestra) Jaladera abierta para apilado fácil Base Base desmontable de la jarra Abrazadera del cable (No se muestra) Perilla de control Entrada del enchufe y cable eléctrico Boton para modo de Pulso removible (No se muestra) Start/Stop (Encendido/Apagado) -
Page 32: Seguridad De La Licuadora
SEGURIDAD DE LA LICUADORA SALVAGUARDIAS IMPORTANTES Al utilizar aparatos eléctricos, se deben seguir las precauciones básicas de seguridad, entre las que se incluyen las siguientes: 1. Lea todas las instrucciones. 2. Para protegerse contra el riesgo de choque eléctrico, no ponga la licuadora en contacto con el agua ni en ningún otro líquido. - Page 33 11. Las cuchillas son filosas. Manipúlelas con cuidado. 12. KitchenAid recomienda no usar accesorios, incluidos los frascos de licuadora para conservas, ya que pueden crear un riesgo de lesiones personales.
-
Page 34: Requisitos Eléctricos
SEGURIDAD DE LA LICUADORA REQUISITOS ELÉCTRICOS Tensión: 120 V~ ADVERTENCIA Frecuencia: 60 Hz Potencia: 1 800 W NOTA: Si el enchufe no encaja en el contacto de pared, póngase en contacto con un electricista competente. No modifique el enchufe de ninguna manera. No use un adaptador. -
Page 35: Uso Del Producto
USO DEL PRODUCTO GUÍA DE FUNCIONES DE LA LICUADORA La licuadora tiene un programa de recetas prefijado: Icy Drinks (Bebidas heladas). También tiene funciones de tiempos variables y de pulsador que permiten personalizar el licuado para cualquier receta que se prepare. TIEMPO DE AJUSTE DESCRIPCIÓN... - Page 36 USO DEL PRODUCTO PREPARACIÓN DE LA LICUADORA COMERCIAL PARA EL USO Antes del primer uso ADVERTENCIA Antes de usar la licuadora por primera vez, limpie la base un paño humedecido con agua tibia; luego retire y limpie con un paño húmedo. Seque con un paño suave. Lave la jarra de la licuadora, la tapa, y la taza para ingredientes en agua jabonosa tibia (vea la sección “Cuidado y limpieza”).
- Page 37 USO DEL PRODUCTO CÓMO ARMAR Y HACER FUNCIONAR LA LICUADORA COMERCIAL Coloque los elementos que va a licuar Asegúrese de que la tapa esté dentro de la jarra de la licuadora. completamente asegurada sobre la jarra Agregue primero los líquidos, después de la licuadora;...
- Page 38 USO DEL PRODUCTO Utilice el accesorio pisón con borde flexible según sea necesario para un Si lo desea, use la función Pulse (modo de rendimiento óptimo del licuado. Retire Pulso) para un refuerzo momentáneo de solo la taza medidora de ingredientes la velocidad mientras licua con los ajustes y deje la tapa en su lugar.
-
Page 39: Cuidado Y Limpieza
CUIDADO Y LIMPIEZA LIMPIEZA DE LA LICUADORA Y LOS ACCESORIOS IMPORTANTE: Deje que el aparato se enfríe completamente antes de colocar o quitar piezas y antes de limpiar el aparato. NOTA: Para evitar dañar la licuadora, no sumerja la base de la licuadora ni el cable en agua. - Page 40 CUIDADO Y LIMPIEZA Gire el perilla de control hasta 30 segundos. Mueva el interruptor Lave la jarra de la licuadora, la paleta de alternador START/STOP (Endendido/ la jarra, la tapa, el pisón de borde flexible Apagado) hacia arriba o hacia abajo. y la tapa para ingredientes a mano con Cuando el temporizador finalice, elimine un paño húmedo y agua jabonosa tibia y...
-
Page 41: Solución De Problemas
SOLUCIÓN DE PROBLEMAS ADVERTENCIA Peligro de Choque Eléctrico Conecte a un contacto de pared de conexión a tierra de 3 terminales. No quite la terminal de conexión a tierra. No use un adaptador. No use un cable eléctrico de extensión. No seguir estas instrucciones puede ocasionar la muerte, incendio o choque eléctrico. - Page 42 SOLUCIÓN DE PROBLEMAS Problema Solución Desenchufe la licuadora. Saque la jarra y la base de la jarra. Limpie el alojamiento de la licuadora, la base de la jarra y el exterior de la jarra. Seque Si se produce un derrame de la jarra cada pieza minuciosamente y vuelva a instalar de la licuadora: la base de la jarra.
-
Page 43: Garantía Y Servicio
KitchenAid. Consulte la garantía de KitchenAid para la licuadora comercial en Puerto Rico para ver detalles sobre cómo obtener servicio. KitchenAid no pagará por: A. Daños causados por accidente, alteración, uso indebido o abuso. B. Piezas de repuesto o costos de mano de obra de reparación para licuadoras que se usen fuera de... -
Page 44: Garantía De Reemplazo Sin Dificultades - En Canadá
GARANTÍA Y SERVICIO GARANTÍA KITCHENAID PARA LA BASE DE LA LICUADORA COMERCIAL EN PUERTO RICO Se extiende una garantía limitada por envíela de manera prepaga y asegurada al tres años al comprador y a cualquier centro de servicio autorizado más cercano. - Page 45 GARANTÍA Y SERVICIO GARANTÍA KITCHENAID PARA LA JARRA DE LA LICUADORA COMERCIAL EN PUERTO RICO Se extiende una garantía limitada por envíelo de manera prepaga y asegurada al un año al comprador y a cualquier centro de servicio autorizado más cercano.
- Page 46 Consulte al distribuidor local de KitchenAid o a la tienda donde compró la licuadora comercial para pedir información sobre cómo obtener servicio. ®/™ ©2022 KitchenAid. Todos los derechos reservados. Usado bajo licencia en Canadá W11593908B.indb 46 W11593908B.indb 46 9/19/2022 9:47:27 AM...
- Page 47 NOTES W11593908B.indb 47 W11593908B.indb 47 9/19/2022 9:47:27 AM 9/19/2022 9:47:27 AM...
- Page 48 CANADA: 1.800.807.6777 | KitchenAid.ca MEXICO: KitchenAid.com.mx LATIN AMERICA: KitchenAid-Latam.com ®/™ ©2022 KitchenAid. All rights reserved. Used under license in Canada. Tous droits réservés. Utilisé sous licence au Canada. Todos los derechos reservados. Usado bajo licencia en Canadá. W11593908B 09/22 W11593908B.indb 48 W11593908B.indb 48...
Need help?
Do you have a question about the KSBC1B0CU and is the answer not in the manual?
Questions and answers