Table of Contents
Advertisement
Quick Links
Advertisement
Table of Contents

Related Manuals for SonicWALL SonicOSX 7


Summary of Contents for SonicWALL SonicOSX 7
- Page 1 SonicOSX 7 Getting Started Guide for the NSsp Series...
-
Page 2: Table Of Contents
Registration and Licensing Instance Licenses Latest Firmware Configuring Multiple Instances Enabling Multi-Instances Configuring Multi-Instances Adding an Instance Editing an Instance Uploading Instance Firmware Licenses for Multiple Instances Surveying Multiple Instances SonicOSX 7 Getting Started Guide for the NSsp Series Contents... - Page 3 To Access SonicOSX Console Using the SafeMode GUI Accessing SafeMode Rebooting the System Upgrading Firmware Diagnostics System Information Hardware Sensors Switch Port Counters Switch Port SFP Information SonicWall Support About This Document SonicOSX 7 Getting Started Guide for the NSsp Series Contents...
-
Page 4: Product Overview
Firewalls must evolve and adapt to support dynamic IT environments. Firewall limitations can present major IT operations bottlenecks. The SonicWall Network Security services platform NSsp 15700 is a next-generation firewall with high port density and Multi-Gigabit interfaces, that can process several million connections while checking for zero- day and advanced threats. -
Page 5: Simplified Management And Reporting
The platform consolidates threat intelligence gathered from multiple sources including our award-winning multi-engine network sandboxing service, Capture Advanced Threat Protection, as well as more than 1.1 million SonicWall sensors located around the globe. Deep Packet Inspection of SSL/TLS (DPI-SSL) The NSsp 15700 provides inspection for over millions of simultaneous TLS/SSL and SSH encrypted connections regardless of port or protocol. -
Page 6: Application Control
Virtual firewalls require an allocation of at least two CPU cores: one Control Plane (CP) and one Data Plane (DP). Up to two CP cores and seven DP cores can support a virtual firewall. Cores supporting a virtual firewall must reside on one logical blade. SonicOSX 7 Getting Started Guide for the NSsp Series Product Overview... -
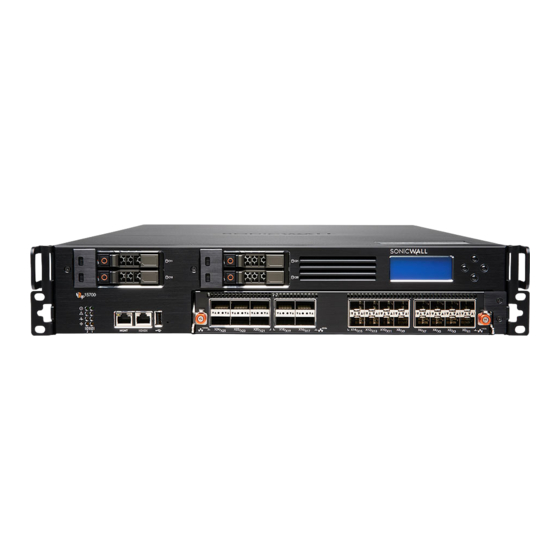
Page 7: Hardware Overview
These 40Gb ports also support 10Gb interface connectivity. X20 - X25 100Gb QSFP28 Ports (6) Serial Console Port MGMT Port – 1GbE LED Indicators LEDs from top: Power, Alarm, System Status, MGMT Port SonicOSX 7 Getting Started Guide for the NSsp Series Product Overview... -
Page 8: Rear Panel
Press to stop alarm after power supply failure Power Supplies (2) - 1200W each Fully redundant, field replaceable Ground Fans (10) Key Compartment Contains keys to unlock SSD handles for removal/replacement SonicOSX 7 Getting Started Guide for the NSsp Series Product Overview... -
Page 9: Leds
Compute blade is ready MGMT Port No activity Blinking Amber Traffic present Specifications NOTE: For a list of qualified SFP+/QSFP transceivers, contact SonicWall Technical Support. NSSP 15700 SPECIFICATIONS Feature Detail Number of Compute Blades Number of CPUs 100G QSFP28 40G QSFP+... - Page 10 Front SSDs for Blade #2 (Bottom) 480GB RAID Configuration RAID 1 Compact Flash 32GB USB 2.0 Type A Console RS232 RJ45 Management Port 1GbE RJ45 4056 Fan Redundant Power Supplies Power 1200 Watts SonicOSX 7 Getting Started Guide for the NSsp Series Product Overview...
-
Page 11: System Setup
Serial port: baud rate: 115200; data: 8; parity none; stop 1; flow control; none Login = techsupport / sonicwall-<buildnum> 10.10.10.10 Not set by default Management 192.168.168.168 (Blade 1) Management 192.168.168.167 (Blade 2) (admin; password) SafeMode https://192,168,168.168:65443 SonicOSX 7 Getting Started Guide for the NSsp Series System Setup... -
Page 12: System Startup
SonicOS/X Basic Configuration. If the services are enabled, you can access SafeMode, SSH, or ping via the MGMT port. From SafeMode, you can upgrade firmware, boot backup images and more. SonicOSX 7 Getting Started Guide for the NSsp Series System Setup... -
Page 13: Sonicos/X Basic Configuration
4. Connect the X0 interface to your LAN network and connect X1 to the Internet, as described in Connecting LAN and WAN Interfaces. 5. Register SonicOS/X as described in Registration and Licensing. 6. For network configuration considerations, refer to Network Configuration. SonicOSX 7 Getting Started Guide for the NSsp Series System Setup... -
Page 14: Connecting Lan And Wan Interfaces
, then use an IP below the range or above 10.206.52.10 10.206.52.200 the range, but not the Broadcast ( ) or Gateway IP (for example, ) address. 10.206.52.255 10.206.52.100 SonicOSX 7 Getting Started Guide for the NSsp Series System Setup... -
Page 15: Registration And Licensing
SonicOS/X firmware versions on each Instance, if desired. The Instance firmware images are available for download along with the main firmware in MySonicWall. NOTE: Enabling Multi-Instance requires a chassis reboot, which can take up to 15 minutes. SonicOSX 7 Getting Started Guide for the NSsp Series System Setup... -
Page 16: Configuring Multiple Instances
Each instances’s X0, X1, X2... X7 interfaces are mapped to a VLAN on the front panel port (X0 to X25) by the RI. Each instance can be configured with up to eight ports. Each instance port is mapped to a front panel port and tagged with a VLAN ID. SonicOSX 7 Getting Started Guide for the NSsp Series Configuring Multiple Instances... -
Page 17: Enabling Multi-Instances
However, the configuration is flexible, we could have three logical blades running in multi-bladed firewall mode with one logical blade configured to launch instances. SonicOSX 7 Getting Started Guide for the NSsp Series Configuring Multiple Instances... - Page 18 2. Move the Enable switch to the right to turn on Multi-Instance capability. 3. Determine the number of CPUs available to support instances. 4. Click Accept and then reboot the system. SonicOSX 7 Getting Started Guide for the NSsp Series Configuring Multiple Instances...
-
Page 19: Configuring Multi-Instances
There is a limit on the number of instances that can be launched because of CPU core availability and total Instance Licenses available in the system. Before completing this step, upload the Instance Firmware from the Multi-Instance > Firmware page. A typical Multi-Instance setup work flow is: SonicOSX 7 Getting Started Guide for the NSsp Series Configuring Multiple Instances... - Page 20 VLAN should be in the range of 65 .. 4094 For a given instance, the VLAN configured on X0 .. X7 should be unique, two or more instances of Xn cannot have the same VLAN. SonicOSX 7 Getting Started Guide for the NSsp Series Configuring Multiple Instances...
-
Page 21: Editing An Instance
3. Wait until the status of the instance changes to "Stopped." This could take up to five minutes. 4. Click Action again and then click Edit. STOP AND EDIT BUTTONS UNDER ACTION ON INSTANCE DISPLAY SonicOSX 7 Getting Started Guide for the NSsp Series Configuring Multiple Instances... -
Page 22: Uploading Instance Firmware
To Upgrade Instance Firmware: 1. Upload the firmware as described previously. 2. Stop the instance. 3. Use the edit process to select new firmware. 4. Restart the instant. SonicOSX 7 Getting Started Guide for the NSsp Series Configuring Multiple Instances... -
Page 23: Licenses For Multiple Instances
After all instances are consumed, a request to start a new instance would fail owing to insufficient licenses. The Instances page displays the list of instance licenses and their status (used/available) and also the name of the instance (for licenses in use). INSTANCE LISTING SonicOSX 7 Getting Started Guide for the NSsp Series Licenses for Multiple Instances... -
Page 24: Instance Registration
One of them resumes the role as a Primary active instance and the other as Secondary standby instance. The active and standby roles can change during an instance's lifetime. This section explains how to form instance HA pairing within one NSsp. SonicOSX 7 Getting Started Guide for the NSsp Series Licenses for Multiple Instances... - Page 25 Navigate to DEVICE | Multi-Instance > Firmware and check that up-to-date firmware is available. If not, upload new firmware. See Uploading Instance Firmware. d. Navigate to DEVICE | Multi-Instance > Instances and click +Add. The Add Instance dialog appears. SonicOSX 7 Getting Started Guide for the NSsp Series Licenses for Multiple Instances...
- Page 26 Add additional ports to connect the instances to front panel ports. NOTE: The VLAN should be in the range of 65 .. 4094. l. Click Next and the Advanced Settings dialog box appears. SonicOSX 7 Getting Started Guide for the NSsp Series Licenses for Multiple Instances...
- Page 27 Make a note of the LAN and WAN monitor IP addresses for the HA instances, derived from the default X0 and X1 IP. r. Note Reside Information and LAN / WAN monitor IP addresses. s. Click Next and the Summary appears. SonicOSX 7 Getting Started Guide for the NSsp Series Licenses for Multiple Instances...
- Page 28 6. The instance HA status can also be verified by logging into the instance user interface and navigating to the DEVICE | High Availability > Monitoring. SonicOSX 7 Getting Started Guide for the NSsp Series Licenses for Multiple Instances...
-
Page 29: Configuring High Availability
This section provides instructions for setting Active/Standby HA between two NSsp appliances. Prerequisites Both Primary and Secondary units must be Internet addressable and inter-accessible. The Root Instance versions on each unit must be identical. SonicOSX 7 Getting Started Guide for the NSsp Series Configuring High Availability... - Page 30 9. When finished with all High Availability configuration, click ACCEPT. All settings are synchronized to the Secondary firewall, and the Secondary firewall reboots. SonicOSX 7 Getting Started Guide for the NSsp Series Configuring High Availability...
-
Page 31: Configuring Advanced Settings
8. If you want Failover to occur only when ALL aggregate links are down, select Active/Standby Failover only when ALL aggregate links are down. This option is not selected by default. SonicOSX 7 Getting Started Guide for the NSsp Series Configuring High Availability... -
Page 32: Checking High Availability Status
Active Up Time — Indicates how long the current Active firewall has been Active, since it last became Active. This line only displays when High Availability is enabled. If failure of the Primary SonicWall occurs, the Secondary SonicWall assumes the Primary SonicWall LAN and WAN IP addresses. -
Page 33: High Availability Configuration
HA Mode - One method to determine which SonicWall is Active is to check the HA Settings Status indicator on the DEVICE | High Availability > Settings page. If the Primary SonicWall is Active, the first line in the SonicOSX 7 Getting Started Guide for the NSsp Series... - Page 34 Primary SonicWall is currently Active. It is also possible to check the status of the Secondary SonicWall by logging into the LAN IP address of the Secondary SonicWall. MONITORING DISPLAY To set the independent LAN management IP addresses and configure physical and/or logical interface monitoring: 1.
-
Page 35: Configuring Multi-Appliance Instance-Level Ha
Running column on the DEVICE | Instance > Firmware page on the Active unit shows as BOTH. SonicOSX 7 Getting Started Guide for the NSsp Series Configuring High Availability... - Page 36 6. Note that the residence of the instance is announced in the following figure, Residence Announcement. RESIDENCE ANNOUNCEMENT 7. Verify the addition of a Primary and a Secondary Instance from the Multi-Instance on the Instances page. SonicOSX 7 Getting Started Guide for the NSsp Series Configuring High Availability...
-
Page 37: Cli Bring-Up
The SonicCore banner appears and the login takes you to the ChassisOS prompt. See Logging into ChassisOS through the Console Port. If the SonicCore banner does not come up and offer a login, check to ensure the NSsp has completed its boot up process. SonicOSX 7 Getting Started Guide for the NSsp Series CLI Bring-up... -
Page 38: At The Chassisos Prompt
1 in the system. From here you can ChassisOS-1 move to the second physical blade, ChassisOS-2. To get a brief help summary, enter CHASSIS OS HELP SonicOSX 7 Getting Started Guide for the NSsp Series CLI Bring-up... -
Page 39: To Change To The Console Port Of Another Physical Blade
To Change to the Console Port of Another Physical Blade and indicate the port to which you are moving. switch-serial-port Use the same login and password information after the SonicCore banner. CHANGING PHYSICAL BLADES SonicOSX 7 Getting Started Guide for the NSsp Series CLI Bring-up... -
Page 40: Check Network Address Settings
RJ45 interface aux chassis IP connectors. Commands at ChassisOS Prompt A list of common commands appears in response to CHASSISOS COMMANDS SonicOSX 7 Getting Started Guide for the NSsp Series CLI Bring-up... -
Page 41: Show Commands At Chassisos Prompt
Blades. This command only works on the master blade (Physical Blade 1). : This command is particularly useful in showing processes in progress on the show system-status two Physical Blades: SonicOSX 7 Getting Started Guide for the NSsp Series CLI Bring-up... - Page 42 SHOW SYSTEM STATUS COMMAND A useful installation routine for administrators would be to first check system hardware indications with show env-sensors SonicOSX 7 Getting Started Guide for the NSsp Series CLI Bring-up...
- Page 43 SHOW ENV-SENSORS Then check SonicOSX with show sonicos-status SHOW SONIOCS- STATUS SonicOSX 7 Getting Started Guide for the NSsp Series CLI Bring-up...
-
Page 44: Configure Ip Addresses From The Cli
To Access SonicOSX Console Entering allows access to the SonicOSX Console CLI on the Root Instance. smconsole 1 To gain access to the console use admin and password. Enter for help. SonicOSX 7 Getting Started Guide for the NSsp Series CLI Bring-up... - Page 45 ACCESSING THE SONICOSX CONSOLE A useful operation at the SonicOSX Console is . This gives an overview of the firewall's show interfaces status. Type to end. Ctrl-C quit SonicOSX 7 Getting Started Guide for the NSsp Series CLI Bring-up...
-
Page 46: Using The Safemode Gui
NOTE: Unlike SafeMode on other SonicWall appliances, SafeMode is not a state in the NSsp; instead it is a GUI available at all times. The appliance does not need to go into the SafeMode state in order to access the SafeMode utilities. -
Page 47: Rebooting The System
To boot new firmware: 1. Select the option as shown below and boot. The upload and boot process takes only about two minutes. SonicOSX 7 Getting Started Guide for the NSsp Series Using the SafeMode GUI... -
Page 48: Diagnostics
This is also accessible through the CLI. See Show Commands at ChassisOS Prompt. Switch Port Counters This tab presents details on the switching performance of the 26 ports on the NSsp 15700 front panel. SonicOSX 7 Getting Started Guide for the NSsp Series Using the SafeMode GUI... -
Page 49: Switch Port Sfp Information
SWITCH PORT COUNTER TAB Switch Port SFP Information This tab provides details on the SFP links used on the NSsp 15700. SWITCH PORT SFP INFORMATION SonicOSX 7 Getting Started Guide for the NSsp Series Using the SafeMode GUI... -
Page 50: Sonicwall Support
The Support Portal provides self-help tools you can use to solve problems quickly and independently, 24 hours a day, 365 days a year. To access the Support Portal, go to https://www.sonicwall.com/support. The Support Portal enables you to: View knowledge base articles and technical documentation View and participate in the Community forum discussions at https://community.sonicwall.com/technology-and-support. -
Page 51: About This Document
Open Source Code SonicWall Inc. is able to provide a machine-readable copy of open source code with restrictive licenses such as GPL, LGPL, AGPL when applicable per license requirements. To obtain a complete machine-readable copy, send your written requests, along with certified check or money order in the amount of USD 25.00 payable to “SonicWall Inc.”, to:...
Need help?
Do you have a question about the SonicOSX 7 and is the answer not in the manual?
Questions and answers