Advertisement
Quick Links
Advertisement

Subscribe to Our Youtube Channel
Related Manuals for GrillSmith CG2001301-GS


Summary of Contents for GrillSmith CG2001301-GS
- Page 1 Rustler 30” Barrel Grill Owner’s Manual Assembly and Operating Instructions Model # CG2001301-GS Tools required for assembly: (Not Included) Pliers, Philips & Flathead Screwdrivers, Adjustable Wrench. Keep this manual for future reference. CG2001301-GS ENG Page 1 of 19 20210727...
- Page 2 DO NOT attempt to move the grill. ⚫ Wear protective gloves or oven mitts. ⚫ DO NOT touch any hot grill surfaces. ⚫ DO NOT wear loose clothing or allow hair to come in contact with grill. CG2001301-GS ENG Page 2 of 19 20210727...
- Page 3 WARNING: This product can expose you to chemicals including soot, which is known to the State of California to cause cancer, and carbon monoxide, which is known to the State of California to cause birth defects or other reproductive harm. For more information go to www.P65Warnings.ca.gov. CG2001301-GS ENG Page 3 of 19...
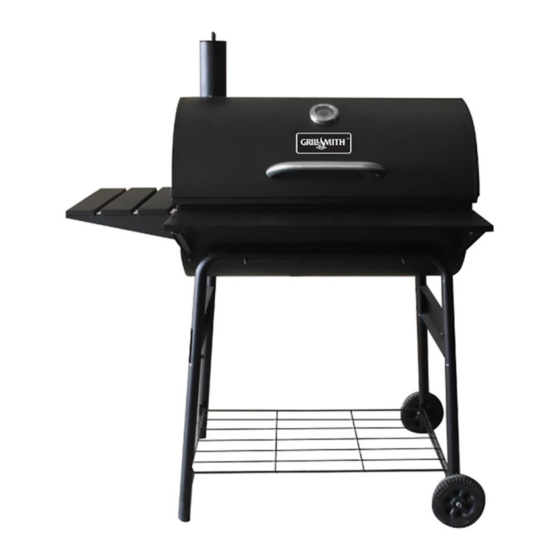
- Page 4 Inspect contents of the box to ensure all parts are included and undamaged. We recommend two people for assembly of this grill. The following tools are required for assembly and are not included: ⚫ Pliers ⚫ Philips & Flathead Screwdrivers ⚫ Adjustable Wrench Product Diagram CG2001301-GS ENG Page 4 of 19 20210727...
- Page 5 2 pcs 13. Front table slat 14. Chimney 15. Chimney Cover 16. Temperature Gauge Part number: MET-BG0034 Part number: MET-BG0035 Part number: MET-BG0036 Part number: THE-BG0001 2 pcs 1 pc 1 pc 1 pc CG2001301-GS ENG Page 5 of 19 20210727...
- Page 6 For assembly assistance, missing or damaged parts, please contact customer service at Mon to Fri, 8:00 a.m. – 5:00 p.m. Pacific customerservice@rankam.com 1-888-837-1380 Standard Time. Hardware List Bolt (M6X40) 12 pcs Bolt (M6X15) 22 pcs Lock Nut (M8) 2 pcs CG2001301-GS ENG Page 6 of 19 20210727...
- Page 7 1 pc Lid Handle Insulation Washer 2 pcs Hinge Pin 2 pcs Cotter Pin 4 pcs Bolt (M5X10) 6 pcs Flange Nut (M5) 6 pcs WARNING ⚫ Please wear gloves while assembling the grill. CG2001301-GS ENG Page 7 of 19 20210727...
- Page 8 Connect Left Braces (1) and Left Legs (2) and Right Legs (3) together. Step 2. Insert Wire Rack (4) into holes on the inside of legs (2) and (3), then fold up the legs (2) and (3). CG2001301-GS ENG Page 8 of 19...
-
Page 9: Step 3
M6 Flange Nut (F). Do the same on other side with Legs (1) and (3). Do not tighten bolts until Step 4 is completed. Step 4. Assemble Grill Body (8) on top of Leg Braces (1) using M6X40 Bolt (A) and M6 Flange Nut (F). NOTE: Now tighten all screws in Steps 1 through Step 4 CG2001301-GS ENG Page 9 of 19 20210727... -
Page 10: Step 6
Front Table Bracket (12) and Front Table Support (11) to Front Table Slats (13) with using M6X15 Bolt (B). Step 6. Attach Front Table (13) to front of Grill Body (8) using M6x15 bolt (B) and M6 Flange Nut (F). CG2001301-GS ENG Page 10 of 19 20210727... - Page 11 (8). Attach Air Vent Shutter (10) onto both sides of Grill Body (8) using one M6x15 bolt (B) and M6 Lock Nut (E). Do not over tighten Air Vent Shutter (10), Air Vent Shutter (10) should move freely. CG2001301-GS ENG Page 11 of 19...
- Page 12 Insert grease cup holder (22) into holes on bottom of Grill Body (8). Use the Charcoal Grate Adjusters (20) to lower Charcoal Grate (21) into the grill base. Rest the Charcoal Grate Adjusters (20) on the supports of Grill Body (8). Place the Cooking Grates (23) on the support rims of Grill Body (8). CG2001301-GS ENG Page 12 of 19...
-
Page 13: Contains Hot Coals
In windy weather, place the grill in an outdoor area that is protected from the wind. WARNING Read all safety warnings and instructions carefully before operating your grill. CG2001301-GS ENG Page 13 of 19 20210727... -
Page 14: If Using Charcoal Chimney Starter, Proceed To Step 5
(see “Adding Charcoal/Wood During Cooking“ section of this manual). Maintain this temperature for 1 hour then allow unit to cool completely. NOTE: It is important that the exterior of the grill is not scraped or rubbed during the curing process. CG2001301-GS ENG Page 14 of 19... -
Page 15: Table Of Contents
Step 5 Place cooking grates on grill support lips. WARNING Always wear oven mitts/gloves when adjusting cooking levels, air vent and chimney cover to protect your hands from burns. CG2001301-GS ENG Page 15 of 19 20210727... -
Page 16: Step 6
If necessary, use your Charcoal Chimney Starter to light additional charcoal and/or wood and add to existing fire. CG2001301-GS ENG Page 16 of 19... - Page 17 Leave closed for at least one hour. Let grates remain in grill until cool. Place grates in proper position in the grill. Your cast iron grates should be properly seasoned and ready to use! CG2001301-GS ENG Page 17 of 19...
- Page 18 All parts to be replaced will need to be shipped before replacement items will be sent. Follow the Customer Service Representative’s instructions exactly. If a return is necessary, it must be packed carefully and shipped prepaid. CG2001301-GS ENG Page 18 of 19...
- Page 19 Address: 18/F, New Lee Wah Centre, 88 Tokwawan Road, Kowloon, Hong Kong. Please contact Customer Service at: 1 – 888 – 837 – 1380 Mon to Fri, 8:00 a.m. – 5:00 p.m. Pacific Standard Time. or by email customerservice@rankam.com Made in China CG2001301-GS ENG Page 19 of 19 20210727...
Need help?
Do you have a question about the CG2001301-GS and is the answer not in the manual?
Questions and answers