Table of Contents
Advertisement
Quick Links
Advertisement
Table of Contents

Related Manuals for Vaisala SHM40


Summary of Contents for Vaisala SHM40
- Page 1 USER'S GUIDE Vaisala Structural Humidity Measurement Kit SHM40 M211423EN-C...
- Page 2 Please observe that this manual does not create any legally binding obligations for Vaisala towards the customer or end user. All legally binding commitments and agreements are included exclusively in the applicable supply contract or Conditions of...
-
Page 3: Table Of Contents
Regulatory Compliances ............8 Trademarks ................8 Warranty ..................9 CHAPTER 2 PRODUCT OVERVIEW ................11 Introduction to SHM40 Kit ............. 11 SHM40 Kit Contents ............... 12 CHAPTER 3 HUMIDITY MEASUREMENT IN CONCRETE ..........15 Humidity Measurements in a Borehole ........ 15 Measurement Depth ............ - Page 4 USER'S GUIDE ____________________________________________________________________ Connecting the Probe ............34 First Startup ................35 Initial Settings ..............35 Quantities Explained .............. 36 Screen Layout and Controls ..........37 Indicators ................38 Numeric View ..............38 Statistics View ..............39 Graph View ................39 Hold and Tag ................
- Page 5 _________________________________________________________________________________ HUMIDITY REPORT FORM ................. 65 VAISALA _________________________________________________________________________ 3...
- Page 6 USER'S GUIDE ____________________________________________________________________ List of Figures Figure 1 Contents of the SHM40 Kit ............12 Figure 2 Drying in One Direction ............17 Figure 3 Drying in Two Directions ............17 Figure 4 Measurement Error at 1 °C Temperature Difference ....19 Figure 5 Pressing the Tube into the Hole ..........
-
Page 7: Chapter 1 General Information
Chapter 1 _________________________________________________________ General Information CHAPTER 1 GENERAL INFORMATION This chapter provides general notes for the manual and the SHM40 kit. About This Manual This manual provides information for operating, and maintaining the Vaisala Structural Humidity Measurement Kit SHM40. The manual also instructs in performing structural humidity measurements using the borehole method. -
Page 8: Version Information
USER'S GUIDE ____________________________________________________________________ Version Information Table 1 Manual Revisions Manual Code Description M211423EN-C October 2015. This manual. HM40 indicator software version updated to 1.5 with new calibration reminder and automatic power off functionalities. RH measurement accuracy specification updated. 2-point calibration reference limit information added. -
Page 9: Safety
Chapter 1 _________________________________________________________ General Information Safety The SHM40 kit delivered to you has been tested approved as shipped from the factory. Note the following precautions: WARNING When drilling holes in concrete, wear respiratory protection to avoid breathing concrete dust. If you are drilling through a floor coating, note that the dust may also contain hazardous materials such as lead, asbestos fibers, or crystalline silica. -
Page 10: Recycling
Dispose of batteries and the unit according to statutory regulations. Do not dispose of with regular household refuse. Regulatory Compliances The Vaisala Structural Humidity Measurement Kit SHM40 is in conformity with the provisions of the following EU directive(s): - EMC-Directive... -
Page 11: Warranty
Chapter 1 _________________________________________________________ General Information Warranty Visit our Internet pages for more information and our standard warranty terms and conditions: www.vaisala.com/warranty. Please observe that any such warranty may not be valid in case of damage due to normal wear and tear, exceptional operating conditions, negligent handling or installation, or unauthorized modifications. - Page 12 USER'S GUIDE ____________________________________________________________________ This page intentionally left blank. 10 ___________________________________________________________________ M211423EN-C...
-
Page 13: Chapter 2 Product Overview
- Interchangeable HMP40S humidity and temperature probe - HMP110 probe and cable with integrated rubber plug. - Can be calibrated by a Vaisala Service Center or user calibrated using the HMK15 humidity calibrator, for example. - Various accessories for ensuring accurate humidity measurement using the borehole method. -
Page 14: Shm40 Kit Contents
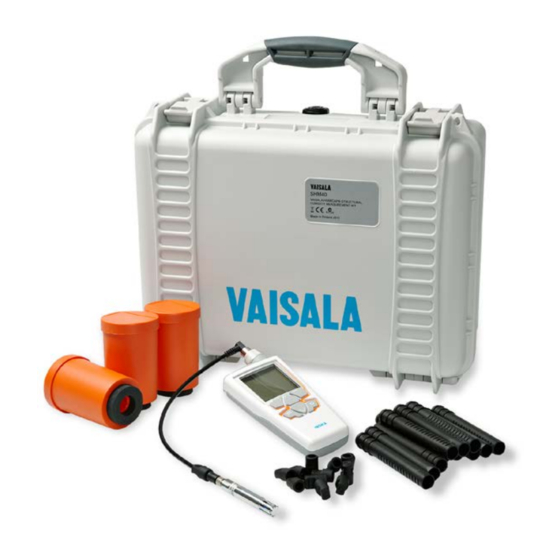
USER'S GUIDE ____________________________________________________________________ SHM40 Kit Contents 1508-113 Figure 1 Contents of the SHM40 Kit Standard contents: 1 = Pocket for documents and accessories 2 = HM40 indicator with quick connection adapter (1 pc, HM40SINDI) 3 = HMP40S humidity and temperature probe (1 pc, HMP40S) 4 = Plastic tubes: ∅... - Page 15 For the full list of accessories, see section Spare Parts and Accessories on page 63. NOTE Vaisala recommends using multiple HMP40S probes so that they can be inserted in all measurement points and left to equalize concurrently. VAISALA ________________________________________________________________________ 13...
- Page 16 USER'S GUIDE ____________________________________________________________________ This page intentionally left blank. 14 ___________________________________________________________________ M211423EN-C...
-
Page 17: Humidity Measurement In Concrete
- The hole must be sealed during the equalization time. The plastic tube and rubber plug in the SHM40 kit are used for this purpose. Ideally, the probe should be inside the plastic tube during this time. For reliable results, it is recommended to have several measurement NOTE points. -
Page 18: Measurement Depth
- For a concrete slab that is exposed to air on both sides, the minimum depth of measurement (d) is 20 % of the depth of the slab. See Figure 3 on page 17. The minimum measurement depth using standard SHM40 accessories is 30 mm, maximum is 90 mm. Humidity Profile The humidity profile of the slab depends on the drying conditions of the concrete: whether the concrete dries in one or in two directions. -
Page 19: Figure 2 Drying In One Direction
After coating, the slab is driest on the uncoated side. hole for the humidity coating hole for the plastic tube profile humidity plastic tube profile 0,2 × d 0,2 × d concrete concrete slab slab BEFORE COATING AFTER COATING 1111-094 Figure 3 Drying in Two Directions VAISALA ________________________________________________________________________ 17... -
Page 20: Maximum Humidity Levels For Coating
USER'S GUIDE ____________________________________________________________________ Maximum Humidity Levels for Coating SisäRYL 2000 Code of Building Practice (RT 14-10668, 2000, ISBN 951-682-506-0) recommends the following maximum humidity levels (at +20 °C) for coating of various materials: Table 3 Wooden Floor Coverings Maximum RH (%) Coating Wooden parquet boards without moisture barrier (plastic film) between wood and concrete. -
Page 21: Importance Of Temperature Differences
Measurement Error at 1 °C Temperature Difference Figure 4 above shows the measurement error at 100 %RH at temperatures ranging from -40 to 100 °C, when the difference between the ambient and sensor temperature is 1 °C. VAISALA ________________________________________________________________________ 19... -
Page 22: Preparations For Measurement
USER'S GUIDE ____________________________________________________________________ Preparations for Measurement Before you can measure the humidity of concrete using the borehole method, you must prepare the borehole and wait for humidity to stabilize. The preparations can be started on a freshly cast concrete if desired. Before starting, read section Measurement Depth on page 16. -
Page 23: Preparations For Solid Concrete
For best results, you can also seal the crack around the tube and concrete with a suitable material. Continue from section Inserting the Probe and Sealing the Hole on page 24. VAISALA ________________________________________________________________________ 21... -
Page 24: Preparations For Freshly Cast Concrete
USER'S GUIDE ____________________________________________________________________ Preparations for Freshly Cast Concrete Preparing the measurement in freshly cast concrete has the advantage that no drilling of the concrete is needed, and tubes are easy and fast to install. You can do the preparations without any danger to floor heating elements or water tubing that may be embedded in the concrete. -
Page 25: Figure 7 Plugged Tube In Fresh Concrete
Cracking this surface helps the air in the tube to reach equilibrium with the humidity in the concrete. See Figure 8 below. 1111-092 Figure 8 Cracking the Concrete at the Bottom of the Tube VAISALA ________________________________________________________________________ 23... -
Page 26: Inserting The Probe And Sealing The Hole
USER'S GUIDE ____________________________________________________________________ Clean the concrete dust at the bottom of the tube using a vacuum cleaner. Now you have a clean borehole that reaches to the correct depth, and a plastic tube in it. Continue from section Inserting the Probe and Sealing the Hole on page 24. -
Page 27: Figure 10 Sealing The Tube With A Rubber Plug
Figure 10 Sealing the Tube with a Rubber Plug Fold the cable inside the protective cover and close the lid. Leave the probe to stabilize before starting the measurements. 1111-133 Figure 11 Cable Folded in the Protective Cover VAISALA ________________________________________________________________________ 25... -
Page 28: Figure 12 Recommended Setup During Stabilization
USER'S GUIDE ____________________________________________________________________ If you cannot leave the probe in the tube, plug the tube using a rubber plug (233976). This means you will have to insert the probe when taking the measurement, and wait for about 30 minutes for stabilization. It is recommended that you leave the probe into the tube as this ensures the best possible reliability of the readings. -
Page 29: Alternate Sealing Materials
Plastic Tubes Inserting a plastic tube in the hole is always necessary to ensure that you are measuring the humidity of the concrete at the desired depth. Vaisala recommends using the tubes in the plastic tube set (19266HM) since they provide a seal around the bottom part of the tube with the three thin ridges around the tube. -
Page 30: Performing The Measurement
USER'S GUIDE ____________________________________________________________________ Performing the Measurement The humidity of the hole reaches equilibrium with the humidity of the concrete approximately in three days. Before this, you cannot obtain reliable measurements. If the probe has not been left to stabilize inside the tube: Remove the rubber plug from the tube. -
Page 31: Ending The Measurements
Chapter 3 _____________________________________________ Humidity Measurement in Concrete Ending the Measurements When the concrete is dry enough and measurements are no longer necessary, remove the probe and the protective cover. Pull out the plastic tube. VAISALA ________________________________________________________________________ 29... - Page 32 USER'S GUIDE ____________________________________________________________________ This page intentionally left blank. 30 ___________________________________________________________________ M211423EN-C...
-
Page 33: Using The Hm40 Indicator
1 = Quick connection adapter for HMP40S probe 2 = Display 3 = Right function button 4 = Up arrow button 5 = Power button 6 = Left function button 7 = Down arrow button 8 = Menu button VAISALA ________________________________________________________________________ 31... -
Page 34: Batteries
USER'S GUIDE ____________________________________________________________________ 1112-008 Figure 15 HMP40S Probe where 1 = HMP110 probe 2 = 30 cm cable 3 = Integrated rubber plug 4 = Cable connector to HM40 indicator with quick connection adapter Batteries The HM40 indicator is powered by two AA-size batteries. You can use the following battery types: - Alkaline (IEC-LR6) - Lithium (IEC-FR6) -
Page 35: Battery Life
HM40. NiMH batteries are rechargeable. Two NiMH batteries are included with the USB recharger that is available from Vaisala as an option. For order codes, see section Spare Parts and Accessories on page 63. Battery Life Typical operation time that is achieved with alkaline batteries is 100 hours. -
Page 36: Connecting The Probe
It is recommended that you turn off the HM40 indicator before connecting or disconnecting the probe. The HM40 indicator that is delivered with the SHM40 kit (or when ordering the HM40S) has an adapter with a 3.5 mm TRRS connector socket on top. -
Page 37: First Startup
For more information, see section Settings Submenu on page 45. NOTE HM40 indicator will retain the date and time even during battery changes. The clock will have to be set again only if the indicator is without battery power for several hours. VAISALA ________________________________________________________________________ 35... -
Page 38: Quantities Explained
USER'S GUIDE ____________________________________________________________________ Quantities Explained The table below describes the quantities measured by the HM40 indicator with the HMP40S probe. All of the quantities are measured or calculated when the HM40 is on, independent of what is currently displayed. Relative humidity (RH) and temperature (T) are the most important NOTE quantities for structural humidity measurement. -
Page 39: Screen Layout And Controls
7 = Menu button: enter menu 8 = Right function button Long press: tag point, short press: tag point and hold screen 9 = Power button Long press: power on/off, short press: activate backlight 10 = Arrow buttons: change quantity VAISALA ________________________________________________________________________ 37... -
Page 40: Indicators
USER'S GUIDE ____________________________________________________________________ Pressing the right function button holds the screen and tags the current NOTE measurement point. See section Hold and Tag on page 40. Indicators Table 6 Indicators on the HM40 Display Symbol (s) Name Description Battery Fresh batteries will always show three charge bars. -
Page 41: Statistics View
1111-096 Figure 18 Elements of the Graph View where 1 = Current values 2 = Vertical spacing of the grid 3 = Graph maximum 4 = Graph minimum 5 = Time VAISALA ________________________________________________________________________ 39... -
Page 42: Hold And Tag
USER'S GUIDE ____________________________________________________________________ The timescale of the graph can be changed in the Main menu. By default, the graph will automatically change the timescale to fit the measured data. If you select a short timescale, only the most recent data will be visible. The graph view is not available in the all quantities view. -
Page 43: Figure 19 Tagged Points In The Graph View
When the view is held, you can reset all measurement data by pressing the Reset button. This will clear all graphs and tagged points. NOTE If you keep pressing the right function button (long press), the HM40 will tag the point without freezing the screen. VAISALA ________________________________________________________________________ 41... -
Page 44: Main Menu
USER'S GUIDE ____________________________________________________________________ Main Menu You can open the menu from the measurement view at any time by pressing the menu button. If you are already in the menu, pressing the menu button returns you to the measurement view. If you are in a submenu, the menu button returns you to the previous menu level. -
Page 45: Graph Duration
32 h. Settings Opens the Settings menu. The menu options are described in section Settings Submenu on page VAISALA ________________________________________________________________________ 43... -
Page 46: Calibration
USER'S GUIDE ____________________________________________________________________ Calibration In the Calibration submenu, you can perform an adjustment procedure that corrects the humidity and temperature measurement of the meter. For more information and the adjustment procedure, see section Calibration on page 52. Help Opens a menu with help topics on measurement, calibration, and the measured quantities. -
Page 47: Settings Submenu
- Japanese (jp) - Portuguese (pt) Units The Units setting determines the measurement system that is used for the quantities: - Metric - Non-metric The Pressure unit is set separately: - hPa - bar - atm - PSI VAISALA ________________________________________________________________________ 45... -
Page 48: Time & Date
USER'S GUIDE ____________________________________________________________________ Time & Date In the Date setup screen, you can set the current date: - Arrow buttons change the selected value - Left function button selects the next value (year, month, or day). - OK button stores the date and returns to the Settings menu. -
Page 49: Pressure
NOTE Calibrating any parameter in the probe resets the calibration interval. This means that if you leave one parameter uncalibrated in a calibration session, the reminder will not appear separately for that parameter. VAISALA ________________________________________________________________________ 47... -
Page 50: Backlight
USER'S GUIDE ____________________________________________________________________ Backlight Always on: Screen is always lit. This option will shorten the battery life significantly. Always off: Screen is always unlit. This option provides the best battery life. Delay (30s): Backlight will automatically turn on when the user presses any button. The backlight will turn off after 30 seconds of inactivity. -
Page 51: Navigation
- On: Measured values are rounded to one decimal place. - Off: Measured values are shown with two decimal places. Factory Settings The Factory settings option restores all settings to their default values. Probe calibration is not affected. VAISALA ________________________________________________________________________ 49... - Page 52 USER'S GUIDE ____________________________________________________________________ This page intentionally left blank. 50 ___________________________________________________________________ M211423EN-C...
-
Page 53: Chapter 5 Maintenance
Chapter 5 _______________________________________________________________ Maintenance CHAPTER 5 MAINTENANCE This chapter provides information that is needed in basic maintenance of the SHM40 kit. Periodic Maintenance Cleaning HM40 indicator can be cleaned by wiping it with a moist cloth. If the filter on the HMP40S probe becomes contaminated, it is very likely to affect the humidity measurement since residue on the filter will retain some moisture. -
Page 54: Changing The Filter
You can do this yourself using a humidity reference (for example, the Vaisala Humidity Calibrator HMK15), or send the probe to a Vaisala Service Center for calibration. See the back cover of this manual for contact information. -
Page 55: Calibrating The Hmp40S Probe Using Hmk15 Humidity Calibrator
- Always wait for the measurement to stabilize. For an introduction to calibration, order or download the free calibration NOTE book from Vaisala at the following address: www.vaisala.com/calibrationbook Calibrating the HMP40S Probe Using HMK15 Humidity Calibrator The HMK15 Humidity calibrator allows you to produce known humidity environments using saturated salt solutions. - Page 56 USER'S GUIDE ____________________________________________________________________ 1. Press the Menu button and select the Calibration submenu. Select the quantity to be calibrated at menu item [1] Quantity. You can calibrate Temperature (T) or Relative Humidity (RH) measurement. All other humidity quantities are calculated from RH and T, so they will also be adjusted.
- Page 57 To exit without saving, press the Cancel button. Select menu item [6] Apply to save the calibration in the probe. Check the applied corrections in the confirmation screen and press the Apply button. To exit without applying the correction, press the Cancel button. VAISALA ________________________________________________________________________ 55...
-
Page 58: Repair Maintenance
HMP40S probe. Depending on the malfunction, repair by a Vaisala Service Center may be possible. Replacement HM40 indicators, HMP40S probes, and measurement accessories are available from Vaisala. See section Spare Parts and Accessories on page 63. 56 ___________________________________________________________________ M211423EN-C... -
Page 59: Chapter 6 Troubleshooting
Do not use the transport protection cap if the probe is wet, since it will prevent the probe from drying. Do not touch the sensor or blow on it to dry it out. CAUTION VAISALA ________________________________________________________________________ 57... -
Page 60: Problem Situations
See section than expected. adjustment. Calibration on page 52. HMP40S probe has Allow the probe and been stored in wet SHM40 case to dry out conditions. before resuming measurement. Measured humidity HMP40S probe in need Adjust and calibrate the... -
Page 61: Technical Support
Chapter 6 ____________________________________________________________ Troubleshooting Technical Support For technical questions, contact the Vaisala technical support by e-mail at helpdesk@vaisala.com. Provide at least the following supporting information: - Name and model of the product in question - Serial number of the product... - Page 62 USER'S GUIDE ____________________________________________________________________ This page intentionally left blank. 60 ___________________________________________________________________ M211423EN-C...
-
Page 63: Chapter 7 Technical Data
Chapter 7 _____________________________________________________________ Technical Data CHAPTER 7 TECHNICAL DATA This chapter provides the technical data of the SHM40 kit. Specifications Table 8 HMP40S Probe Property Description / Value Relative humidity Measurement range 0 ... 100 %RH Accuracy (incl. non-linearity, hysteresis and repeatability) Temperature range 0 ... -
Page 64: Table 9 Hm40 Indicator
Dimensions (H×W×D) Indicator with adapter 184 x 72 x 44 mm Weight Indicator with adapter and batteries 240 g SHM40 case with standard content 3.7 kg Indicator materials PC/ABS blend Acrylic display lens Indicator adapter materials Nickel plated brass and... -
Page 65: Spare Parts And Accessories
Long cable (2.7 m) for HMP40S probe HMP40SCABLE2 Plastic tubes (12 pcs) 19266HM Rubber plugs (12 pcs) 233976 Weather-proof carrying case with SHM40 filling CASEFORSHM40SP Light carrying case for HM40S 230245SP Protective covers with lid (3 pcs) 19268HM Plastic flanges (12 pcs) for wet concrete... -
Page 66: Dimensions In Mm
USER'S GUIDE ____________________________________________________________________ Dimensions in mm 1111-097 Figure 21 HM40S Dimensions 64 ___________________________________________________________________ M211423EN-C... - Page 67 Appendix A ______________________________________________________ Humidity Report Form APPENDIX A HUMIDITY REPORT FORM This appendix contains an example report form that can be used to record humidity measurement results in concrete. VAISALA ________________________________________________________________________ 65...
- Page 68 HUMIDITY REPORT Name and Location of Measured Structure Floor or Section Notes (for example: slab thickness, drying direction, casting date) Location Depth of Relative Temperature Air Relative Date and time (building grid code borehole Humidity (°C/°F) Temperature Humidity or number) (cm) (%RH) (°C/°F)
- Page 70 *M211423EN*...
Need help?
Do you have a question about the SHM40 and is the answer not in the manual?
Questions and answers