
Subscribe to Our Youtube Channel
Related Manuals for laerdal SIMETRY 212-55190


Summary of Contents for laerdal SIMETRY 212-55190
- Page 1 Lower Extremity Fasciotomy System for Laerdal SimMan 3G Laerdal Product No. 212-55190 212-55200 212-55210 User Manual Rev.1.1...
-
Page 2: Table Of Contents
Contents Contents 1 SYSTEM SUMMARY 2 INSTALLATION INSTRUCTIONS UPPLIES YSTEM ONFIGURATION 2.2.1 B Contents 2.2.2 F 2.2.3 F ASCIAL HEATHS 2.2.4 M USCLE OMPARTMENTS 2.2.5 N ERVES AND EINS 2.2.6 S AYER REPARATION FOR Contents 3 USER INSTRUCTIONS NSTALLATION ROCESS ASCIOTOMY ROCEDURE 3.2.1 L... -
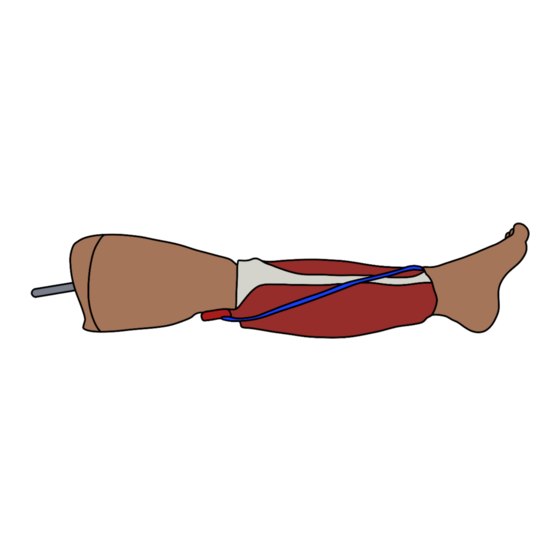
Page 3: System Summary
This document covers the preparation, use, and care of the Lower Extremity, 2 incisions, 4 compartment Lower Extremity Fasciotomy System for Laerdal. SIMETRI developed a training system compatible with the Laerdal SimMan manikin that helps train in treating compartment syndrome of the lower leg. The Lower Leg Fasciotomy training system’s reliability and maintainability is critical to the objective of maintaining warfighters’... -
Page 4: Installation Instructions
2.2.1 Base Unit The base unit is the main component of the Lower Extremity Fasciotomy System for Laerdal. All components of the System for Laerdal will be sequentially applied to the base unit as outlined in Section 2.2. The base Figure 1... -
Page 5: Foot
2.2.2 Foot The distal end of the unit has a bony foot projection with 2 transverse holes that situate 4 magnetic pegs (Figure 1) to serve as anchor points for muscular and Great Saphenous Vein attachments. One of the last steps involved in assembling the trainer includes placing the foot skin, seen in Figure 2, on the distal end of the base unit. -
Page 6: Muscle Compartments
2.2.4 Muscle Compartments There are four muscle compartments in the lower extremity. Figure 4 displays (from left to right) (1) the deep posterior compartment, (2) the superficial posterior compartment, (3) the lateral compartment, and (4) the anterior compartment. The end labeled with a number indicates the top, or superior, part of the muscle assembly. -
Page 7: Preparation For Use
2.3 Preparation for Use Once you become familiar with the components that make up the system, follow the steps below to prepare the Lower Extremity Fasciotomy System for Laerdal for use. 1. Identify all components for the System (Figure 7). - Page 8 2. Pair each muscle with its corresponding fascial sheath by matching the numbers on the top right corner of the fascia with numbers on the top of the muscle tubing. The muscle compartment and fascia numbering are as follows: a. Pair deep posterior compartment (#1) with Fascia #1. b.
- Page 9 is up. Then place the muscle, facing up, over the right side of the fascia so that only half of the muscle is superimposing the corner fascia. Bring the fascia over the muscle and press firmly to remove creases. Flip the muscle over to adhere the remaining fascia.
- Page 10 Figure 11. Fascia Adhered to Muscle 4. Place each muscle compartment with adhered fascia (Figure 11) on the system base unit. a. Each muscle will have a superior corresponding anchor point on the base unit that is specific to that muscle. The anchor points are numbered for each muscle (see order of application below).
- Page 11 Superficial Posterior Compartment (#2) will be attached to anchor point #2 on the top and peg #2 on the bottom (Figure 13). The Great Saphenous Vein installation will come already attached to the magnetic peg #4 and will run around as shown below and hook around anchor point #2.
- Page 12 Figure 15. Application of the Skin Layer 7. Apply the foot skin layer. a. Fold the ankle portion of the skin down and around the heel of the foot (as seen in Figure 16), then place the foot portion of the base unit inside the foot skin.
-
Page 13: User Instructions
USER INSTRUCTIONS After completing the steps outlined in Section 2.3 (Preparation for Use) the System for Laerdal will be ready for use in a training scenario. 3.1 Installation Process In order to install the Lower Extremity Fasciotomy System for Laerdal, remove the existing limb from the manikin. - Page 14 Locate the top of the leg pipe, which is secured by a small 2” metal pin that is attached to a yellow string. Remove the 2” metal pin from the leg shaft, loosening the limb as depicted in Figure 19 below.
-
Page 15: Fasciotomy Procedure
Insert the 2” metal pin attached by a yellow string into the holes, securing both components into place as illustrated in Figure 21 Figure 21. Secure Metal Pin in Leg Shaft 3.2 Fasciotomy Procedure A fasciotomy can be performed on each of the four compartments via 2 incisions (medial and lateral). -
Page 16: Medial Incision Fasciotomy Procedure
nerve. f. Leave incisions open if the swelling is too great to allow primary skin closure (skin grafting is rarely needed if a full week is allowed for dissipation of edema). 3.2.2 Medial Incision Fasciotomy Procedure: a. Identify the posterior medial palpable edge of the tibia. b. -
Page 17: Maintenance
The following sections contain the maintenance procedures required to ensure continued operation of the Lower Extremity Fasciotomy System for Laerdal. Refurbishment of the Leg Skin requires Sil-Poxy (silicone adhesive), gloves, and paper towels. A new set of Fascias (Fasciotomy – Fascia Set FASC-FSCE-001) must be used to replace the used Fascias and reset the SYSTEM.
Need help?
Do you have a question about the SIMETRY 212-55190 and is the answer not in the manual?
Questions and answers