Advertisement
Quick Links
Advertisement

Related Manuals for Netgate 5100


Summary of Contents for Netgate 5100
- Page 1 Product Manual TNSR 19.02 Netgate Aug 25, 2022...
- Page 2 SOFTWARE DOCUMENTATION 1 Tested Platforms 2 Untested Platforms...
- Page 3 Product Manual, TNSR 19.02 TNSR software is available pre-installed on Netgate hardware or as a Bare Metal Image (BMI) for use on Commercial Off the Self (COTS) hardware or in virtual environments. For quotes, updates, and more information about TNSR, please visit tnsr.com...
- Page 4 CHAPTER TESTED PLATFORMS These systems and components have been tested extensively by Netgate and are known to work well with TNSR. In addition to the support included with the TNSR license, Netgate warranty and technical support is available for purchase for Netgate-branded appliances.
-
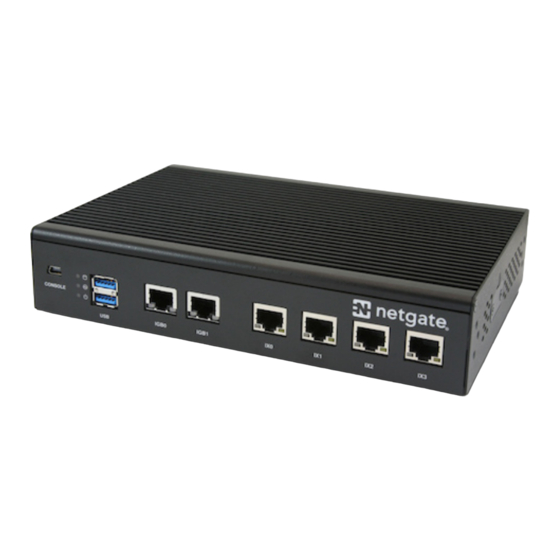
Page 5: Input And Output Ports
There are also TNSR Configuration Example Recipes that might be of assistance when configuring TNSR. Input and Output Ports Rear Side Network Ports Table 1: Netgate 5100 Network Interface Layout Port Label Linux Label TNSR Label Port Type Port Speed IGB0... - Page 6 Front Side 1. Receessed Reset Button 2. Power Button 3. Power (12VDC with threaded locking connector) Center Pin Positive Note: The power button on the Netgate 5100 has been programmed to perform a graceful shutdown when depressed. 1.1. Netgate Appliances...
- Page 7 If the client OS does not see the serial device, connect the power cord to the device to allow it to start booting. If the device appears without power, then better to wait until the terminal is open before connecting power so the client can view the entire boot output. 1.1. Netgate Appliances...
- Page 8 The device associated with the system console is likely to show up as /dev/ttyUSB0. Look for messages about the device attaching in the system log files or by running dmesg. Note: If the device does not appear in /dev/, see the note above in the driver section about manually loading the 1.1. Netgate Appliances...
- Page 9 • Set the Connection type to Serial • Set Serial line to the console port determined previously • Set the Speed to 115200 bits per second. • Click the Open button PuTTY will then display the console. 1.1. Netgate Appliances...
- Page 10 Product Manual, TNSR 19.02 Fig. 1: An example of using PuTTY in Windows 1.1. Netgate Appliances...
- Page 11 In many cases screen may be invoked simply by using the proper command line, where <console-port> is the console port that was located above. sudo screen <console-port> 115200 Note: The sudo command will prompt for the local workstation password of the current account. 1.1. Netgate Appliances...
- Page 12 Wrong Device In some cases there may be multiple serial devices available. Ensure the one used by the serial client is the correct one. Some devices expose multiple ports, so using the incorrect port may lead to no output or unexpected output. 1.1. Netgate Appliances...
- Page 13 Product Manual, TNSR 19.02 Hardware Failure There could be a hardware failure preventing the serial console from working. Contact Netgate TAC for assistance. No Serial Output If there is no output at all, check the following items: USB Cable Not Plugged In For USB consoles, the USB cable may not be fully engaged on both ends. Gently, but firmly, ensure the cable has a good connection on both sides.
- Page 14 Netgate training has got you covered. https://www.netgate.com/training/ Resource Library To learn more about how to use your Netgate appliance and for other helpful resources, make sure to browse our Resource Library. https://www.netgate.com/resources/ Warranty and Support •...
- Page 15 Product Manual, TNSR 19.02 1.1.2 Netgate 6100 MAX Secure Router Manual This Quick Start Guide covers the first time connection procedures for the Netgate 6100 MAX Secure Router and also provides information needed to stay up and running. Getting Started Use the following steps to configure the TNSR Secure Router.
- Page 16 Product Manual, TNSR 19.02 Fig. 3: Rear view of the Netgate 6100 MAX Secure Router The numbered labels in this image rerfer to entries in Networking Ports Other Ports. Table 2: Netgate 6100 Network Interface Layout Port Label Linux Label...
- Page 17 If both ports are connected only the RJ45 console port will function. • The Power connector is 12VDC with threaded locking connector. Power Consumption 20W (idle) Front Side Fig. 4: Front view of the Netgate 6100 Firewall Appliance 1.1. Netgate Appliances...
- Page 18 Standby Circle solid orange Power On Circle solid blue Left Side Fig. 5: Left side view of the Netgate 6100 Firewall Appliance The left side panel of the device (when facing the front) contains: Description Purpose Reset Button (Recessed) No function on TNSR at this time...
- Page 19 Look for an entry with a title such as Silicon Labs CP210x USB to UART Bridge. If there is a label in the name that contains “COMX” where X is a decimal digit (e.g. COM3), that value is what would be used as the port in the terminal program. 1.1. Netgate Appliances...
- Page 20 The device associated with the system console is likely to show up as /dev/cuaU0. Look for messages about the device attaching in the system log files or by running dmesg. Note: If the serial device is not present, ensure the device has power and then check again. 1.1. Netgate Appliances...
- Page 21 Note: The sudo command will prompt for the local workstation password of the current account. • Set the Connection type to Serial • Set Serial line to /dev/ttyUSB0 • Set the Speed to 115200 bits per second • Click the Open button PuTTY will then display the console. 1.1. Netgate Appliances...
- Page 22 Product Manual, TNSR 19.02 Fig. 6: An example of using PuTTY in Windows 1.1. Netgate Appliances...
- Page 23 If portions of the text are unreadable but appear to be properly formatted, the most likely culprit is a character encoding mismatch in the terminal. Adding the -U parameter to the screen command line arguments forces it to use UTF-8 for character encoding: sudo screen -U <console-port> 115200 1.1. Netgate Appliances...
- Page 24 Some devices expose multiple ports, so using the incorrect port may lead to no output or unexpected output. Hardware Failure There could be a hardware failure preventing the serial console from working. Contact Netgate TAC for assistance.
- Page 25 Terminal Speed Ensure the terminal program is configured for the correct speed. (See No Serial Output) Character Encoding Ensure the terminal program is configured for the proper character encoding, such as UTF-8 or Latin-1, depending on the operating system. (See Screen) 1.1. Netgate Appliances...
- Page 26 Netgate training has got you covered. https://www.netgate.com/training/ Resource Library To learn more about how to use your Netgate appliance and for other helpful resources, make sure to browse our Resource Library. https://www.netgate.com/resources/ Warranty and Support •...
-
Page 27: Table Of Contents
Product Manual, TNSR 19.02 1.1.3 Netgate 1537 Secure Router Manual This Quick Start Guide covers the first time connection procedures for the Netgate 1537 1U Secure Router and also provides information needed to stay up and running. Getting Started Use the following steps to configure the TNSR Secure Router. -
Page 28: Default Configuration
OS and not available in TNSR. Though technically optional, the best practice is to have one for accessing and updating the host OS. Other I/O Port I/O Type 2x USB 3.0 IPMI Reset & Power buttons Status LEDs (see table below) 1.1. Netgate Appliances... -
Page 29: Status Leds
Product Manual, TNSR 19.02 Status LEDs 1.1. Netgate Appliances... - Page 30 Indicates power is being supplied to Illuminated the system power supply units. This LED should normally be illuminated when the system is operating. Indicates no power is being supplied to the system power 1.1. Netgate Appliances supply. System is powered off.
-
Page 31: With Cpic-8955 Accelerator Card With Intel® Quickassist Technology
Note: Default Host OS Interface is eno1. The Host OS Interface is one network interface that is only available to the host OS and not available in TNSR. Though technically optional, the best practice is to have one for accessing and updating the host OS. 1.1. Netgate Appliances... -
Page 32: With 2 Port Intel 10 Gbps X710 Sfp+ Expansion Card
Note: Default Host OS Interface is eno1. The Host OS Interface is one network interface that is only available to the host OS and not available in TNSR. Though technically optional, the best practice is to have one for accessing and 1.1. Netgate Appliances... - Page 33 Connecting to the VGA console is identical to connecting any computer to a monitor. Connect the VGA cable (DB-15) between the Netgate appliance and the monitor. Use a USB or PS/2 keyboard and mouse as applicable to the hardware. Additional Resources Professional Services Support does not cover more complex tasks such as network design and conversion from other firewalls.
- Page 34 Netgate training has got you covered. https://www.netgate.com/training/ Resource Library To learn more about how to use your Netgate appliance and for other helpful resources, make sure to browse our Resource Library. https://www.netgate.com/resources/ Warranty and Support •...
- Page 35 With 2 Port Intel 1 Gbps Ethernet Expansion Card – With 2 Port Intel 10 Gbps X710 SFP+ Expansion Card – With 4 Port Intel 1 Gbps Ethernet Expansion Card – With 4 Port Intel 10 Gbps X710 SFP+ Expansion Card Default Configuration 1.1. Netgate Appliances...
- Page 36 OS and not available in TNSR. Though technically optional, the best practice is to have one for accessing and updating the host OS. Other I/O Port I/O Type IPMI 2x USB 3.0 Reset & Power buttons Status LEDs (see table below) Status LEDs 1.1. Netgate Appliances...
- Page 37 Indicates power is being supplied to Illuminated the system power supply units. This LED should normally be illuminated when the system is operating. Indicates no power is being supplied to the system power 1.1. Netgate Appliances supply. System is powered off.
- Page 38 Note: Default Host OS Interface is eno1. The Host OS Interface is one network interface that is only available to the host OS and not available in TNSR. Though technically optional, the best practice is to have one for accessing and updating the host OS. 1.1. Netgate Appliances...
- Page 39 1 Gbps eno2 GigabitEthernet7/0/1 RJ-45 1 Gbps eno3 TenGigabitEthernet3/0/0 RJ-45 10 Gbps eno4 TenGigabitEthernet3/0/1 RJ-45 10 Gbps Note: Default Host OS Interface is eno1. The Host OS Interface is one network interface that is only available to 1.1. Netgate Appliances...
- Page 40 Connecting to the VGA console is identical to connecting any computer to a monitor. Connect the VGA cable (DB-15) between the Netgate appliance and the monitor. Use a USB or PS/2 keyboard and mouse as applicable to the hardware. Additional Resources Professional Services Support does not cover more complex tasks such as network design and conversion from other firewalls.
- Page 41 Netgate training has got you covered. https://www.netgate.com/training/ Resource Library To learn more about how to use your Netgate appliance and for other helpful resources, make sure to browse our Resource Library. https://www.netgate.com/resources/ Warranty and Support •...
- Page 42 3. Click Launch Instance to enter the Launch Instance Wizard 4. Click the AWS Marketplace heading 5. Type Netgate in the search box and press Enter 6. Find the entry for TNSR and click Select 7. Click Continue on the information page...
- Page 43 Product Manual, TNSR 19.02 8. Choose an Instance Type, then click Next Note: The available instance types are those that support ENA network adapters. These include all C5 and M5 instance types. The type of C5 or M5 instance depends on the needs of a given network. For networks with a large number of subnets in the VPC or for networks that expect high throughput, one of the larger instance types is likely to be more appropriate.
- Page 44 Product Manual, TNSR 19.02 Add TNSR LAN Interface to the Instance The Management and WAN Interfaces were created while launching the instance. Now create the LAN interface. If this instance requires additional interfaces, either public or private, create those now. To allocate a new TNSR LAN Network Interface, create a new Elastic Network Interface on the LAN subnet follow- ing the instructions here https://docs.aws.amazon.com/AWSEC2/latest/UserGuide/using-eni.html#create_eni...
- Page 45 This warning only appears the first time connecting using SSH on a given system and user account. Type yes to continue connecting. If all went well, the TNSR CLI will automatically be launched, resulting in output similar to the following: Netgate TNSR Version: v0.1.0-567-g0967ac3 Build timestamp: Fri Apr 20 16:16:48 2018 CDT Git Commit: 0x967ac3d ip-10-5-2-225.ec2.internal tnsr#...
- Page 46 Product Manual, TNSR 19.02 tnsr# configure tnsr(config)# service dataplane restart Success tnsr(config)# exit Check the interfaces again: tnsr# show interface Interface: VirtualFunctionEthernet0/6/0 Admin status: down Link down, 100 Gbit/sec, full duplex Link MTU: 9216 bytes MAC address: 0a:54:d0:7c:df:c0 IPv4 Route Table: ipv4-VRF:0 IPv6 Route Table: ipv6-VRF:0 counters: received: 0 bytes, 0 packets, 0 errors...
- Page 47 Product Manual, TNSR 19.02 (continued from previous page) tnsr(config-interface)# description eth1 eni-beaa7c21 WAN tnsr(config-interface)# exit This sets an address, brings up the interface, and sets a description to serve as a reminder of the interface identity & purpose. Substitute a different Private IP address/mask and description as needed. Configure LAN interface: 1.
- Page 48 Product Manual, TNSR 19.02 (continued from previous page) IPv6 Route Table: ipv6-VRF:0 counters: received: 1925 bytes, 30 packets, 0 errors transmitted: 1226 bytes, 19 packets, 0 errors 20 drops, 0 punts, 27 rx miss, 0 rx no buffer The output shows that the interfaces are up and configured, and the counters show that a few packets have been received.
- Page 49 Product Manual, TNSR 19.02 2. Click Instances 3. Click the button next to the TNSR interface to select it 4. Look at the bottom of the page, under the Description tab to see Network Interfaces 5. The eth0 interface it the management interface and won’t appear in the TNSR CLI. Look at eth1, eth2, etc. 6.
- Page 50 Product Manual, TNSR 19.02 (continued from previous page) 64 bytes from 52.7.26.219: icmp_seq=4 ttl=45 time=48.433 ms --- 52.7.26.219 ping statistics --- 5 packets transmitted, 5 packets received, 0.0% packet loss round-trip min/avg/max/stddev = 48.433/48.863/49.238/0.323 ms Warning: Once the Host OS is capable of reaching the Internet, check for updates (Updating TNSR) before proceeding.
- Page 51 Netgate training has got you covered. https://www.netgate.com/training/ Resource Library To learn more about how to use your Netgate appliance and for other helpful resources, make sure to browse our Resource Library. https://www.netgate.com/resources/ 1.2.2 Azure TNSR Instance Setup This zero-to-ping setup guide will explain how to get started using TNSR to route network traffic in an Azure Virtual...
- Page 52 Product Manual, TNSR 19.02 TNSR WAN/Internet Interface The TNSR WAN interface is used by TNSR to connect to the Internet. A WAN interface will have a Public IP Address assigned and it will be attached to a subnet that has a route to an Internet Gateway in its Route Table.
- Page 53 Product Manual, TNSR 19.02 (continued from previous page) -n TNSR-WAN-Subnet --address-prefixes 10.5.0.0/24 az network vnet subnet create -g TNSR-Resource-Group --vnet-name TNSR-VNet -n TNSR-LAN-Subnet --address-prefixes 10.5.1.0/24 az network vnet subnet create -g TNSR-Resource-Group --vnet-name TNSR-VNet -n TNSR-MGMT-Subnet --address-prefixes 10.5.2.0/24 6. Create Public IPs to be used by WAN and Management interfaces. az network public-ip create -g TNSR-Resource-Group -n TNSR-WAN-IP...
- Page 54 TNSR_SIZE="Standard_DS4_v2" 12. Choose the TNSR image URN to be used from the list obtained with the following command and export a variable called TNSR_URN with it. az vm image list --publisher Netgate --all --query "[?contains(offer,'tnsr')].{Sku:sku, Version:version Urn:urn}" \ --output table export TNSR_URN="netgate:netgate-tnsr-azure-fw-vpn-router:netgate-tnsr:20.02.2"...
- Page 55 If all went well, the TNSR CLI will automatically be launched, resulting in output similar to the following: Netgate TNSR Version: tnsr-v19.02.1-2 Build timestamp: Mon Apr 8 15:16:48 2019 CDT Git Commit: 0x8b47d140 This TNSR instance is not configured for package updates. For information see http://www.netgate.com/docs/tnsr/updating/index.html TNSR-Instance1 tnsr# 1.2. Cloud Platforms...
- Page 56 Product Manual, TNSR 19.02 Configure Interface Addresses in TNSR Now that the TNSR CLI is open, start configuring the TNSR instance. First, configure the network interfaces and bring them up. In TNSR, type show interface to view the interface configurations. Here’s an example of what will appear: TNSR-Instance1 tnsr# show interface Interface: NetVSC2 Admin status: down...
- Page 57 Product Manual, TNSR 19.02 This sets an address, brings up the interface, and sets a description to serve as a reminder of the interface identity & purpose. Substitute a different Private IP address/mask and description as needed. Configure LAN interface: 1.
- Page 58 It is now possible to verify connectivity with the ping command from the TNSR CLI. TNSR-Instance1 tnsr# ping www.netgate.com PING www.netgate.com (208.123.73.73) 56(84) bytes of data. 64 bytes from www.netgate.com (208.123.73.73): icmp_seq=1 ttl=49 time=19.6 ms 64 bytes from www.netgate.com (208.123.73.73): icmp_seq=2 ttl=49 time=19.5 ms 64 bytes from www.netgate.com (208.123.73.73): icmp_seq=3 ttl=49 time=19.4 ms 64 bytes from www.netgate.com (208.123.73.73): icmp_seq=4 ttl=49 time=20.1 ms...
- Page 59 Product Manual, TNSR 19.02 (continued from previous page) 64 bytes from 40.122.49.143: icmp_seq=2 ttl=49 time=19.8 ms 64 bytes from 40.122.49.143: icmp_seq=3 ttl=49 time=19.8 ms 64 bytes from 40.122.49.143: icmp_seq=4 ttl=49 time=19.6 ms 64 bytes from 40.122.49.143: icmp_seq=5 ttl=49 time=19.9 ms --- 40.122.49.143 ping statistics --- 5 packets transmitted, 5 received, 0% packet loss, time 4006ms rtt min/avg/max/mdev = 19.649/19.862/19.940/0.140 ms...
- Page 60 Netgate Training Netgate training offers training courses for increasing your knowledge of Netgate products and services. Whether you need to maintain or improve the security skills of your staff or offer highly specialized support and improve your customer satisfaction; Netgate training has got you covered.
- Page 61 Product Manual, TNSR 19.02 Resource Library To learn more about how to use your Netgate appliance and for other helpful resources, make sure to browse our Resource Library. https://www.netgate.com/resources/ Limitations There are issues running TNSR on Azure which can lead to problems when communicating using public IP addresses between multiple TNSR instances all running on Azure.
- Page 62 Product Manual, TNSR 19.02 Installing TNSR on KVM When creating the virtual machine, use the requirements on Supported Platforms as a guide for determining configu- ration parameters before starting. For example: • Number of CPUs, Cores, and their topology • Amount of RAM •...
- Page 63 Product Manual, TNSR 19.02 KVM Optimization Virtio interfaces use tap as a backend, which requires a memcpy() of each packet forwarded. Due to this design, the stock configuration can result in poor performance. The tuning suggestions in this section will help obtain higher performance in these environments.
- Page 64 Card. Network Interface Card (NIC) support in TNSR is provided by drivers in the underlying Linux operating system. The following NIC drivers have been tested by Netgate: igb NICs based on the following Intel Gigabit Ethernet controllers: • 82575/6, 82580, I350, I354, I210/211 ixgbe NICs based on the following Intel 10 Gigabit Ethernet controllers: •...
- Page 65 Product Manual, TNSR 19.02 i40e NICs based on the following Intel 10/40 Gigabit Ethernet controllers: • X710, XL710, XXV710 mlx5 NICs based on the following Mellanox 10/25/40/50/100 Gigabit Ethernet controllers: • ConnectX-4, ConnectX-4 Lx, ConnectX-5 1.4. Recommended Components...
- Page 66 CHAPTER UNTESTED PLATFORMS The best practice is to use a platform tested by Netgate. That said, the underlying components may support additional hardware that has not been tested by Netgate nor confirmed to run TNSR software successfully. Netgate customers are often on the cutting edge of technology, so they may encounter systems and components that work with TNSR before Netgate has an opportunity to test them.
Need help?
Do you have a question about the 5100 and is the answer not in the manual?
Questions and answers