
Related Manuals for 3DHISTECH iSaCS


Summary of Contents for 3DHISTECH iSaCS
- Page 1 – IHC Stainer, Automated Coverslipper and Scanner User's Guide September 22, 2016...
-
Page 2: Table Of Contents
– IHC Stainer, Automated Coverslipper and Scanner User's Guide Contents Disclaimer............................4 Character Formats and Symbols....................6 Notes Regarding Operational Safety.....................7 Notes on Warranty........................10 1 Installation..........................11 2 Product Description.........................12 2.1 Overview..........................12 2.1.1 Intended use..............................12 2.1.2 Features and benefits.............................13 2.2 Main outer parts of the device....................13 2.3 Main inner parts of the device....................15... - Page 3 – IHC Stainer, Automated Coverslipper and Scanner User's Guide 8 Troubleshooting and Maintenance..................42 8.1 Safety Information........................42 8.2 Maintenance..........................43 8.2.1 Preventive maintenance..........................43 8.2.2 Cleaning the device............................43 8.2.3 Cleaning the tray............................43 8.2.4 Replacing fuses of the main power switch.....................43 8.2.5 Opening the protective cover.........................45 8.3 Troubleshooting........................45...
-
Page 4: Disclaimer
Disclaimer Copyright © 2001-2016 3DHISTECH Ltd. All rights reserved. 3DHISTECH Ltd. as the manufacturer declares that the product iSaCS, an automated slide stainer for IHC, coverslipper and scanner, is a -labeled laboratory device that is designed and produced with consideration of specified requirements, and conforms to Directives 2004/108/EC and 2006/95/EC. - Page 5 User's Guide Third-Party Disclaimer (LibTIFF – TIFF Library and Utilities) 3DHISTECH Ltd. is not liable for damage of whatever nature (including, but not limited to, general or specific damage, indirect damage, consequential damage or incidental damage, including damage resulting from lost profits, interruption of business, loss of business information, pecuniary loss or similar damage) that stems from or is associated with the incorporated part of this Product that is made by third parties.
-
Page 6: Character Formats And Symbols
– IHC Stainer, Automated Coverslipper and Scanner Character Formats and Symbols User's Guide Character Formats and Symbols Example Words or characters that appear on the screen. These include field names, screen and window titles, push-buttons and menu names, paths or options. -
Page 7: Notes Regarding Operational Safety
The operation of the instrument in explosion-risk environments is not Warning! allowed. If protective devices are found to be ineffective, the device of iSaCS must be shut down and precautions must be taken to prevent unintended usage. For Warning! necessary repair work or work to restore proper operating condition, you should contact the 3DHISTECH Customer Service. - Page 8 – IHC Stainer, Automated Coverslipper and Scanner Notes Regarding Operational Safety User's Guide Operations Notices General Do not operate the device near strong electromagnetic radiation sources (non-shielded RF • radiation sources), because this may prevent the device from operating properly.
- Page 9 – IHC Stainer, Automated Coverslipper and Scanner Notes Regarding Operational Safety User's Guide Filling up containers DI Water: Distilled water, final 0.04% Tween20 non-ionic detergent solution (min. 0.5l) • Wash Buffer: Diluted (1x), final 0.04% Tween20 non-ionic detergent solution (min. 0.5l) •...
-
Page 10: Notes On Warranty
User's Guide Notes on Warranty 3DHISTECH Ltd. – as the Product Manufacturer – warrants iSaCS to be free from faults in material and workmanship at the moment of installation. Defects must be notified immediately on identification and maximum efforts must be undertaken in order to minimize damage. On receiving notice of a fault, the Product Manufacturer will be under obligation to remove the fault, at his own option, either by providing adequate repair services or by delivering a faultless product for replacement. -
Page 11: Installation
The supplier or distributor is not liable for any damages caused by an installation carried out by an unauthorized person. Warning! The device of iSaCS must be operated only when placed on a heavy- duty rolling workbench. September 22, 2016 3DHISTECH Ltd. -
Page 12: Product Description
Warning! The device of iSaCS can be operated by qualified professionals only. The operator must be a person who is fully aware of the sources of potential hazards during the operation. The iSaCS is a precision medical device which can suffer can significant functional and physical damages when operated incorrectly. -
Page 13: Features And Benefits
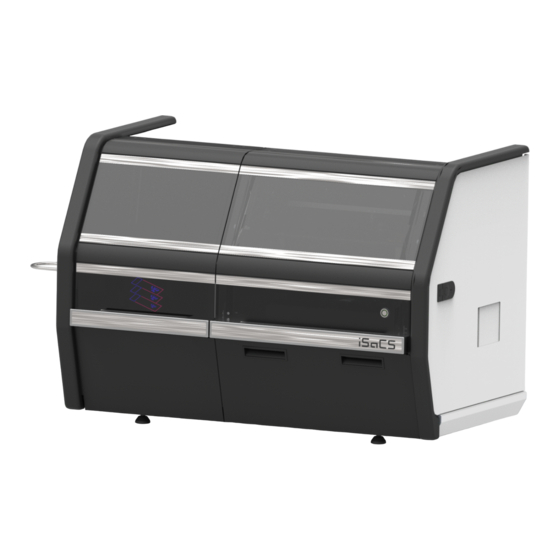
Initially stained slides can be accessed through LAN almost promptly after scanning, it is not • necessary to wait until the batch process is finished. 2.2 Main outer parts of the device The below image illustrates the main outer parts of the iSaCS: Figure 1.– Main outer parts of the device 1. Upper door 2. - Page 14 – IHC Stainer, Automated Coverslipper and Scanner 2 Product Description User's Guide 4. Main power switch (ON/OFF) 5. Connector panel 6. Power supply and switch compartment 7. Lumencor SPECTRA fluorescent illumination unit (optional) 8. Optical cable (optional) 9. Tray feeding slot 10.
-
Page 15: Main Inner Parts Of The Device
– IHC Stainer, Automated Coverslipper and Scanner 2 Product Description User's Guide 2.3 Main inner parts of the device The below image illustrates the main inner parts of the iSaCS: Figure 3.– Main inner parts of the device 1. Pipetting unit 2. Coverslipper 3. -
Page 16: Preparation Procedures
– IHC Stainer, Automated Coverslipper and Scanner 3 Preparation procedures User's Guide 3 Preparation procedures 1. Before switching on the device and the control computer make sure that: the doors of the device are closed • the device is connected properly to the power supply •... -
Page 17: Commissioning
3. Switch the main power rocker switch off to turn off the device. 4.2 Software startup 1. Launch the control software of iSaCS by double-clicking the iSaCS program icon. 2. Open Services window from under the Service menu, and start processes that are not yet running by clicking the Start buttons. -
Page 18: Hardware Startup
– IHC Stainer, Automated Coverslipper and Scanner 4 Commissioning User's Guide Note: When shutting down, after you have clicked the Shutdown button, all of the running processes must be stopped before restarting the control software. 3. Both of he Door Open buttons are active on the main window of the control software. -
Page 19: Loading The Supplies
– IHC Stainer, Automated Coverslipper and Scanner 4 Commissioning User's Guide 4.4 Loading the supplies 4.4.1 Fluids 1. Open the lower door of the device according the following: Click the Door open button at the lower section of the main window. - Page 20 – IHC Stainer, Automated Coverslipper and Scanner 4 Commissioning User's Guide Warning! The pump unit must be removed before refilling or emptying the container by rotating the cap by 20° clockwise. 3. Fill up Buffer and DI water containers with distilled water, and empty the rest of the containers.
-
Page 21: Incubation Unit
Do not use a slide when it is broken or its edges are not properly cut or grounded. Using such slides may lead to injury. Important! Only original 3DHISTECH trays can be loaded into the device. Do NOT insert slides into tray positions 1 and 12! Feeding the slide tray Figure 7 –... -
Page 22: Filling Up The Incubation Compartment
– IHC Stainer, Automated Coverslipper and Scanner 4 Commissioning User's Guide 2. Push the tray until it cannot be pushed further. 3. After the tray is loaded with the completed slides, the tray is moved to the output position where it can be removed. - Page 23 – IHC Stainer, Automated Coverslipper and Scanner 4 Commissioning User's Guide Important! During filling, be sure to check that each slot contains one slide only. If more than one slide are loaded into a slot, slides may brake during processing them.
-
Page 24: Initialization
– IHC Stainer, Automated Coverslipper and Scanner 4 Commissioning User's Guide 4.5.3 Initialization 1. Click Initialize on the upper panel of the main window. 2. The recorded slide images will be displayed on the upper panel. 4.5.4 Unthreading/threading the reagent chain Unthreading 1. -
Page 25: Filling Up The Reagent Chain With Pipette Tips And Reagent Vials
– IHC Stainer, Automated Coverslipper and Scanner 4 Commissioning User's Guide 4.5.5 Filling up the reagent chain with pipette tips and reagent vials 1. Open the upper door 2. Remove used pipette tips from the racks at right side of the chain (1), then insert unused ones into the racks at the left side of the chain (2). -
Page 26: Initialization
– IHC Stainer, Automated Coverslipper and Scanner 4 Commissioning User's Guide 4.5.7 Initialization Click Initialize on the lower panel. The software first reads the barcodes of the reagents, then their identification is initiated. Important! If during initialization an error message is received stating that there is... - Page 27 – IHC Stainer, Automated Coverslipper and Scanner 4 Commissioning User's Guide Important! New reagent type cannot be created, and the already existing ones cannot be modified. Reagent types that are listed are predefined. Reagent data are not editable, therefore fields in the Reagent data pane are inactive (displayed with gray background).
-
Page 28: Protocol Assignment
– IHC Stainer, Automated Coverslipper and Scanner 4 Commissioning User's Guide 4.7 Protocol assignment 1. Click the thumbnail of a slide to edit its data. 2. If you select several slides (with mouse or keyboard), then right-double-click the thumbnail of one of the selected slides. -
Page 29: Protocol Sequencing
– IHC Stainer, Automated Coverslipper and Scanner 4 Commissioning User's Guide The area to be stained is marked with red in the B/W preview image of the slide. Area selection and editing is available on the preview image by default: Eraser –... - Page 30 – IHC Stainer, Automated Coverslipper and Scanner 4 Commissioning User's Guide Important! The following must be kept in mind when creating or modifying a protocol: At least one protocol step must be added – Steps other than Incubation and Quant (as post-processing) must be present –...
- Page 31 – IHC Stainer, Automated Coverslipper and Scanner 4 Commissioning User's Guide – Washing One or more washing cycles can be added to the selected reagent. It is available for you to select washing cycle from Buffer or DI Water fluid containers. Set washing time by dragging the slider to a required value.
- Page 32 – IHC Stainer, Automated Coverslipper and Scanner 4 Commissioning User's Guide – Scanning Select a location in the Target field (Local or CaseCenter) II. Set the profile to be loaded in the Scanner Data field of Scan Properties panel. The profile type (BF of FL) automatically appears in Profile type and Scan area fields together with the scannable area (preview image or stained area).
- Page 33 – IHC Stainer, Automated Coverslipper and Scanner 4 Commissioning User's Guide – Post processing (QuantCenter) Select Post processing list item from the Category drop-down menu II. Click III. Choose the Quant scenario you want to use during processing September 22, 2016 3DHISTECH Ltd.
- Page 34 – IHC Stainer, Automated Coverslipper and Scanner 4 Commissioning User's Guide 1. Double-click an item in the protocol list to select, or type a character string into the Name field to show result, then select the appropriate one. 2. To assign the selected protocol to the slide, click OK.
- Page 35 – IHC Stainer, Automated Coverslipper and Scanner 4 Commissioning User's Guide 3. Click Create Protocol to edit protocol before assigning it to the slide. Select a predefined protocol from the Saved Protocol List items, or click + to define •...
- Page 36 – IHC Stainer, Automated Coverslipper and Scanner 4 Commissioning User's Guide 6. Sequenced parts on the Queued Parts panel of the Slide Editor window are displayed so that by double-clicking the protocol, it will be assigned to the slide. Click OK to accept and return to main window.
-
Page 37: Scheduling
– IHC Stainer, Automated Coverslipper and Scanner 5 Scheduling User's Guide 5 Scheduling Important! Do NOT open any of the doors during scheduling, because all of the slide data will be lost! Scheduling can be executed based on the following aspects:... - Page 38 – IHC Stainer, Automated Coverslipper and Scanner 5 Scheduling User's Guide Click to display the view in which the probably completion times can be seen at the bottom of the slide thumbnails. Click on the Reagens panel, and if there are several reagents filled in, their statuses are displayed with narrower marking icons, and further data is displayed in a tooltip of the reagent.
-
Page 39: Service
– IHC Stainer, Automated Coverslipper and Scanner 6 Service User's Guide 6 Service The following functions are available under the Service menu: Shutdown – Slide data will be deleted before turning off the device. Startup – The four fluid compartments will be calibrated, the system will be flushed out (remaining materials will be discarded into the Hazardous Waste container). - Page 40 – IHC Stainer, Automated Coverslipper and Scanner 6 Service User's Guide Recognition settings – Setting of parameters of Barcode parsing Important! This function is NOT compatible with HL7 system. Services – Managing services (Start or Stop) September 22, 2016 3DHISTECH Ltd.
-
Page 41: Running The Process
– IHC Stainer, Automated Coverslipper and Scanner 7 Running the process User's Guide 7 Running the process 1. Ascertain that parameters are correctly set 2. Click Run to launch the process 3. After scheduling, the calculated completion time is visible at the bottom of the slide... -
Page 42: Troubleshooting And Maintenance
– IHC Stainer, Automated Coverslipper and Scanner 8 Troubleshooting and Maintenance User's Guide 8 Troubleshooting and Maintenance This section demonstrates those common troubleshooting and maintenance activities that the user/operator of the device can easily perform. For those maintenance solutions that are not described here, contact 3DHISTECH service for support. -
Page 43: Maintenance
– IHC Stainer, Automated Coverslipper and Scanner 8 Troubleshooting and Maintenance User's Guide 8.2 Maintenance 8.2.1 Preventive maintenance To prevent fungus growth Do not leave the equipment in an unconditioned environment with a storage temperature • above 60°C (140°F) or below 0°C (32°F), which may damage the equipment. - Page 44 – IHC Stainer, Automated Coverslipper and Scanner 8 Troubleshooting and Maintenance User's Guide 3. Release lock (1) by pushing the lever to the left, so the insert (2) can be pulled out. Figure 12 – Fuse compartment 4. Remove insert from the compartment.
-
Page 45: Opening The Protective Cover
User's Guide 8.2.5 Opening the protective cover To perform maintenance work, the protective cover and doors of iSaCS need to be opened. Before reaching into the device, exit control software, switch off the main power supply and disconnect power cables (see section 2.2 Main outer parts of the device). - Page 46 – IHC Stainer, Automated Coverslipper and Scanner 8 Troubleshooting and Maintenance User's Guide Image is black Contact 3DHISTECH Service for support. • Poor image quality Imaging error (for example, chromatic aberrations) • Contact 3DHISTECH Service for support. • Warning! Do not modify the camera driver settings, as the default settings adjusted by 3DHISTECH, give the most accurate images.
-
Page 47: Transporting Of Isacs
9 Transporting of iSaCS User's Guide 9 Transporting of iSaCS The below sequence of steps demonstrate the moving of iSaCS to another location (within a building to a different room): Important! The device is not equipped with handles for lifting or moving. To install the device in another room, the rolling work-bench (on which the device is placed) must be moved. -
Page 48: Technical Data
– IHC Stainer, Automated Coverslipper and Scanner 10 Technical Data User's Guide 10 Technical Data Slide capacity: 72 pcs Max. reagent count: 40 Coverslip capacity / measurements: 150 pcs of cover glasses / 22×50 mm Reagent identification: 2D barcode Acceptable slide measurements: 25×75 mm, 1 mm thickness... - Page 49 – IHC Stainer, Automated Coverslipper and Scanner 10 Technical Data User's Guide Operation Range of allowed temperature Between +10°C and +35°C Max. relative air humidity (non-condensing) Altitude at installation site max. 2000 m Atmospheric pressure 500 hPa – 1060 hPa...
- Page 50 – IHC Stainer, Automated Coverslipper and Scanner 10 Technical Data User's Guide Slide identification Slides are identified by a VRmagic VRmC-8+ PRO preview camera. Label area is saved as image and barcode is interpreted as a character string, with capability for interpretation of the following types of...
- Page 51 – IHC Stainer, Automated Coverslipper and Scanner 10 Technical Data User's Guide Control computer, minimum system requirements Operating System Microsoft Windows 7 Professional SP1 64-bit EN 2x Intel Xeon (8-core) 12 MB l2 cache Recommended: 12 GB DDR3 Hard disk 1.5 TB...
Need help?
Do you have a question about the iSaCS and is the answer not in the manual?
Questions and answers