
Related Manuals for Pari LC PLUS 022


Summary of Contents for Pari LC PLUS 022
- Page 1 Instructions for use ® PARI LC PLUS Model: PARI LC PLUS (Type 022) Nebulisers for PARI inhalation systems...
- Page 2 PARI products and optional accessories. For this reason, these instructions for use also describe and illustrate features not present in your PARI product because they are, for instance, country-specific and/or optional. When using the systems, products and functions, the applicable country-specific regula- tions must be observed.
-
Page 3: Table Of Contents
– 3 – TABLE OF CONTENTS IMPORTANT INFORMATION.......... Intended purpose ............. Indication ................Contraindication ............... Labelling ................Safety and warning instructions ........PRODUCT DESCRIPTION ..........Components ..............Overview and product designations ......... Product variants ............... Product combinations ............Description of function ............Material information ............ - Page 4 – 4 – REPROCESSING IN PROFESSIONAL HEALTH INSTI- TUTIONS................Reprocessing cycles ............Processing limits .............. Nebuliser ................Connection tubing ............Visual inspection and storage .......... TROUBLESHOOTING ............. TECHNICAL DATA............General nebuliser data ............. Aerosol characteristics according to ISO 27427 ....FURTHER INFORMATION ..........
-
Page 5: Important Information
The nebuliser must only be connected with a PARI compressor or with a central gas supply system. The PARI CENTRAL is in- tended for the connection with the central gas supply system. This PARI product can be used in a home environment, as well as in professional health institutions. -
Page 6: Indication
The frequency and duration of use is determined by profes- sional medical staff according to the individual needs of the patient. 1.2 Indication For treatment of diseases of the lower airways. 1.3 Contraindication There are no contraindications known to PARI GmbH. 2) Professional medical staff: Doctors, pharmacists, and physiotherapists. -
Page 7: Labelling
Regulation 2017/745. Follow the instructions for use Mouthpiece with exhalation valve Inhalation valve Connection tubing Nebuliser insert PARI LC PLUS nebuliser LC interrupter Air filter for compressor types 128/130/152 Air filter for compressor type 041 Air filter for compressor types 028/085 Tubing adapter Filter changer... -
Page 8: Safety And Warning Instructions
The user must follow these in order to guarantee safe op- eration of this PARI product. This PARI product must be used only as described in these in- structions for use. The instructions for use of the compressor and accessories used and the information for use of the inhalation solution used must also be followed. - Page 9 – 9 – General If non-approved solutions or suspensions are used for nebulisation, then nebuliser aerosol characteristics may differ from the information provided by the manufacturer. This product is not suitable for use in an anaesthetic breathing system or a ventilator breathing system. Tracheotomised patients cannot inhale using a mouthpiece.
- Page 10 – 10 – Hazard due to small parts which can be swallowed The product contains small parts. Small parts can block the air- ways and lead to a choking hazard. Keep all components out of the reach of babies and infants at all times. Hygiene Comply with the following hygiene instructions: –...
-
Page 11: Product Description
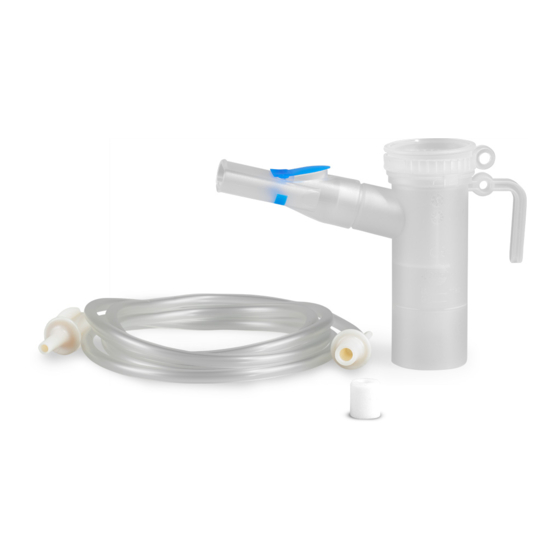
(1c) Nebuliser lower part (1d) LC interrupter (1e) Mouthpiece (1f) Connection tubing (2) Air filter for compressor 2.3 Product variants PARI LC PLUS (nozzle insert: transparent) With mouthpiece for treatment of the airways in adults and chil- dren aged approx. 4 years and older. -
Page 12: Product Combinations
The PARI nebuliser can be connected to all PARI compressors or to a central medical gas supply system via a PARI CENTRAL. The nebuliser can be used in combination with a range of PARI accessories. 2.5 Description of function The PARI nebuliser is part of a PARI inhalation system. -
Page 13: Material Information
INSTITUTIONS, page 28] When the expected operating life has been reached, replace the affected component. For this, nebuliser replacement sets (a nebuliser with connection tubing) or PARI Year Packs (a nebuliser with connection tubing and an air filter for a com- pressor) are available. -
Page 14: Use
All the steps described below must be carried out correctly. If the nebuliser is to be connected to a central gas supply sys- tem via a PARI CENTRAL, the instructions for use of the PARI CENTRAL must be followed. 3.1 Preparing for treatment... - Page 15 – 15 – • Attach the connection tubing to the nebuliser. • Attach the LC interrupter to the nebuliser. • Insert the connection tubing in the air inlet on the side of the LC interrupter. Using the mouthpiece • Fit the mouthpiece onto the nebuliser.
- Page 16 – 16 – Using accessories Information on assembling accessories is included in the in- structions for use of the respective accessory Filling the nebuliser • Insert the nebuliser in the holder on the compressor in- tended for this purpose. • If applicable, detach the inhalation valve from the nebuliser. •...
- Page 17 – 17 – If several inhalation solutions are to be used one after the other: • Rinse the nebuliser out with drinking water between the indi- vidual applications. • Shake excess water out of the nebuliser. • Fill the nebuliser with the next inhalation solution as de- scribed.
-
Page 18: Performing Treatment
– 18 – 3.2 Performing treatment All the safety instructions and warnings in these instruc- tions for use must have been read and understood before any treatment is carried out. Always hold the nebuliser upright during treatment. • If necessary, use the tubing adapter to connect the connec- tion tubing and the com- pressor. - Page 19 – 19 – • Take the nebuliser out of its holder on the compressor, and hold it upright. • Verify that all parts are firmly connected to each other. • DANGER! Life-threaten- ing situation from electrocu- tion if there is a device fault! Switch the compressor off im- mediately, and disconnect the power plug from the mains...
- Page 20 – 20 – Inhaling with the mouthpiece • Sit in an upright position and relax. • Hold the mouthpiece between your teeth and enclose it with your lips. • Breathe in as slowly and deeply as possible through the mouthpiece, and out again calmly. •...
-
Page 21: Ending The Treatment
– 21 – Inhaling with accessories Inhalation with accessories (e.g. masks) is described in the in- structions for use of the respective accessory. 3.3 Ending the treatment To end the treatment, proceed as follows: • Switch the compressor off by shifting the on/off switch to "OFF”. -
Page 22: Reprocessing In A Home Environment
– 22 – REPROCESSING IN A HOME ENVIRONMENT The product components must be cleaned thoroughly immedi- ately after each use, and disinfected at least once a week. The connection tubing cannot be cleaned or disinfected. Dry the connection tubing after each use [see: Care of the con- nection tubing, page 27]. -
Page 23: Cleaning
– 23 – 4.4 Cleaning Precleaning All individual parts must be precleaned immediately after use. EQUIPMENT: – Drinking water temperature of about 15 °C PROCEDURE: • Rinse all parts used for 2 minutes in running drinking water. Manual cleaning EQUIPMENT: – Drinking water temperature of at least 40 °C –... - Page 24 – 24 – In the dishwasher The individual parts can be cleaned in a standard household dishwasher, provided it is connected to a mains water supply of drinking water quality. To ensure safety when handling the cleaning agent used, fol- low the corresponding instructions for use, particularly the ac- companying safety instructions.
-
Page 25: Disinfecting
– 25 – 4.5 Disinfecting Disinfect all individual components after cleaning. Only com- ponents that have been cleaned can be disinfected effectively. The validated disinfection procedures are described below. In boiling water EQUIPMENT: – Clean saucepan – Drinking water PROCEDURE: CAUTION Risk of infection due to moisture Moisture encourages the growth of bacteria. - Page 26 – 26 – Using a standard thermal disinfector for baby bottles (not a microwave oven) EQUIPMENT: – Thermal disinfector with a runtime of at least 6 minutes PROCEDURE: CAUTION Risk of infection due to inadequate disinfection Inadequate disinfection encourages the growth of bacteria and thus increases the risk of infection.
-
Page 27: Care Of The Connection Tubing
– 27 – 4.6 Care of the connection tubing Dry the connection tubing after every inhalation session: • Connect the connection tubing to the compressor. • Switch your compressor on. • Let the compressor continue to run until all the moisture in the tube has been removed. -
Page 28: Reprocessing In Professional Health Institutions
– 28 – REPROCESSING IN PROFESSIONAL HEALTH INSTITUTIONS Dry the connection tubing after each use [see: Connection tubing, page 37]. 5.1 Reprocessing cycles Single patient use Nebuliser excluding – Clean immediately after every use connection tubing and – Disinfect once per week accessories (e.g. -
Page 29: Nebuliser
• Replace the connection tubing or carry out mechanical cleaning and disinfection of the connection tubing [see: Connection tubing, page 37]. All components of a PARI nebuliser and of the PARI accessor- ies used can be cleaned, disinfected, and sterilised as per the procedures described below. - Page 30 – 30 – Cleaning and disinfecting Manual cleaning EQUIPMENT The method has been validated in Europe using: – pH-neutral, enzymatic cleaning agent: ® Bode Bomix plus (concentration: 0.1%) – Drinking water temperature of about 15 °C – Application time: 10 minutes PROCEDURE: CAUTION Risk of infection due to growth of bacteria Inadequate disinfection encourages the growth of bacteria...
- Page 31 – 31 – RINSING: • Rinse all individual parts thoroughly under running drinking water at approx. 15 °C for 3 minutes. DRYING: • Shake the water out of all of the parts. • Place all parts on a dry, clean and absorbent surface, and allow them to dry completely.
- Page 32 – 32 – Cleaning with disinfection Cleaning and disinfection can be carried out in a single cycle using chemical reprocessing. To ensure safety when handling chemicals, observe the in- structions for use for the disinfectant. Mechanical EQUIPMENT: cleaning with The method has been validated in Europe using: disinfection: –...
- Page 33 – 33 – Chemical EQUIPMENT: cleaning with The method has been validated in Europe using: disinfection: – Aldehyde-free instrument disinfectant: Bode ® Bomix plus (concentration: 2%) Active agent basis: Quaternary ammonium compound – Drinking water at about 15 °C – Application time: 5 minutes PROCEDURE: •...
- Page 34 – 34 – Chemical disinfection To ensure safety when handling chemicals, observe the in- structions for use for the disinfectant. EQUIPMENT: The method has been validated in Europe using: ® – Aldehyde-containing disinfectant: Bode Korsolex basic (concentration: 4%) Active agent basis: Aldehyde donor, aldehyde –...
- Page 35 Disinfectants can trigger allergic reactions or irritation of the mucous membrane on contact with the skin. • Rinse the product thoroughly to ensure that no residues of the disinfectant remain on the PARI product. • Rinse off all parts thoroughly in running drinking water at about 15 °C for 3 minutes.
- Page 36 – 36 – Sterilising CAUTION Risk of infection by residual germs If there is dirt on the parts, germs capable of reproduction may remain despite the sterilisation process. As a result, there is a danger of infection. • Clean, disinfect, and dry all parts thoroughly before steril- ising.
-
Page 37: Connection Tubing
– 37 – 5.4 Connection tubing Mechanical cleaning and disinfecting EQUIPMENT: The method has been validated in Europe using: ® – Alkaline cleaning agent: Dr. Weigert neodisher MediClean forte – Neutralising agent: Dr. Weigert neodisher Z – Cleaning and disinfection device: RDG G7836 CD (Miele) (conforming to DIN EN ISO 15883) –... -
Page 38: Visual Inspection And Storage
– 38 – Drying • Connect the connection tubing to a compressed air source (compressor or central medical gas supply system). • Switch the compressed air source on. • Leave the compressed air source running until all the mois- ture in the tubing has been removed. 5.5 Visual inspection and storage Check all individual components. -
Page 39: Troubleshooting
– 39 – TROUBLESHOOTING Contact the manufacturer or distributor: – in the event of faults that are not listed in this chapter – if the suggested procedure does not correct the fault Fault Possible cause Remedy No aerosol is The nebuliser nozzle Clean the nebuliser. -
Page 40: Aerosol Characteristics According To Iso 27427
[% > 2 µm < 5 µm] Aerosol fraction 56.0 46.8 33.8 [% > 5 µm] Aerosol output [ml] 0.30 0.40 0.38 Aerosol output rate 0.09 0.12 0.14 [ml/min] 6) Operation with PARI COMPACT2 compressor (Type 152). 7) MMAD = Mass Median Aerodynamic Diameter 8) GSD = Geometric Standard Deviation... -
Page 41: Further Information
– 41 – Minimum Nominal Maximum compressor compressor compressor Nozzle insert flow flow flow (transparent) (3 l/min. – (4 l/min. – (6 l/min. – 0.6 bar) 1.2 bar) 1.9 bar) Residual volume 1.28 1.15 1.14 [ml] (gravimetric) Percentage of fill volume emitted per minute [%/min.] FURTHER INFORMATION All product components may be disposed of with normal do- mestic waste. - Page 42 – 42 –...
- Page 43 – 43 –...
- Page 44 ©2022 PARI GmbH Spezialisten für effektive Inhalation, 022D3001 A en 2022-09-27 PARI GmbH Spezialisten für effektive Inhalation Moosstraße 3 82319 Starnberg • GERMANY info@pari.de • www.pari.com...
Need help?
Do you have a question about the LC PLUS 022 and is the answer not in the manual?
Questions and answers