ClearOne CHATAttach CHAT 150 User Manual
Group speaker phone
Hide thumbs
Also See for ClearOne CHATAttach CHAT 150:
- User manual (43 pages) ,
- Quick start manual (22 pages) ,
- Interoperability manual (4 pages)
Table of Contents
Advertisement
Quick Links
Advertisement
Table of Contents

Related Manuals for ClearOne ClearOne CHATAttach CHAT 150


Summary of Contents for ClearOne ClearOne CHATAttach CHAT 150
- Page 1 CHAT 150 Group Speaker Phone USER’S MANUAL...
- Page 2 TABLE OF CONTENTS TELEPHONE 1.800.283.5936 1.801.974.3760 1.801.974.3669 EMAIL tech.support@clearone.com ON THE WEB www.clearone.com CHAT 150 USER’S MANUAL CLEARONE PART NO. 800-156-201. JANUARY 2007 (REV. 2.0) © 2007 ClearOne Communications, Inc. All rights reserved. No part of this document may be reproduced in any form or by any means without written permission from ClearOne Communications.
-
Page 3: Table Of Contents
TABLE OF CONTENTS CONTINUED TABLE OF CONTENTS CHAPTER 1: INTRODUCTION Product Overview ....... 1 Service and Support . -
Page 4: Chapter 1: Introduction
CHAPTER 1: INTRODUCTION PRODUCT OVERVIEW Thank you for purchasing the ClearOne Chat 150 group speaker phone. The Chat 150 is a speaker phone for individual or small group use. The Chat 150 connects to telephones, PCs, and video conferencing systems for rich, full-duplex audio communications. You can use the Chat 150 with a variety of devices and applications, including: •... -
Page 5: Important Safety Information
IMPORTANT SAFETY INFORMATION Read the safety instructions before first use of this product. This speaker phone is not designed for making emergency telephone calls when the power fails. Make alternative arrangements for access to emergency services. • Read and understand all instructions and follow all warnings marked on the product. •... -
Page 6: Unpacking
UNPACKING Carefully place the Chat 150 on a level surface. Ensure that you have received the items shown in Figure 1.1 that come with the configuration you purchased (see the Chat 150 Configurations table below). Chat 150 Power Supply Power Supply Clips (Phone/VC ) (Phone/VC ) Part# 551-156-200... -
Page 7: Chapter 2: Getting Started
CHAPTER 2: GETTING STARTED CONNECTING CHAT 150 TO A TELEPHONE Perform the following steps to connect your Chat 150 to a telephone: 1. Using the included ClearOne RJ-45 Chat 150 connection cable, connect the Chat 150 Phone Breakout Box to your Chat 150 as shown in Figure 2.1. 2. - Page 8 3. If you have a headset that you typically use with your telephone, connect it to the headset jack on the Chat 150 Phone Breakout Box as shown in Figure 2.3. 4. Slide the correct power supply clip for your country into the included power supply as shown in Figure 2.4. The power supply may contain a plastic shield that must be removed before inserting the clip.
- Page 9 5. Using the included power supply, connect the Chat 150 Phone Breakout Box to a power outlet as shown in Figure 2.5. 6. The blue LED indicators on the Chat 150 illuminate, indicating that the Chat 150 is powered and ready for use.
- Page 10 8. Using the included USB 2.0 cable, connect the Chat 150 to your PC or USB device as shown in Figure 2.6. 9. Start the Chat 150 configuration software by double-clicking the ClearOne Chat icon (Figure 2.7) on your desktop, or by launching the application from the Start menu. 10.
-
Page 11: Connecting Chat 150 To A Video Conferencing Device
CONNECTING CHAT 150 TO A VIDEO CONFERENCING DEVICE Perform the following steps to connect your Chat 150 to a video conferencing device: 1. Using the included ClearOne RJ-45 Chat 150 connection cable, connect the Chat 150 VC Breakout Box to your Chat 150 as shown in Figure 2.9. - Page 12 Black 3. Slide the correct power supply clip for your country into the included power supply as shown in Figure 2.11. The power supply may contain a plastic shield that must be removed before inserting the clip. 4. Using the included power supply, connect the Chat 150 VC Breakout Box to a power outlet as shown in Figure 2.12.
- Page 13 5. The blue LED indicators on the Chat 150 illuminate, and the green LED power indicator on the VC Breakout Box illuminates, indicating that the Chat 150 is powered and ready for use. 6. Install the Chat software. Visit Chat 150 from the product drop-down list. Select the Chat 50/150 Software from the list to download the latest version of the Chat software.
- Page 14 8. Start the Chat 150 configuration software by double-clicking the ClearOne Chat icon (Figure 2.14) on your desktop, or by launching the application from the Start menu. 9. Click the Device Setup button on the Chat software (Figure 2.15). 10. Configure your Chat 150 for the video conferencing device you will be using by following the procedures outlined in the Device Setup section of Chapter 3: Using Chat 150 Configuration Software.
-
Page 15: Connecting Chat 150 To A Pc
CONNECTING CHAT 150 TO A PC Perform the following steps to connect your Chat 150 to a PC: 1. Install the Chat software. Visit Chat 150 from the product drop-down list. Select the Chat 50/150 Software from the list to download the latest version of the Chat software. -
Page 16: Chapter 3: Using Chat 150 Configuration Software
CHAPTER 3: USING CHAT 150 CONFIGURATION SOFTWARE INSTALLING CHAT 150 SOFTWARE 1. Visit http://www.clearone.com/support/downloads.php?content=main uct drop-down list. Select the Chat 50/150 Software from the list to download the latest version of the Chat software. Unzip the software and run Setup.exe to begin the installation process. The home screen appears (Figure 3.1). - Page 17 3. Click Next>. The License Agreement screen appears (Figure 3.3). FIGURE 3.3 ClearOne Chat License Agreement Screen 4. Read through the license agreement and then click the I Agree radio button, followed by Next>. The Select Installation Folder screen appears (Figure 3.4). FIGURE 3.4 ClearOne Chat Select Installation Folder Screen Technical Services: 800.283.5936...
- Page 18 5. Change the target installation folder, if you wish, or simply accept the default folder shown by clicking Next>. The Confirm Installation screen appears (Figure 3.5). 6. Click Next> to start the software installation. The Installing ClearOne Chat screen appears (Figure 3.6), tracking the software installation.
- Page 19 7. Once the installation is finished, the Device Driver Installation Wizard Welcome screen appears (Figure 3.7). 8. Click Next>. The Chat 150 device drivers are installed. Once the installation is finished, the Completing the Device Driver Installation Wizard screen appears (Figure 3.8). Technical Services: 800.283.5936 FIGURE 3.7 ClearOne Chat Device Driver Installation Wizard Welcome Screen...
- Page 20 9. Click Finish. The ClearOne Chat Information screen appears (Figure 3.9). Review the information and click Next>. FIGURE 3.9 ClearOne Chat Information Screen 10. The Installation Complete screen appears (Figure 3.10). Click Close to end the installation process. FIGURE 3.10 ClearOne Chat Installation Complete Screen Chapter 3: Using Chat 150 Configuration Software...
-
Page 21: Device Setup
DEVICE SETUP Device Setup enables you to select the device you have connected to your Chat 150, and then apply the pre- set audio settings so that it operates at optimal efficiency (Figure 3.11). If the device you are using is not list- ed, you can create a custom device by using Advanced: Database. -
Page 22: My Devices
MY DEVICES My Devices displays all of the devices that you have configured for use with your Chat 150 (Figure 3.12). This screen allows you to easily switch between settings for your listed devices, including any saved custom configu- rations, if you have created custom audio settings for your device (see Advanced Settings: Database later in this chapter for more information on saving custom settings). -
Page 23: Update Firmware & Database
UPDATE FIRMWARE & DATABASE The Update Firmware screen displays the current firmware version, unit name, and checks ClearOne's website for available firmware and device database updates (Figure 3.13). Update Firmware allows you to automatical- ly update to the most recent firmware and device database using the Check for updates button, or you can use the Select File button to manually load an existing firmware file. - Page 24 FIGURE 3.14 Update Screen: Ready to Update 3. Click the Update button to install available updates. The Update dialog box appears (Figure 3.15). FIGURE 3.15 Update Dialog Box 4. Click Update Firmware to update firmware only. 5. Click Update Database to update the device database only. 6.
- Page 25 8. Click Yes to proceed with the firmware or device database update, or No to cancel. 9. A second warning dialog appears. Click Yes to proceed or No to cancel. 10. A series of messages appears below the progress bar indicating that the updates are in progress. WARNING: Do not unplug the Chat 150 while updates are in progress.
- Page 26 Select File (Manual Firmware Update) > Note: This procedure is for advanced users, technical support purposes, and corporate environments where IT security policies may prohibit automatic updates. Loading an incorrect firmware file can cause unpredictable results. In most cases, you should use the automatic update procedure by pressing the Check for updates button.
-
Page 27: Help
HELP The Help button provides the following options (Figure 3.19): • Click Help to activate the online help file. • Click About to get information about your Chat 150, including software and firmware revision numbers. • Click ClearOne Homepage to visit the ClearOne website using your default web browser. •... -
Page 28: Advanced Settings: Audio Settings
ADVANCED SETTINGS: AUDIO SETTINGS Audio Settings displays the current audio settings and allows you to change them for the Chat 150 currently connected to your PC (Figure 3.21). You can also create custom audio settings for a device (see Advanced Settings: Database later in this chapter for more information). -
Page 29: Advanced: Database
• USB/Analog Mix: Click this box to mix the audio coming into the Chat 150 through the USB connection with the audio coming through the I/O jack. For example, if this option is selected and you are talking to a colleague via Skype on your PC connected to your Chat 150, and you also initiated a video conference call through the VC Breakout Box, all three parties would be joined together for a bridged call. - Page 30 Click Ok to close the View Database Record dialog. To save custom audio settings for a device, perform the following procedure: 1. Click the New button. The Add Settings to Database dialog appears with the settings of the device you had selected in the database view (Figure 3.24).
- Page 31 5. The custom device is added to the Chat 150 device database and is now available through Device Setup as an available device. (Note that in the device database, your custom device does not have the ClearOne icon next to it, differentiating it from a pre-programmed device.) To edit custom devices, click the Edit button (appears in the place of the View button for custom devices) after selecting the custom device you wish to edit.
-
Page 32: Advanced Settings: Log
ADVANCED SETTINGS: LOG Log displays a list of actions taken by the Chat 150, including a timestamp and a description of the action or even (Figure 3.26). FIGURE 3.26 Advanced Settings: Database Screen To save the log to a text file, click the Save button. A standard Windows save dialog appears. Name the file and choose the directory in which you wish to save the file (the default directory is the Chat 150 Log directory). -
Page 33: Chapter 4: Using Chat 150
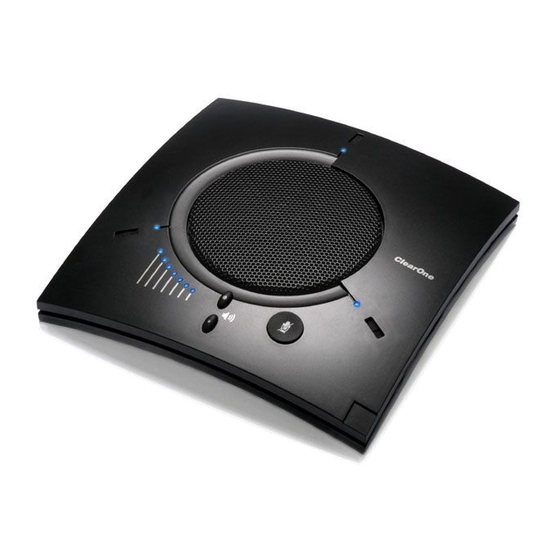
CHAPTER 4: USING CHAT 150 LED INDICATORS The three microphone LED indicators illuminate blue when the Chat 150 microphones are unmuted. The indicators illuminate red when the Chat 150 microphone mute function is active. The seven volume LED indica- tors illuminate blue to indicate the current volume setting--more lights indicate higher volume. VOLUME UP/DOWN AND MUTE BUTTONS Use the Volume Up/Down buttons (indicated by a large dot and a small dot) to adjust the volume level of the Chat 150. -
Page 34: Chapter 5: Maintenance
CHAPTER 5: MAINTENANCE CARING FOR YOUR CHAT 150 • Follow all warnings and instructions in this manual. • Unplug all cables from the Chat 150 before cleaning. • Unplug the power supply from the wall outlet (Phone/VC only) before cleaning. •... -
Page 35: Recovering From An Interrupted Firmware Update
RECOVERING FROM AN INTERRUPTED FIRMWARE UPDATE If firmware programming was interrupted (such as by a power loss or an accidental cable disconnection), the Chat 150 might become unstable. The Chat 150 boots in generic mode and the Generic Mode screen appears (Figure 5.1). -
Page 36: Chapter 6: Appendix
CHAPTER 6: APPENDIX SPECIFICATIONS Connections USB connector Version 2.0 compatible Type: Mini B Controls Volume up Volume down Microphone mute Audio Speaker Bandwidth: 150Hz-15kHz Max output level: 86dBSPL @ 1 foot Microphone Bandwidth: 50Hz-8kHz Line input through VC Breakout Box Frequency response: 20Hz-20kHz +/- 1dB Maximum input level: +6 dBu Input impedance: 10K Ohms... -
Page 37: European Compliance
COMPLIANCE The following paragraphs present all of the required compliance and declaration of conformity information. EUROPEAN COMPLIANCE Conformity of the equipment with the guidelines below is attested by the CE mark. EC Declaration of Conformity Manufacturer's Name: Manufacturer's Address: Model Name: Model No.: Standard(s) to which Conformity is declared: 89/336/EEC "Electromagnetic Compatibility (EMC) Directive":... -
Page 38: Fcc Part 15/Ices-003 Compliance
FCC PART 15/ICES-003 COMPLIANCE This equipment has been tested and found to comply with the limits for a Class A digital device, pursuant to Part 15 of the FCC rules and Industry Canada ICES-003. These limits are designed to provide reasonable protection against harmful inter- ference when the equipment is operated in a commercial environment.
Need help?
Do you have a question about the ClearOne CHATAttach CHAT 150 and is the answer not in the manual?
Questions and answers