Blue Sea Systems M2 Quick Start Installation Manual
Oled digital monitor, dc ammeter
Hide thumbs
Also See for M2:
- Instructions manual (18 pages) ,
- Quick start installation manual (2 pages) ,
- Quick start installation manual (2 pages)
Advertisement
Quick Links
M2 OLED
Digital Monitor
QuickStart Installation Guide
1832 DC Ammeter
Components Included
M2 Head Unit
Surface Mount Bezel
Surface Mount Gasket
and Seal
Surface Mount Cover
Flat Mount Bezel
Flat Mount Clamp
Mounting Ring
Mounting Nut
PN 8255 Shunt
(1X)
Connector
Screwdriver
(retail package only)
360 Panel Mounting Kit 1525
(sold separately)
Header
#6-32 x 1/4"
Flat Head
Machine Screws
(4X)
Bezel
Panel
Mount
Frame
#6-32 x 3/8"
Carrier
Flat Head
Mount
Machine Screws
(4X)
Footer
bluesea.com/products/1832
Connector Pin Assignment
USB
Micro USB Port
8 Pin Connector*
Function
1 Required Connection
DC Negative
2 Required Connection
DC Supply
Relay Output
3
4
Relay Supply
5
Shunt 1 –
Shunt 1 +
6
Shunt 2 –
7
8
Shunt 2 +
*The 8 pin low voltage connector supports wire sizes from 16-26 AWG
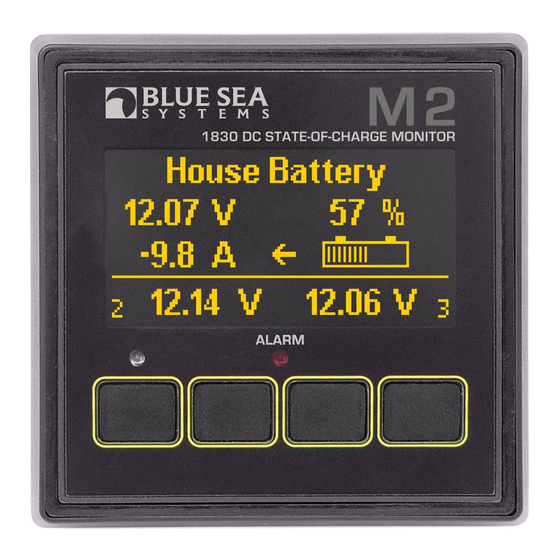
M2 Meter Navigation
Screen Menu Functions
Press any button to bring up the menu.
1. After start-up, press any button to access the menu.
2. Press the UP or DOWN arrow buttons to scroll
through menu windows.
3. To set alarms and for more detailed information, see
the online manual at bluesea.com/products/1832
System Overview
BusBar
Battery 2
Battery 1
Shunt
5A Fuse
5A Fuse
1 2 3 4 5 6 7 8
Relay
Alarm (1070)
LED
OR
OR
(7713 12V)
(8033 Amber)
(7717 24V)
(8171 Red)
(8172 Green)
For the online manual that includes other configurations,
bluesea.com/products/1832
go to
Installation Steps
1. Choose meter mounting style and location.
2. Prepare mounting hole using cutout templates.
3. Using wiring diagram:
• Install provided 500A/50mV Shunt.
Optional
• Install busbar, if needed.
Shunt
• Make all connections to the meter's connector.
Do not put fuses into fuse holders at this time.
4. Plug wired connector into the meter.
5. Insert fuses into fuse holders, making the fuse to
Pin 2 (DC Supply) Last.
Basic Meter Setup
1. If using the included 8255 500A/50mV shunt, no
setup is required.
2. If you are only monitoring one shunt, you may
want to shut off the other input.
3. To do this, go to the Setup Menu.
4. Scroll to the unused input (either DC1 or DC2)
5. Set Enabled to OFF.
6. For more detailed information or instructions
regarding Alarm Setup, Relay Setup, or using a
different sized shunt, see the full instructions
found at bluesea.com/products/1832.
Click here for more information at
bluesea.com/products/1832
bluesea.com
980020410 Rev.003
Advertisement

Related Manuals for Blue Sea Systems M2


Summary of Contents for Blue Sea Systems M2
- Page 1 *The 8 pin low voltage connector supports wire sizes from 16-26 AWG Basic Meter Setup 1 2 3 4 5 6 7 8 M2 Meter Navigation 1. If using the included 8255 500A/50mV shunt, no Screen Menu Functions setup is required.
- Page 2 Flat mount bezel edge Warranty Ø2.125" Surface Mount The M2 OLED Digital Meters come with a 5 year (54mm) manufacturer’s warranty. This means the meter is warranted to be free from defects in materials or workmanship for 5 years from the date of first Cut Line purchase.
Need help?
Do you have a question about the M2 and is the answer not in the manual?
Questions and answers