Table of Contents
Advertisement
RAVIOLI MAKER
INSTRUCTIONS
Model KRAV
These attachments have been approved for use
®
with all KitchenAid
household stand mixers
and, for best results, should be used with the
KitchenAid
®
Pasta Roller and Cutter Set (KPRA)
or the Pasta Sheet Roller (KPSA) attachment,
1-800-541-6390
which is sold separately.
Details Inside
®
FOR THE WAY IT'S MADE.
™
A A
Advertisement
Table of Contents

Related Manuals for KitchenAid KRAV


Summary of Contents for KitchenAid KRAV
- Page 1 RAVIOLI MAKER INSTRUCTIONS Model KRAV These attachments have been approved for use ® with all KitchenAid household stand mixers and, for best results, should be used with the KitchenAid ® Pasta Roller and Cutter Set (KPRA) or the Pasta Sheet Roller (KPSA) attachment, 1-800-541-6390 which is sold separately.
-
Page 2: Hassle-Free Replacement Warranty
KitchenAid that, if your Ravioli Maker should fail within the first year of ownership, KitchenAid will arrange to deliver an identical or comparable replacement to your door free of charge and arrange to have your original Ravioli Maker returned to us. Your... -
Page 3: Table Of Contents
Hassle-Free Replacement Warranty...Inside Front Cover Product Registration Card ...Inside Front Cover Important Safeguards...2 Warranty ...3 How to Arrange for Warranty Service in Puerto Rico ...4 How to Arrange for Service after the Warranty Expires — All Locations...4 How to Arrange for Service Outside these Locations ...4 How to Order Accessories and Replacement Parts...4 Ravioli Maker Attachment...5 Assembling Your Pasta Sheet Roller...6... -
Page 4: Important Safeguards
Return the mixer to the nearest Authorized Service Center for examination, repair or electrical or mechanical adjustment. 7. The use of attachments not recommended or sold by KitchenAid may cause fire, electric shock or injury. 8. Do not use the mixer outdoors. -
Page 5: Warranty
EXCLUSIVE REMEDY SHALL BE REPAIR OR REPLACEMENT ACCORDING TO THE TERMS OF THIS LIMITED WARRANTY. KITCHENAID DOES NOT ASSUME ANY RESPONSIBILITY FOR INCIDENTAL OR CONSEQUENTIAL DAMAGES. This warranty gives you specific legal rights and you may also have other rights that vary from state to state. -
Page 6: How To Arrange For Warranty Service In Puerto Rico
Time), or Saturday, 10 a.m. to 5 p.m. in Puerto Rico Take the Ravioli Maker or ship prepaid and insured to an Authorized KitchenAid Service Center. Your repaired Ravioli Maker will be returned prepaid and insured. If you are unable to obtain... -
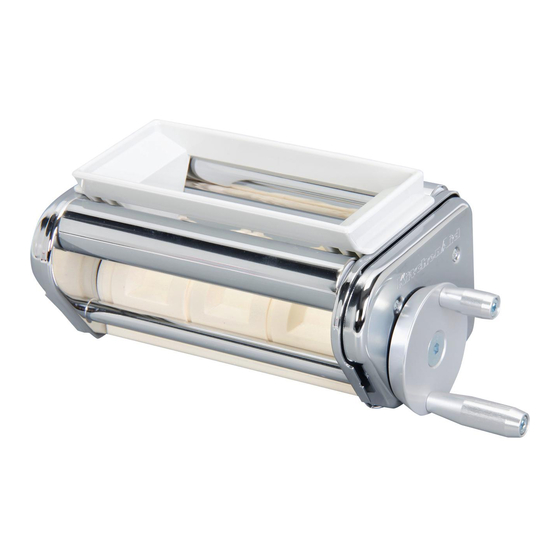
Page 7: Ravioli Maker Attachment
Ravioli Maker Attachment Ravioli Maker — Fills sheets of pasta with filling, then crimps the edges for strips of stuffed pasta that after drying can be separated for cooking. Ravioli Maker attaches to the stand mixer for stability, but is operated manually for precise control. -
Page 8: Assembling Your Pasta Sheet Roller
Assembling Your Pasta Sheet Roller If you do not own a KitchenAid Sheet Roller, pasta sheets can be prepared by hand. Pasta sheets should be rolled out to a thickness of and a width of 5 ⁄ inches in order to pass through the Ravioli Maker. -
Page 9: Preparing Pasta Sheets
Preparing Pasta Sheets 1. Prepare pasta dough and let rest at least 10 minutes. Cut dough into sections approximately the size of a tennis ball and work with one section at a time. Wrap remaining dough in plastic wrap to keep from drying out. 2. -
Page 10: Assembling Your Ravioli Maker
Assembling Your Ravioli Maker To Attach Ravioli Maker: To attach accessory: 1.Turn OFF and unplug mixer. 2. Depending on which type of hub you have, either flip up hinged cover or loosen attachment knob (A) by turning it counterclockwise and remove attachment hub cover (B). - Page 11 Using Your Ravioli Maker Indentation 5. Locate the slight indentation on one side of the hopper rim. Position the indented side so it faces the attachment-knob-side of the stand mixer. Place the hopper on top of the dough sheet, between the separated ends, and push down until you hear a click and the side edges of the hopper rest against the Ravioli Maker.
-
Page 12: Care And Cleaning
To clean the Ravioli Maker 1. Dust the attachment with flour and use the brush to clean it. 2. Remove the hopper and snap open the thin white plastic guides/levers at the bottom of the attachment for easy access to the rollers. Wash in warm, soapy water. -
Page 13: Recipes
4 large eggs ⁄ cup eggs) ⁄ cup water ⁄ cups sifted all-purpose flour ⁄ teaspoon salt Pumpkin-Sage Ravioli with Browned Butter and Pecans 1 recipe Basic Egg Pasta 1 can (15 oz.) pumpkin ⁄ cup packed brown sugar 1 teaspoon ground sage ⁄... - Page 14 Salmon-Cream Cheese Ravioli with Roasted Garlic Cream Sauce Ravioli 1 recipe Basic Egg Pasta, page 11 1 fillet (12 oz.) salmon 2-3 teaspoons olive oil ⁄ teaspoon salt ⁄ teaspoon black pepper 1 container (8 oz.) cream cheese with chives and onion 2-3 teaspoons chopped fresh dill or ⁄...
- Page 15 Chicken, Pine Nut and Goat Cheese Ravioli with Traditional Red Sauce Ravioli 1 recipe Basic Egg Pasta, page 11 ⁄ cup pine nuts ⁄ cup finely chopped roasted chicken 1 package (4 oz.) mild goat cheese with garlic and herbs Sauce 1 tablespoon olive oil 1 medium onion,...
- Page 16 ® FOR THE WAY IT’S MADE. ™ ® Registered trademark/™ Trademark/ the shape of the mixer is a registered trademark of KitchenAid, U.S.A. 9709406 © 2005. All rights reserved. (4645dZw705)
Need help?
Do you have a question about the KRAV and is the answer not in the manual?
Questions and answers