
Related Manuals for Xblitz GORIDE


Summary of Contents for Xblitz GORIDE
- Page 1 [GO ] RIDE Instrukcja obsługi w języku polskim - PL User’s manual in English lanugage - EN...
-
Page 3: Instrukcja Obsługi
[GO ] RIDE INSTRUKCJA OBSŁUGI... -
Page 4: Przed Użyciem
Szanowny Kliencie, dziękujemy za wybranie kamery samochodowej Xblitz GoRide. Zakupione przez Ciebie urządzenie jest wideorejestratora samochodowym, służącym do rejestrowania trasy pojazdu. Przed rozpoczęciem korzystania z urządzenia, prosimy o zapoznanie się z poniższą instrukcją. PRZED UŻYCIEM 1. Zaleca się używanie markowych kart SD (pojemność od 8 do 64GB) klasy 10. -
Page 5: Opis Produktu
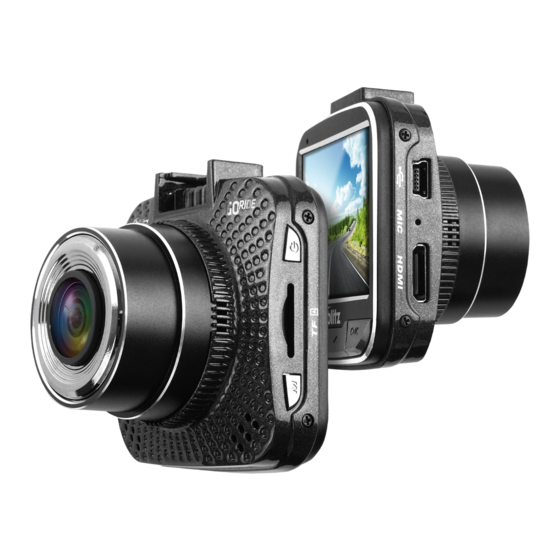
OPIS PRODUKTU 9. Przycisk POWER 1. Miejsce montażu uchwytu 10. Przycisk MODE 2. Obiektyw 3. Głośnik 11. Slot na kartę pamięci micro SD 12. Port HDMI (port nieaktywny) 4. Przycisk COFNIJ 13. Mikrofon 5. Przycisk W DÓŁ 14. Port USB 6. -
Page 6: Montaż Kamery
01. MONTAŻ KAMERY 1. Wybierz miejsce montażu kamery. Upewnij się, że nic nie zasłania widoku dla obiektywu wideorejestratora. 2. Wyczyść wybrane miejsce montażu kamery. 3. Przyklej uchwyt kamery do szyby w wybranym miejscu. 4. Poprowadź kabel zasilający zgodnie z powyższym diagramem. 5. -
Page 7: Opis Klawiszy
03. OPIS KLAWISZY 1. POWER Krótkie naciśnięcie przycisku włącza/wyłącza wyświetlacz rejestratora. Przytrzymanie przycisku przez ok 3 sekundy włącza/wyłącza urządzenie. 2. MODE Naciśnięcie przycisku „M” otwiera menu urządzenia. Naciśnięcie przycisku w menu urządzenia przełącza urządzenie pomiędzy menu obecnego trybu a menu ustawień urządzenia. -
Page 8: Funkcje Urządzenia
04. FUNKCJE URZĄDZENIA 1. Nagrywanie w pętli Pozwala ustawić długość nagrań plików video. Jeśli funkcja ta jest wyłączona, nowe nagrania nie będą nadpisywać starych gdy karta pamięci zostanie zapełniona. 2. WDR (Wide Dynamic Range) Funkcja umożliwia nagrywanie zarówno w ciemności, jak i jasnym, często oślepiającym świetle. -
Page 9: Środki Ostrożności
05. ŚRODKI OSTROŻNOŚCI 1. Nie dokonuj samodzielnego demontażu ani modyfikacji urządzenia. W razie awarii, skontaktuj się z punktem serwisowym. 2. Używaj wyłącznie oryginalnych akcesoriów. 3. Korzystaj wyłącznie z oryginalnej ładowarki, która została dołączona do zestawu. Używanie innego zasilacza może mieć negatywny wpływ na działanie wbudowanej baterii wideorejestratora. - Page 10 Szczegóły, kontakt oraz adres serwisu można znaleźć na stronie: www.xblitz.pl Specyfikacje i zawartość zestawu mogą ulec zmianie bez powiadomienia, Przepraszamy za wszelkie niedogodności. Pełna wersja instrukcji dostępna na stronie www.xblitz.pl Producent: KGK Trade sp. z o.o. sp. k. ul. Ujastek 5b 31-752 Kraków...
- Page 11 [GO ] RIDE USER’S MANUAL...
-
Page 12: Kit Contents
Dear Customer, Thank you for purchasing the Xblitz GoRide dashboard camera. The product you have purchased is a video device designed to record any activity from the dashboard of your vehicle and record the routes taken by your vehicle. BEFORE USE 1. -
Page 13: Product Description
PRODUCT DESCRIPTION 1. Handle mounting slot 9. Power button 2. Camera lens 10. “MODE” button 3. Loudspeaker 11. Micro SD memory card slot 4. BACK button 12. HDMI Port (inactive) 5. DOWN button 13. MiCROPHONE 6. UP button 14. USB port 7. -
Page 14: Mounting Your Camera
01. MOUNTING YOUR CAMERA 1. Select a designated place where you wish to install the camera. Be sure to check that the camera lens will not be obstructed. 2. Thoroughly clean the designated installation place. 3. Place and stick the camera mounting bracket in the designated location. 4. -
Page 15: Key Description
03. KEY DESCRIPTION 1. POWER A quick push on this button will turn the display panel on and o . To turn the device on or o , the key needs to be pushed in and held for 3 seconds. 2. -
Page 16: Device Functions
04. DEVICE FUNCTIONS 1. LOOP RECORDING This feature allows you to set the length of the video files. If this feature is disabled, any new recordings will not overwrite the existing or old video files once the memory card is full. 2. -
Page 17: Specifications
05. PRECAUTIONS 1. Do not disassemble or modify the device yourself. In the event of failure or error, contact the designated service center. 2. Only use original accessories for the device. 3. Only use the original charger provided in the kit for the device. Using a di erent charger may damage or harm the device. -
Page 18: Warranty Claims
Specifications and contents of the kit are subject to change without notice, We apologise for any inconvenience. For the full version of the manual, please visit www.xblitz.pl Manufacturer: KGK Trade sp. z o.o. sp. k. Ujastek 5b...
Need help?
Do you have a question about the GORIDE and is the answer not in the manual?
Questions and answers