
Related Manuals for Soozier A90-271


Summary of Contents for Soozier A90-271
- Page 1 INan012_US A90-271 IMPORTANT, RETAIN FOR FUTURE REFERENCE: READ CAREFULLY ASSEMBLY & INSTRUCTION MANUAL...
-
Page 2: Important Safety Instructions
WARNINGS IMPORTANT SAFETY INSTRUCTIONS • When using an electrical appliance, basic precautions should always be followed, including the following: • Read all instructions before using (this appliance). • DANGER – To reduce the risk of electric shock: 1) Always unplug this appliance from the electrical outlet immediately after using and before cleaning. •... -
Page 3: Grounding Instructions
WARNINGS GROUNDING INSTRUCTIONS This product must be grounded. If it should malfunction or breakdown, grounding provides a path of least resistance for electric current to reduce the risk of electric shock. This product is equipped with a cord having an equipment grounding conductor and a grounding plug. The plug must be plugged into an appropriate outlet that is properly installed and grounded in accordance with all local codes and ordinances. - Page 4 WARNINGS • Read, understand, and carefully follow all warnings, instructions, and procedures on treadmill and in this instruction manual before using. • Inspect treadmill for incorrect, worn, or loose components and then correct, replace, or tighten prior to use. • Care should be used when mounting or dismounting the treadmill. •...
- Page 5 the wear and aging of bearings, running belts, and running boards. • Keep power cord away from moving objects and extreme temperatures. Do not allow power cord to be bent or crushed, such as under a door, to avoid damage to the cord. Do not attempt to service the treadmill beyond what is instructed in this manual as this could cause serious injury and void warranty.
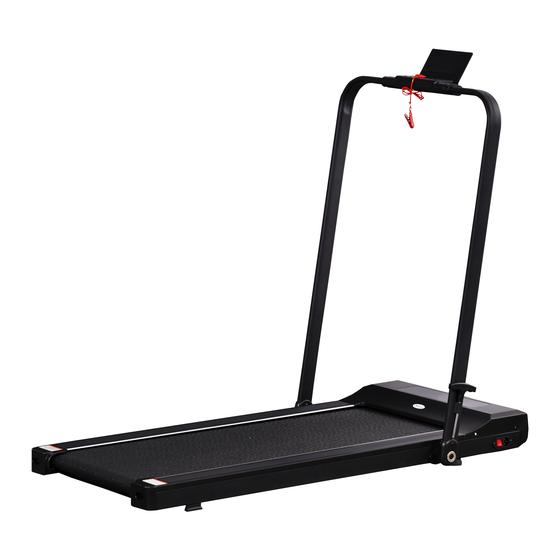
- Page 6 TREADMILL DIGRAM Keyboard Safety Lock Handlebar Motor Cover Running Belt "T" Wrench Antiskid Border Rear cover Power plug Cushion Rear cover...
-
Page 7: Explosive View
EXPLOSIVE VIEW... - Page 8 EXPLOSIVE LIST Description Description MAIN FRAME CONTROL BOARD HANDLE PCB DISPLAY FIXED BORAD TWRENCH RUNNING DESK POWER SWICH FRONT ROLLER POWER PLUG REAR ROLLER SAFE LOCK RUNNING BELT PC BOARD PJ BELT INSIDER CONNECT WIRE HANDLE ANTI-SKID BOARDER CONNECT WIRE-RED MOTOR BOTTOM COVER CONNECT WIRE-BLACK MOTOR UPPER COVER...
-
Page 9: Technical Specifications
TECHNICAL SPECIFICATIONS Voltage 100-120V 60Hz Rated power 0.75 HP Speed 1-10 km/h Product size L143*W69*H13cm Running area L110*W42cm Max user's weight 100 kg Usage Class PART LIST Picture Part name Treadmill Manual T Wrench I pad shelf Power plug Safety lock Remote control Lubrication( Silicone oil ) -
Page 10: Assemble Instruction
ASSEMBLE INSTRUCTION Please check all the accessories after carton opened . Please inform us if some accessories missing . Please read the assemble steps carefully before assemble . Step 1 : Please take out the treadmill and lay flat on ground as picture 1 shown picture 1 Step2:... -
Page 11: Power Switch On /Off
Step3: Assemble the I pad shelf to the shelf of keyboard as picture 3 shown Picture 3 Step 4: Put the safety lock on the keyboard as picture 4 shown. Picture 4 OPERATION INSTUCTION 1.Power Switch on /off : Make sure the power supply is normal ,connect the power plug to the machine . Open the Power Switch on , the light will be turn on .You will sound a tick and the display of also light up at same time 2. - Page 12 3. Fold treadmill: Please turn off the power switch and pull out the power plug from power supply . Please operate according to the opposite of assembling. You can save space to stock the treadmill after folding . 4.Treamdill movement : As shown in the figure , ,the tail of the treadmill can be lifted up and down with both hands ,which is suitable for short-distance movement in the room .
-
Page 13: Led Display
2 .LED DISPLAY ◆ "Start/stop” light display: Running: green color .Stop: red color . ◆ Time,Speed,Calorie,Distance,Step,display in a cycle every 6 second and shown in a same windows ◆ Step: Current movement Steps. When the step on 9999,Automatic Zero and recalculate. Display and Set range Function Display range... - Page 14 3.System operation Quick -Start / Stop (manual mode): Please make sure the Safety lock put on the yellow area appointed on keyboard before start treadmill and clip it to your cloths. Press the Start/stop button to start treadmill ,the treadmill start running with a lower speed after 3 second countdown.
- Page 15 Detail data of program list: Level Speed Level Speed Level Speed Level Speed Level Speed Level Speed Level Speed Level Speed Level Speed Level Speed Level Speed Level Speed...
- Page 16 6. Application Software (App) You can download the "aSports" application with QR code shown here .Mobile device requirement: Android 4.3 or later with Bluetooth 4.0, iOS7.0 or Newer . Please turn on your Bluetooth function on your device first, then search the bluetooth "...
- Page 17 Please make sure the power of treadmill turn on and Bluetooth must be switched on , then open the " aSports" App. Please click the mark to switch the Unit ( Metric and English ) and language your prefer ( Chinese , English are available now ) . Then click "Back" bottom to main page . Step 2 Click the bottom and entry next page .
- Page 18 Clink the bottom , the treadmill will start to run after countdown 3second.You can speed up or down by Speed bottom . Please noted that "incline" bottom is not available for this treadmill . Step 4 If you want to stop the treadmill , you can click the bottom and the treadmill will stop slowly and shown the above window.
-
Page 19: Safety Lock
TIME: 1-180 Mins DISTANCE: 1.0-30Km CALORIES :100-3000Kcal 7. Auto Stand-by and sleep Mode Stop without any operation for 6 minutes , the system closed all the display and enters into the sleep state .Press any key or remote control to activate. 8.Safety Lock In any case ,pull out the safety lock can stop the treadmill in an emergency .The window shows "E--7"... - Page 20 Running belt adjustment How to adjust the running belt? 1)Insert the 6 mm inner hexagonal wrench into the adjusting screw on the left side of the running belt and rotate the wrench clockwise for 1/4 turns to adjust the rear roller to tighten the running belt. 2)Repeat step 1 to adjust the right screw.
-
Page 21: Exercise Guide
Analyzing and eliminating malfunction Malfunction code Reasons Solution 1. Communication Error or circuit damage 1. Please check the circuit whether damaged Er-1 2. Display PC board Error or damage 2. Replace the Display PC board 3. Electric control board error or damage 3.Replace electric control board 1. -
Page 22: Training Zone Exercise
or individuals with pre-existing health problems. The pulse sensors are not medical devices(This treadmill not include Pulse sensors , you can purchase pulse sensors by other channels) . Various factors, including the user’s movement, may affect the accuracy of heart rate readings. The pulse sensors are intended only as an exercise aid in determining heart rate trends in general. - Page 23 Cool Down Finish each workout with a light jog or walk for at least 1 minute. Then complete 5 to 10 minutes of stretching to cool down. This will increase the flexibility of your muscles and will help prevent post-exercise problems. THIS IS HOW YOUR PULSE SHOULD BEHAVE DURING GENERAL FITNESS EXERCISE.
Need help?
Do you have a question about the A90-271 and is the answer not in the manual?
Questions and answers