Table of Contents
Advertisement
Quick Links
Advertisement
Table of Contents

Related Manuals for Excel 11570


Summary of Contents for Excel 11570
- Page 1 MODEL:11570...
-
Page 2: Scope Of Delivery
carefully follow its information. The machine can only 1. Introduction be operated by persons who were instructed Dear Customer, concerning the operation of the machine and who are We hope your new tool brings you much enjoyment and informed about the associated dangers. The minimum success. -
Page 3: Safety Instructions
•The machine is intended for use only with original 4. Safety instructions spare parts and original tools from the producer. •The equipment is allowed to be used only for its Caution! In order to protect yourself from the danger of prescribed purpose. - Page 4 8. Wear suitable clothing. 16. Make sure that no spanners, keys etc. are left •Do not wear loose-fitting clothing or jewellery. They attached. •Check before switching on that all spanners, keys and could become caught on moving parts. •We recommend that you wear anti-slip footwear when setting tools have been removed.
- Page 5 23. If devices are provided for the connection of j) Always use saw blades with correct size and dust extraction and collection facilities, ensure shape (diamond versus round) of bore. Saw blades these are connected and properly used. Use of dust that do not match the mounting hardware of the saw will run eccentrically, causing loss of control.
-
Page 6: Technical Data
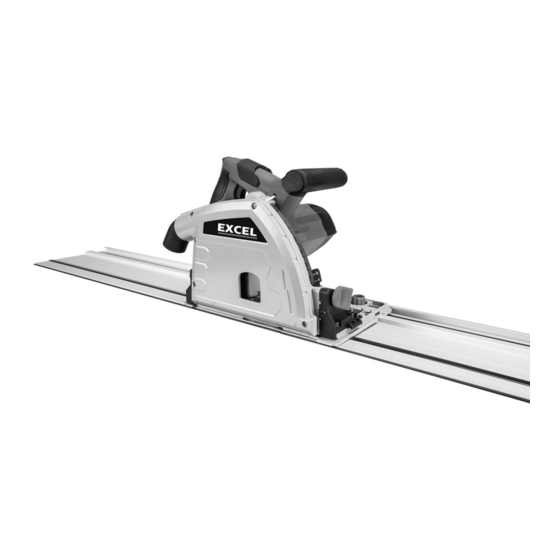
5. Technical Data 6. Product Features 1. Cable and plug Specifications: Voltage : 240V / 50Hz 2. Dust Port Power : 1200W 3. Safety Switch No load Speed : 5200rpm 4. ON/OFF Trigger Blade Spec : Ø165x20mmx24T 5. Blade Change Lever Mitre Angle : 0°... - Page 8 2.Press the Knob inwards and slide to set the desired depth 7. Assembly using the Cutting Depth Scale. Avoid unintentional starting of the machine. During assembly and for all work on the machine, the power plug must not be connected to the mains supply.
-
Page 9: Operation
8. Operation Cutting Line Guides The Cutting guide will give an approximate line of cut. Warning!: The tool is recommended for use with a For a straight cut, use the 0° notch. For a 45° cut, use residual current device with a rated residual current of the 45°... - Page 10 Sawing With the Guide Rail 4.Place the Plunge Saw in the guide Rail. The Guide Rail is used to carry out straight cuts. The rubber lip (black rubber lip) on the guide rail acts as a splinter guard; it prevents fraying of the surface while sawing wooden materials.
-
Page 11: Blade Fitment
9. Blade fitment 4.Use the large(5mm)Hex Key to undo the Blade Bolt, turning anti-clockwise. Warning!: Ensure the tool is switched OFF and disconnected from the power supply before performing any of the following tasks. The tool is recommended for wood cutting only and is not recommended for use with abrasive wheels or masonry/diamond cutting wheels. -
Page 12: Maintenance
10. Maintenance Carbon Brushes When the carbon brushes wear out, the saw will spark Keep your tool in good repair by adopting a regular and/or stop. Discontinue use as soon as this happens. maintenance program. Before use, examine the general They should be replaced prior recommencing use of condition of your tool. -
Page 13: Troubleshooting
11. Troubleshooting Circular saw tips Always hold the soft grip handle with one hand and the front handle with the other. Maintain a firm grip and operate the ON/OFF switch with a positive action. Never force the saw. Use light and continuous pressure. Allow the saw to reach full speed before beginning a cut. -
Page 14: Parts Diagram And Parts List
Parts Diagram and Parts List... - Page 15 Parts Diagram and Parts List Description Description Self tapping screw ST4.1x16-F Hexagon socket cap screws M5x16 Self tapping screw ST4.1x16-F Lifting limit shaft Self tapping screw ST4.1x16-F Locking knob Lock handle Depth mark Pan head screw M5x42 Lifting instructions block Small washer Lifting instructions block sea Spring washer...
- Page 16 Parts Diagram and Parts List Description Description Lock screw M6x2 Dust pipe Big washer Rail friction strip Self tapping screw ST3.5x9-F Rail Lock screw M6x8 Rail antislip strip Front bracket Rail rubber strip Hexagon socket cap screw M6x15 Cable and plug Small washer Lock screw M6X6 Spring washer...
Need help?
Do you have a question about the 11570 and is the answer not in the manual?
Questions and answers