Table of Contents
Advertisement
Available languages
Available languages
Quick Links
Advertisement
Table of Contents

Related Manuals for Teamtex OXALIS


Summary of Contents for Teamtex OXALIS
- Page 2 - 2 - Merci d'avoir choisi notre siège auto pour enfant Oxalis. Si vous avez besoin d'aide concernant ce produit, veuillez vous adresser à notre service client. • Ce p UTILISATION joint • Ce p • Ce produit est utilisable pour les enfants des groupes ECE 0+ / 1 / 2 / 3. Catégorie de poids : poin 0-36 kg.
- Page 3 - 3 - ernant AVERTISSEMENT • Ce produit est un système de retenue pour enfant « semi-universel ». Il correspond à UN- Reg. 44/04 et doit être exclusivement utilisé dans les véhicules mentionnés dans la liste jointe des véhicules autorisés. • Ce produit est exclusivement adapté pour des véhicules avec des ceintures de sécurité 3 poids : points fixes ou pourvues d'un automate de ceinture conformément à...
- Page 4 - 4 - AVERTISSEMENT • Lisez attentivement cette notice avant utilisation et conservez-la pour vous y référer ultérieu- rement, afin d'assurer la sécurité de votre enfant. Le non-respect des consignes du présent manuel peut entraîner de graves blessures pour votre enfant. •...
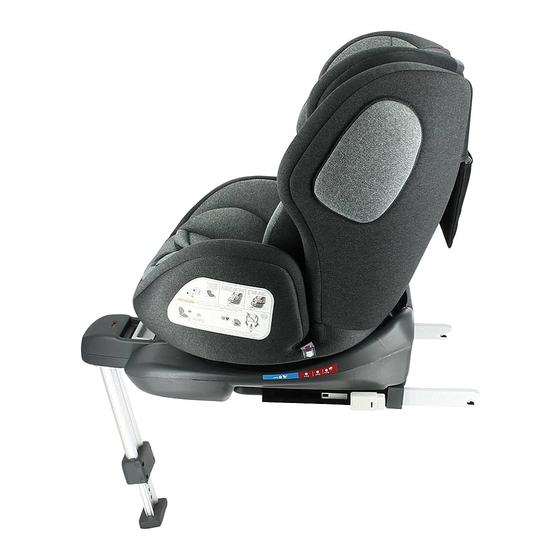
- Page 5 - 5 - COMPOSANTS DU SIÈGE AUTO ENFANT térieu- résent Vue avant points Appuie-tête Appuie-tête points Insert confort Coque du siège oute et Sangle d'épaule atteint Rembourrage aux épaules Boucle de ceinture Rembourrage boucle arqués de ceinture Réglage de la sangle sé...
- Page 6 - 6 - UTILISATION DU SIÈGE AUTO ENFANT Régler l'angle d'inclinaison du siège Régl auto • Pou le b • Avec une main, actionnez le levier de réglage de avan l'angle sous la partie avant de la coque du siège. •...
-
Page 7: Réglage De L'appui-Tête
- 7 - Réglage de la ceinture • Pour libérer la ceinture, appuyez d'une main sur le bouton de réglage de la ceinture dans la partie avant du siège. • De l'autre main, saisissez la boucle avec les cein- tures et relâchez-les. •... - Page 8 - 8 - Connecteurs Isofix Retra • Des • Glissez les aides à l'insertion jaunes dans la fente rière du rembourrage entre le dossier et l'assise et dans • Dég les supports Isofix. enfa • Le côté plat doit être orienté vers le bas. Cette •...
- Page 9 - 9 - Retrait du système de ceinture • Desserrez le système de ceinture afin de faire apparaître l'arceau de sangle d'épaule à l'ar- rière du siège auto pour enfant. (Fig. 1) • Dégagez la sangle aux épaules de leurs supports métalliques à l'arrière du siège auto pour enfant et faites-les passer à...
- Page 10 - 10 - UTILISATION DU SIÈGE AUTO POUR ENFANT 2) Gr (Pour l 1) Groupe 0+/1 (dos à la route) (Pour les enfants dont le poids est compris entre 0 et 18 kg) IMPOR TION T 1. Pressez les deux boutons de connecteurs latéraux Isofix pour allonger les connecteurs Isofix sur la longueur.
- Page 11 - 11 - 2) Groupe 1 (face à la route) (Pour les enfants dont le poids est compris entre 9 et 18 kg) IMPORTANT : N'UTILISEZ PAS LE SIÈGE AUTO POUR ENFANT DANS LE SENS DE CIRCULA- TION TANT QUE LE POIDS DE L'ENFANT N'A PAS DÉPASSÉ 9 KG. cteurs 1.
- Page 12 - 12 - 3) Groupe 2/3 (face à la route) (Pour les enfants dont le poids est compris entre 15 et 36 kg) Lors d au con avant d Pour g pas le toujou laver la INFORMATION : TOUT D'ABORD, ENLEVEZ LE SYSTÈME DE CEI TURE DE SÉCURITÉ COMME DÉCRIT PRÉ- CÉDEMMENT.
-
Page 13: Entretien
- 13 - NETTOYAGE Lors du développement de ce produit, une attention particulière a été accordée à la sécurité, au confort et à la fonctionnalité. Veuillez prendre le temps d'étudier attentivement cette notice avant d'utiliser le produit et conservez-la pour vous y référer ultérieurement. Pour garantir que votre siège auto enfant reste en bon état pendant longtemps, veuillez ne pas le nettoyer avec des solvants, des produits à... - Page 14 - 14 - Thank you for choosing our Oxalis child car seat. If you need help with this product, please contact our customer service. • This only • It is belt • This product is suitable for children in the ECE Group 0+/1/2/3. Weight range: 0-36 kg.
- Page 15 - 15 - please WARNING • This is a semi-universal child restraint system. It complies with UN Reg. No. 44/04 and may only be used in vehicles that appear in the attached list of permissible vehicles. • It is only suitable for vehicles with fixed 3-point safety belts or 3-point safety belts with seat belt retractor, which correspond to the UN/ECE Regulation No.
- Page 16 - 16 - WARNING • Please read through these instructions carefully before use and keep them for subsequent reference in order to guarantee the safety of your child. Non-compliance with the instructions Fron in this manual may result in serious injuries to your child. •...
- Page 17 - 17 - COMPONENTS OF THE CHILD CAR SEAT equent uctions Front view weigh Adjustable head support h over Comfort insert Seat bucket on with Shoulder belt weight Shoulder pad Belt lock ns and Belt lock pad Belt adjustment should Angle adjustment lever Support leg indicator h i s...
- Page 18 - 18 - USING THE CHILD CAR SEAT Adjusting the tilt angle of the car Adju seat • To lo ton a • With one hand, use the lever on the lower front • Use side of the seat bucket to adjust the tilt. belt •...
-
Page 19: Adjusting The Belt
- 19 - Adjusting the belt • To loosen the belt, press the belt adjustment but- ton at the front of the seat with one hand. • Use your other hand to hold the belt lock with the belts and loosen it. •... -
Page 20: Support Leg
- 20 - Isofix connectors • Loos • Insert the yellow insertion aids through the slit in the cushion between the backrest and seat and • Pull into the Isofix holders. guid • When doing this, the flat side must be facing •... - Page 21 - 21 - Removal of the belt system • Loosen the belt system so that the shoulder belt bracket can be seen on the reverse side of the child car seat. (Fig. 1) • Pull the shoulder belts out of their metal brackets on the reverse side of the child car seat and guide these through the child car seat to the front side.
- Page 22 - 22 - INSTALLATION OF THE CHILD CAR SEAT 2) Gr (For ch 1) Group 0+/1 (rear-facing) (For children from 0 to 18 kg) IMPOR TIL TH 1. Press the two lateral Isofix connector buttons in order to extend the length of the Isofix connectors.
- Page 23 - 23 - 2) Group 1 (forward-facing) (For children weighing 9–18 kg) IMPORTANT: DO NOT USE THE CHILD CAR SEAT FACING IN THE DIRECTION OF TRAVEL UN- TIL THE CHILD WEIGHS AT LEAST 9 KG. e Isofix 1. Press the two lateral Isofix connector buttons in order to extend the length of the Isofix connectors.
- Page 24 - 24 - 3) Group 2/3 (forward-facing) (For children weighing 15–36 kg) This pr take th instruc To ens from u ways c accord INFORMATION: FIRST, REMOVE BELT SYSTEM PREVIOUSLY DESCRIBED. THE SUPPORT LEG MUST BE RETRACTED AND MUST NOT TOUCH THE CAR FOOTWELL. THE Please SUPPORT LEG INDICATOR MUST THEREFORE SHOW RED.
- Page 25 - 25 - CLEANING This product has been developed taking into account safety, comfort and functionality. Please take the time to read these instructions carefully before using the product and retain these instructions for future reference. To ensure that your child car seat remains in a good condition for a long time, please refrain from using solvents or abrasive or aggressive cleaning products to clean it.
- Page 26 - 26 - Hartelijk dank dat u voor ons autostoeltje Oxalis heeft gekozen. Als u hulp nodig heeft bij dit product, kunt u contact opnemen met onze klantenservice. • Dit 44/0 GEBRUIK voeg • Het • Dit product kan worden gebruikt voor kinderen uit de ECE-groep 0+/1/2/3. Gewichtsklas- veili 0-36 kg.
- Page 27 - 27 - bij dit WAARSCHUWING • Dit is een semi-universeel kinderbeveiligingssysteem. Het voldoet aan Verordening UN 44/04 en mag uitsluitend worden gebruikt in voertuigen die zijn opgenomen in de bijge- voegde lijst met goedgekeurde voertuigen. • Het is uitsluitend geschikt voor voertuigen met vaste of automatische gordels met 3-punts- tsklas- veiligheidsgordels die voldoen aan de verordening UN/ECE nr.
- Page 28 - 28 - WAARSCHUWING • Lees deze handleiding voor gebruik zorgvuldig door en bewaar de handleiding voor later gebruik om de veiligheid van uw kind te waarborgen. Niet-inachtneming van de aanwijzingen Voor in deze handleiding kan leiden tot ernstig letsel bij uw kind. •...
- Page 29 - 29 - ONDERDELEN VAN HET AUTOSTOELTJE or later zingen Vooraanzicht er een Verstelbare hoofdsteun aams- Comfort-inlegstuk Zitschaal waarts Schoudergordel aams- Schouderkussen Gordelslot n en in Kussen gordelslot Gordelverstelling n mag Hendel voor hoekver- stelling Steunpoot-indicator sterke Steunpoot Draaihendel nd niet Knop om de hoogte van de steunpoot te stigen...
- Page 30 - 30 - GEBRUIK VAN HET AUTOSTOELTJE Hellingshoek van het autostoeltje Gord instellen • Om op d • Bedien met één hand de hendel voor hoekverstel- kant ling onderaan aan de voorkant van de zitschaal. • Pak • Houd met de andere hand de rugleuning van de gord zitschaal naar achteren en stel de hoek in.
-
Page 31: Hoofdsteun Instellen
- 31 - Gordel instellen • Om de gordel los te maken, drukt u met één hand op de knop voor de gordelverstelling aan de voor- kant. • Pak met de andere hand het gordelslot met de gordels vast en maak het los. •... - Page 32 - 32 - Isofix-verbindingsstukken Gord • Maa • Schuif de gele inbrenghulpen door de gleuf in het auto kussen tussen rugleuning en zitting en in de Iso- • Haa fix-houders. voer • De platte kant moet naar beneden zijn gericht. •...
- Page 33 - 33 - Gordelsysteem verwijderen • Maak het gordelsysteem los, zodat de schoudergordelbeugel aan de achterkant van het autostoeltje te voorschijn komt. (Afb. 1) • Haal de schoudergordels uit de metalen beugel aan de achterkant van het autostoeltje en voer deze door het autostoeltje naar voren. (Afb. 2) •...
- Page 34 - 34 - MONTAGE VAN HET AUTOSTOELTJE 2) Gr (Voor k 1) Groep 0+/1 (achterwaarts gericht) (Voor kinderen met een gewicht van 0 tot 18 kg) BELAN GEWIC 1. Druk de Isofix-connectorknoppen aan beide kanten in om de Isofix-connectoren in de leng- te uit te schuiven.
- Page 35 - 35 - 2) Groep 1 (voorwaarts gericht) (Voor kinderen met een gewicht van 9 tot 18 kg) BELANGRIJK: GEBRUIK HET AUTOSTOELTJE NIET IN DE RIJRICHTING ALS HET GEWICHT VAN HET KIND NIET MEER BEDRAAGT DAN 9 KG. e leng- 1.
- Page 36 - 36 - REIN 3) Groep 2/3 (voorwaarts gericht) (Voor kinderen met een gewicht van 15 tot 36 kg) Bij de naliteit gebrui Om er met op en de aange INFORMATIE: VERWIJDER EERST GORDELSYSTEEM ZOALS HIERBOVEN BESCHREVEN. DE STEUNPOOT MOET INGEBRACHT WORDEN EN MAG DE VOETRUIMTE VAN DE AUTO NIET Contro MEER RAKEN.
- Page 37 - 37 - REINIGING Bij de ontwikkeling van dit product is aandacht besteed aan veiligheid, comfort en functio- naliteit. Neem de tijd om deze gebruiksaanwijzing grondig te lezen alvorens het product te gebruiken en bewaar de gebruiksaanwijzing voor toekomstige raadpleging. Om ervoor te zorgen dat uw autostoeltje lang in goede staat blijft, mag u het niet schoonmaken met oplosmiddelen, schuurmiddelen of agressieve schoonmaakmiddelen.
- Page 38 - 38 - Grazie per aver scelto il nostro seggiolino auto per bambini Oxalis. In caso di domande riguardo al prodotto, rivolgersi al nostro servizio clienti. • Que UTILIZZO dei v • È ad • Questo prodotto è destinato ai bambini del gruppo ECE 0+/ 1/2/3. Gruppo di peso: 0-36 kg.
- Page 39 - 39 - guardo AVVERTENZA • Questo è un sistema di ritenuta per bambini semi-universale. È conforme al regolamento UN/ECE n. 44/04 e può essere utilizzato soltanto nei veicoli menzionati nell’elenco allegato dei veicoli autorizzati. • È adatto esclusivamente a veicoli equipaggiati con cinture di sicurezza a 3 punti fisse o auto- matiche conformi al regolamento UN/ECE n.
- Page 40 - 40 - AVVERTENZA • Si prega di leggere attentamente questo manuale prima dell’uso e di conservarlo per con- sultazioni future, al fine di garantire la sicurezza del bambino. La mancata osservanza delle Vista istruzioni contenute nel presente manuale può causare gravi lesioni al bambino. •...
-
Page 41: Vista Frontale
- 41 - COMPONENTI DEL SEGGIOLINO AUTO PER BAMBINI er con- a delle Vista frontale bini di Regolabile Poggiatesta mbini a Inserto comfort Guscio del seggiolino sofix e Cintura di ritenuta n abbia spalle Spallina olo. Fibbia rasse- Imbottitura della fibbia Regolatore della cintura dome- Leva per la regolazione... - Page 42 - 42 - UTILIZZO DEL SEGGIOLINO AUTO PER BAMBINI Regolazione dell’angolo d’inclinazio- Rego ne del seggiolino auto • Per puls • Azionare con una mano la leva per la regolazione ante dell’angolo posta nella parte anteriore del guscio • Affe del seggiolino.
-
Page 43: Regolazione Del Poggiatesta
- 43 - Regolazione della cintura • Per slacciare la cintura, premere con una mano il pulsante del regolatore della cintura nella parte anteriore del seggiolino. • Afferrare con l’altra mano la fibbia con le cinture e slacciarla. • Quando il bambino è allacciato, tirare la linguetta di regolazione per stringere la cintura. - Page 44 - 44 - Elementi di connessione Isofix Rimo • Stac • Far scorrere gli ausili di inserimento gialli attraverso retro la fessura nell’imbottitura tra schienale e sedile e • Estr negli attacchi Isofix. pass • Il lato piatto deve essere rivolto verso il basso. •...
- Page 45 - 45 - Rimozione della cintura • Staccare la cintura portando così allo scoperto la staffa delle cinture di ritenuta spalle sul retro del seggiolino. (Fig. 1) • Estrarre il sistema cintura e le imbottiture dalla staffa metallica sul retro del seggiolino e farle passare attraverso il seggiolino sul lato anteriore.
- Page 46 - 46 - INSTALLAZIONE DEL SEGGIOLINO AUTO PER BAMBINI 2) Gr (Per ba 1) Gruppo 0+/1 (orientato all’indietro) (Per bambini di peso compreso tra 0 e 18 kg) IMPOR MARC 1. Premere entrambi i pulsanti laterali dei connettori Isofix per estendere in lunghezza i con- nettori Isofix.
- Page 47 - 47 - 2) Gruppo 1 (orientato in avanti) (Per bambini di peso 9-18 kg) IMPORTANTE: NON UTILIZZARE IL SEGGIOLINO AUTO PER BAMBINI NELLA DIREZIONE DI MARCIA FINO A QUANDO IL BAMBINO NON ABBIA SUPERATO I 9 KG DI PESO. i con- Premere entrambi i pulsanti laterali dei connettori Isofix per estendere in lunghezza i connettori Isofix.
- Page 48 - 48 - 3) Gruppo 2/3 (orientato in avanti) (Per bambini con un peso di 15-36 kg) Questo nalità. prodot Affinch stanze ture do sotto). INFORMAZIONE: RIMUOVERE INNANZITUTTO CINTURA COME DESCRITTO PRECEDENZA. RETRARRE LA BASE DI SOSTEGNO CHE NON DEVE PIÙ ESSERE A CONTATTO CON IL PAVI- Contro MENTO DEL VEICOLO.
- Page 49 - 49 - PULIZIA Questo prodotto è stato progettato prestando attenzione alla sicurezza, al comfort e alla funzio- nalità. Prendersi del tempo per studiare attentamente le istruzioni per l’uso prima di utilizzare il prodotto e conservare le istruzioni per consultazioni future. Affinché...
- Page 50 - 50 - Muchas gracias por elegir nuestro asiento infantil Oxalis. Si necesita ayuda con este producto, diríjase a nuestro servicio de atención al cliente. • Este 44/0 auto • Solo • Este producto está destinado a niños del grupo ECE 0+/1/2/3. Rango de peso: 0-36 kg.
- Page 51 - 51 - ducto, ADVERTENCIA • Este es un sistema de retención infantil semiuniversal. Cumple con la normativa de la ONU 44/04 y solo podrá utilizarse en los vehículos enumerados en la lista adjunta de vehículos autorizados. • Solo es adecuado para vehículos equipados con cinturones de seguridad fijos o automáticos 36 kg.
- Page 52 - 52 - ADVERTENCIA • Lea este manual detenidamente antes de usarlo y consérvelo para futuras referencias con el fin de garantizar la seguridad de su hijo. El incumplimiento de las instrucciones de este Vista manual puede resultar en lesiones graves para su hijo. •...
-
Page 53: Vista Frontal
- 53 - COMPONENTES DEL ASIENTO INFANTIL PARA AUTOMÓVIL as con e este Vista frontal o para Reposacabezas ajustable puntos Inserto de confort Carcasa del asiento fijación Cinturón del hombro l peso Almohadilla para hombro Hebilla del cinturón Almohadilla de cierre y mar- del cinturón Ajuste del cinturón... - Page 54 - 54 - USO DEL ASIENTO INFANTIL PARA AUTOMÓVIL Ajustar el ángulo de inclinación del Ajus asiento de automóvil • Para • Use una mano para accionar la palanca de ajuste del ángulo situada bajo la parte delantera de la •...
-
Page 55: Ajustar El Reposacabezas
- 55 - Ajustar el cinturón • Para soltar el cinturón, presione el botón de ajuste del cinturón en la zona delantera del asiento con una mano. • Con la otra mano sostenga la hebilla del cinturón con los cinturones y suéltela. •... - Page 56 - 56 - Conectores Isofix Desm • Sue • Deslice las ayudas amarillas de inserción suminis- part tradas a través de la ranura del acolchado entre • Saq el respaldo y el asiento y dentro de los soportes infan Isofix. •...
- Page 57 - 57 - Desmontaje del sistema de cinturones • Suelte el sistema de cinturones de forma que la almohadilla del cinturón del hombro en la parte trasera del asiento infantil sea visible. (Fig. 1) • Saque los cinturones para los hombros del estribo metálico en la parte posterior del asiento infantil y páselos a la parte delantera a través del asiento infantil.
- Page 58 - 58 - INSTALACIÓN DEL ASIENTO INFANTIL PARA AUTOMÓVIL 2) Gr (Para n 1) Grupo 0+/1 (orientado hacia atrás) (Para niños de 0 a 18 kg) IMPOR HASTA 1. Pulse los dos botones laterales del conector Isofix para ampliar la longitud de los conec- tores Isofix.
- Page 59 - 59 - ÓVIL 2) Grupo 1 (orientado hacia delante) (Para niños de 9 a 18 kg) IMPORTANTE: NO UTILICE EL ASIENTO INFANTIL EN EL SENTIDO DEL DESPLAZAMIENTO HASTA QUE EL PESO DEL NIÑO HAYA SUPERADO 9 KG. conec- 1. Pulse los dos botones laterales del conector Isofix para ampliar la longitud de los conec- tores Isofix.
- Page 60 - 60 - 3) Grupo 2/3 (orientado hacia delante) (Para niños de 15 a 36 kg) Durant funcio produc Para a tiempo siemp cubier INFORMACIÓN: PRIMERO RETIRE EL SISTEMA DE CINTURONES TAL Y COMO SE DESCRIBE ANTERIORMENTE. LA BASE SE TIENE QUE RECOGER Y NO DEBE TOCAR EL ESPACIO PARA LOS PIES DEL COCHE. Por fav EL INDICADOR DE LA BASE DEBERÁ...
- Page 61 - 61 - LIMPIEZA Durante el desarrollo de este producto, se prestó atención a la seguridad, la comodidad y la funcionalidad. Por favor, tómese el tiempo de estudiar este manual a fondo antes de usar el producto y consérvelo para futuras referencias. Para asegurarse de que el asiento infantil se mantenga en buenas condiciones durante mucho tiempo, no lo limpie con disolventes, agentes abrasivos o limpiadores agresivos.
- Page 62 - 62 -...
- Page 63 - 63 -...
- Page 64 FCOXALIS R1 - 01-20 Rue du Claret 38230 Charvieu France Tel : +33 (0)4 72 46 98 98 www.groupeteamtex.com...
Need help?
Do you have a question about the OXALIS and is the answer not in the manual?
Questions and answers