Table of Contents
Advertisement
Quick Links
Advertisement
Chapters
Table of Contents

Related Manuals for M&R Red Chili 1418


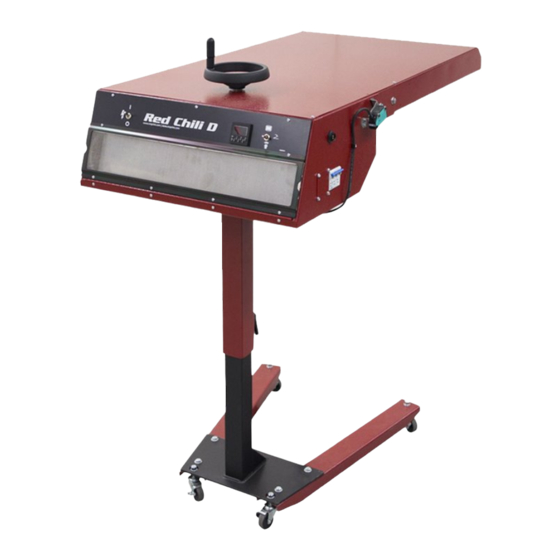
Summary of Contents for M&R Red Chili 1418
- Page 1 Red Chili™ Nv3 Part # MAN-REDCHILI $95.00 USD V.062414...
-
Page 3: Table Of Contents
V.062414 Contents Safety and Operational Guidelines Management Responsibilities ........................5 Operator Responsibilities ......................... 6 General Information Service and Parts ............................. 8 Defined Purpose ............................9 Warranty ..............................10 Specifications Assembly and Installation Assembly ..............................11 4.1.1 Quartz Heating Elements ......................11 Installation .............................. -
Page 4: Safety And Operational Guidelines
V.062414 1. Safety and Operational Guidelines DANGER This symbol identifies situations that endanger people, property, and/or equipment. If such conditions exist, the equipment must be shut down and all energy sources (electrical, gas, and pneumatic) must be disconnected, purged, and locked out until the problem is resolved. Never attempt to bypass or defeat any safety device. -
Page 5: Management Responsibilities
V.062414 1.1 Management Responsibilities Ensure that this equipment is used only for the purposes set forth in the “Defined Purpose” section of this manual. Ensure that all employees involved with the operation of this equipment or working near it read, understand, and act in accordance with the operational and safety standards set forth in this manual, including the Operator Responsibilities listed below. -
Page 6: Operator Responsibilities
V.062414 1.2 Operator Responsibilities Note: 'Operator Responsibilities' pertain to all employees who work on or near the equipment; this includes, but is not limited to those who clean, maintain and repair the equipment as well as those who operate it. In general, all those who work on or near the equipment have a duty to use reasonable and ordinary care for their own safety when in the vicinity of the machine. -
Page 7: General Information
V.062414 2. General Information This Document This document is based on information available at the time of its publication. While every effort has been made to be accurate, the information contained herein does not purport to cover all details or variations in hardware, software, features, or specifications, or to provide for every possible contingency in connection with installation, operation and maintenance. -
Page 8: Service And Parts
V.062414 2.1 Service and Parts Manufacturer's Rating Plate Most products manufactured by the M&R Companies have a metal manufacturer's rating plate. Below is a label imprinted with the information from your product's rating plate. Please be prepared to provide this information when calling. -
Page 9: Defined Purpose
V.062414 2.2 Defined Purpose Textile Presses Textile Presses are designed to print textile inks on textile substrates, as more fully set forth in the manual specific to that product. Any other use of this equipment is not permitted. Textile Dryers Textile Dryers are designed to cure/dry textile inks on textile substrates, as more fully set forth in the manual specific to that product. -
Page 10: Warranty
V.062414 2.3 Warranty Limited Warranty Your Warranty does not apply to damages sustained due to equipment misuse, whether intentional or negligent, and such misuse may void your warranty. Misuse includes - but is not limited to - the items listed below. In addition, M&R Printing Equipment, Inc. -
Page 11: Specifications
V.062414 3. Specifications Specifications Red Chili 1418 Red Chili 1618 Red Chili 2024 Red Chili 2028 Red Chili 3244 208/230 V, 1 ph, 208/230 V, 1 ph, 208/230 V, 3 ph, 40 A 40 A 208/230 V, 3 ph, 45 A... - Page 12 V.062414 WARNING: Never operate the unit when placed on its side. In this position, the Quartz Heating Element filaments (1) compress and arcing results in premature failure of the element filament. Always operate the unit with the Quartz Heating Elements in the horizontal (normal operating) position. The Quartz Heating Element has a female electrical connector at both ends (1).
-
Page 13: Installation
V.062414 4.2 Installation WARNING: Before entering between print heads, always push in Emergency Stop button and disconnect Cycle Interruption Cords. Adjust Front and Rear Proximity Switches Move the front and rear proximity switches, print carriage, rear frame holder, as far as they will go toward the rear of the print head. - Page 14 V.062414 With the pallets in the “UP” position, position the unit into the print station so that the Quartz Heating Elements are centered over the pallet. Lock the four Swivel Casters by pushing down on the Caster Locks (1). Dimensions between the surface of the Quartz Heating Elements and the pallet surface should be approximately 2-1/4”...
-
Page 15: Install Photoelectric Sensor
V.062414 4.2.1 Install Photoelectric Sensor Place the Press PLC/ Foot Pedal/Flash Sensor switch down in the Flash Sensor position (1). The Photoelectric Sensor (1) on your unit is designed to activate the Quartz Heating Elements by sensing the leading edge of the pallets as they are indexed around the press. The Photoelectric Sensor is installed at the factory on the right side of the unit for use on presses set up for clockwise rotation. -
Page 16: Install Press Plc Signal Cable
V.062414 4.2.2 Install Press PLC Signal Cable The unit is designed to receive operational signals from the flash sensor mounted on the unit, foot pedal or the press PLC. WARNING: Ensure none of the pallets are positioned under the unit for an excessive amount of time while the unit is on. -
Page 17: Install Foot Pedal
V.062414 4.2.3 Install Foot Pedal The unit is designed to receive operational signals from the flash sensor mounted on the unit, foot pedal or the press PLC. WARNING: Ensure none of the pallets are positioned under the unit for an excessive amount of time while the unit is on. -
Page 18: Operation
V.062414 5. Operation 5.1 Control Panel Number Name Function Power On/Off Switch The Power On/Off switch supplies electrical power to the unit. Place the switch in the On position to turn on. Place the switch in the Off position to turn off. The Digital Controller selects output power, exposure time and lamp section Digital Controller selection. -
Page 19: Digital Controller
V.062414 5.1.1 Digital Controller Red Chili 2024, 2028 uses an alpha/numeric digital controller to control flash time, quartz heating element section use and power output. Power Output and Exposure Time Place the Power switch in the On position. The control displays the Power Output Setting on the top line and the Flash Exposure Time on the lower line. - Page 20 To deselect a section, press F3 until the section letter flashes. Press the arrow down button; the indication changes to a dash "-" and the section is now inoperative. F3 Section (Red Chili 1418, 1618) The quartz heating elements are arranged in three sections: LEFT (L), CENTER (C) and RIGHT (R). Press F3 to select lamp sections for curing operation;...
- Page 21 V.062414 Setup Menu Electrical Frequency is accessed from the Setup menu. Press the F4 button until the word PASS displays. Next, press the arrow down button until the number "1969" displays on the lower line. The SETUP menu displays. The control exits the SETUP menu automatically after 10 seconds. To exit immediately, press ENT. Set Electrical Frequency From the Setup menu, press the F2 button to adjust the electrical frequency;...
-
Page 22: Operation Overview
V.062414 5.2 Operation Overview WARNING: Ensure none of the pallets are positioned under the unit for an excessive amount of time while the unit is on. Extreme heat can damage pallets, garments and/or cause a fire. After the first color is printed, the pallet indexes to the flash position. The Photoelectric Sensor will sense the pallet edge and signal the Quartz Heating Elements to turn on. -
Page 23: Scheduled Maintenance
V.062414 6. Scheduled Maintenance Benefits Properly maintained equipment operates more efficiently, reduces operating costs, and lasts longer. A properly managed preventive maintenance program can minimize downtime. Preparation An effective preventive maintenance program includes: proper selection, handling, and application of lubricants ... -
Page 24: Clean Surface Of Unit
Items required: 1 - Vacuum Use a vacuum to clean the Blower Fan Cover (1) and air vent (2) underneath the unit. Clean Ventilation Fan and Air Vents (Red Chili 1418) Items required: 1 - Vacuum Use a vacuum to clean the ventilation fans and finger guard assemblies (1). -
Page 25: Clean Heating Elements
V.062414 Every 2 Weeks WARNING: To prevent possible injury to personnel and/or damage to the equipment, lock out and tag the electrical service to the equipment. Clean Heating Elements Items required: 1 - Isopropyl Alcohol 1 - Lint Free Cloth 1 - Lint Free Gloves Wearing lint free gloves;... -
Page 26: Lubricate Swivel Casters
V.062414 Monthly WARNING: To prevent possible injury to personnel and/or damage to the equipment, lock out and tag the electrical service to the equipment. Lubricate Swivel Casters Items required: 1 - Lightweight Machine Oil Apply one drop of oil to the ball bearing assembly (1). Do not over lubricate the bearing. Lubricate Vertical Tube Items required: 1 - Permatex Super Lube with Teflon Grease (M&R Part No. -
Page 27: Clean Heating Element Reflector
V.062414 Every 3 Months WARNING: To prevent possible injury to personnel and/or damage to the equipment, lock out and tag the electrical service to the equipment. Clean Heating Element Reflector Items required: 1 - Isopropyl Alcohol 1 - Lint Free Cloth 1 - Lint Free Gloves Wearing lint free gloves, remove Quartz Heating Elements (1). -
Page 28: Scheduled Maintenance Log
V.062414 6.1 Scheduled Maintenance Log Date Maintenance Procedure performed/ Initials Check Quartz Heating Element Operation Clean Surface of Unit Check and Clean Blower Fan Cover and Air Vent (Red Chili 2024, 2028, 3244) Clean Ventilation Fan and Air Vents (Red Chili 1418) Clean Heating Elements Clean Blower Fans (Red Chili 2024, 2028,... -
Page 29: Troubleshooting
V.062414 7. Troubleshooting General Guide The following information is provided as a guide for troubleshooting. If you have any questions regarding the installation, operation, or preventive maintenance procedures for this equipment, contact The M&R Companies Service Department. Anyone using this troubleshooting guide should have a working knowledge of electrical power and the control systems on this equipment. - Page 30 V.062414 Problem Probable Causes Solution The high temperature switch The unit has shut down mounted on the inside of the and the audible signal is Check the operation of the blower, replaced reflector assembly has opened up. sounding. The Digital as required.
-
Page 31: Replacement Parts
V.062414 8. Replacement Parts CE vs. UL Models All equipment containing electrical components is designed to comply with either Conformance European (CE) or Underwriters Laboratories (UL) standards, and each type of equipment has a different parts list. CE equipment runs at 50 Hz; UL equipment runs at 60 Hz. Electrical specifications, including Hertz, can be found on the Manufacturer’s Rating Plate similar to the one shown below. - Page 32 V.062414 Control Panel (UL & CE) Control Panel (UL & CE) Part Numbers Part Name Toggle Switch 208/230/380 V 50/60 Hz 1010003 Toggle Switch 380/415 V 50 Hz 1010011 Digital Controller 1012180 Toggle Switch 1010013 M&R Companies 1N 372 Main St. Glen Ellyn, IL 60137 USA Tel: +630-858-6101 Fax: +630-858-6134 www.mrprint.com | store.mrprint.com...
- Page 33 V.062414 Electrical (Red Chili 2024, 2028) (UL & CE) Note: 380V 3Ph. 50Hz. shown. Refer to Schematic Diagrams for Electrical Parts before placing a parts order. Part Numbers Electrical (UL & CE) Part Name 20 X 24 20 X 28 1011205 1011205 Solid State Relay 1 Pole - 75A 208/230V...
- Page 34 V.062414 Electrical (Red Chili 1418) (UL & CE) Note: 230V 1Ph. 60Hz. shown. Refer to Schematic Diagrams for Electrical Parts at the beginning of this section before placing a parts order. Electrical (UL & CE) Part Numbers Part Name Toggle Switch 208/230 V 50/60 Hz...
- Page 35 V.062414 Electrical (Red Chili 3244) (UL & CE) Note: 380/415V 3Ph. 50Hz. shown. Refer to Schematic Diagrams for Electrical Parts before placing a parts order. Part Numbers Electrical (UL & CE) Part Name 32 X 44 1011207 Solid State Relay 1 Pole - 75A 380/480V 1031004 Heat Sink 1016042...
- Page 36 V.062414 Reflector Assembly (UL & CE) Reflector Assembly (UL & Part Numbers Red Chili Red Chili Red Chili Red Chili Part Name 1418, 1618 2024 2028 3244 — Quartz Lamp 208/230V 1007210B 1007210A 1007210A Quartz Lamp 380/415V 1007251A 1007251A 1007251A 1007165B —...
- Page 37 V.062414 14 X 18 Top Assembly (UL & CE) 14 X 18 Top Assembly (UL & CE) Part Number Part Name All Models Flash Body Weldment 9Q11010-B Sub Panel 9Q11014-A Control Panel 9Q11124 Fan Guard With Filter 1009012 Mirror Assembly 9Q11025-A Heat Sink 9Q11028...
- Page 38 V.062414 Foot Pedal (Not Shown) 8EA0030 Top Assembly (UL & CE) – Part Numbers Top Assembly (UL & CE) Part Name 20 X 24 20 X 28 Lamp Holder 9Q00296-E 9Q00275-F Mirror Panel 9Q00251-A 9Q00201 Bottom Grill 9Q00281-B 9Q00281-B Inside Ceiling 9Q00292-B 9Q00206-C Top Cover...
- Page 39 V.062414 32 X 44 Top Assembly (UL & CE) 32 X 44 Top Assembly (UL & CE) Part Number Part Name All Models Lamp Holder Weldment 9Q00414 Red Chili Hinge 9Q00401 Mirror Panel 9Q00409 Inside Ceiling 9Q00411 Top Cover 9Q00417 #3 Self Drill Screw 10-16 X1/2 3055001 Control Panel Mounting Plate...
- Page 40 V.062414 14 X 18 Stand Assembly (UL & CE) 14 X 18 Stand Assembly (UL & CE) Part Numbers Part Name All Models Vertical Leg 9Q11073 Leg Channel 9071803-A Furniture Caster 2" Dia. 3037002 Split Lock Washer 3/8" 3022002 Finish Hex Nut 3/8-16 3013007 Guide Tube Weldment 9071812...
- Page 41 V.062414 Stand Assembly (UL & CE) Stand Assembly (UL & CE) Part Numbers Part Name All Models Vertical Tube Weldment 26-3/8" 8014830-A Guide Tube Weldment 18.25" 9Q00232 Leg Channel 26.13" 9071803-A Caster 2" Diameter 3037002 Thrust Ball Bearing 1.3/4" OD. 3023341 Wrought Flat Washer 1/2"...
- Page 42 V.062414 32 X 44 Stand Assembly (UL & CE) 32 X 44 Stand Assembly (UL & CE) Part Number Part Name All Models Flash Lamp Base Weldment 9Q00435 Adjustable Handle With Stud 3033060 Leveling Pad Socket Type 3037021 Finished Hex Jam Nut 1/2-13 3013050 Cast Iron Swivel Caster 2"...
- Page 43 V.062414 Male Handle 3/8-16 X 1" 3033033 Finished Hex Jam Nut 3/4-16 3013031 Thrust Ball Bearing 1.3/4" 3023341 Bearing Support Flange 1.875" 9Q00452 2 Piece Split Collar 3/4" 3011016 SAE Washer 5/16" 3021023 Hex Head Bolt 5/16-18 X 1" 3008010 Nylon Flat Washer 5/16"...
Need help?
Do you have a question about the Red Chili 1418 and is the answer not in the manual?
Questions and answers