
Related Manuals for M&R CHALLENGER II Series


Summary of Contents for M&R CHALLENGER II Series
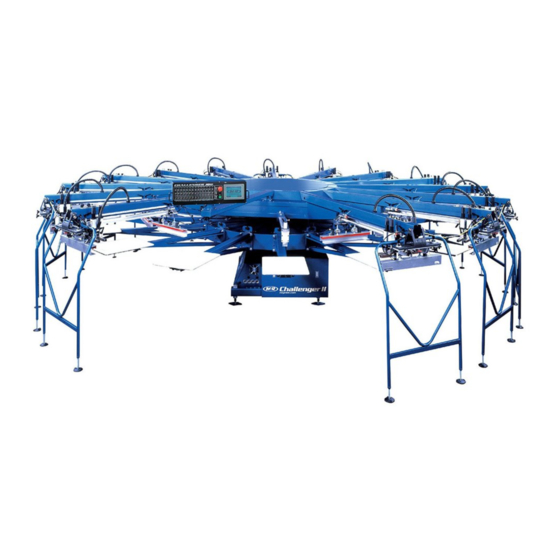
- Page 1 $75.00 The M&R M&R Printing Equipment, Inc. www.mrprint.com Toll Free 1-800-736-6431 111802MS MAN-CH2...
- Page 2 IMPORTANT! IMPORTANT! The product described in this publication may employ hazardous voltages or might cre- ate other conditions that could, through misuse, inattention, or lack of understanding, result in personal injury, or damage to the product or to other equipment. It is imperative, therefore, that personnel involved in the installation, maintenance, or use of this product understand the operation of the product and the contents of this publication.
- Page 3 The information listed below will prove helpful when ordering replacement parts, requesting service or repairs. Please fill in the following information. The Model No., Serial No., Schematic No. and Machine No. are all located on the Manufacturers Rating Plate mounted to the equipment. Should you have any questions regarding this information, please do not hesitate to contact our Equipment Service Department at 1 (800) 736-6431 during normal business hours.
- Page 5 Introduction Valued Customer, Thank you and congratulations on your purchase of your new M&R Challenger Series II semi-auto- matic Textile Screen Printing System. The M&R Challenger Series II has set the industry standard for affordable, high performance automat- ic textile screen printing. Designed for quick set-ups and high volume production, the M&R Challenger Series II is loaded with time saving, cost cutting features.
-
Page 7: Table Of Contents
Challenger Series II Table of Disclaimer Contents Model Description Introduction Safety Precautions..........1 Safety Precautions & Specifications............5 Screen Frame & Image Size........11 Specifications Installation Instructions........13 Set-Up & Tri-Lok Pre-Registration System......15 Operation Set Up Instructions/Central Off-Contact.....21 Omni/Uni Flash............23 Quartz Flash............27 Operator Controls..........31 E 300 Operator Interface........41 Recommended Lubricants/Tools......63 Maintenance and... -
Page 9: Safety Precautions
Safety Precautions SAFETY PRECAUTIONS This equipment must be used only for the defined purpose as described in the Operator’s Manual, and must be main- FUNDAMENTAL SAFETY INSTRUCTIONS: tained in perfect running condition in accordance with Please read all information regarding safety precautions described Safety Regulations. - Page 10 Safety Precautions This symbol signifies a possible 1. The equipment is shut down. imminent danger for life and health 2. The electrical power has been dis-connected from the persons equipment equipment. Operators. 3. In case of delivery of partial components, the Operator Non-observance these must install safety devices in accordance with regula-...
- Page 11 Safety Precautions All pneumatic piping and/or hoses must be checked at reg- 2. Safety guards have been provided to protect the opera- ular intervals for signs of wear or failure. tor from all moving parts. Please do not remove these Safety Guards any time the equipment is in operation.
- Page 12 Safety Precautions 3. PRACTICE GOOD HOUSEKEEPING: Maintain and area adjacent to NOT ON the equipment for tool and color stor- age. Clean up all spills and eliminate all potential trip points from the operating areas around the equipment to prevent slipping or falling into the working zone of the equipment.
-
Page 13: Specifications
Specifications SPECIFICATIONS CHALLENGER Series II (Pneumatic Models) MODEL No. 12 COLOR 14 COLOR 16 COLOR 18 COLOR Maximum Image Size 20” x 28” (50 x 70 cm) 20” x 28” (50 x 70 cm) 20” x 28” (50 x 70 cm) 20”... - Page 14 Specifications SPECIFICATIONS CHALLENGER Series II (AC Models) MODEL No. 12 COLOR 14 COLOR 16 COLOR 18 COLOR Maximum Image Size 20” x 28” (50 x 70 cm) 20” x 28” (50 x 70 cm) 20” x 28” (50 x 70 cm) 20”...
- Page 15 Specifications Standard Features Stroke Length Calibrated stroke length adjustment allows faster setup Carousel Rotation Rear stroke length is adjustable to maximize print Bi-directional rotation speed and efficiency and to reduce the “working” Free-wheel capability of ink Pre-registration performed at the factory Training Certification Access to M&R’s Training Center...
- Page 16 Specifications Figure 2 Typical Multiple Unit (Loop) Compressor-Chiller Layout A clean, moisture free compressed air supply is essential for the contin- ued operation of the M&R Challenger Series II press. We strongly recom- mend that a refrigerated air chiller be installed in the compressed air sup- ply line to the Challenger Series II press to prevent moisture damage to pneumatic seals, valves and air cylinders used in the operation of the print carriage (See diagram above).
- Page 17 Specifications Figure 1 Typical Compressor-Chiller Layout A clean, moisture free compressed air supply is essential for the contin- ued operation of the M&R Challenger Series II press. We strongly recom- mend that a refrigerated air chiller be installed in the compressed air sup- ply line to the Challenger Series II press to prevent moisture damage to pneumatic seals, valves and air cylinders used in the operation of the print carriage (See diagram above).
- Page 18 Specifications NOTES: M&R Printing Equipment, Inc. - Glen Ellyn, Illinois...
-
Page 19: Screen Frame & Image Size
Screen Frame & Image Size NOTE: Although every effort has been made to provide accurate screen frame specifications, M&R Printing Equipment, Inc. does not assume any liability for damages, whether consequential or incidental that may result from the use or misuse of the indicated specifications. M&R Printing Equipment, Inc. - Page 20 Screen Frame & Image Size Use this chart to determine whether your existing screen frame can be used on the M&R Challenger Series II. 1. Locate where your frames width falls along the left side of the chart. 2. Now find where the frame length falls along the bottom of the chart. As long as these two dimensions come together within the chart, the frame will fit on the press.
-
Page 21: Installation Instructions
Installation The M&R Challenger Series II requires installation by an • A three-color minimum print job, with tight registration, should be ready to run. Refer M&R factory-trained service representative. The following to page 11 & 12 for the required screen conditions must be addressed before a technician can be frame dimensions and image placement. - Page 22 Installation Hardware The hardware list shown below illustrates and describes all hardware required to assemble your Challenger Series II screen printing system. The quantity is indicated for each available model size. Although a Factory Trained M&R Service Representative will perform the original installation of this equipment, this hardware list can prove valuable should the equipment be relocated or dis-assembled for any reason.
-
Page 23: Tri-Lok Pre-Registration System
Tri-Loc Pre-Registration System To better facilitate shops that have existing film/pin sys- The M&R Tri-Loc Registration System is designed to aid in tems, the M&R Tri-Loc is offered without a film register Pin the set up and registration of screens on the M&R Gauntlet, Bar attached. - Page 24 Tri-Loc Pre-Registration System Once the Pin Bar has been attached to the Master Frame, (ie: 23” frame = 11.5” centerline)When pasting up films, the place a punched film on the Pin Strip and measure over main or “trap color” should be positioned first and taped from the side stop block to find the image center.
- Page 25 Tri-Loc Pre-Registration System The master frame may also be mounted permanently to the If using a roller type adjustable frame, be sure to check that exposure glass (See Fig. 7) using a heavy bond double the push pin is properly engaged and that the frame is flat sided tape (M&R Part No.
- Page 26 Tri-Loc Pre-Registration System IMPORTANT: While prepping screens Once it is determined that the press is calibrated properly for the press, it is important NOT to (i.e; Pallet Level and Off Contact), adjust the micros on each tape over the corners that were in print head to their center position.
- Page 27 Tri-Loc Pre-Registration System Figure 14 Figure 17 With the Tri-Loc pallet locked in position, repeat procedure on all remaining print heads and confirm measurements. Using the Tri-Loc (See Fig.13 & 14) The goal of positioning frame holders is to After having marked the press with the “Prime Position” set- ensure they are not restricting the frame while in contact ting, and adjusted the frame holders to their optimum posi- with the stop blocks.
- Page 28 Tri-Loc Pre-Registration System The rear micro lock holds the rear frame holder ridged dur- NOTES: ing the initial engagement of the frame locks. This added rigidity improves accuracy regardless of what type registra- tion system is being used. Although locked during set-up, it can be easily loosened if a micro adjustment is necessary.
-
Page 29: Set Up Instructions/Central Off-Contact
General Setup & Registration NOTE: When using the micro- 1. Before installing screens into the print stations, check the registration, you must have the rear recommended print order, consider the mesh count, type of screen frame clamps released to ink, and area (image size) of ink deposit. This is the best allow the screen frame to move time to eliminate problems, such as ink build-up and butt- freely and to avoid side loading of the... - Page 30 General Setup & Registration The following is a step by step instruction of how to change Each setting is designed to change the off-contact setting the off -contact setting using the central-off-contact lever: by 1/16” (1.5mm). The central off-contact adjustment lever has four possible After determining the proper off-contact setting, lower the positions.
-
Page 31: Omni/Uni Flash
Omni/Uni Flash Operation AUTO FLASH MODE - 4. Return the single-double switch to the middle position (See page 43 for control instructions) and the front-rear switch to the front position. When using any print station for Auto Flash Operation, the control panel switches for that particular print station must be 5. - Page 32 Omni/Uni Flash Operation Fig. 4A Fig. 2 Be sure to loosen the ratchet knob, (Kipp Elisa Knob) that secures the two telescope tubes together, before making this adjustment. (See Fig. 5) WARNING! operate Fig. 5 Omni/Uni Flash cure unit if the flip-up front screen holder assembly does not lock securely into position.
- Page 33 Omni/Uni Flash Operation Fig. 7 Fig. 9A 7. Install the flash panel mounting bracket on the mounting bar and secure with two squeegee clamps (manual) (See NOTE: Check to be sure all bolts and Fig. 8) nuts are securely tightened. Fig.
- Page 34 Omni/Uni Flash Operation WARNING! Be careful not to adjust the 4.To check the current process temperature, press the inboard or outboard speed too fast. “PV/SV” key so the red L.E.D. lights beside the PV Higher speeds can lead to premature (Measured Value) indication.
-
Page 35: Quartz Flash
Quartz Flash Installation QUARTZ FLASH INSTALLATION - After determining the location of the M&R Quartz Flash unit Fig. 3 (usually print station number two in the print sequence) move the front screen frame holder into the fully raised and locked position. - Page 36 Quartz Flash Installation 2. To adjust the front to rear angle of the heating element 5. When leveling adjustments are completed, tighten the 3/4” assembly, loosen the 3/4” hex head bolts located on either pivot hex head bolts and the rear leveling leg adjustments. side of the chassis near the floor.
- Page 37 Quartz Flash Operation NOTES: Fig. 11 The “Quartz” timer is used to select the time interval in which the Quartz Flash unit is activated to flash cure print- ed garments. The time interval settings are adjusted in the same manner as described for “Index” timers described previously.
- Page 38 Quartz Flash Operation NOTES: M&R Printing Equipment, Inc. - Glen Ellyn, Illinois...
-
Page 39: Operator Controls
Operator Controls The Challenger Series II is a blend of exciting technology Main “ON/OFF” switch location. (See figure 1) that incorporates microprocessor controls and a unique Fig. 1 servo driven index system that offer the ultimate in maxi- mum production efficiency. The following is a description of a single cycle operation of your new press, followed by a description of all control functions. - Page 40 Operator Controls A small L.E.D. located in the tip of the toggle handle will The index system will cycle one time, along with any print illuminate confirming activation. When in the “Single” stations that are selected to “ON”. Placing this toggle position the L.E.D.
- Page 41 Operator Controls Independent Print Start Push Button: This push button permits manual cycling of a selected print station. Please note that the “Single/Double” toggle switch for the selected print station must be set to either “Single” or “Double” position in order for the print station to operate. When Emergency Stop Push Button: the “Single/Double”...
- Page 42 Operator Controls Test Print Toggle Switch: This toggle switch is designed to aid the system operator when it is desired to print only one garment to check for registration or image quality. When this toggle switch is placed in the “ON” Print Start/Print Finish Toggle Switch: position, the control system will auto- This toggle switch is provided as a...
- Page 43 Operator Controls Front/Rear Toggle Switch: This toggle switch permits the system operator to command the selected print station to stop in either the “Front” or “Rear” position. Generally, this switch is used whenever the Operator desires to complete the print cycle with the screen frame flooded with ink, to reduce the chance of ink drying in the image.
- Page 44 Operator Controls To lower the index table, press the green “Reset” push but- Individual Print Station Controls: ton located just to the right of the “Print” push button on Each of the print stations used on the M&R Challenger the Print Station control panel. Series II includes individual controls for adjustment of flood stroke speed, print stroke speed, independent print start, NOTE: The “Single/Double”...
- Page 45 Operator Controls YELLOW CYCLE INTERRUPTION CORDS/BARRIER WARNING! NEVER ATTEMPT TO GATES: BY-PASS OR DEFEAT ANY CONTROL To prevent injury to operating personnel, yellow cycle inter- DEVICE OR APPLIANCE. CHECK TO ruption cords, or on some models, yellow barrier gates are SURE THAT CONTROL...
- Page 46 Operator Controls DO NOT STAND BETWEEN INDEX PALLET SUPPORT ARMS TO INSTALL SCREEN FRAMES, ADJUST SCREEN REGISTER OR PERFORM ANY OTHER OPERATIONAL ADJUSTMENTS WITH THE YELLOW BARRIER GATES CON- NECTED! WARNING! AC PRINT STATIONS: (Optional) The M&R Challenger Series II is offered with optional AC drive print stations.
- Page 47 Operator Controls Once centered, lock the squeegee/flood bar in place using the pneumatic clamps or manual clamps as provided. Both the flood bar and the squeegee are provided with an angle adjustment. If the angle is set to a greater degree, the squeegee will deposit more ink during the print stroke.
- Page 48 Operator Controls The AC drive print stations include an adjustment for setting The M&R AC print stations feature solid state proximity sen- of the off-contact distance. Off-contact is defined as the sors to facilitate the setting of print stroke length from the dimension between the bottom of the screen fabric and the front and the rear of the screen.
-
Page 49: E 300 Operator Interface
E 300 Operator Interface Figure 1 E 300 OPERATOR INTERFACE - NOTE: If your press has been The Operator Interface control panel used in the ordered with the “Revolver” manufacture of the M&R Challenger Series II Textile print sequencing program, Screen Printing System incorporates an L.C.D. - Page 50 E 300 Operator Interface Figure 2 d. Located at the bottom left of the control is the FLASH/QUARTZ TIMER - alpha numeric keypad used to input information for When the “Flash Timer” command is selected, this various programming parameters. L.E.D. will display a green indication. e.
- Page 51 E 300 Operator Interface PLC: CH18R1 v.100102 MTA: CH161 Figure 3 (CCW) operation. representation of the M&R Challenger Series II press. When selected for clockwise (CW) operation, the In the lower right corner of the L.C.D. window, the L.E.D. will display a red indication. screen will display the program reference information for the program currently installed in the press.
- Page 52 E 300 Operator Interface Figure 4 Lastly, in the upper right corner of the screen, the as a reference for the systems operational history. current time of day is displayed. (See Figure 4 above) TIMERS - The “Shift Counter” displays the production shift. The “TIMERS”...
- Page 53 E 300 Operator Interface Figure 5 Index Dwell Time. Now, press the “ENTER” key. tion. Now enter the numerical value using the num- Your selection is now programmed into the PLC ber keys, maximum “15.0” seconds, minimum is “0” memory. (See Figure 5 above) seconds and press the “ENTER”...
- Page 54 E 300 Operator Interface >Revolver Mode: >Index Delay: >Stop Alarm >Enter Program Revolution No. : 181716151413121110 9 8 7 6 5 4 3 2 1 Figure 6 “Preheat” will change to “ON” for the selected time M&R REVOLVER SEQUENCING PROGRAM of the preheat cycle, and the “Preheat”...
- Page 55 E 300 Operator Interface >Revolver Mode: >Index Delay: >Stop Alarm >Enter Program Revolution No. : 181716151413121110 9 8 7 6 5 4 3 2 1 Figure 7 the word “Revolver” in “Revolver Mode”. You will see the “WAIT” message appear in the mes- sage window.
- Page 56 E 300 Operator Interface Revolution No. : 181716151413121110 9 8 7 6 5 4 3 2 1 Pallet No.: Job No.: Date: 00/00/00 00:00 Job Clear: Alarm Enabled: Figure 8 This control function allows the selection of up to 10 Figure 8 above) different revolutions to be programmed for print, The next menu item is “Job Clear”.
- Page 57 E 300 Operator Interface OPTIONS >Revolver Mode Rotation : CCW/CW Index : Single/Double Skip : Foot Pedal/Push Button Pallets Size : TIMERS nozzle TESTS Pg Dwn Pg Up Figure 9 The next sub-menu item after “Revolver Mode” is The next menu item is “SKIP”. This menu item per- “Rotation”...
- Page 58 E 300 Operator Interface Flash: WAIT 181716151413121110 9 8 7 6 5 4 3 2 1 Servo Offset: End Position: 0.000” TIMERS nozzle TESTS Pg Dwn Pg Up Figure 10 head is currently selected for print operation, or the stop after changing pallets to a smaller or larger size. letter “F”...
- Page 59 E 300 Operator Interface Servo Offset: End Position : 0.000” Strt Position: 0.000” TIMERS nozzle TESTS Pg Dwn Pg Up Figure 11 Duration”, Rear Delay”, “Rear Duration”, apply adhesive to the printing pallets based on the “Revolution #:” and “Pallet #:”. number of revolutions of the press.
- Page 60 E 300 Operator Interface GLUE APPLICATOR Spray 1 Revltn Only: Spray Every: 0 Revolution Front Delay: 0.01 [s] Duration: 0.00 [s] Rear Delay: 0.01 [s] Duration: 0.00 [s] Revolution #: 0 Pallet #: 0 TIMERS nozzle TESTS Pg Dwn Pg Up Figure 12 The adjustment has a range of between “0.01”...
- Page 61 E 300 Operator Interface GLUE APPLICATOR Spray 1 Revltn Only: Spray Every: 0 Revolution Front Delay: 0.01 [s] Duration: 0.00 [s] Rear Delay: 0.01 [s] Duration: 0.00 [s] Revolution #: 0 Pallet #: 0 TIMERS nozzle TESTS Pg Dwn Pg Up Figure 13 The adjustment has a range of “0.00”...
- Page 62 E 300 Operator Interface OILER Oil Every: 20 indexes Index No.: Manual Oiler: TIMERS nozzle TESTS Pg Dwn Pg Up Figure 14 OILER - OILER”, use the “ARROW” keys to place the flash- The next sub-menu item is “OILER”. This sub menu ing cursor on the “ON/OFF”...
- Page 63 E 300 Operator Interface Ink Dip Ink Dip Every: Duration: 0.70 [s] TIMERS nozzle TESTS Pg Dwn Pg Up Figure 15 been completed. You may enter a value up to a max- TESTS - imum of “999”. If you enter the value “0”, the “Ink The next menu item is the “TEST”...
- Page 64 E 300 Operator Interface Figure 16 Should the indication on the graphic representation As each individual switch is activated, the corre- of the control panel fail to respond, then the particu- sponding indication on the display screen will con- lar switch in question must be examined for a possi- firm its operational integrity.
- Page 65 E 300 Operator Interface HARDWARE TEST > Panel Test > Proximities test > Motion Card test > Servo Drive test > Servo Motion Card History > Other tests Figure 17 include these items. Use the “ARROW DOWN” key A detailed logging builds a data base, which may be to scroll through the component list to examine each used for cost analysis, job tracking, production vol- parameter.
- Page 66 E 300 Operator Interface Figure 18 Based on your pre-determined Message and Error code listing, enter the corresponding code number, To enter the current year, press the “9” key, then then press the “ENTER” key. Your selections are press the “8” key. Now press the “ENTER” key. The now saved in the PLC memory.
- Page 67 E 300 Operator Interface Figure 19 M&R INFO - The last menu item is “M&R INFO” located under the L.C.D. window at the extreme left of the control panel. This menu item provides information on how to contact M&R Printing Equipment, Inc. It lists our phone number, Fax number and address.
- Page 68 E 300 Operator Interface Logic Diagram MAIN MENU SCREEN REVOLVER MODE PLC Identity No. >Revolver Mode: Program Version No. >Index Delay: COUNTERS MTA No. >Wait Shift Counter >Enter Program Job Counter Revolution No.: Total Counter 181716151413121110987654321 Speed (Doz/hour) Pallet No.: 0 Job No.: Date: 00/00/00 00:00 TIMERS Job Clear:...
- Page 69 E 300 Operator Interface Logic Diagram MAIN MENU SCREEN PLC Identity No. Program Version No. MTA No. SERVO DRIVE TEST Regenerative load ratio: Effective load ratio: Peak load ratio: HARDWARE TEST Motor Rotational Speed: 0.0 rpm >Panel Test Actual Present: 0 pls >Proximities Test Feed Present:...
- Page 70 E 300 Operator Interface Logic Diagram MAIN MENU SCREEN PLC Identity No. Program Version No. MTA No. MPR DATA Job No. Message Code SERVICE DATA DATE AND TIME M&R INFO M&R Printing Equipment, Inc. - Glen Ellyn, Illinois...
-
Page 71: Recommended Lubricants/Tools
PREVENTIVE MAINTENANCE PROCEDURE CHALLENGER Series II TOOLS/LUBE Recommended Lubricants Description Quantity M&R Part No. 1 Quart 10 Wt. Non-Detergent Oil 7017000 1 Tube White Lithium Grease 7018017 1 Tube Permatex Super Lube with Teflon 7018031 1 Quart Vactra No. 4 Oil 7017018 Recommended Tools Description... - Page 72 PREVENTIVE MAINTENANCE PROCEDURE CHALLENGER Series II NOTES: 081200MS...
-
Page 73: Preventive Maintenance Procedures
PREVENTIVE MAINTENANCE PROCEDURE CHALLENGER Series II Bulletin No. PH1 The frequency of the following preventive maintenance procedure is based on a 8 hour daily production shift or 40 hour work week. Maintenance Point Check and clean away as needed any lint, ink or spray adhesive which may have accumulated on the print carriage assembly. - Page 74 PREVENTIVE MAINTENANCE PROCEDURE CHALLENGER Series II Bulletin No. PH1 Procedure Information (Cont.) Using a clean cloth moistened with 10 wt. non-detergent oil, clean away any accumulation of ink, lint, dirt or spray adhe- sive from the print carriage guide shafts, chopper linkage assembly, adjustment knobs, squeegee/flood bar angle brackets and miscellaneous hardware.
- Page 75 PREVENTIVE MAINTENANCE PROCEDURE CHALLENGER Series II Bulletin No. EL1 The frequency of the following preventive maintenance procedure is based on a 8 hour daily production shift or 40 hour work week. Maintenance Point Check and clean as required the lower electrical component enclosure air vents and circulation fan of any accumula- tion of lint or dirt.
- Page 76 PREVENTIVE MAINTENANCE PROCEDURE CHALLENGER Series II Bulletin No. EL1 Procedure Information (Cont.) 4. Remove lock-out tag from electrical disconnect switch and turn disconnect switch back “ON” to supply electrical power to the equipment. 081200MS...
- Page 77 PREVENTIVE MAINTENANCE PROCEDURE CHALLENGER Series II Bulletin No. IX1 The frequency of the following preventive maintenance procedure is Maintenance Point based on a 8 hour daily production shift or 40 hour work week. Check moisture trap and drain as needed. In normal operation, you should never notice any accumulation of water in the moisture trap.
- Page 78 PREVENTIVE MAINTENANCE PROCEDURE CHALLENGER Series II Bulletin No. IX1 Procedure Information (Cont.) 4. Remove moisture trap reservoir by pushing up while turn- ing the reservoir bowl 1/4 turn to the left, then pull straight down. Inspect the inside of the reservoir for indications of standing water or excessive moisture.
- Page 79 PREVENTIVE MAINTENANCE PROCEDURE CHALLENGER Series II Bulletin No. IX2 The frequency of the following preventive maintenance procedure is Maintenance Point based on a 8 hour daily production shift or 40 hour work week. Lubricate indexer assembly bearing using Permatex Super Lube with Teflon. (M&R Part No. 7018031) Frequency Interval Every Day Procedure Information...
- Page 80 PREVENTIVE MAINTENANCE PROCEDURE CHALLENGER Series II Bulletin No. IX2 Procedure Information (Cont.) 4. Using the grease gun, apply Super Lube with Teflon grease to the index drive assembly bearing. Two to three pumps of the grease gun should be all that is required. (See illustration at right) 5.
- Page 81 PREVENTIVE MAINTENANCE PROCEDURE CHALLENGER Series II Bulletin No. IX3 The frequency of the following preventive maintenance procedure is based on a 8 hour daily production shift or 40 hour work week. Maintenance Point Check (Vactra) oil level and inspect index drive screw lubrication system for proper operation. Frequency Interval Every Day Procedure Information...
- Page 82 PREVENTIVE MAINTENANCE PROCEDURE CHALLENGER Series II Bulletin No. IX3 Procedure Information (Cont.) 4. The reservoir for the Vactra oil is located on the upper por- tion of the indexer assembly between the unload and load stations. The lubricant is supplied to the index drive screw assembly by pneumatic pressurized feed through a small tube from the reservoir to the index screw drive assembly.
- Page 83 PREVENTIVE MAINTENANCE PROCEDURE CHALLENGER Series II Bulletin No. IX3 Procedure Information (Cont) 7. The frequency of lubrication may be adjusted through the use of the E 300 Operator Interface on the main control panel. Press the “OPTIONS” key. Now use the “ARROW DOWN”...
- Page 84 PREVENTIVE MAINTENANCE PROCEDURE CHALLENGER Series II NOTES: 081200MS...
- Page 85 PREVENTIVE MAINTENANCE PROCEDURE CHALLENGER Series II Bulletin No. IX4 The frequency of the following preventive maintenance procedure is based on a 8 hour daily production shift or 40 hour work week. Maintenance Point Check air line lubricator/moisture trap assembly oil level. Add 10 wt. non-detergent oil as needed. Oil should be added whenever the graduated sight glass indicator displays a half full indication.
- Page 86 PREVENTIVE MAINTENANCE PROCEDURE CHALLENGER Series II Bulletin No. IX4 Procedure Information (Cont.) 4. Check the current oil level on the glass indicator. If the oil level indicated is less than half full, you will need to add oil. Oil Fill Plug Half full at this point 5.
- Page 87 PREVENTIVE MAINTENANCE PROCEDURE CHALLENGER Series II Bulletin No. IX5 The frequency of the following preventive maintenance procedure is based on a 8 hour daily production shift or 40 hour work week. Maintenance Point The air line lubricator automatically dispenses 10 wt. non-detergent oil into the compressed air used to operate the system.
- Page 88 PREVENTIVE MAINTENANCE PROCEDURE CHALLENGER Series II NOTES: 081200MS...
- Page 89 PREVENTIVE MAINTENANCE PROCEDURE CHALLENGER Series II Bulletin No. IX6 The frequency of the following preventive maintenance procedure is based on a 8 hour daily production shift or 40 hour work week. Maintenance Point Lubricate the center index shaft bearings using white lithium grease M&R Part No. 7018017. Frequency Interval Every 16 hours of operation Procedure Information...
- Page 90 PREVENTIVE MAINTENANCE PROCEDURE CHALLENGER Series II Bulletin No. IX4 Procedure Information (Cont.) 4. Apply white lithium grease until you notice the grease Zerk grease fittings breaking between the bearing race and the center shaft. Two or three pumps of the grease gun should be all that is required for proper lubrication of the index bearings.
- Page 91 PREVENTIVE MAINTENANCE PROCEDURE CHALLENGER Series II Bulletin No. PH2 The frequency of the following preventive maintenance procedure is based on a 8 hour daily production shift or 40 hour work week. Maintenance Point (Pneumatic) Clean away old lubricant and apply a fresh coat of 1/3 white lithium grease (M&R Part No. 7018017) and 2/3 non- detergent oil (M&R Part No.
- Page 92 PREVENTIVE MAINTENANCE PROCEDURE CHALLENGER Series II Bulletin No. PH2 Procedure Information (Cont.) Pneumatic Print Stations Only 4. Using a suitable wiper or cloth shop towel, remove old grease from the print carriage guide shafts on each print sta- tion. Using a small painters brush, apply a blend of 1/3 white lithium grease with 2/3 10 wt.
- Page 93 PREVENTIVE MAINTENANCE PROCEDURE CHALLENGER Series II Bulletin No. PH3 The frequency of the following preventive maintenance procedure is based on a 8 hour daily production shift or 40 hour work week. Maintenance Point (AC Drive Print Stations Only) Lubricate the print carriage assembly linear bearing using Permatex Super lube with Teflon (M&R Part No. 7018031) Frequency Interval Weekly Procedure Information...
- Page 94 PREVENTIVE MAINTENANCE PROCEDURE CHALLENGER Series II Bulletin No. PH3 Procedure Information (Cont.) 4. Using a standard pump action grease gun, apply 3 or 4 applications of Permatex Super Lube to the zerk grease fit- ting located between the print carriage squeegee and flood pressure air cylinders.
- Page 95 PREVENTIVE MAINTENANCE PROCEDURE CHALLENGER Series II Bulletin No. IX7 The frequency of the following preventive maintenance procedure is Maintenance Point based on a 8 hour daily production shift or 40 hour work week. Lubricate the lower carousel plate with white lithium grease (M&R Part No. 7018017) at the point where the index table lift cylinder pistons make contact with the plate.
- Page 96 PREVENTIVE MAINTENANCE PROCEDURE CHALLENGER Series II Bulletin No. IX7 Procedure Information (Cont.) 4. Using a suitable wiper or cloth shop towel, clean away the old grease from the bottom surface of the lower carousel plate. Use a small painters brush to apply white lithium grease around the bottom of the lower carousel plate where the index lift pistons make contact with the plate.
- Page 97 PREVENTIVE MAINTENANCE PROCEDURE CHALLENGER Series II Bulletin No. PH4 The frequency of the following preventive maintenance procedure is based on a 8 hour daily production shift or 40 hour work week. Maintenance Point Clean away old grease, dirt or lint and apply a fresh coat of 10 wt. non-detergent oil (M&R Part No. 7017000) to the print carriage stroke cylinder (Tol-O-Matic band cylinder) on each print station.
- Page 98 PREVENTIVE MAINTENANCE PROCEDURE CHALLENGER Series II Bulletin No. PH4 Procedure Information (Cont.) 4. Using a suitable wiper of cloth shop towel remove the old oil from the outside surface of the print carriage stroke cylin- der on each print station. Using a cloth wiper, apply 10 wt. non-detergent oil along the length of each stroke cylinder.
- Page 99 PREVENTIVE MAINTENANCE PROCEDURE CHALLENGER Series II Bulletin No. PH5 The frequency of the following preventive maintenance procedure is based on a 8 hour daily production shift or 40 hour work week. Maintenance Point Clean away old grease dirt or lint and apply a fresh coat of white lithium grease (M&R Part No. 7018017) to the inside “U”...
- Page 100 PREVENTIVE MAINTENANCE PROCEDURE CHALLENGER Series II Bulletin No. PH5 Procedure Information (Cont.) 4. Using a suitable wiper of cloth shop towel remove the old grease from the inside surface of the “U” shaped index cap- ture fork clevis and outside race of the index cam follower bearings.
- Page 101 PREVENTIVE MAINTENANCE PROCEDURE CHALLENGER Series II Bulletin No. IX8 The frequency of the following preventive maintenance procedure is based on a 8 hour daily production shift or 40 hour work week. Maintenance Point Clean away old grease from the inside of the “U” shaped registration forks and each of the registration cam follower bearings on the index table.
- Page 102 PREVENTIVE MAINTENANCE PROCEDURE CHALLENGER Series II Bulletin No. IX8 Procedure Information (Cont.) 4. Using a suitable wiper or cloth rag, remove old grease from the inside “U” surface of the registration forks and out- side race of the registration cam follower bearings. Using a Apply white lithium grease here small painters brush, apply white lithium grease to the inside “U”...
- Page 103 PREVENTIVE MAINTENANCE PROCEDURE CHALLENGER Series II Bulletin No. PH6 The frequency of the following preventive maintenance procedure is based on a 8 hour daily production shift or 40 hour work week. Maintenance Point Lubricate the micro-registration threaded adjustment shafts on each print stations front and rear screen frame holder assembly.
- Page 104 PREVENTIVE MAINTENANCE PROCEDURE CHALLENGER Series II NOTES:...
- Page 105 PREVENTIVE MAINTENANCE PROCEDURE CHALLENGER Series II Bulletin No. IX9 The frequency of the following preventive maintenance procedure is based on a 8 hour daily production shift or 40 hour work week. Maintenance Point Drain accumulated water and moisture from your compressor receiver tank and the press air manifold located on the bottom of the indexer chassis.
- Page 106 PREVENTIVE MAINTENANCE PROCEDURE CHALLENGER Series II Bulletin No. IX9 Procedure Information (Cont.) 4. Using the wrench, remove the press manifold drain plug on the bottom of the indexer chassis and alternate manifold by turning counterclockwise. Allow any accumulated water and moisture to discharge from the manifold.If moisture is discovered in the press manifold, check your compressor and/or refrigerated air chiller unit.
- Page 107 PREVENTIVE MAINTENANCE PROCEDURE CHALLENGER Series II Bulletin No. IX10 The frequency of the following preventive maintenance procedure is based on a 8 hour daily production shift or 40 hour work week. Maintenance Point Replace air filter element in air line moisture trap assembly. Frequency Interval Every Six Months Procedure Information...
- Page 108 PREVENTIVE MAINTENANCE PROCEDURE CHALLENGER Series II Bulletin No. IX10 Procedure Information (Cont.) 4. Remove moisture trap reservoir assembly by pushing up while turning the reservoir 1/4 turn to the right (clockwise). Filter element 5. Remove the filter element keeper by turning to the left Filter element keeper (counterclockwise).
- Page 109 PREVENTIVE MAINTENANCE PROCEDURE CHALLENGER Series II Bulletin No. PH7 The frequency of the following preventive maintenance procedure is based on a 8 hour daily production shift or 40 hour work week. Maintenance Point (AC Print Stations Only) Check and adjust as required, the print carriage timing belt tension on each of the print stations. Frequency Interval Every Six Months Procedure Information...
- Page 110 PREVENTIVE MAINTENANCE PROCEDURE CHALLENGER Series II Bulletin No. PH7 Procedure Information (Cont.) 4. Using a 1/8” allen wrench, remove both the left and right dust covers by loosening the three 10-24 X 3/8” button head allen screws. 5. Using a 3/16” allen wrench, loosen the two 5/16”-18 X 3/4”...
- Page 111 PREVENTIVE MAINTENANCE PROCEDURE CHALLENGER Series II Bulletin No. PH7 Procedure Information (Cont.) 9. Open manual shut-off valve for compressed air supply to the equipment. The manual shut-off valve is open when the handle is aligned with the incoming compressed air supply line pipe or hose.
- Page 112 PREVENTIVE MAINTENANCE PROCEDURE CHALLENGER Series II NOTES:...
- Page 113 PREVENTIVE MAINTENANCE PROCEDURE CHALLENGER Series II Bulletin No. EL3 The frequency of the following preventive maintenance procedure is based on a 8 hour daily production shift or 40 hour work week. Maintenance Point The service life of the battery in the Mitshubishi PLC unit is three years. When the battery is nearly discharged the “ALARM”...
- Page 114 PREVENTIVE MAINTENANCE PROCEDURE CHALLENGER Series II NOTES: 081200MS...
- Page 115 PREVENTIVE MAINTENANCE PROCEDURE CHALLENGER Series II Bulletin No. EL4 The frequency of the following preventive maintenance procedure is based on a 8 hour daily production shift or 40 hour work week. Maintenance Point The service life of the battery in the Mitshubishi Servo Amplifier Unit is three years. Replace the battery (M&R Part No.
- Page 116 PREVENTIVE MAINTENANCE PROCEDURE CHALLENGER Series II NOTES:...
- Page 117 PREVENTIVE MAINTENANCE LOG CHALLENGER Series II The benefits of a regularly scheduled preventive maintenance program can never be over-estimated. Equipment which is properly maintained operates more efficiently, prolongs service life and reduces operating costs. A prop- erly managed preventive maintenance program will minimize downtime and its attendant costs before they occur. Documentation of preventive maintenance procedures performed on your equipment can prove an invaluable ref- erence in the future.
- Page 118 This page left blank intentionally 081200MS...
-
Page 119: Pallet Leveling Procedure
Leveling the Pallets LEVELING THE PALLETS: Fig. 3 1. Make sure the print station being used to level the pallets is level by placing a small magnetic level (Torpedo Level) on the chrome plated plate (See Fig. 1). Fig. 1 3. - Page 120 Leveling the Pallets After doing this, unplug the air line located on the back of NOTE: If your machine has the “Central - Off Contact the head (Tol-O-Matic Brass Cylinder Fitting). Use a brass Lever”, make sure it is set for the highest position, least fitting union with plug , to plug the air line.
- Page 121 Leveling the Pallets NOTES: 10. Now bring the pallet back up and move the head back and forward, (by hand), and adjust the base pallet frame so that surface of the pallet is one business card (.010") from the edge of the flood bar, throughout the length of the print stroke of the head.
- Page 122 Leveling the Pallets NOTES: M&R Printing Equipment, Inc. - Glen Ellyn, Illinois...
-
Page 123: Proximity Switch Location
Proximity Switch Location & Function INDEX TABLE UP PROXIMITY SWITCH - (Lift “ON” Prox) This proximity switch is mounted to a bracket located in the middle area of the indexer assembly. The function of this proximity switch is to signal the PLC that the index table has reached its fully raised, or print position. - Page 124 Proximity Switch Location & Function DOUBLE INDEX PROXIMITY SWITCH - The function of this proximity switch is to signal the PLC that the double index fork is “dis-engaged” from the index table. A small L.E.D. on the switch illuminates confirming switch operation and the position of the double index fork.
- Page 125 Proximity Switch Location & Function HOME PROXIMITY SWITCH - This proximity switch is used during the initial installation Home Proximity Switch and set-up of your M&R Challenger Series II press. The Home proximity switch is used in conjunction with the Index Servo Drive to “teach”...
-
Page 126: Index Lift Cylinder Cushion Adj
Proximity Switch Location & Function INDEX DRIVE PROXIMITY SWITCHES - Lower Limit/Reverse Snap Action Switch (“A”) “B” Home Position Proximity Switch (“B”) Upper Limit/Forward Snap Action Switch (“C”) “A” “C” Index Lift Cylinder Cushion Adjustments Adjustments for the deceleration or cushioning of the index table lift/lower cycle are provided on both of the index lift air cylinders. -
Page 127: Idec Relay Location
Idec Relay Identification Idec Relay Location & Function K1 (Quartz Lamps Relay 4 Pole 120 volts AC) - This relay is used to signal the optional Quartz Lamp Flash Cure Units to cycle up to the pre-selected output power setting for flashing of garments. K2 (Emergency Relay 4 Pole 120 volts AC) - This relay is used to confirm the closure of the red emergency stop push button located on the Operator’s control panel. - Page 128 Idec Relay Identification NOTES:...
- Page 129 E 300 Alarm Message Listing ALARM LIST FOR THE CHALLENGER SERIES II WITH THE MITSUBISHI PLC AND SERVO DRIVE, AND THEIR DEFINITIONS. EMERGENCY-PANEL. – This alarm will appear if the Emergency stop push button on the control panel is pushed “IN”. In order to clear the alarm, first the push button must be pulled “OUT” and then the Green reset push button must be pressed momentarily to clear the alarm.
- Page 130 E 300 Alarm Message Listing SRVO AMPLIFIER ALARM. - This alarm will appear if there is an error on the servo amplifier, you must check the read-out on the face of the servo amplifier to see which code is given, this way the source of the problem can be determined.
-
Page 131: Troubleshooting Procedure
Troubleshooting Procedure The following information is provided as a guide for troubleshooting in the event a problem may occur during the operation of your M&R Challenger Series II press. Should you have any questions regarding the installation, oper- ation or preventive maintenance procedures for this equipment, we strongly encourage you to contact our Equipment Service Department at 1 (630) 858-6101 during normal business hours, or our 24 hour Emergency Service hotline at 1 (630) 462-4715 in the evening, week ends or holidays. - Page 132 Troubleshooting Procedure PROBLEM PROBABLE CAUSE/SOLUTION (Cont.) 4. Index “ON” proximity switch has failed or is mis-adjusted. Check to see if the small Electrical power is indicated to con- L.E.D. on the side of the proximity switch illuminates when the index cam follower trols, but nothing operates.
- Page 133 Troubleshooting Procedure PROBLEM PROBABLE CAUSE/SOLUTION Indexer shudders or is excessively 1. The main index shaft bearings require lubrication. Lubricate the index shaft bearing noisy when cycling up or down. with white lithium grease. There are two zerk grease fittings provided on the center index shaft for this purpose.
- Page 134 Troubleshooting Procedure PROBLEM PROBABLE CAUSE/SOLUTION In the automatic mode the press 1.The center proximity switch is loose or not making contact. Push the Emergency stop cycles a few times and then stops. push button. Check to see if the proximity switch mounted to the underside of the print station support arm is loose.
-
Page 135: Kebco Frequency Drive
Kebco Frequency Drive Power Supply Terminal Control Card Terminal Motor, brake resistor Terminal M&R Printing Equipment, Inc. - Glen Ellyn, Illinois... - Page 136 Kebco Frequency Drive 5 Digit LED display Interface control BUS-Operation “LED on” Operating/Error display Normal “LED on” Error “LED blinks” Double function keyboard M&R Printing Equipment, Inc. - Glen Ellyn, Illinois...
-
Page 137: Recommended Spare Parts
Kebco Frequency Drive Error List KEB Combivert error messages are always represented with an “E” and the appropriate error in the display. Error messages cause the immediate deactivation of the modulation. Restart is possible only after reset. Malfunctions are represented with an “A” and the appropriate message. Reactions to malfunction can vary. Status Messages have no addition. - Page 138 Kebco Frequency Drive Error List Display Plaintext Combivis Value Meaning E.nEd no ERROR detected no defined error recognized (should not occur) E.ndOH no ERROR drive overheat no longer overtemperature of motor PTC, PTC is again low resistance. E.PU ERROR power unit Error: General power circuit fault.
-
Page 139: Replacement Parts
Kebco Frequency Drive Error List Display Plaintext Combivis Value Meaning E.SET ERROR set Error: Set selection: It has been attempted to select a locked parameter set. E.PRF ERROR prot. rot. for. Error: Locked direction of rotation clockwise. E.PRR ERROR prot. rot. rev. Error: Locked direction of rotation counter-clockwise E. - Page 140 Kebco Frequency Drive Error List Display Plaintext Combivis Value Meaning hardware current limit Hardware current limit active search for ref. active Search for reference point approach active calculate drive Measurement of the motor stator resistance POSI positioning Positioning function active low speed/power off No direction of rotation after Power-Off brake on...
-
Page 141: Servo Amplifier Alarm List
Servo Amplifier Alarm List Alarms and Warning Listing: When a fault occurs during operation, the corresponding alarm or warning is displayed. The alarms marked “O” in the alarm deactivation column can be deactivated by the corresponding operations. Alarm deactivation Display Name Power Error reset... - Page 142 Servo Amplifier Alarm List This page left blank intentionally M&R Printing Equipment, Inc. - Glen Ellyn, Illinois...
- Page 143 Recommended Spare Replacement Parts QUANTITY M&R PART No. DESCRIPTION 2010034 Stroke Valve (Pneumatic Heads Only) 2011000 Chopper Valve 2009023 Air Cylinder (Air Locks) 2009118 Air Clamps 9150003 Chopper Cylinders 2009303 Stroke Cylinder (Pneumatic Heads Only) 8080252A Clevis 3023064 Cam Follower 1004026 Fuse 30 Amp (FLNR 30) 1004024...
- Page 144 Trouble Shooting Procedure NOTES:...
- Page 145 Ordering Replacement Parts As your equipment supplier, M&R Printing Equipment, Inc. and our subsidiaries, NuArc Company and Amscomatic, Inc. are committed to your satisfaction. We will do whatever it takes to provide you with the exact replacement part you need, when you need it. In the event an exact replacement part is no longer available due to discontinuance, manufacturer component modification or other factors beyond our con- trol, we will provide you with an alternate part which meets, or exceeds, the original part specifications for application and performance.
- Page 146 Worldwide Technical Support M&R Printing Equipment, Inc. Amscomatic, Inc. NuArc Company, Inc. 1 N. 372 Main Street 6200 Howard Street 6200 Howard Street Glen Ellyn, Illinois 60137 U.S.A. Niles, Illinois 60714-3400 U.S.A. Niles, Illinois 60714-3400 U.S.A. 1 (800) 736-6431 1 (800) 241-1899 1 (800) 962-8883 International Phone &...
- Page 147 Replacement Parts Operator Control Console Part Description Part Number Push Button Switch 1017159 Toggle Switch 1017157 Toggle Switch 1017158 Toggle Switch 1010007 Emergency Stop Push Button 1010040 E-300 Operator Interface 1017295 Reset Push Button 1010001 Toggle Switch 1010007 Toggle Switch 1010011 M&R Printing Equipment, Inc.
- Page 148 Replacement Parts Indexer Electrical Enclosure Part Name Part Number Servo Amplifier MR-J2S-350-B 1017483 Power Supply 24 vdc 1024059 Siemens Safety Relay 1017422 Idec Relay 1011079 Idec Relay 1011079 Mitshubishi Power Supply Module 1017043 DC Module A1SX42-UL 1017044 Output Module A1SY10 1017073 Output Module A1SY10 1017073...
- Page 149 Replacement Parts Indexer Electrical Enclosure Part Name Part Number Output Module A1SY10 1017073 Output Module A1SY10 1017073 Mitshubishi Ext. Base 1017233 Contactor 1011516 Axial Fan 1009004 M&R Printing Equipment, Inc. - Glen Ellyn, Illinois...
- Page 150 Replacement Parts Indexer Electrical Enclosure Fuses Part Name Part Number Idec Relay Plug Base 1010208 Fuse 7 Amp FLNR 7 (F8) 1004028 Fuse 1/4 Amp FLNR 1/4 (F6) 1004020 Fuse 1/4 Amp FLNR 1/4 (F7) 1004020 Fuse 3 Amp FLNR 3 (F4) 1004024 Fuse 3 Amp FLNR 3 (F5) 1004024...
- Page 151 Replacement Parts Indexer Electrical Enclosure Fuses Part Name Part Number Fuse 7 Amp FLNR 7 (F8) 1004028 Fuse 1/4 Amp FLNR 1/4 (F6) 1004020 Fuse 1/4 Amp FLNR 1/4 (F7) 1004020 Fuse 3 Amp FLNR 3 (F4) 1004024 Fuse 3 Amp FLNR 3 (F5) 1004024 Fuse 30 Amp FLNR 30...
- Page 152 Replacement Parts AC PRINT STATION DRIVE CONTROL Part Name Part Number Fuse 30 Amp FLNR 30 (F13) 1004026 Fuse 30 Amp FLNR 30 (F14) 1004026 Fuse 25 Amp FLNR 25 (F1) 1004036 Fuse 25 Amp FLNR 25 (F2) 1004036 Fuse 25 Amp FLNR 25 (F3) 1004036 Contactor...
- Page 155 (A.C. HEAD) FRONT FRAME HOLDER/MICRO ASSEMBLY ® M&R PRINTING EQUIPMENT, INC. www.mrprint.com EAD_CH2_18_AC_FFHMA PAGE 1A If you are ordering parts, please include your machine serial number, model number, and any identification numbers stamped or printed on the part you wish to replace, since the drawings you view may not be an exact match for your product.
- Page 157 THREADED ROD 3/4"-16 X 4.75" 9150005-15 HEX CAP SCREW 3/8"-24 X 1 1/4" 3054031 SCREEN FRAME LOCKING BAR 9153315 SOCKET CAP SCREW 8-32 X 3/4" 3009032 CUP WASHER 8010005 KEY LOCKING INSERT 3013106 FRONT AIR LOCK SCREEN HOLDER 9153314 FRONT SCREEN HOLDER KNOB 9362098 CYLINDER, AIR LOCK 2009023...
- Page 158 BUTTON SOCKET CAP SCREW 6-32 X 3/8" 3001016 CABLE CLIP 9150128 ITEM NO. DESCRIPTION PART NO. CHALLENGER II 18 COLOR (A.C. HEAD) FRONT FRAME HOLDER/MICRO ASSEMBLY Page 1C...
- Page 161 SHOULDER BOLT 1/2" X 5/8" (LEFT SIDE) 3006064 9150017 LOCK CLAMP SPACER PLATE DE-STA-CO CLAMP 3033087 SPLIT LOCK WASHER ZP 1/4" 3022001 BUTTON SOCKET CAP SCREW 1/4"-20 X 1" 3001004 SHOULDER BOLT 1/2" X 1-1/4" (RIGHT SIDE) 3006065 THREADED ROD 3/8"-24 X 3-1/2" 9151846 THREADED ROD 3/8"-24 X 3"...
- Page 165 CUP WASHER 8010005 FRONT LOCKING BAR 9159052 2003031 FITTING, MALE SWIVEL ELBOW 10-32 SOCKET CAP SCREW 8-32 X 5/8" 3009051 FRONT SCREEN HOLDER 9159051 KEY LOCKING INSERT 3013106 SCREEN HOLDER KNOB ASSEMBLY 8090144 DOUBLE ACTING AIR CYLINDER 2009023B 3021005 SAE WASHER 3/4" HEX JAM NUT ZP 3/4"-16 3013031 THREADED ROD 3/4"-16 X 4-3/4"...
- Page 169 HEAD SUPPORT FRAME (JUMBO) 9150085 SOCKET CAP SCREW 1/4"-20 X 5/8" 3009047 DOWEL PIN 1/4" X 1" 3014001 DE-STA-CO CLAMP 3033087 SOCKET CAP SCREW 5/16"-18 X 1" 3009003 SOCKET CAP SCREW 10-24 X 1/2" 3009024 IDLER SHAFT CLAMP 9150939 IDLER ROLLER 9150907 BALL BEARING, BOSTON 3023097...
- Page 170 3009022 SOCKET CAP SCREW 1/4"-20 X 3/4" LEVELING FOOT VALVE GUIDE 5/8" 3037001 FIN. HEX NUT ZP 5/8"-11 3013016 PERIMETER RAIL 9130088 FRONT END PLATE 9150909 ITEM NO. DESCRIPTION PART NO. CHALLENGER II 18 COLOR (A.C. HEAD) HEAD TUBE ASSEMBLY Page 7...
- Page 173 FITTING, MALE SWIVEL ELBOW 10-32 2003031 SWITCH, PUSH BUTTON 1010006 POTENTIOMETER 1029020 HEAD CONTROL PLATE 9150928 FITTING, MALE CONNECTOR 10-32 NPT 2003023 AIR SWITCH, 4 WAY 2018011 KNOB 3033006 BUTTON SOCKET CAP SCREW 1/4"-20 X 1/2" 3001005 ITEM NO. DESCRIPTION PART NO.
- Page 177 TRANSMISSION COVER BASE 9150930 3024038 EXTERNAL RETAINING RING 3/4" HTD SPROCKET 5mm PITCH 3041270A BUSHING 3/4" 2004032 TRANSMISSION COVER 9150932 BUTTON SOCKET CAP SCREW 5/16"-18 X 3/4" 3001046 BUTTON SOCKET SCREW 10-24 X 1/4" 3001021 SAE WASHER ZP 1/4" 3021015 BELT, 5mm PITCH 15mm WIDE 3040261 FRONT MICRO BUSHING...
- Page 181 CARRIAGE AIR CABLE BUSHING 9151113 LINEAR CARRIAGE BEARING 3030113 BUTTON SOCKET CAP SCREW 10-24 X 1/2" 3001013 SOCKET CAP SCREW 5/16"-24 X 1" 3009085 SQUEEGEE MOUNTING BAR 9362169 WROUGHT FLAT WASHER ZP 5/16" 3020007 KIPP ELISA MALE HANDLE 5/16"-18 3032009 AIR LOCK SPACER 9151047 SQUEEGEE/FLOOD BAR AIR CLAMP...
- Page 185 ENERGY CHAIN MOUNTING BRACKETS 1017430 ENERGY CHAIN 1017431 PROX. SLIDE 9150925 BUTTON SOCKET CAP SCREW 8-32 X 3/8" 3001031 7001108 GROMMET, RUBBER HEAD PROX. MOUNTING BRACKET (FRONT) 9155692 HEAD PROX. MOUNTING BRACKET (REAR) 9155693 PROX. SWITCH 4-WIRE 1010082D 90° PLUG, PROX. 1038106 RULER 38"...
- Page 189 MALE HANDLE 5/16"-18 3032045 SHOULDER SCREW SPACER 9362579 SHOULDER BOLT 3/8" X 1-3/4" 3006008 SOCKET CAP SCREW 8-32 X 5/8" 3009051 REAR LOCKING BAR 9159055 CUP WASHER 8010005 REAR SCREEN HOLDER 9159053 FITTING, MALE SWIVEL ELBOW 10-32 2003031 DOUBLE ACTING AIR CYLINDER 2009023B KEY LOCKING INSERT 3013106...
- Page 193 ADJUSTABLE TRIGGER LOCK 3060000 DRIVE COVER 9150375 WROUGHT FLAT WASHER 1-1/4" 3020034 FIN HEX NUT 1-1/4"-12 GRADE 8 3013052 LEVELING BOLT BASE 9362221 LEVELING BOLT 9362220 SIDE COVER (SPECIFY LEFT OR RIGHT WHEN ORDERING) 9150376 FIN HEX NUT ZP 1/2"-13 (NOT SHOWN) 3013027 WROUGHT FLAT WASHER 1/2"...
- Page 197 ELASTIC STOP NUT ZP 1/4"-20 3012000 8051242 OFF-CONTACT SLIDES HEX HEAD BOLT 1/4"-20 X 1" 3008001 SPACER BRACKET 9150366 LIFT CYLINDER EXTENSION 9150362 LIFT COMPRESSION SPRING 9150361 OFF-CONTACT DOWN PLATE 9150363 OFF-CONTACT DOWN PLATE #1 8051232 OFF-CONTACT LOCK 9150364 STEEL BALL BEARING Ø3/8" 3023104 OFF-CONTACT REGULATOR 8051244...
- Page 199 UPPER/LOWER CAROUSEL ASSEMBLY ® M&R PRINTING EQUIPMENT, INC. www.mrprint.com EAD_CH2_18_ULCA PAGE 22 If you are ordering parts, please include your machine serial number, model number, and any identification numbers stamped or printed on the part you wish to replace, since the drawings you view may not be an exact match for your product.
- Page 201 CAM FOLLOWER 1-1/2" 3023012 LOWER CAROUSEL 9130010 ROUND PROX. SWITCH CABLE 1010224 ROUND PROX. SWITCH 1010223 3001003 BUTTON SOCKET CAP SCREW 10-24 X 3/8" LIFT PROX. MOUNTING BRACKET 9130043 FIN HEX JAM NUT ZP 3/8"-16 3013014 CAM FOLLOWER 1-1/2" 3023012A SOCKET CAP SCREW 3/8"-16 X 2"...
- Page 205 WROUGHT FLAT WASHER ZP 1/2" 3020004 SPLIT LOCK WASHER 1/2" ZP 3022000 HEX HEAD BOLT 1/2"-13 X 2-3/4" 3008021 PALLET STOP MOUNTING BAR 9130053 SOCKET CAP SCREW 1/4"-20 X 3/4" 3009022 PALLET STOP FRONT GUIDE 9151137 PALLET STOP REAR GUIDE 9151138 PALLET STOP 9151136...
- Page 209 BOLT FL WHIZ-LOCK 3/8"-16 X 1" 3003000 SPIDER ARM RING 9369301 WROUGHT FLAT WASHER 3/8" ZP 3020010 FIN HEX JAM NUT ZP 3/8"-24 3013015 BUTTON SOCKET CAP SCREW 3/8"-24 X 1-1/2" 3001078 ELASTIC STOP NUT ZP 5/16"-18 3012001 WROUGHT FLAT WASHER 5/16" ZP 3020007 HEX HEAD BOLT 5/16"-18 X 1-3/4"...
- Page 213 1010224 ROUND PROX. SWITCH CABLE ROUND PROX. SWITCH 1010223 BUTTON SOCKET CAP SCREW 1/4"-20 X 1/2" 3001005 DOUBLE INDEX FORK BRACKET 9151145 SOCKET CAP SCREW 10-24 X 3/4" 3009052 9151167 WASHER DOUBLE INDEX BASE 9151141 BEARING 3/8" X 1/2" X 1/2" 3023170 SHOULDER BOLT 3/8"...
- Page 217 PULL HANDLE 3033046 WROUGHT FLAT WASHER 5/16" ZP 3020007 FIN HEX NUT ZP 5/16"-18 3013010 SPLIT LOCK WASHER ZP 5/16" 3022003 SOCKET CAP SCREW 5/16"-18 X 1" 3009003 TOWER LIGHT, 3 COLOR (OPTIONAL) 1013062 TOWER LIGHT 1013042 MALE KNOB 5/16"-18 3032002 CONTROL BOX HANGER 9150460...
- Page 221 PROX. SWITCH, ROUND 1010223 ROUND HEAD MACHINE SCREW 6-32 X 3/8" 3005007 INDEX CLEVIS 8121252C SOCKET CAP SCREW 1/4"-20 X 1 1/2" 3009017 FITTING, MALE ELBOW 1/8 NPT 2003005 FORK CLEVIS CYLINDER 2009016 INDEX PROX. BRACKET 9154184 WROUGHT FLAT WASHER ZP 1/4" 3020005 3009022 SOCKET CAP SCREW 1/4"-20 X 3/4"...
- Page 225 SOCKET CAP SCREW 1/2"-13 X 1" 3009058 MOTOR MOUNTING BRACKET 9150076 LOCKING NUT 3013143 SOCKET CAP SCREW 3/8"-16 X 1" 3009000 BEARING FLANGE 9105252 SINGLE ROW ANG. CONTACT BALL BEARING 3023089 OIL SEAL 3023088 DISTANCE BUSHING 9105258 BUTTON SOCKET CAP SCREW 1/4"-20 X 1/2" 3001005 BEARING BLOCK, LEFT 9150433...
- Page 226 SOCKET CAP SCREW 1/2"-13 X 2" 3009015 SOCKET CAP SCREW 1/2"-13 X 1 1/4" 3009013 HEX NUT 1/2"-13 3013027 SERVO MOTOR 1008422 MOTOR COUPLING 2007069 KEY STOCK 10 X 8mm 6201033 ITEM NO. DESCRIPTION PART NO. CHALLENGER II 18 COLOR DRIVE MOTOR/BALL SCREW ASSEMBLY Page 36...
- Page 229 3014040 DOWEL PIN Ø3/8" X 1" SOCKET CAP SCREW 1/4"-20 X 3/4" 3009022 WROUGHT FLAT WASHER ZP 3/8" 3020010 TAP BOLT 3/8"-16 X 4" 3054019 FITTING, MALE CONNECTOR 1/8 NPT, Ø5/32 TUBE 2003000 FITTING, ELBOW 1/8 NPT, M6 X .75 2005104 OIL SPLASH SHIELD 9150407...
- Page 233 3012007 ELASTIC STOP NUT 6-32 3009017 SOCKET CAP SCREW 1/4"-20 X 1 1/2" MAC VALVE, 3-WAY 2012050 ELASTIC STOP NUT 1/4"-20 3012000 AIR TWO INJECTOR PUMP 2007084 BUTTON SOCKET CAP SCREW 1/4"-20 X 1/2" 3001005 FITTING, MALE CONNECTOR 1/8 NPT 2003000 FITTING, MALE SWIVEL ELBOW 1/8 NPT 2003010...
- Page 235 Glossary: active size - The speed at which the servo index drive will make the machine carousel turn, determined by the pallet size selected. adjuster - The mechanism used to change, so as to adjust speed, height, distance and etc. adjustment knob - A knob/handle provided with threads which is used to make changes to speed, height, dis- tance etc.
- Page 236 exposure unit master frame The assembly used to secure the screen during the exposure time. flash mode The condition in which a print station (or print stations) will operate as a flash cure station. flash panel The infra-red panel, powered by electricity, used to create heat to cure inks on a garment. film register pin bar A flat metal strip with three (3) machined dowel pins used to secure pre-punched plas- tic carrier sheets for the placing of film positives or art work.
- Page 237 latch clamp The mechanical device used to join the front screen holder assembly against the head front end plate. L.C.D. The liquid crystal display. locking cam A machined cam milled in such a fashion as to lock two mechanical surfaces against one anoth- er when turned in a specific direction.
- Page 238 press manifold The holding tank under the machine, which will store compressed air, available for the machine to use. prime position The ideal location of placement of different components so that maximum adjustment can be achieved. print finish The function of the machine that will allow the press operator to sequentially shut off the print heads as the last garment gets printed.
- Page 239 squeegee blade The flat thin structural member made of a rubber-like material, used to push the ink through the screen. squeegee pressure The amount of force placed on the squeegee blade to push ink though the screen. stop blocks A solid piece of metal having one or more flat sides, which will be used to determine the place- ment of the screen.
- Page 241 LIMITED WARRANTY M&R TEXTILE EQUIPMENT Textile screen printing equipment manufactured by M&R Printing Equipment, Inc. (“M&R”) is warranted against defects in workmanship and materials provided that it is properly maintained and operated under normal use for a period of two years from the date of shipment.
Need help?
Do you have a question about the CHALLENGER II Series and is the answer not in the manual?
Questions and answers