RF Mogul Eagle Instructions
Hide thumbs
Also See for Eagle:
- Owner's manual (33 pages) ,
- Manual (17 pages) ,
- Operation manual (14 pages)
Table of Contents
Advertisement
Quick Links
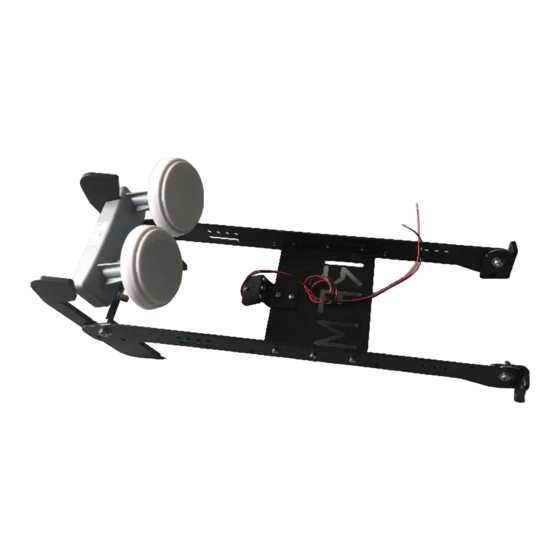
Box Should include:
LNB Arm Assembled with LNB, LED
and Stow Feet
Two (2) Scotch Locks
Two (2) Zip Ties
Four (4) ¼ by 20 Phillips Head Bolts
Four (4) ¼ by 20 Washers
USB Thumb Drive with controller software
Assembly Instructions
1. Elevate your antenna to straight up position.
-Elevating Antenna-
To elevate your antenna, Turn on the
controller on by pushing the
POWER
button. Get into the MENU
OPTIONS by pressing the
again.
From the MENU on your
controller: Push the
times to OPTION #3 MOVE
ELEVATION. Push the RED POWER
button 1 time to enter MOVE
ELEVATION OPTION.
Then press and hold the
the antenna completely raises into full
upright position as shown in the picture on
the right.
2. Unplug your controller before working on the antenna. Pull the 12V barrel jack out of the backside of the
controller. The PS LED on the front should turn OFF.
3. Unplug your satellite receiver. The LNB LED should turn OFF.
1
Eagle LNB ARM Swap Instructions
RED
RED POWER
GREEN
button
2
green
button until
Advertisement
Table of Contents

Subscribe to Our Youtube Channel
Related Manuals for RF Mogul Eagle


Summary of Contents for RF Mogul Eagle
- Page 1 Eagle LNB ARM Swap Instructions Box Should include: LNB Arm Assembled with LNB, LED and Stow Feet Two (2) Scotch Locks Two (2) Zip Ties Four (4) ¼ by 20 Phillips Head Bolts Four (4) ¼ by 20 Washers ...
- Page 2 4. Cut the BLACK and RED wires for LED power near the scotch lock. 5. Loosen and remove the coax cables from the LNB 6. Loosen and remove the four (4) bolts that hold the feed arm on the reflector. Set old feed arm aside. 7.
- Page 3 8. Connect the coax connector to the new LNB. When looking at the LNB (white plastic circles) port one (1) is on the far LEFT – if using a single coax place connector on this port. PORT 1 9. Splice the Black and Red wires using the Scotch-Lok connectors (red button). It is not necessary to strip the wires.
- Page 4 13. Plug your RF Mogul antenna controller and receiver back in. The LNB and PS LEDs should both be illuminated. 14. Power the RF Mogul antenna controller back ON and insert the USB JUMP Drive that has the RF Mogul antenna controller software loaded on it. The LCD display should change and show that the software is downloading.
Need help?
Do you have a question about the Eagle and is the answer not in the manual?
Questions and answers