Advertisement
Quick Links
Advertisement

Related Manuals for RF Mogul RFM 960


Summary of Contents for RF Mogul RFM 960
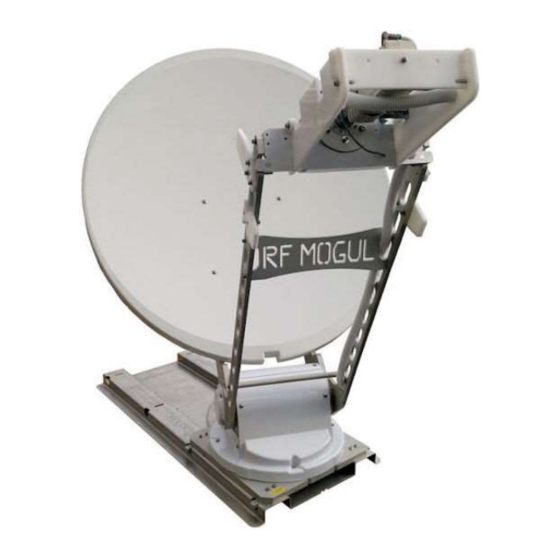
- Page 1 RFM 960/1200 OPERATION MANUAL...
- Page 2 NOTES: P a g e R F M O G U L 3 6 0 4 V i a T e r r a S t S a l t L a k e C i t y , U T 8 4 1 1 5 R e v 5 / 2 0 S a l e s : 8 0 1 - 8 9 5 - 3 3 9 2 s a l e s @ r f m o g u l .
-
Page 3: Specifications
SPECIFICATIONS Mechanical RFM 960 RFM 1200 Reflector 96cm Skyware 1.2M Prodelin Band Tx Gain 41.3 dBi 43.2 dBi Rx Gain 39.8 dBi 41.7 dBi Elevation 0-80° 0-80° Stowed Height 14.5” 14.5” Stowed Length 56” 70” Stowed Width 39.4” 48.6” Deployed Height (Max) 55”... - Page 4 P a g e R F M O G U L 3 6 0 4 V i a T e r r a S t S a l t L a k e C i t y , U T 8 4 1 1 5 R e v 5 / 2 0 S a l e s : 8 0 1 - 8 9 5 - 3 3 9 2 s a l e s @ r f m o g u l .
- Page 5 PACKAGING Remove 14 wood screws with flat washers around the base of the cardboard box that is attached to the wood pallet. The cardboard box will lift up and off of the Pallet. The system ships with 2 boxes. Inside the RFM Mount Box is the Mount Assembly (1.2M or 96CM), the Mounting Pan (secured to the Pallet), the Feed Glide Plate, 30’...
- Page 6 MOUNT HANDLING This Mount Assembly has multiple PINCH and CUT points that during installation and operation can result in severe injuries. There are hinging and moving parts that move during installation that can fall due to gravity. Become familiar with the antenna before installation and ensure that everyone working around this antenna is aware and alert of the dangers associated during installation and operation! P a g e...
-
Page 7: Installation
INSTALLATION It is not necessary to raise the Dish Arms when securing the Dish Mount to the Vehicle or Trailer. The Mounting Plate comes with pre-drilled holes and slots for convenience. It is OK to drill other holes in the mounting plate for installation. The Dish Mount includes a Feed Stow Plate that can be placed in an ideal position to allow for the Feed Assembly to touch and slide on the roof surface. - Page 8 Use a Lap Sealant (Dicor 501LSG or Equiv) to help secure the Mounting Pan to the Roof. Using a Lap Sealant (Dicor 501LSG or Equiv.) will add additional bonding to the vehicle surface. Running a bead of this sealant lengthwise along the bottom edges of the mounting plate and 2 beads through the center lengths of the plate is recommended when possible.
- Page 9 Wiring (Dish Mount Connector Box) Note: Before Installing the Dish Reflector (parabolic antenna) to the Antenna Mount it will be easier to complete the system Wiring. Prewiring the Antenna will allow you to raise the Dish Arms to make installation of the Dish easier. The RF (Coax) cabling is wired from the Feed Assembly to the Connector Box located on the Base Mounting Plate.
- Page 10 Antenna Control Cable wiring for the 12 POS Euro Style Connector 12 - Tan – GPS RX Data In 11 - Pink – 15 to 18 VDC out to GPS 10 - White – GPS and Counter Input Common (Ground) 9 - Gray –...
- Page 11 With Basic wiring complete you can use the DataSAT ACU-2 Antenna Controller to manually move the Antenna Elevation into a raised position to Install the Dish Reflector. Use the Menu, Search (Up) and Stow (Down) buttons on the front panel to access Move EL functions. The Up Button will raise the Antenna manually when in the correct mode.
- Page 12 Installing the Dish Reflector (Antenna) If you choose to install the Dish Reflector before completing the system wiring it is still easier to use the supplied 30’ Antenna Control Cable that comes attached to the Dish Mount to manually raise the Dish Arms using a tool Battery or the supplied 24 Volt DC Power Supply.
- Page 13 Follow the photo illustrations below to attach the Dish to the Mount. Use a Lube Gel to hold the 4 Square nuts into the Slots in the Dish Arms. Also put some lube gel on the 4 Dish Bolts. Do not use electric drill to screw bolts into square nuts. Stainless Steel bolts will seize up. 4 Each Flat Washer 5/16”...
- Page 14 With the Dish Reflector properly attached to the Antenna Mount and all procedures above completed the system is ready for final wiring inside the Vehicle and system testing. Use the DataSAT ACU-2 Controller Wiring-Configuration-Operation Manual to complete the installation. After completion of system wiring before moving the Antenna automatically, one technician should remain outside with a clear view of the Antenna and watch the Antenna Mount perform a Dish Calibration.
- Page 15 SD Card located on the rear of the controller and modify several configuration files. This type of configuration is risky and could corrupt other files used in normal operation. Please contact RF Mogul if this type of setup is necessary. 14 |...
- Page 16 Turn on the ACU-2 Controller Power (Rocker Switch – illuminated) located on the front right side of the controller. The LCD display should power on as shown below. Open a Web Browser. Enter the Controller IP Address. The default is 192.168.1.250. If you cannot access the Antenna Controller using this IP Address you can find the current IP Address using the Menu Functions from the Front Panel.
- Page 17 This is the Main Page which will allow you to access a full Satellite Table in both Horizontal and Vertical receive fields, manually move the antenna in all 3 axis (Elevation, Azimuth, and Skew (polarity), check certain Modem Status configurations (Hughes and iDirect), and to Configuration files that allow set up of Modem, LNB, and Network settings.
- Page 18 For typical setup, you might modify IP Address and the Default Gateway and Subnet Mask. If you have several RF Mogul Systems, you can name each system by changing the Device Name. The Device Name will be viewable in the Top Frame of every HTML Page under the Satellite Antenna Controller.
- Page 19 IF LNB Volts gives a range of 12VDC to 24VDC, use the 18 V LNB Power option 22KHz Tone = Disabled DiSEqC = Disabled Enter LO Freq in MHz (example 10.75GHz = 10750 MHz) see above ...
- Page 20 When using an iDirect X5 Modem your Service Provider (ISP) will be able to provide you with the Modem Address, Username, and Password. You will also need to know the Receive Polarity. Enter this information into the fields above. It MUST be correct, or the Antenna Controller will not see the Modem.
- Page 21 Operation – HTML Move the mouse to the Search Arrow to begin Search. Select Search. A Search for the correct satellite will begin. The following screens will show a typical search progression (see red arrow). 20 | P a g e R F M O G U L 3 6 0 4 V i a T e r r a S t S a l t L a k e C i t y , U T 8 4 1 1 5 R e v 5 / 2 0 S a l e s : 8 0 1 - 8 9 5 - 3 3 9 2 s a l e s @ r f m o g u l .
- Page 22 Depending on Satellite Location, Search Type, and number of adjacent satellites a typical search will range from 4 to 7 minutes. If there are a lot of adjacent satellites that do not have identifiable carriers search time will increase. Try different search modes in Search Settings to see what is optimum for your system.
- Page 23 Operation – Front Panel Once the ACU-2 Antenna Controller has been wired and configured it can be operated from the Front Panel to Search (primary satellite only), Stow (place dish into travel mode), and through Menu functions manually move the Antenna, and test Antenna Sensors. ACU-2 Antenna Controller - Front Panel Search Stow LCD Display...
- Page 24 Once Search has completed the Antenna should be pointed and ready to use. If you are using a Satellite Modem with this system, there may be delays in use due to the Modem synchronizing with the Satellite NMC (network management center). Delay times for TX Lock will vary. If the ACU-2 HTML page does not come up, you can confirm the controller IP address by using the Front Panel Menu commands.
- Page 25 SKEW - POLARIZATION DEFINITIONS Disclaimer: Although every effort has been made to ensure that the information in this manual is correct and complete, no company shall be held liable for any errors or omissions in this manual. Changes and technological advances are continuously being made in the satellite antenna market. Information provided in this manual was accurate at the time of printing.
- Page 26 RF Mogul warrants this product against defects in materials or workmanship for a period of one (1) year from the date of original purchase. During year one (1) of such warranty, RF Mogul will also pay authorized labor costs to an authorized RF Mogul dealer to repair or replace defective components. No warranty...
- Page 27 It does not apply if the physical install of any RF Mogul Systems or components by a Technician that is an independent company not authorized by RF Mogul. The installer shall bear full responsibility for the entire installation process.
Need help?
Do you have a question about the RFM 960 and is the answer not in the manual?
Questions and answers