Lantronix SLC8 User Manual
Console manager
Hide thumbs
Also See for SLC8:
- Manager user manual (299 pages) ,
- User manual (287 pages) ,
- User manual (266 pages)

Related Manuals for Lantronix SLC8


Summary of Contents for Lantronix SLC8
- Page 1 SLC™ Console Manager User Guide SLC8 SLC16 SLC32 SLC48 Part Number 900-449 Revision J July 2014...
-
Page 2: Copyright And Trademark
Copyright and Trademark © 2014 Lantronix, Inc. All rights reserved. No part of the contents of this book may be transmitted or reproduced in any form or by any means without the written permission of Lantronix. Lantronix is a registered trademark of Lantronix, Inc. in the United States and other countries. -
Page 3: Revision History
Lantronix shall have no liability whatsoever to any user for any damages, losses and causes of action (whether in contract or in tort or otherwise) in connection with the user’s access or usage of any of the information or content contained herein. - Page 4 Date (continued) Rev. Comments January 2010 Added support for Interface and Batch Scripting, Ethernet Bonding, configurable LCD screens and scrolling, redesigned SLC Network web page, Email Log, Firmware Update vi PC Card and NFS, SLC Temperature, and PPP dialback (including CallBack Control Protocol). March 2010 Updated for USB support that was added in firmware 5.5.
-
Page 5: Table Of Contents
Table of Contents Copyright and Trademark ____________________________________________________ 2 Warranty _________________________________________________________________ 2 Open Source Software ______________________________________________________ 2 Contacts _________________________________________________________________ 2 Disclaimer and Revisions ____________________________________________________ 2 Revision History ___________________________________________________________ 3 List of Figures ____________________________________________________________ 14 List of Tables ____________________________________________________________ 18 1: About This Guide Chapter Summaries _______________________________________________________ 19 Conventions _____________________________________________________________ 21 Additional Documentation ___________________________________________________ 21... - Page 6 4: Quick Setup Recommendations ________________________________________________________ 34 IP Address _______________________________________________________________ 34 Method #1 Using the Front Panel Display _______________________________________ 35 Front Panel LCD Display and Keypads _____________________________________ 35 Navigating ____________________________________________________________ 36 Entering the Settings ___________________________________________________ 37 Restoring Factory Defaults _______________________________________________38 Method #2 Quick Setup on the Web Page ______________________________________ 38 Network Settings ______________________________________________________ 39 Date &...
- Page 7 NFS and SMB/CIFS _______________________________________________________ 75 SMB/CIFS Share ______________________________________________________ 76 NFS and SMB/CIFS Commands __________________________________________ 77 Secure Lantronix Network ___________________________________________________ 78 Secure Lantronix Network Commands ______________________________________ 80 Date and Time ____________________________________________________________ 81 Date and Time Commands _______________________________________________82 Web Server ______________________________________________________________ 83...
- Page 8 8: Device Ports Connection Methods _______________________________________________________ 90 Permissions ______________________________________________________________ 90 Device Status ____________________________________________________________ 91 Device Port Settings _______________________________________________________ 92 Telnet/SSH/TCP in Port Numbers _________________________________________ 93 Global Commands _____________________________________________________ 93 Device Ports - Settings _____________________________________________________ 94 Device Port Settings ____________________________________________________ 96 IP Settings ___________________________________________________________ 96 Data Settings _________________________________________________________ 97 Hardware Signal Triggers ________________________________________________ 98...
- Page 9 Scripts _________________________________________________________________ 120 Scripts ______________________________________________________________ 121 User Rights __________________________________________________________ 122 Batch Script Syntax ___________________________________________________ 123 Interface Script Syntax _________________________________________________ 124 Primary Commands ___________________________________________________ 125 Secondary Commands _________________________________________________ 127 Control Flow Commands _______________________________________________ 128 Sample Scripts _______________________________________________________ 129 Batch Script—SLC CLI _________________________________________________ 131 Sites __________________________________________________________________ 133 Modem Dialing States _____________________________________________________ 136 Dial In ______________________________________________________________ 136...
- Page 10 Console Server _______________________________________________________ 159 Connection Configuration _______________________________________________ 160 Connection Commands ________________________________________________ 163 12: User Authentication Authentication Commands ______________________________________________167 Local and Remote User Settings ____________________________________________ 168 Adding, Editing or Deleting a User ________________________________________ 169 Shortcut ____________________________________________________________ 173 Local Users Commands ________________________________________________ 173 Local User Rights Commands ___________________________________________ 174 Remote User Commands _______________________________________________ 175 NIS ___________________________________________________________________176...
- Page 11 Administrative Commands ______________________________________________223 System Logs _________________________________________________________ 225 System Log Command _________________________________________________ 227 Audit Log _______________________________________________________________ 228 Email Log ______________________________________________________________ 229 Diagnostics _____________________________________________________________ 230 Diagnostic Commands _________________________________________________ 231 Status/Reports __________________________________________________________ 234 View Report _________________________________________________________ 234 Status Commands ____________________________________________________ 235 Emailing Logs and Reports _________________________________________________ 236 Events _________________________________________________________________ 239 Events Commands ____________________________________________________ 240 LCD/Keypad ____________________________________________________________ 241...
- Page 12 Host List Commands ______________________________________________________ 279 IP Filter Commands ______________________________________________________ 280 Kerberos Commands _____________________________________________________ 282 LDAP Commands ________________________________________________________ 283 Local Users Commands ___________________________________________________ 284 Log Commands __________________________________________________________ 287 Network Commands ______________________________________________________ 289 NFS and SMB/CIFS Commands _____________________________________________ 291 NIS Commands __________________________________________________________ 293 PC Card Commands ______________________________________________________ 294 RADIUS Commands ______________________________________________________ 297 Remote Users Commands _________________________________________________ 299...
- Page 13 Port Connections _________________________________________________________ 320 Appendix D: Sicherheitshinweise Geräteabdeckung ________________________________________________________ 321 Netzstecker _____________________________________________________________ 321 Stromversorgung _________________________________________________________ 322 Anschluß an die Schutzerde ________________________________________________ 322 Gerätesicherung _________________________________________________________ 322 Rack / Einbauschrank _____________________________________________________ 322 Signalverbindungen ______________________________________________________ 323 Appendix E: Adapters and Pinouts Appendix F: Protocol Glossary Appendix G: Compliance Information Appendix H: DC Connector Instructions Appendix I: LDAP Schemas...
-
Page 14: List Of Figures
List of Figures Figure 2-2 Lantronix SLC48 Console Manager with PC Card Slots __________________________24 Figure 2-3 Lantronix SLC48 Console Manager with USB Port ______________________________ 24 Figure 2-4 Device Port Connections __________________________________________________ 26 Figure 2-5 Console Port Connection__________________________________________________ 27 Figure 2-6 Network Connection _____________________________________________________ 27... - Page 15 Figure 8-6 Device Ports > SLP _____________________________________________________ 102 Figure 8-7 Devices > Device Ports > Sensorsoft _______________________________________ 103 Figure 8-8 Devices > Device Ports - Logging __________________________________________ 110 Figure 8-9 Devices > Console Port __________________________________________________ 114 Figure 8-10 Devices > Host Lists ___________________________________________________ 116 Figure 8-11 View Host Lists _______________________________________________________ 118 Figure 8-12 Devices >...
- Page 16 Figure 13-9 Maintenance > Status/Reports ___________________________________________ 234 Figure 13-10 Generated Status/Reports ______________________________________________235 Figure 13-11 Emailed Log or Report_________________________________________________ 237 Figure 13-12 Lantronix Technical Support ____________________________________________ 238 Figure 13-13 Maintenance > Events _________________________________________________ 239 Figure 13-14 Maintenance > LCD/Keypad ____________________________________________ 241 Figure 13-15 Maintenance >...
- Page 17 Figure I-11 User Class Window ____________________________________________________ 346 Figure I-12 Class User Properties Window ____________________________________________ 346 Figure I-13 User Properties Window _________________________________________________ 347 Figure I-14 Select Schema Object Window ___________________________________________ 347 Figure I-15 ADSI Edit Window _____________________________________________________ 348 Figure I-16 ADSI Edit Window, CN=Users Folder ______________________________________ 349 Figure I-17 Properties Window _____________________________________________________ 349 Figure I-18 Attribute Editor Window _________________________________________________ 350 Figure I-19 String Attribute Editor Window ____________________________________________ 351...
-
Page 18: List Of Tables
Table 8-16 Secondary Commands __________________________________________________ 127 Table 8-17 Control Flow Commands ________________________________________________ 128 Table 15-1 Actions and Category Options ____________________________________________ 251 Table A-1 User Commands________________________________________________________ 315 Table G-1 Lantronix Product Family Names and Toxic/Hazardous Substances and Elements ____ 336 SLC™ Console Manager User Guide... -
Page 19: 1: About This Guide
This guide provides the information needed to install, configure, and use the products in the Lantronix® SLC™ console manager family. It is for IT professionals who must remotely and securely configure and administer servers, routers, switches, telephone equipment, or other devices equipped with a serial port. - Page 20 1: About This Guide Table 1-1Chapter/Appendix and Summary (continued) Chapter/Appendix Summary Chapter 10: USB Port Provides instructions for configuring USB storage devices (thumb drive) or USB modems. Chapter 11: Connections Provides instructions for configuring connections and viewing, updating, or disconnecting a connection. Chapter 12: User Provides instructions for enabling or disabling methods that authenticate Authentication...
-
Page 21: Conventions
SLB and SLC Online Help for the Web Interface—Provides online help for configuring the SLC console manager using the web page. Detector™ Online Help—Provides online help for assigning a static IP address to the SLC console manager using the Lantronix® Detector™ tool. SLC™ Console Manager User Guide... -
Page 22: 2: Overview
IT professionals a variety of tools to securely access and manage their resources. Lantronix has been an innovator in this market with terminal servers and secure console servers, as well as other remote access devices. The SLC console managers build on that foundation and offer new features and capabilities. -
Page 23: Table 2-1 Slc Part Numbers, Models, And Descriptions
Table 2-1 SLC Part Numbers, Models, and Descriptions Part Number Part Number Model and Description PC Card Slots SLC00812N-03 SLC00812N-02 SLC8: 8 port, Single AC Supply Secure Console Manager SLC01612N-03 SLC01612N-02 SLC16: 16 Port, Single AC Supply Secure Console Manager SLC03212N-03 SLC03212N-02... -
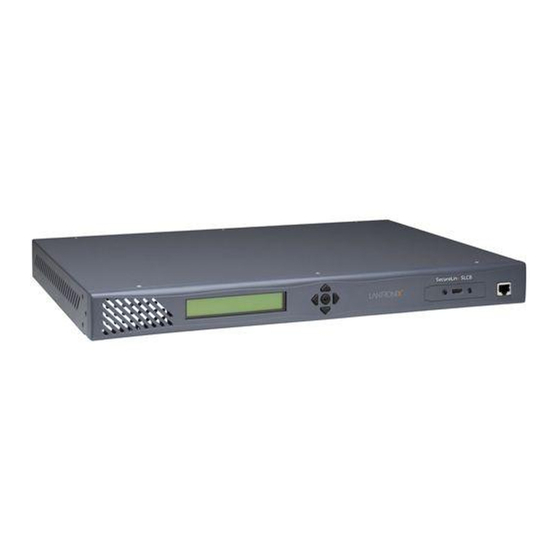
Page 24: System Features
2: Overview Figure 2-2 Lantronix SLC48 Console Manager with PC Card Slots Two-line Display Front Panel Pushbuttons Two PC Card Slots RS232 Port 1u Tall Self-Contained Rack-Mountable Chassis Dual DC Power Inputs RS-232 Device Ports Two 10/100 (1 - 48) -
Page 25: Protocols Supported
2: Overview Configurable user rights for local and remotely authenticated users Supports an internal PC Card modem, USB modem, or an external modem No unintentional break ever sent to attached servers (Solaris Ready) Simultaneous access on the same port - “listen” and “direct” connect mode ... -
Page 26: Hardware Features
Appendix E: Adapters and Pinouts. Note: RJ45 to DB9/DB25 adapters are available from Lantronix. Device ports and the console port support eight baud-rate options: 300, 600, 1200, 2400, 4800, 9600, 19200, 38400, 57600, and 115200 baud. The ports are shown in... -
Page 27: Network Connections
This PC Card interface is only supported on SLC -02 part numbers. The SLC console manager has two PC Card slots as shown in Figure 2-7. Lantronix qualifies cards continuously and publishes a list of qualified cards on the Lantronix web site. SLC™ Console Manager User Guide... -
Page 28: Usb Port
2: Overview Figure 2-7 PC Card Interface USB Port Note: This USB port is only supported on SLC -03 part numbers. The SLC console manager has a USB port as shown in Figure 2-8. Figure 2-8 SLC Console Manager with USB Interface SLC™... -
Page 29: 3: Installation
ADP010104-01 Adapter: RJ45 rolled serial, Cisco, and Sun Netra Note: An optional adapter for an external modem is available from Lantronix. The part number is 200.2073 and description is DB25M (DCE) to RJ45. Cables 200.0063 Cable: RJ45 to RJ45, 6.6 ft (2 m) -
Page 30: Product Information Label
3: Installation Verify and inspect the contents of the SLC package using the enclosed packing slip or the table above. If any item is missing or damaged, contact your place of purchase immediately. Product Information Label The product information label on the underside of the unit contains the following information about each specific unit: Part Number ... -
Page 31: Physical Installation
To connect to a device port: 1. Connect one end of the Cat 5 cable to the device port. 2. Connect the other end of the Cat 5 cable to a Lantronix serial console adapter. Note: To connect a device port to a Lantronix SLP™ power manager, use the rolled serial cable provided with the unit, a 200.2225 adapter and Cat 5 cabling, or the... -
Page 32: Connecting To Network Ports
Cable/Adapter Lookup on the Support menu. To connect a terminal: 1. Attach the Lantronix adapter to your terminal (use PN 200.2066A adapter) or your PC's serial port (use PN 200.2070A adapter). 2. Connect the Cat 5 cable to the adapter, and connect the other end to the SLC console port. -
Page 33: Figure 3-4 Ac Power Input And Power Switch (Slcxxxx2N)
The DC version of the SLC console manager accepts standard –48 VDC power. The SLC0xx24T models accept two DC power inputs for supply redundancy. Lantronix provides the DC power connections using industry standard Wago connectors. One set of connectors is included with the SLC console manager. -
Page 34: 4: Quick Setup
Similar to DHCP but for smaller networks. DeviceInstaller™ The Lantronix DeviceInstaller is a Windows-based GUI application that provides an easy way to install and configure specific Lantronix device server products. You may utilize DeviceInstaller to assign an IP and other network specific addresses. -
Page 35: Method #1 Using The Front Panel Display
4: Quick Setup Method (continued) Description Serial port login to You assign an IP address and configure the SLC device using a terminal or a command line interface SLC console manager PC running a terminal emulation program to the ’s serial console port connection. -
Page 36: Navigating
4: Quick Setup Navigating The front panel keypad has one Enter button (in the center) and four arrow buttons (up, left, right, and down). Press the arrow buttons to navigate from one option to another, or to increment or decrement a numerical entry of the selected option. Use the Enter button to select an option to change or to save your settings. -
Page 37: Entering The Settings
4: Quick Setup Note: The individual screens listed from left to right in Table 4-4 can be enabled or disabled for display on the SLC LCD screen. The order of appearance of the screens, if enabled, along with the elected “Home Page” may vary on the LCD monitor according to configuration. -
Page 38: Restoring Factory Defaults
4: Quick Setup Note: If the prompt does not display, make sure you are no longer in edit mode. 11. Use the left/right arrow buttons to select Yes, and press the Enter button. 12. To review the saved settings, press the up or down arrows to step through the current settings. When you are done, the front panel returns to the clock display. -
Page 39: Network Settings
4: Quick Setup Figure 4-5 Quick Setup 4. To accept the defaults, select the Accept default Quick Setup settings checkbox in the top portion of the page and click the Apply button at the bottom of the page. Otherwise, continue with step 5. -
Page 40: Date & Time Settings
Domain If desired, specify a domain name (for example, support.lantronix.com). The domain name is used for host name resolution within the SLC unit. For example, if abcd is specified for the SMTP server, and mydomain.com is specified for the domain, if abcd cannot be resolved, the SLC device attempts to resolve abcd.mydomain.com... -
Page 41: Figure 4-6 Beginning Of Quick Setup Script
4: Quick Setup To complete the command line interface Quick Setup script: 1. Do one of the following: With a serial terminal connection, power up, and when the command line displays, press Enter. With a network connection, use an SSH program or Telnet program (if Telnet has been enabled) to connect to xx.xx.xx.xx (the IP address in dot quad notation), and press Enter. -
Page 42: Figure 4-7 Completed Quick Setup
The host name becomes the prompt in the command line interface. Domain If desired, specify a domain name (for example, support.lantronix.com). The domain name is used for host name resolution within the SLC unit. For example, if abcd is specified for the SMTP server, and mydomain.com is specified for the domain, if abcd cannot be resolved, the SLC device attempts to resolve abcd.mydomain.com... -
Page 43: Next Step
4: Quick Setup The current time is Mon Jun 5 02:33:17 2000 Change the current time? [n] ____Sysadmin Password___________________________________________________ Enter new password: [<current password>] Quick Setup is now complete. Next Step After completing quick setup on the SLC console manager, you may want to configure other settings. -
Page 44: 5: Web And Command Line Interfaces
Web and Command Line Interfaces The SLC console manager offers three interfaces for configuring the SLC unit: a command line interface (CLI), a web interface, and an LCD with keypads on the front panel. This chapter discusses the web and command line interfaces. (Chapter 4: Quick Setup includes instructions for using the LCD to configure basic network settings.) -
Page 45: Figure 5-1 Web Page Layout
5: Web and Command Line Interfaces Figure 5-1 Web Page Layout Logout Port Number Button Icons Tabs Help Button Options Entry Fields and Options Apply Button The web page has the following components: Tabs: Groups of settings to configure. Options: Below each tab are options for specific types of settings. -
Page 46: Logging In
The Lantronix SLC Quick Setup page displays automatically the first time you log in. Subsequently, the Lantronix SLC Home page displays. (If you want to display the Quick Setup page again, click Quick Setup on the main menu.) SLC™ Console Manager User Guide... -
Page 47: Logging Out
5: Web and Command Line Interfaces Logging Out To log off the SLC web interface: 1. Click the Logout button located on the upper left part of any user interface page. You are brought back to the login screen when logout is complete. Web Page Help To view detailed information about an SLC web page: 1. -
Page 48: Logging Out
5: Web and Command Line Interfaces a. Enter your SLC user name and press Enter. b. Enter your SLC password and press Enter. Note: The system administrator may have changed the password using one of the Quick Setup methods in the previous chapter. To log in any other user: 1. -
Page 49: Command Line Help
5: Web and Command Line Interfaces Action Category show auth | auditlog | cifs | cli | connections | consoleport | datetime | deviceport | emaillog | group | history | hostlist | ipfilter | kerberos | ldap | localusers | log | menu | network | nfs | nis | ntp | pccard | portcounters | portstatus | radius | remoteusers | routing | script |... -
Page 50: General Cli Commands
5: Web and Command Line Interfaces Use the up and down arrows to scroll through previously entered commands. If desired, select one and edit it. You can scroll through up to 100 previous commands entered in the session. To clear an IP address, type 0.0.0.0, or to clear a non-IP address value, type CLEAR. ... - Page 51 5: Web and Command Line Interfaces To clear the command history: set history clear To view the rights of the currently logged-in user: show user Note: For information about user rights, see Chapter 12: User Authentication. SLC™ Console Manager User Guide...
-
Page 52: 6: Basic Parameters
Basic Parameters This chapter explains how to set the following basic configuration settings for the SLC console manager using the SLC web interface or the CLI: Network parameters that determine how the SLC unit interacts with the attached network Firewall and routing ... -
Page 53: Figure 6-1 Network > Network Settings
6: Basic Parameters To enter settings for one or both network ports: 1. Click the Network tab and select the Network Settings option. The following page displays: Figure 6-1 Network > Network Settings SLC™ Console Manager User Guide... -
Page 54: Eth1 And Eth2 Settings
6: Basic Parameters 2. Enter the following information: Eth1 and Eth2 Settings Note: Configurations with the same IP subnet on multiple interfaces (Ethernet or PPP) are not currently supported. Eth 1 Settings Disabled: If selected, disables the network port. Obtain from DHCP: Acquires IP address, subnet mask, hostname and gateway ... -
Page 55: Gateway
Domain If desired, specify a domain name (for example, support.lantronix.com). The domain name is used for host name resolution within the SLC unit. For example, if abcd is specified for the SMTP server, and mydomain.com is specified for the domain, if abcd cannot be resolved, the SLC device attempts to resolve abcd.mydomain.com for the SMTP server. -
Page 56: Dns Servers
6: Basic Parameters DNS Servers DNS Servers Configure up to three name servers. #1 is required if you choose to configure DNS #1 - #3 (Domain Name Server) servers. The first three DNS servers acquired via DHCP through Eth1 and/or Eth2 display automatically. - Page 57 6: Basic Parameters To configure up to three DNS servers: set network dns <1|2|3> ipaddr <IP Address> To set the default and alternate network gateways: set network gateway <parameters> Parameters: default <IP Address> precedence <dhcp|gprs|default> alternate <IP Address> pingip <IP Address> ethport <1 or 2>...
-
Page 58: Ip Filter
6: Basic Parameters IP Filter IP filters (also called a rule set) act as a firewall to allow or deny individual or a range of IP addresses, ports, and protocols. When a network connection is configured to use an IP filter, all network traffic through that connection is compared, in order, to the rules of that filter. -
Page 59: Enabling Ip Filters
6: Basic Parameters Enabling IP Filters On the Network > IP Filter page, you can enable all filters or disable all filters. Note: There is no way to enable or disable individual filters. To enable IP filters: 1. Enter the following: Enable IP Filter Select the Enable IP Filter checkbox to enable all filters, or clear the checkbox to disable all filters. -
Page 60: Rule Parameters
6: Basic Parameters Figure 6-3 Network > IP Filter Ruleset (Adding/Editing Rulesets) Rulesets can be added or updated on this page. 2. Enter the following: Ruleset Name Name that identifies a filter; may be composed of letters, numbers, and hyphens only. - Page 61 6: Basic Parameters Port Range Enter a range of destination TCP or UDP port numbers to be tested. An entry is required for TCP, TCP New, TCP Established, and UDP, and is not allowed for other protocols. Separate multiple ports with commas. Separate ranges of ports by colons.
-
Page 62: Updating An Ip Filter
6: Basic Parameters Updating an IP Filter To update an IP filter rule set: 1. From the Network > IP Filter page, the administrator selects the IP filter ruleset to be edited and clicks the Edit Ruleset button to return to the Network >... -
Page 63: Routing
6: Basic Parameters state <disable> state <enable> ruleset <Ruleset Name> To set IP filter rules: set ipfilter rules <parameters> Parameters: add <Ruleset Name> delete <Ruleset Name> edit <Ruleset Name> <Edit Parameters> Edit Parameters: append insert <Rule Number> replace <Rule Number> delete <Rule Number>... -
Page 64: Dynamic Routing
6: Basic Parameters 2. Enter the following: Dynamic Routing Enable RIP Select to enable Dynamic Routing Information Protocol (RIP) to assign routes automatically. Disabled by default. RIP Version Select the RIP version. The default is 2. Static Routing Enable Static Select to assign the routes manually. -
Page 65: Vpn
6: Basic Parameters This page can be used to create a Virtual Private Network (VPN) tunnel to the SLC console manager for secure communication between the SLC unit and a remote host or gateway. The SLC device supports IPSec tunnels using Encapsulated Security Payload (ESP). The SLC console manager supports host-to-host, net-to-net, host-to-net, and roaming user tunnels. - Page 66 6: Basic Parameters 2. Enter the following: Enable VPN Tunnel Select to create a tunnel. Name The name assigned to the tunnel. Required to create a tunnel. Ethernet Port Select ethernet port 1 or 2. Remote Host The IP address of the remote host's public network interface. The special value of any can be entered if the remote host is a roaming user who may not have the same IP address each time a tunnel is created.
- Page 67 6: Basic Parameters DH Group (Ike) The Diffie-Hellman Group, 2 or 5, used for the key exchange for data sent through the tunnel. Any can be selected if the two sides can negotiate which Diffie-Hellman Group to use. Authentication The type of authentication used by the host on each side of the VPN tunnel to verify the identity of the other host.
-
Page 68: 7: Services
Enable or disable SSH and Telnet logins. Configure an audit log. View the status of and manage the SLC console managers on the Secure Lantronix network. Set the date and time. SSH/Telnet/Logging To configure SSH, Telnet, and Logging settings: 1. -
Page 69: System Logging
7: Services Figure 7-1 Services > SSH/Telnet/Logging 2. Enter the following settings: System Logging In the System Logging section, select one of the following alert levels from the drop-down list for each message category: Off: Disables this type of logging. ... -
Page 70: Audit Log
7: Services Diagnostics Messages concerning system status and problems. General Any message not in the categories above. Remote Servers IP address of the remote server(s) where system logs are stored. (#1 and #2) The system log is always saved to local SLC storage. It is retained through SLC unit reboots for files up to 200K. -
Page 71: Telnet
7: Services Telnet Enable Logins Enables or disables Telnet logins to the SLC console manager to allow users to access the CLI using Telnet. Disabled by default. This setting does not control Telnet access to individual device ports. (See Device Ports - Settings (on page 94) for information on enabling Telnet access to individual ports.) You may want to keep this option disabled for security reasons. -
Page 72: Snmp
7: Services SNMP Simple Network Management Protocol (SNMP) is a set of protocols for managing complex networks. 1. Click the Services tab and select the SNMP option. The following page displays: Figure 7-2 Services > SNMP 2. Enter the following: Enable Agent Enables or disables SNMP agent, which allows read-only access to the system. -
Page 73: Communities
7: Services Enable Traps Traps are notifications of certain critical events. Disabled by default. This feature is applicable when SNMP is enabled. Examples of traps that the SLC console manager sends include: Ethernet Port Link Up Ethernet Port Link Down ... -
Page 74: V3 Read-Only User
7: Services V3 Read-Only User User Name SNMP v3 is secure and requires user-based authorization to access SLC MIB objects. Enter a user ID. The default is snmpuser. Up to 20 characters. Password/Retype Password for a user with read-only authority to use to access SNMP v3. The default is Password SNMPPASS. -
Page 75: Nfs And Smb/Cifs
7: Services servlog <off|error|warning|info|debug> smtpserver <IP Address or Hostname> snmp <enable|disable> ssh <enable|disable> syslogserver1 <IP Address or Name> syslogserver2 <IP Address or Name> telnet <enable|disable> timeoutssh <disable or 1-30> timeouttelnet <disable or 1-30> traps <enable|disable> trapcommunity <Trap Community> v1ssh <enable|disable> v1v2 <enable|disable>... -
Page 76: Smb/Cifs Share
7: Services To configure NFS and SMB/CIFS: 1. Click the Services tab and select the NFS/CIFS option. The following page displays: Figure 7-3 Services > NFS/CIFS 2. Enter the following for up to three directories: NFS Mounts Remote Directory The remote NFS share directory in the format: nfs_server_hostname or ipaddr:/ exported/path Local Directory The local directory on the SLC console manager on which to mount the remote... -
Page 77: Nfs And Smb/Cifs Commands
7: Services CIFS User Only one user special username (cifsuser) can access the CIFS share. Enter the CIFS Password/Retype user password in both password fields. The default user password is CIFSPASS. Password More than one user can access the share with the cifsuser user name and password at the same time. -
Page 78: Secure Lantronix Network
To access Secure Lantronix Managers and Spider devices on the local network: 1. Click the Services tab and select the Secure Lantronix Network option. The following page displays. Figure 7-4 Services > Secure Lantronix Network 2. -
Page 79: Figure 7-5 Telnet Session
A ssh or telnet popup window appears depending on what is clicked. Figure 7-5 Telnet Session To configure how Secure Lantronix devices are searched for on the network: 1. Click the Search Options link on the top right of the Services >... -
Page 80: Secure Lantronix Network Commands
5. To delete an IP address from the IP Address List, select the address and click the Delete IP Address button. 6. Click the Apply button. When the confirmation message displays, click Secure Lantronix Network on the main menu. The Services >... -
Page 81: Date And Time
7: Services To detect and display all secure Lantronix managers and Spider devices on the local network: show slcnetwork [ipaddrlist <all|Address Mask>] Note: Without the ipaddrlist parameter, the command searches the network according to the search setting. With the ipaddrlist parameter, the command displays a sorted list of all IP addresses or displays the IP addresses that match the mask (for example, 172.19.255.255 would display all IP addresses that start with 172.19). -
Page 82: Date And Time Commands
7: Services Time From the drop-down lists, select the current hour and minute. Time Zone From the drop-down list, select the appropriate time zone. 3. To save, click the Apply button. To synchronize the SLC unit with a remote timeserver using NTP: 1. -
Page 83: Web Server
7: Services localserver3 <IP Address or Hostname> poll <local|public> publicserver <IP Address or Hostname> state <enable|disable> sync <broadcast|poll> To view NTP settings: show ntp Web Server The Web Server page allows the system administrator to: Configure attributes of the web server. ... -
Page 84: Admin Web Commands
7: Services 2. Enter the following fields: Timeout Select No to disable Timeout. Select Yes, minutes (5-120) to enable timeout. Enter the number of minutes (must be between 30 and 120 minutes) after which the SLC web session times out. The default is 5. Note: If a session times out, refresh the browser page and login to a new web session. -
Page 85: Services - Web Sessions
7: Services To configure the strength of the cipher used by the web server (high is 256 or 128 bit, medium is 128 bit, low is 64, 56 or 40 bit): admin web cipher <himed|himedlow> To enable or disable iGoogle Gadget web content: admin web gadget <enable|disable>... -
Page 86: Services - Ssl Certificate
7: Services Figure 7-9 Web Sessions 2. To terminate, click the check box in the row of the session you want to terminate. 3. To return to the Services > Web Server page, click the Back to Web Server link. Services - SSL Certificate Services >... -
Page 87: Figure 7-10 Ssl Certificate
7: Services Figure 7-10 SSL Certificate 2. If desired, enter the following: Reset to Default To reset to the default certificate, select the checkbox to reset to the default Certificate certificate. Unselected by default. Import SSL Certificate To import your own SSL Certificate, select the checkbox. Unselected by default. Import via From the drop-down list, select the method of importing the certificate (SCP or SFTP). -
Page 88: Web Server Commands
1. Load the following XML code on a web server that is accessible over the Internet. This code describes how to retrieve information and how to format the data for display. <?xml version="1.0" encoding="UTF-8" ?> <Module> <ModulePrefs title="__UP_model__ Devport Status" title_url="http://www.lantronix.com" directory_title="SLC Status" description="Devport status and counters" scrolling="true" width="400" height="360" /> <UserPref name="model" display_name="Model" datatype="enum"... -
Page 89: Figure 7-11 Igoogle Gadget Example
7: Services <EnumValue value="10" display_value="10 seconds" /> <EnumValue value="30" display_value="30 seconds" /> <EnumValue value="60" display_value="1 minute" /> <EnumValue value="300" display_value="5 minutes" /> <EnumValue value="600" display_value="10 minutes" /> /UserPref> <Content type="url" href="http://__UP_ip__/devstatus.htm" /> </Module> 2. On the iGoogle web page, click the Add stuff link. 3. -
Page 90: 8: Device Ports
Device Ports This chapter describes how to configure and use an SLC device port connected to an external device, such as a server or a modem. The next chapter, Chapter 11: Connections describes how to use the Devices > Connections web page to connect external devices and outbound network connections (such as Telnet or SSH) in various configurations. -
Page 91: Device Status
8: Device Ports Device Status Devices > Device Status page displays the status of the SLC console manager's ports, and power outlets. Click the Devices tab and select the Device Status option. The following page displays: Figure 8-1 Devices > Device Status SLC™... -
Page 92: Device Port Settings
8: Device Ports Device Port Settings On the Devices > Device Ports page, you can set up the numbering of Telnet, SSH, and TCP ports, view a summary of current port modes, establish the maximum number of direct connections for each device port, and select individual ports to configure. 1. -
Page 93: Telnet/Ssh/Tcp In Port Numbers
8: Device Ports To set up Telnet, SSH, and TCP port numbering: 1. Enter the following: Telnet/SSH/TCP in Port Numbers Starting Telnet Port Each port is assigned a number for connecting via Telnet. Enter a number (1025- 65528) that represents the first port. The default is 2000 plus the port number. For example, if you enter 2001, subsequent ports are automatically assigned numbers 2002, 2003, and so on. -
Page 94: Device Ports - Settings
8: Device Ports Parameters: sshport <TCP Port> tcpport <TCP Port> telnetport <TCP Port> Port is a port number between 1025 and 65528. To view global settings for device ports: show deviceport global Device Ports - Settings On the Device Ports > Settings page, configure IP and data (serial) settings for individual ports, and if the port connects to an external modem, modem settings as well. -
Page 95: Figure 8-4 Device Ports > Settings
8: Device Ports Figure 8-4 Device Ports > Settings SLC™ Console Manager User Guide... -
Page 96: Device Port Settings
Connected to The type of device connected to the device port. Presently, the SLC console manager supports Lantronix’s Secure Lantronix Remote Power Manager (SLP8 and SLP16), SserverTech CDUs and Sensorsoft devices. If the type of device is not listed, select undefined. -
Page 97: Data Settings
8: Device Ports Authentication If selected, the SLC unit requires user authentication before granting access to the port. Authenticate is selected by default for Telnet in and SSH in, but not for TCP in. Timeout To cause an idle Telnet, SSH or TCP connection to disconnect after a specified number of seconds, select the checkbox and enter a value from 1 to 1800 seconds. -
Page 98: Hardware Signal Triggers
8: Device Ports Show Lines on If enabled, when the user either does a connect direct from the CLI or connects Connecting directly to the port using Telnet or SSH, the SLC console manager outputs up to 24 lines of buffered data as soon as the serial port is connected. For example, an SLC user issues a connect direct device 1 command to connect port 1 to a Linux server. -
Page 99: Modem Settings: Text Mode
8: Device Ports Modem Timeout Timeout for all modem connections. Select Yes (default) for the SLC unit to terminate the connection if no traffic is received during the configured idle time. Enter a value of from 1 to 9999 seconds. The default is 30 seconds. Caller ID Logging Select to enable the SLC console manager to log caller IDs on incoming calls. - Page 100 8: Device Ports CHAP Auth Uses Select the method of CHAP Authorization: Through the CHAP Host user name and password established under CHAP Handshake. Through the username and password established under Local/Remote User database. Same authentication for Select this option to let incoming connections (dial-in) use the same Dial-in &...
-
Page 101: Port Status And Counters
8: Device Ports Port Status and Counters Port Counters describe the status of signals and interfaces. SLC console manager updates and increments the port counters as signals change and data flows in and out of the system. These counters help troubleshoot connections or diagnose problems because they give the user an overview of the state of various parameters. -
Page 102: Status/Info
8: Device Ports Figure 8-6 Device Ports > SLP To enter SLP commands: 1. Enter the following: Number of Outlets Enter the number of outlets for a ServerTech CDU. This setting is not applicable for an SLP unit. Number of Expansion Enter the number of outlets for a ServerTech CDU expansion unit. -
Page 103: Slp Commands
8: Device Ports Environmental Status Click the link to view the environmental status (e.g., temperature and humidity). Infeed Status Click the link to view the status of the data the SLP unit or ServerTech CDU is receiving. System Info Click the link to see system information pertaining to the SLP unit or ServerTech CDU. -
Page 104: Device Port Commands
8: Device Ports Low Humidity Enter the relative humidity permitted on the device the sensor is monitoring below which the sensor sends a trap to the SLC console manager. High Humidity Enter the highest relative acceptable humidity permitted on the device above which the sensor sends a trap to the SLC unit. - Page 105 8: Device Ports A script that initializes a modem. localipaddr <negotiate|IP Address> logins <enable|disable> modemmode <text|ppp> modemstate <disable|dialout|dialin|dialback|dialondemand| dialin+dialondemand|dialinhostlist> modemtimeout <disable|1-9999 seconds> name <Device Port Name> nat <enable|disable> parity <none|odd|even> remoteipaddr <negotiate|IP Address> restartdelay <PPP Restart Delay> showlines <enable|disable> sshauth <enable|disable> sshin <enable|disable>...
-
Page 106: Device Commands
8: Device Ports Device Commands The following CLI commands correspond to the web page entries described above. To send commands to (or control) a device connected to an SLC device port over the serial port: Note: Currently the only devices supported for this type of interaction are the SLP, ServerTech CDU and Sensorsoft devices. -
Page 107: Interacting With A Device Port
8: Device Ports Sets the lowest temperature permitted for the port. sensorsoft hightemp <High Temperature in C.> Sets the hightest temperature permitted for the port. sensorsoft lowhumidity <Low Humidity %> Sets the lowest humidity pemitted for the port. sensorsoft highhumidity <High Humidity %> Sets the lowest humidity permitted for the port. -
Page 108: Device Ports - Logging
8: Device Ports escape sequence assigned to the currently logged in user. If the endpoint is telnet or SSH, logging out returns the user to the command line prompt. Note: To escape from the connect listen command, press any key. Setting up a user with an escape sequence is optional. -
Page 109: Pc Card Logging
8: Device Ports Examples: 02_Port-2_1.log 02_Port-2_2.log 02_Port-2_3.log 02_Port-2_4.log 02_Port-2_5.log PC Card Logging Data can be logged to a PC card that is loaded into PC card slot on the front of the SLC unit (see PC Cards on page 140). Data logged locally to the SLC device is limited to 256 Kbytes and may be lost in the event of a power loss. -
Page 110: Local Logging
8: Device Ports Figure 8-8 Devices > Device Ports - Logging 2. Enter the following: Local Logging Local Logging If you enable local logging, each device port stores 256 Kbytes (approximately 400 screens) of I/O data in a true FIFO buffer. Disabled by default. Clear Local Log Select the checkbox to clear the local log. -
Page 111: Log Viewing Attributes
8: Device Ports Trigger on Select the method of triggering a notification: Byte Count: A specific number of bytes of data. This is the default. Text String Recognition: A specific pattern of characters, which you can define by a regular expression. Note: Text string recognition may negatively impact the SLC unit’s performance, particularly when regular expressions are used. -
Page 112: Nfs File Logging
8: Device Ports NFS File Logging NFS File Logging Select the checkbox to log all data sent to the device port to one or more files on an external NFS server. Disabled by default. NFS Log to View Available log files in the selected NFS Directory to view. Directory to Log to The path of the directory where the log files will be stored. - Page 113 8: Device Ports Note: Local logging must be enabled for a device port for the locallog commands to be executed. To use the set locallog clear command, the user must have permission to clear port buffers (see Chapter 12: User Authentication on page 165).
-
Page 114: Console Port
8: Device Ports Console Port The console port initially has the same defaults as the device ports. Use the Devices > Console Port page to change the settings, if desired. To set console port parameters: 1. Click the Devices tab and select Console Port. The following page displays: Figure 8-9 Devices >... -
Page 115: Console Port Commands
8: Device Ports Group Access If undefined, any group can access the console port. If one or more groups are specified (groups are delimited by the characters ' ' (space), ',' (comma), or ';' (semicolon)), then any user who logs into the console port must be a member of one of the specified groups, otherwise access will be denied. -
Page 116: Host Parameters
8: Device Ports Figure 8-10 Devices > Host Lists 2. Enter the following: Note: To clear fields in the lower part of the page, click the Clear Host List button. Host List Id Displays after a host list is saved. Host List Name Enter a name for the host list. - Page 117 8: Device Ports Port Port on the host to connect to. Escape Sequence The escape character used to get the attention of the SSH or Telnet client. It is optional, and if not specified, Telnet and SSH use their default escape character. For Telnet, the escape character is either a single character or a two-character sequence consisting of '^' followed by one character.
-
Page 118: Host Parameters
8: Device Ports Figure 8-11 View Host Lists 2. View, add, or update the following: Host List Id Displays after a host list is saved. Host List Name Enter a name for the host list. Retry Count Enter the number of times the SLC console manager should attempt to retry connecting to the host list. -
Page 119: Host List Commands
8: Device Ports To remove a host from the host list, select the host in the Hosts box and click the left arrow. To give the host a higher precedence, select the host in the Hosts box and click the arrow. -
Page 120: Scripts
8: Device Ports Scripts The SLC console manager supports two types of scripts: Interface Scripts which use a subset of the Expect/Tcl scripting language to perform pattern detection and action generation on Device Port output. Batch Scripts which are a series of CLI commands. A user can create scripts at the web, ... -
Page 121: Scripts
8: Device Ports 2. Click the Add Scripts button. The page for editing script attributes displays. Figure 8-13 Adding or Editing New Scripts 3. Enter the following: Scripts Script Name A unique identifier for the script. Type Select Interface for a script that utilizes Expect/Tcl to perform pattern detection and action generation on Device Port output. -
Page 122: User Rights
Services Right to enable and disable system logging, SSH and Telnet logins, SNMP, and SMTP. Secure Lantronix Right to view and manage Secure Lantronix units (e.g., SLP, Spider, SLC and SLB Network units) on the local subnet. Date/Time Right to set the date and time. -
Page 123: Batch Script Syntax
8: Device Ports To rename a script: 1. In the Scripts table, select the script and enter a new script name in the New Name field. 2. Click the Rename Script button. The script will be renamed and the Devices > Scripts page redisplays. -
Page 124: Interface Script Syntax
8: Device Ports Interface Script Syntax This section describes the abbreviated scripting syntax for Interface Scripts. This limited syntax was created to prevent the creation of scripts containing potentially harmful commands. Script commands are divided into three groups: Primary, Secondary and Control Flow. Primary commands provide the basic functionality of a script and are generally the first element on a line of a script, as in: send_user "Password:"... -
Page 125: Primary Commands
8: Device Ports Primary Commands These are stand-alone commands which provide the primary functionality in a script. These commands may rely on one or more of the Secondary Commands to provide values for some parameters. The preprocessor will require that these commands appear only as the first element of a command line. - Page 126 8: Device Ports Command Description command waits for input and attempts to match it against one or expect, expect more patterns. If one of the patterns matches the input the corresponding expect_user, (optional) command is executed. All commands have the same syntax: expect expect_before, expect_after,...
-
Page 127: Secondary Commands
8: Device Ports Secondary Commands These are commands which provide data or other support to the Primary commands. These commands are never used by themselves in a script. The preprocessor will require that these commands always follow a left square bracket ('[') character and be followed on a single line by a right bracket (']'). -
Page 128: Control Flow Commands
8: Device Ports Command Description This command evaluates an arithmetic expression and returns the result. The expr expr command will only be used in combination with the command to generate a value for a variable. Syntax: expr <value> <operation> <value> Each <value>... -
Page 129: Sample Scripts
8: Device Ports Command Description command executes an associated block of commands if its Boolean if, elseif and expression evaluates to TRUE. Each command within the block must be a Primary else command. Syntax: if {<Boolean expression>} { command 1 command 2 command n elseif... - Page 130 8: Device Ports expect { #Did not capture "ogin" or Command Prompt timeout { send_user "Time out login..\r\n"; return } #Got login prompt "login" { send_user "Logging in..\r\n" send "$login\r" expect { timeout { send_user "Time out waiting for pwd prompt..\r\n";...
-
Page 131: Batch Script-Slc Cli
7 login: Logging in..sysadmin sysadmin Password: PASS Welcome to the Secure Lantronix Console Manager Model Number: SLC 48 For a list of commands, type 'help'. [SLC251glenn]> show network port 1 host show network port 1 host... - Page 132 [slb247glenn]> connect script monport deviceport 7 login: Logging in..sysadmin sysadmin Password: PASS Welcome to the Secure Lantronix Console Manager Model Number: slc 48 For a list of commands, type 'help'. [slc251glenn]> show network port 1 host show network port 1 host...
-
Page 133: Sites
8: Device Ports [Current Time:21:25:20] show portcounter deviceport 7 show portcounter deviceport 7 Device Port: 7 Seconds since zeroed: 1454136 Bytes input: 0 Bytes output: 0 Framing errors: 0 Flow control errors: 0 Overrun errors: 0 Parity errors: 0 [slc251glenn]> Port Counter Monitor Script Ending.. - Page 134 8: Device Ports CHAP Secret The CHAP secret associated with this site. If a modem has sites enabled and CHAP authentication enabled, then at dial-in, if the remote server sends a name in the CHAP challenge response that matches the CHAP host of a site, the CHAP secret for the site will be used to authenticate the CHAP challenge response sent by the remote server.
- Page 135 8: Device Ports Restart Delay The number of seconds after the modem timeout and before the SLC console manager attempts another connection. The default is 30 seconds. CBCP Server For a CBCP Server site, allows "No Callback" as an option in the CBCP Allow No Callback handshake in addition to User-defined Number and Admin-defined Number.
-
Page 136: Modem Dialing States
8: Device Ports Modem Dialing States This section describes how each modem state that supports sites operates when sites are enabled. Dial In The SLC console manager waits for a peer to call the SLC unit to establish a text (command line) or PPP connection. -
Page 137: Dial-On-Demand
8: Device Ports The user will remain connected to the SLC device until they either logout of the CLI session, or (if Timeout Logins is enabled) the CLI session is terminated if it has been idle. For PPP connections, the user will be authenticated via PAP or CHAP (determined by the ... -
Page 138: Dial-Back & Dial-On-Demand
8: Device Ports CHAP Secret match the name and secret sent in the CHAP Challenge response by the PPP peer, (b) Authentication is set to CHAP, and (c) the Port is set to None or matches the port the modem is on. If the remote peer requests PAP or CHAP authentication from the SLC console manager, the Remote/Dial-out Login and Remote/Dial-out Password configured for the modem (not the site) will be provided as authentication tokens. -
Page 139: Cbcp Server
8: Device Ports dial-on-demand connection will be started for each, waiting for IP traffic destined for a remote network. When IP traffic needs to be sent, the SLC unit dials the appropriate Dial-out Number for the site, and if the remote peer requests PAP or CHAP authentication, provides the Dial-out Login and Dial-out Password as authentication tokens. -
Page 140: 9: Pc Cards
Device Ports – Logging on page 96). The SLC console manager supports a variety of Compact Flash-to-PC Card adapters, as well as modem and Basic Rate Interface (BRI) ISDN cards. See the Lantronix web site www.lantronix.com/products/pc-cards-slc.html for a complete list. -
Page 141: Figure 9-2 Pc Card - Storage Page
9: PC Cards Figure 9-2 PC Card - Storage Page 4. Enter the following fields. Slot Slot on the SLC console manager where the PC Card is inserted. (view only) Device (view only) Type of PC Card (modem or storage). Type (view only) Information read from PC Card. -
Page 142: Modem Settings
To enter modem settings for a PC card, perform the following steps. 1. Insert any of the supported modem or ISDN cards (see www.lantronix.com/slc) into one of the PC card bays on the front of the SLC device. You can do this before or after powering up the SLC console manager. - Page 143 9: PC Cards 5. Enter the following fields. Slot (view only) Displays the slot position. Device (view only) Displays the device type. Type (view only) Displays the card type. State (view only) Displays the state of the device. State Enables the modem to use dial-out, dial-in, dial-back, CBCP server, CBCP client, dial-on-demand, dial-in &...
- Page 144 9: PC Cards Modem Command Modem AT command used to initiate caller ID logging by the modem. Note: For the AT command, refer to your Modem User Guide. Dial-back Number Users with dial-back access can dial into the SLC device and enter their login and password.
- Page 145 9: PC Cards Dial-out GPRS connections may replace the default route and DNS entries. Static routes may be required to maintain access to subnets that are not directly attached to the SLC console manager. Click the Static Routes link (above Data Settings) to configure a static route.
- Page 146 9: PC Cards CHAP Auth Uses Select the method of CHAP Authorization: Through the CHAP Host user name and password established under CHAP Handshake. Through the username and password established under Local/Remote User database. Same Select this option to let incoming connections (dial-in) use the same authentication authentication for settings as outgoing connections (dial-on-demand).
-
Page 147: Pc Card Commands
9: PC Cards Telnet Port Telnet session port number to use if you selected Telnet. Defaults: Upper PC Card Slot: 2049 Lower PC Card Slot: 2050 Range: 1025-65535 Authenticate: Checkbox and if selected, the SLC console manager requires ... -
Page 148: 10: Usb Port
10: USB Port This chapter describes how to configure storage by using the Devices > USB page and CLI. This page can be used to configure the thumb drive and modems. The thumb drive is useful for saving and restoring configurations and for Device Port Logging. See Device Port Settings (on page 96). -
Page 149: Figure 10-2 Devices > Usb > Configure
10: USB Port Figure 10-2 Devices > USB > Configure 3. Enter the following fields. Mount Enables the first partition of the USB device (if not currently mounted). Once mounted, a device is used for device port logging and saving/ restoring configurations. -
Page 150: Figure 10-3 Devices > Usb > Modem
10: USB Port Figure 10-3 Devices > USB > Modem 3. Enter the following fields. SLC™ Console Manager User Guide... -
Page 151: Data Settings
10: USB Port Data Settings Note: Check the modem’s equipment settings and documentation for the proper settings. The attached modem must have the same settings. Baud The speed with which the device port exchanges data with the attached serial device. From the drop-down list, select the baud rate. -
Page 152: Text Mode
10: USB Port Use Sites Enables the use of site-oriented modem parameters which can be activated by various modem-related events (authentication, outbound network traffic for dial- on-demand connections, etc.). Sites can be used with the following modem states: dial-in, dial-back, dial-on-demand, dial-in & dial-on-demand, dial-back & dial-on-demand, and CBCP server. -
Page 153: Ppp Mode
10: USB Port Dial-in Host List From the drop-down list, select the desired host list. The host list is a prioritized list of SSH, Telnet, and TCP hosts that are available for establishing outgoing modem connections or for connect direct at the CLI. The hosts in the list are cycled through until the SLC console manager successfully connects to one. -
Page 154: Ip Settings
10: USB Port Restart Delay The number of seconds after the timeout and before the SLC console manager attempts another connection. The default is 30 seconds. CBCP Server Allow For CBCP Server state, allows "No Callback" as an option in the CBCP No Callback handshake in addition to User-defined Number and Admin-defined Number. -
Page 155: Manage Firmware And Configuration Files
10: USB Port Manage Firmware and Configuration Files To manage any firmware and configuration files stored on a USB thumb drive, perform the following steps. 1. Click the Manage Files on the Thumb Drive link on the Devices > USB > Configure page. -
Page 156: Usb Commands
10: USB Port USB Commands The following CLI commands correspond to the USB port. For more information, see Chapter 15: Command Reference. set usb access set usb modem set usb storage mount set usb storage unmount ... -
Page 157: 11: Connections
11: Connections Chapter 8: Device Ports described how to configure and interact with an SLC device port connected to an external device. This chapter describes how to use the Devices > Connections page to connect external devices and outbound network connections (such as Telnet or SSH) in various configurations. -
Page 158: Remote Access Server
11: Connections Figure 11-1 Terminal Server VT100 Terminals VT100 Terminals Remote Access Server In this setup, the SLC console manager is connected to one or more modems by its device ports. Configure the device ports on the Device Ports > Settings web page by selecting the Dial-in option in the Modem Settings section. -
Page 159: Multiport Device Server
A PC can use the device ports on the SLC console manager as virtual serial ports, enabling the ports to act as if they are local ports to the PC. To use the SLC unit in this setup, the PC requires special software, for example, Com Port Redirector (available on www.lantronix.com or similar software). -
Page 160: Connection Configuration
11: Connections Figure 11-5 Console Server Connection Configuration To create a connection: 1. Click the Devices tab and select the Connections option. The following page displays: SLC™ Console Manager User Guide... -
Page 161: Figure 11-6 Devices > Connections
11: Connections Figure 11-6 Devices > Connections For a device port, enter the following: Outgoing Select to turn on or turn off the connection timeout: Connection No for no timeout Timeout Yes for a timeout. Specify the number of seconds in the seconds field. ... -
Page 162: Figure 11-7 Current Connections
11: Connections From the drop-down list, select a destination for the connection: a device port connected to a serial device, a device port connected to a modem, or an outbound network connection (Telnet, SSH, TCP Port, or UDP Port). Note: To see the current settings for a selected device port, click the Settings link. -
Page 163: Connection Commands
11: Connections Connection Commands These commands for configuring connections correspond to the web page entries described above. To connect to a device port to monitor and/or interact with it, or to establish an outbound network connection: connect direct <endpoint> Endpoint is one of: deviceport <Port # or Name>... - Page 164 11: Connections Note: If the trigger is datetime (establish connection at a specified date/time), enter the date parameter. If the trigger is chars (establish connection on receipt of a specified number or characters or a character sequence), enter the charxfer parameter and either the charcount or the charseq parameter.
-
Page 165: 12: User Authentication
12: User Authentication Users who attempt to log in to the SLC console manager by means of Telnet, SSH, the console port, or one of the device ports are granted access by one or more authentication methods. The User Authentication page provides a submenu of methods (Local Users, NIS, LDAP, RADIUS, Kerberos, and TACACS+) for authenticating users attempting to log in. -
Page 166: Figure 12-1 User Authentication > Authentication Methods
12: User Authentication Figure 12-1 User Authentication > Authentication Methods 2. To enable a method currently in the Disabled methods list, select the method and press the left arrow to the left of the list. The methods include: A network naming and administration system developed by Sun (Network Information Microsystems for smaller networks. -
Page 167: Authentication Commands
12: User Authentication TACACS+ TACACS+ allows a remote access server to communicate with an (Terminal Access authentication server to determine whether the user has access to the Controller Access network. TACACS+ is a completely new protocol and is not compatible with Control System) TACACS or XTACACS. -
Page 168: Local And Remote User Settings
12: User Authentication Local and Remote User Settings The system administrator can configure the SLC console manager to use local accounts and remote accounts to authenticate users. 1. Click the User Authentication tab and select the Local/Remote Users option. The following page displays. -
Page 169: Adding, Editing Or Deleting A User
12: User Authentication To enable local and/or remote users: 2. Enter the following: Enable Local Users Select to enable all local users except sysadmin. The sysadmin is always available regardless of how you set the check box. Enabled by default. Multiple Sysadmin Select to allow the sysadmin to have multiple simultaneous logins to the web Web Logins... -
Page 170: Figure 12-3 User Authentication > Local/Remote User > Settings
12: User Authentication Figure 12-3 User Authentication > Local/Remote User > Settings 2. Enter the following information for the user: Login User ID of selected user. Authentication Select the type of authenticated user: Local: User listed in the SLC database. ... - Page 171 12: User Authentication Enable for Dial-back Select to grant a local user dial-back access. Users with dial-back access can dial into the SLC console manager and enter their login and password. Once the SLC unit authenticates them, the modem hangs up and dials them back. Disabled by default.
- Page 172 Right to enable and disable system and audit logging, SSH and Telnet logins, SNMP, and SMTP. Includes NFS and CIFS. Secure Lantronix Right to view and manage Secure Lantronix units (e.g., SLP, Spider, and SLC Network units) on the local subnet.
-
Page 173: Shortcut
12: User Authentication Shortcut To add a user based on an existing user: 1. Display the existing user on the Local/Remote Users Settings page. The fields in the top part of the page display the current values for the user. 2. -
Page 174: Local User Rights Commands
12: User Authentication dataports <Port List> dialbacknumber <Phone Number> displaymenu <enable|disable> escapeseq <1-10 Chars> group <default|power|admin|Custom Group Name> listenports <Port List> passwordexpires <enable|disable> permissions <Permission List> uid <User Identifier> To set whether a complex login password is required: set localusers complexpasswords <enable|disable> To enable or disable authentication of local users: set localusers state <enable|disable>... -
Page 175: Remote User Commands
12: User Authentication <Permission List> is one or more of nt, sv, dt, lu, ra, sk, um, dp, ub, rs, rc, dr, wb, sn, ad , po, pc To remove a permission, type a minus sign before the two-letter abbreviation for a user right. -
Page 176: Nis
12: User Authentication The system administrator can configure the SLC console manager to use NIS to authenticate users attempting to log in to the SLC unit through the Web, SSH, Telnet, or the console port. If NIS does not provide port permissions, you can use this page to grant device port access to users who are authenticated through NIS. - Page 177 12: User Authentication 2. Enter the following: Enable NIS Displays selected if you enabled this method on the Authentication Methods page. If you want to set up this authentication method but not enable it immediately, clear the checkbox. Note: You can enable NIS here or on the first User Authentication page. If you enable NIS here, it automatically displays at the end of the order of precedence on the User Authentication page.
-
Page 178: Nis Commands
Services Right to enable and disable system logging, SSH and Telnet logins, SNMP, and SMTP. Secure Lantronix Right to view and manage Secure Lantronix units (e.g., SLP, Spider, SLC, and Network units) on the local subnet. Date/Time Right to set the date and time. -
Page 179: Ldap
12: User Authentication escapeseq <1-10 Chars> listenports <Port List> master <IP Address or Hostname> slave1 <IP Address or Hostname> slave2 <IP Address or Hostname> slave3 <IP Address or Hostname> slave4 <IP Address or Hostname> slave5 <IP Address or Hostname> state <enable|disable> To set group and permissions for NIS users: set nis group <default|power|admin>... -
Page 180: Figure 12-5 User Authentication > Ldap
12: User Authentication Figure 12-5 User Authentication > LDAP 2. Enter the following: Enable LDAP Displays selected if you enabled this method on the first User Authentication page. If you want to set up this authentication method but not enable it immediately, clear the checkbox. - Page 181 Attribute use to search for a name (ie, "msmith") or a Distinguished Name (ie, "uid=msmith,ou=People,dc=lantronix,dc=com"). Select either Name or DN as appropriate for the LDAP server. If nothing is specified for the group membership attribute, the SLC console manager will use "memberUID" for name and "uniqueMember"...
- Page 182 12: User Authentication Encrypt Messages Select Start TLS or SSL to encrypt messages between the SLC or SLB unit and the LDAP server. If Start TLS is selected, the port will automatically be set to 389 and the StartTLS extension will be used to initiate a secure connection; if SSL is selected, the port will automatically be set to 636 and a SSL tunnel will be used for LDAP communication.
-
Page 183: Ldap Commands
Services Right to enable and disable system logging, SSH and Telnet logins, SNMP, and SMTP. Secure Lantronix Right to view and manage Secure Lantronix units (e.g., SLP, Spider, SLB, and SLC Network units) on the local subnet. Date/Time Right to set the date and time. - Page 184 12: User Authentication breakseq <1-10 Chars> dataports <Ports List> listenports <Port List> clearports <Port List> escapeseq <1-10 Chars> bindpassword <Bind Password> encrypt <starttls|ssl|disable> filteruser <User Login Attribute> filtergroup <Group Objectclass> grmemberattr <Group Membership Attribute> grmembervalue <dn|name> port <TCP Port> Default is 389. server <IP Address or Hostname>...
-
Page 185: Radius
12: User Authentication RADIUS The system administrator can configure the SLC console manager to use RADIUS to authenticate users attempting to log in using the Web, Telnet, SSH, or the console port. Users who are authenticated through RADIUS are granted device port access through the port permissions on this page. - Page 186 12: User Authentication 2. Enter the following: Enable RADIUS Displays selected if you enabled this method on the User Authentication page. If you want to set up this authentication method but not enable it immediately, clear the checkbox. Note: You can enable RADIUS here or on the first User Authentication page. If you enable RADIUS here, it automatically displays at the end of the order of precedence on the User Authentication page.
- Page 187 Services Right to enable and disable system logging, SSH and Telnet logins, SNMP, and SMTP. Secure Lantronix Right to view and manage Secure Lantronix units (e.g., SLP, Spider, SLC and SLB Network unit) on the local subnet. Date/Time Right to set the date and time.
-
Page 188: Radius Commands
12: User Authentication Right to enter modem settings for USB. The USB checkbox is available for certain SLC and SLB models. PC Card Right to enter modem settings for PC cards. Includes managing storage PC cards. The PC card checkbox is available for certain SLC and SLB models. 5. -
Page 189: User Attributes & Permissions From Ldap Schema Or Radius Vsa
FreeRADIUS server, the dictionary will need be updated with the Lantronix definition by including the contents below in a file named dictionary.lantronix, and including it in the RADIUS server dictionary definitions by adding the appropriate $INCLUDE directive to the main dictionary file. -
Page 190: Kerberos
VENDOR Lantronix 244 BEGIN-VENDOR Lantronix ATTRIBUTE Lantronix-User-Attributes 1 string END-VENDOR Lantronix Once this is complete, the users file can be updated to include the Lantronix VSA for any user: myuser Auth-Type := Local, User-Password == "myuser_pwd" Reply-Message = "Hello, %u", Lantronix-User-Attributes = "data 1-4 listen 1-6 clear 1-4... -
Page 191: Figure 12-7 User Authentication > Kerberos
12: User Authentication Figure 12-7 User Authentication > Kerberos 2. Enter the following: Enable Kerberos Displays selected if you enabled this method on the User Authentication page. If you want to set up this authentication method but not enable it immediately, clear the checkbox. - Page 192 Services Right to enable and disable system logging, SSH and Telnet logins, SNMP, and SMTP. Secure Lantronix Right to view and manage Secure Lantronix units (e.g., SLP, Spider, SLC and SLB Network units) on the local subnet. Date/Time Right to set the date and time.
-
Page 193: Kerberos Commands
12: User Authentication Remote Right to assign a remote user to a user group and assign a set of rights to the user. Authentication SSH Keys Right to set SSH keys for authenticating users. User Menus Right to create a custom user menu for the CLI for Kerberos users. Web Access Right to access Web-Manager. -
Page 194: Tacacs
12: User Authentication To set permissions for Kerberos users not already defined by the user rights group: set kerberos permissions <Permission List> where <Permission List> is one or more of nt, sv, dt, lu, ra, sk, um, dp, ub, rs, rc, dr, wb, sn, ad, po, pc To remove a permission, type a minus sign before the two-letter abbreviation for a user right. -
Page 195: Figure 12-8 User Authentication > Tacacs
12: User Authentication Figure 12-8 User Authentication > TACACS+ 2. Enter the following: Enable TACACS+ Displays selected if you enabled this method on the User Authentication page. If you want to set up this authentication method but not enable it immediately, clear the checkbox. - Page 196 Services Right to enable and disable system logging, SSH and Telnet logins, SNMP, and SMTP. Secure Lantronix Right to view and manage Secure Lantronix units (e.g., SLP and Spider units) on Network the local subnet. Date/Time Right to set the date and time.
-
Page 197: Tacacs+ Commands
12: User Authentication Diagnostics & Right to obtain diagnostic information and reports about the unit. Reports Reboot & Shutdown Right to use the CLI or shut down the SLC console manager and then reboot it. Firmware & Right to upgrade the firmware on the unit and save or restore a configuration (all Configuration settings). -
Page 198: Groups
12: User Authentication To remove a permission, type a minus sign before the two-letter abbreviation for a user right. To set a default custom menu for TACACS+ users: set tacacs+ custommenu <Menu Name> To view TACACS+ settings: show tacacs+ Groups The SLC console manager has 3 pre-defined groups: Administrators, Power Users, and Default Users. -
Page 199: Figure 12-9 User Authentication > Group
12: User Authentication Figure 12-9 User Authentication > Group 2. Enter the following: Group Name Enter a name for the group. Listen Ports The ports users are able to monitor using the connect listen command. SLC™ Console Manager User Guide... - Page 200 Services Right to enable and disable system logging, SSH and Telnet logins, SNMP, and SMTP. Secure Lantronix Right to view and manage Secure Lantronix units (e.g., SLP, Spider, or Network SLC units) on the local subnet. Date/Time Right to set the date and time.
-
Page 201: Ssh Keys
12: User Authentication Firmware & Configuration Right to upgrade the firmware on the unit and save or restore a configuration (all settings). Device Port Operations Right to enter control device ports. Device Port Configuration Right to enter device port settings. Right to enter modem settings for USB. -
Page 202: Exported Keys
12: User Authentication Exported Keys The SLC console manager can generate SSH keys for SSH connections out of the SLC device for any SLC user. The SLC unit retains both the private and public key on the SLC console manager , and makes the public key available for export via SCP, FTP, or copy and paste. -
Page 203: Imported Keys (Ssh In)
12: User Authentication Figure 12-10 User Authentication > SSH Keys 2. Enter the following: Imported Keys (SSH In) Host & User Associated with Key These entries are required in the following cases: The imported key file does not contain the host that the user will be making an SSH connection from, or SLC™... -
Page 204: Host & Login For Import
12: User Authentication The SLC local user login for the connection is different from the user name the key was generated from or is not included in the imported key file, or The imported key file contains multiple keys; in this case, each key must include the user name and host at the end of the line in the standard "<key>... -
Page 205: Host And Login For Export
12: User Authentication Host and Login for Export Export via Select the method (SCP, FTP, HTTPS,or Cut and Paste) of exporting the key to the remote server. Cut and Paste, the default, requires no other parameters for export. Host IP address of the remote server to which the SLC console manager will SCP or FTP the public key file. -
Page 206: Figure 12-11 Current Host Keys
12: User Authentication To view, reset, or import SSH RSA1, RSA, And DSA host keys: 1. On the User Authentication - SSH Keys page, click the SSH Server/Host Keys link at the top right. The following page displays the current host keys. In the example below, the current keys are the defaults. -
Page 207: Ssh Commands
12: User Authentication 2. View or enter the following: Select the All Keys checkbox to reset all default key(s), or select one or more Reset to Default Host checkboxes to reset defaults for RSA1, RSA, or DSA keys. All checkboxes are unselected by default. - Page 208 12: User Authentication To export the public keys of all previously created SSH keys: set sshkey all export <ftp|scp|copypaste> [pubfile <Public Key File>] [host <IP Address or Name>] [login <User Login>] [path <Path to Copy Keys>] To delete a key: set sshkey delete <one or more parameters>...
-
Page 209: Custom Menus
12: User Authentication Custom Menus Users can have custom user menus as their command line interface, rather than the standard CLI command set. Each custom user menu can contain up to 50 commands ('logout' is always the last command). Instead of typing each command, the user enters the number associated with the command. -
Page 210: Figure 12-12 User Authentication > Custom Menus
12: User Authentication Figure 12-12 User Authentication > Custom Menus 2. In the lower section of the page, enter the following: SLC™ Console Manager User Guide... - Page 211 12: User Authentication Note: To clear fields in the lower part of the page, click the Clear Custom Menu button. Menu Name Enter a name for the custom menu. Title Enter an optional title which will be displayed about the menu at the CLI. Nicknames Select to enable nicknames to be displayed in the menu instead of the commands.
-
Page 212: Custom User Menu Commands
12: User Authentication To view or update a custom menu: 1. In the Custom Menus table, select the custom menu and click the View Custom Menu button. The custom menu attributes appear in the lower part of the page. 2. Update the menu attributes following the instructions for adding a menu above. 3. - Page 213 12: User Authentication To set the optional title for a menu: set menu edit <Menu Name> title <Menu Title> To enable or disable the display of command nicknames instead of commands: set menu edit <Menu Name> shownicknames <enable|disable> To enable or disable the redisplay of the menu before each prompt: set menu edit <Menu Name>...
- Page 214 12: User Authentication ___Custom User Menus___________________________________________________________ menu1 menu2 [SLC]> show menu menu1 ___Custom User Menus___________________________________________________________ Menu: menu1 Title: Menu1 Title Show Nicknames: enabled Redisplay Menu: disabled Command 1: connect direct deviceport 1 Nickname 1: connect Port-1 Command 2: connect direct deviceport 2 Nickname 2: connect Port-2 Command...
- Page 215 12: User Authentication User 'john ' logs into the command line interface, initially sees menu1, executes the command to jump to nested menu menu2, and then returns to menu1: Welcome to the SLC-Console Server Model Number: SLC32 For a list of commands, type 'help'. [Enter 1-4]>...
-
Page 216: 13: Maintenance
13: Maintenance The system administrator performs maintenance activities and operates the SLC using the options for the Maintenance tab and additional commands on the command line interface. SLC Maintenance Maintenance > Firmware & Config page allows the system administrator to: Configure the FTP, SFTP, or TFTP server that will be used to provide firmware updates and ... -
Page 217: Figure 13-1 Maintenance > Firmware & Config
13: Maintenance Figure 13-1 Maintenance > Firmware & Config SLC™ Console Manager User Guide... -
Page 218: Internal Temperature
The name of the firmware update file downloaded from the Lantronix web site. Firmware Filename A key for validating the firmware file. The key is provided with the firmware file (32 hex characters). -
Page 219: Boot Banks
13: Maintenance Boot Banks Note: The first time boot for each bank may take up to 5 minutes. Subsequent boot times will be approximately 2 minutes. Displays the version of SLC firmware in bank 1. Bank 1 Note: The word "current" displays next to the bank from which the SLC unit booted. - Page 220 13: Maintenance Preserve Configuration Allows the user to keep a subset of the current configuration after restoring a after Restore configuration or resetting to factory defaults. Select the checkbox for each part of the current configuration you want to keep, for example, Networking, Services, or Device Ports.
- Page 221 13: Maintenance To display the acceptable range and the current reading from the internal temperature sensor: show temperature To set the acceptable range for the internal temperature sensor (an SNMP trap is sent if the temperature is outside of this range): set temperature <one or more parameters>...
- Page 222 13: Maintenance To delete or rename a configuration (the user is prompted for the new name for renames): admin config rename|delete <Config Name> location <local|nfs|cifs|usb|pccard> [nfsdir <NFS Mounted Directory>] [usbport <U1>] [pccardslot <upper|lower>] To copy the current configuration (or optionally, a configuration from another location) to the other bank (for dual-boot SLB/SLC units): admin config copy <current|Config Name>...
-
Page 223: Administrative Commands
13: Maintenance Figure 13-2 Manage Configuration Files 2. To delete files, select one or more files and click the Delete File button. 3. To download a new firmware file, click the Delete File button. 4. To rename a listed file, select the file, type the new file name into the New File Name field, and click the Rename File button. - Page 224 13: Maintenance To update SLC firmware to a new revision: Note: The firmware file should be accessible via the settings displayed by admin ftp show. The SLC console manager automatically reboots after successful update. admin firmware update <ftp|tftp|sftp|nfs|pccard|usb> file <Firmware File> key <Checksum Key> [nfsdir <NFS Mounted Directory>] [usbport <U1>] [pccardslot <upper|lower>] To set the boot bank to be used at the next SLC unit reboot:...
-
Page 225: System Logs
13: Maintenance <Config Params to Preserve> is a comma-separated list of current configuration parameters to retain after the config restore or factory defaults: nt – Networking ra - Remote Authentication sv – Services dp – Device Ports dt – Date/Time ub - USB lu –... -
Page 226: Figure 13-3 Maintenance > System Logs
13: Maintenance Figure 13-3 Maintenance > System Logs 2. Enter the following to define the parameters of the log you would like to view: Select the type(s) of log you want to view: Network Services Authentication ... -
Page 227: System Log Command
Figure 13-4 System Logs From a queried system log (i.e., Figure 13-4), you may email this information to a specific individual or to Lantronix Technical Support. See Emailing Logs and Reports (on page 236). To clear system logs: 1. From the Maintenance >... -
Page 228: Audit Log
13: Maintenance To clear one or all of the system logs: show syslog clear <all|netlog|servlog|authlog|devlog|diaglog|genlog> Audit Log Maintenance > Audit Log page displays a log of all actions that have changed the configuration of the SLC console manager. The audit log is disabled by default. Use the Services >... -
Page 229: Email Log
13: Maintenance 4. To clear the log, click the Clear Log button. 5. To freeze or stop automatic refreshing of the log, click the Stop Refresh button. Email Log Maintenance > Email Log page displays a log of all attempted emails. The log file can be cleared from here. -
Page 230: Diagnostics
13: Maintenance Diagnostics Maintenance > Diagnostics page provides methods for diagnosing problems such as network connectivity and device port input/output problems. You can use equivalent commands on the command line interface. An additional diagnostic, loopback, is only available as a command. 1. -
Page 231: Diagnostic Commands
13: Maintenance Ping Select to verify that the host is up and running. If selected, also do the following: Enter a host name in the corresponding Hostname field Specify Ethernet Port (Both, Eth1 or Eth2) Check IPv6 if... need text. Send Packet This option sends an Ethernet packet out one of the Ethernet ports, mainly as a network connectivity test. - Page 232 13: Maintenance You can optionally email the displayed information. To display a report of network connections: diag netstat [protocol <all|tcp|udp>] [email <Email Address>] You can optionally email the displayed information. To resolve a host name into an IP address: diag lookup <Hostname> [email <Email Address>] You can optionally email the displayed information.
- Page 233 13: Maintenance The default is 1. To display all network traffic, applying optional filters: Note: This command is not available on the web interface. diag nettrace <one or more parameters> Parameters: ethport <1|2> host <IP Address or Name> numpackets <Number of Packets> protocol <tcp|udp|icmp>...
-
Page 234: Status/Reports
13: Maintenance Status/Reports On this page, you can view the status of the SLC ports and power supplies and generate a selection of reports. Note: Status and statistics shown on the web interface represent a snapshot in time. To see the most recent data, you must reload the web page. 1. -
Page 235: Status Commands
13: Maintenance IP Routes Displays the routing table. Connections Displays all active connections for the SLC unit: Telnet, SSH, TCP, UDP, device port, and modem. System Configuration – Displays a complete snapshot of the SLC settings. Complete System Configuration – Displays a snapshot of the SLC unit's basic settings (for example, network, Basic date/time, routing, services, console port). -
Page 236: Emailing Logs And Reports
Use the basic show connections command to obtain the Connection ID. Emailing Logs and Reports The following logs and reports can be directly emailed to a specific individual or to Lantronix Technical Support directly from the log page: System Log (i.e.,... -
Page 237: Figure 13-11 Emailed Log Or Report
To email a log to Lantronix Technical Support: 1. Click the question mark icon on the upper right corner to access SLC console manager device and setup information as well as contact information for Lantronix Technical Support (see Figure 13-12). -
Page 238: Figure 13-12 Lantronix Technical Support
Figure 13-12 Lantronix Technical Support 2. Call Lantronix Tech Support with the contact information provided and obtain a case number. 3. Press the Email Output button to send Lantronix Tech Support the log along with the identifying support number. 4. Click OK in the confirmation popup that appears. -
Page 239: Events
13: Maintenance Events On this Maintenance > Events page, you can define what action you want to take for events that may occur in the SLC console manager. 1. Click the Maintenance tab and select the Events option. The following page displays: Figure 13-13 Maintenance >... -
Page 240: Events Commands
13: Maintenance Modem Connection For actions that require a modem connection (for example, Forward All Traps to a Modem Connection, select which device port or USB port/PC Card with a modem connection to use. NMS/Host to forward For actions that forward a trap, enter the IP address of the computer to forward the trap to trap to. -
Page 241: Lcd/Keypad
13: Maintenance nms <SNMP NMS> oid <SNMP Trap OID> usbport <U1|U2> To delete an event: admin events delete <Event ID> To view events: admin events show LCD/Keypad The LCD has a series of screens, consisting of 2 lines of 24 characters each. Specific screens and the display order can be configured. -
Page 242: Lcd/Keypad Commands
13: Maintenance To configure the LCD: The screens that are currently enabled are displayed in order in the left Enabled screens list. 1. Select a screen to be removed from the Enabled Screens and click the button. The screen moves to the Disabled Screens list to the right. 2. -
Page 243: Banners
13: Maintenance Banners Maintenance > Banners page allows the system administrator to customize text messages that display to users. To configure banner settings: 1. Click the Maintenance tab and select Banners option. Figure 13-15 Maintenance > Banners 2. Enter the following fields. Welcome Banner The text to display on the command line interface before the user logs in. -
Page 244: Banner Commands
13: Maintenance Banner Commands The following CLI commands correspond to the Maintenance > Banners page. For more information, see Chapter 15: Command Reference. admin banner login admin banner logout admin banner show admin banner ssh admin banner welcome SLC™... -
Page 245: 14: Application Examples
14: Application Examples Each SLC console manager has multiple serial ports and two network ports as shown in Figure 14-1. Each serial port can be connected to the console port of a device. Using a network in-band port or an out-of-band modem for a dial-up connection, an administrator can remotely access any of the connected devices using Telnet or SSH. - Page 246 14: Application Examples In the example below, the system administrator performs the following steps: 1. Display the settings for device port 2 by using the show deviceport command. [SLC]> show deviceport port 2 ___Current Device Port Settings________________________________________________ Number: 2 Name: Port-2 Modem Settings-------------------Data Settings----------IP Settings--------- Modem State: disabled Baud Rate: 9600...
-
Page 247: Dial-In (Text Mode) To A Remote Device
14: Application Examples Dial-in (Text Mode) to a Remote Device The example in Figure 14-3 shows a modem connected to the SLC console manager device port 1, and a SUN server connected to the SLC device port 2. You can configure the modem for text mode dial-in, so a remote user can dial into the modem using a terminal emulation program and access the SUN server. -
Page 248: Local Serial Connection To Network Device Via Telnet
14: Application Examples 4. Log into the SLC console manager. CONNECT 57600 Welcome to the SLC login: sysadmin Password: Welcome to the SLC Console Manager Model Number: SLC 48 For a list of commands, type 'help'. [SLC]> 5. Connect to the SUN UNIX server using the connect direct command. [SLC]>... - Page 249 14: Application Examples The system administrator performs the following steps. 1. Display the settings for device port 2 by using the show deviceport command. [SLC]> show deviceport port 2 ___Current Device Port Settings________________________________________________ Number: 2 Name: Port-2 Modem Settings-------------------Data Settings----------IP Settings--------- Modem State: disabled Baud Rate: 9600 Telnet: disabled...
-
Page 250: 15: Command Reference
15: Command Reference This chapter lists and describes all of the commands available on the SLC command line interface (CLI) accessed by using Telnet, SSH, or a serial connection. In addition to the commands, this chapter contains the following sections: Introduction to Commands ... -
Page 251: Command Line Actions And Categories
15: Command Reference The <parameters> value is one or more name-value pairs in one of the following formats: <aa | bb> User must specify one of the values (aa or bb) separated by a vertical line (|). The values are in all lowercase and must be entered exactly as shown. Bold indicates a default value. -
Page 252: Deprecated Commands
15: Command Reference Should you make a mistake while typing, backspace by pressing the Backspace key and/or the Delete key, depending on how you accessed the interface. Both keys work if you use VT100 emulation in your terminal access program when connecting to the console port. Use the left and right arrow keys to move within a command. - Page 253 15: Command Reference Description Displays the welcome, login and logout banners. admin banner ssh Syntax admin banner ssh <Banner Text> Description Configures the banner that displays prior to SSH authorization. admin banner welcome Syntax admin banner welcome <Banner Text> Description Configures the banner displayed before the user logs in.
- Page 254 15: Command Reference admin config factorydefaults Syntax admin config factorydefaults [savesshkeys <enable|disable>][savesslcert <enable|disable>] [savescripts <enable|disable>] [preserveconfig <Config Params to Preserve>] <Config Params to Preserve> nt - Networking ra - Remote Authentication sv - Services dp - Device Ports dt - Date/Time pc - PC Card lu - Local Users ub - USB / pc - PC Card...
- Page 255 15: Command Reference Description Saves the current SLC configuration to a selected location. admin config show Syntax admin config show <default|ftp|sftp|nfs|cifs|pccard|usb> [nfsdir <NFS Mounted Dir>] [usbport <U1>][pccardslot <upper|lower>] Description Lists the configurations saved to a location. admin firmware bootbank Syntax admin firmware bootbank <1|2>...
- Page 256 15: Command Reference Note: CLEAR must be in all caps. admin ftp login, path admin ftp password Syntax admin ftp password Description Sets the FTP server password and prevent it from being echoed. admin ftp server Syntax admin ftp server <IP Address or Name> [login <User Login>] [path <Directory>] Description Sets the FTP/TFTP/SFTP server used for firmware updates and configuration save/restore.
- Page 257 15: Command Reference Description Displays keypad settings. admin lcd default Syntax admin lcd default Description Restores the LCD screens to their factory default settings. admin lcd reset Syntax admin lcd reset Description Restarts the program that controls the LCD. admin lcd line1 Syntax admin lcd line1 <1-24 Chars>...
- Page 258 15: Command Reference Description Configures auto-scroll of the LCD screens, including the number of seconds after keypad input before auto-scrolling restarts. admin lcd show Syntax admin lcd show Description Displays the LCD screens. admin memory Syntax admin memory Description Displays information about SLC memory usage and allows configuration of a swap space if available memory is low.
- Page 259 15: Command Reference admin site show Syntax admin site show Description Displays the row, cluster, and rack on which the SLC console manager is installed. admin shutdown Syntax admin shutdown Description Prepares the SLC console manager to be powered off. When you use this command to shut down the SLC console manager, the LCD front panel displays the “Shutting down the SLC”...
- Page 260 15: Command Reference admin web certificate show Syntax admin web certificate show Description Displays a web certificate. admin web cipher Syntax admin web cipher <himed|himedlow> Description Configures the strength of the cipher used by the web server (high is 256 or 128 bit, medium is 128 bit, low is 64, 56 or 40 bit).
-
Page 261: Audit Log Commands
15: Command Reference admin web timeout Syntax admin web timeout <disable|5-120> Description Configures the timeout for web sessions. admin web terminate Syntax admin web terminate <Session ID> Description Terminates a web session. admin web show Syntax admin web show [viewslmsessions <enable|disable>] Description Displays the current sessions and their ID. -
Page 262: Cli Commands
15: Command Reference radius <1-6> tacacs+ <1-6> Description Sets ordering of authentication methods. Local Users authentication is always the first method used. Any methods omitted from the command are disabled. show auth Syntax show auth Description Displays authentication methods and their order of precedence. show user Syntax show user... -
Page 263: Connection Commands
15: Command Reference set cli menu Syntax set cli menu <start|menu name> Description Starts a menu if the menu associated with the user does not display. set cli terminallines Syntax set cli terminallines <disable|Number of lines> Description Sets the number of lines in the terminal emulation screen for paging through text one screen at a time, if the SLC console manager cannot detect the size of the terminal automatically. - Page 264 15: Command Reference exclusive <enable|disable> trigger <now|datetime|chars> date <MMDDYYhhmm[ss]> charcount <# of Chars> charseq <Char Sequence> charxfer <toendpoint|fromendpoint> <SSH flags> is one or more of: user <Login Name> version <1|2> command <Command to Execute> Note: If the trigger is datetime (establish connection at a specified date/time), enter the date parameter.
- Page 265 15: Command Reference connect global outgoingtimeout Syntax connect global outgoingtimeout <disable|1-9999 seconds> Description Sets the amount of time the SLC console manager will wait for a response (sign of life) from an SSH/Telnet server that it is trying to connect to. connect global show Syntax connect global show...
-
Page 266: Console Port Commands
15: Command Reference trigger <now|datetime|chars> date <MMDDYYhhmm[ss]> charcount <# of Chars> charseq <Char Sequence> Note: If the trigger is datetime (establish connection at a specified date/time), enter the date parameter. If the trigger is chars (establish connection on receipt of a specified number or characters or a character sequence), enter either the charcount or the charseq parameter. -
Page 267: Custom User Menu Commands
15: Command Reference The following list includes options which accept the CLEAR command: Note: CLEAR must be in all caps. set consoleport group Description Configures console port settings. show consoleport Syntax show consoleport Description Displays console port settings. Custom User Menu Commands Users can have custom user menus as their command line interface, rather than the standard CLI command set. - Page 268 15: Command Reference set menu add Syntax set menu add <Menu Name> [command <Command Number>] Description Creates a new custom user menu or adds a command to an existing custom user menu. set menu copy Syntax set menu copy <Menu Name> newmenu <New Menu Name> Description Make a copy of an existing menu.
-
Page 269: Date And Time Commands
15: Command Reference Description Displays a list of all menu names or all commands for a specific menu. Date and Time Commands set datetime Syntax set datetime <one date/time parameter> Parameters date <MMDDYYhhmm[ss]> timezone <Time Zone> Note: If you do not have a valid <Time Zone>, enter “timezone <invalid time zone>” and the system guides you through the process of selecting a time zone. -
Page 270: Device Commands
15: Command Reference Description Displays NTP settings. Device Commands set command Syntax set command <Device Port # or Name or List> <one or more parameters> Parameters slp|servertech auth login <User Login> slp|servertech config [prompt <Command Prompt>] [numoutlets <Number of Outlets>] [numexpoutlets <Number of Expansion Outlets>] slp|servertech restart slp|servertech outletcontrol state <on|off|cyclepower>... - Page 271 15: Command Reference cbcptype <admin|user> cbcpnocallback <enable|disable> chapauth <chaphost|localusers> chaphost <CHAP Host or User Name> chapsecret <CHAP Secret or User Password> checkdsr <enable|disable> closedsr <enable|disable> databits <7|8> device <none | slp8 | slp16 | slp8exp8 | slp8exp16 | slp16exp8 | slp16exp16 | sensorsoft | servertech>...
- Page 272 15: Command Reference dialinhostlist | cbcpserver | cbcpclient> modemtimeout <disable|1-9999 seconds> name <Device Port Name> nat <enable|disable> nfsdir <Logging Directory> nfslogging <enable|disable> nfsmaxfiles <Max # of Files> nfsmaxsize <Size in Bytes> parity <none|odd|even> pccardlogging <enable|disable> pccardmaxfiles <Max # of Files> pccardmaxsize <Size in Bytes>...
- Page 273 15: Command Reference usbmaxfiles <Max # of Files> usbmaxsize <Size in Bytes> usbport <U1> usesites <enable|disable> viewportlog <enable|disable> webcolumns <Web SSH/Telnet Cols> webrows <Web SSH/Telnet Rows> Note: A group of device ports can be configured by specifying a comma-separated list of ports (i.e., '1-4,8,10-12') or 'ALL'.
-
Page 274: Diagnostic Commands
15: Command Reference show deviceport names Syntax show deviceport names Description Displays a list of all device port names. show deviceport port Syntax show deviceport port <Device Port List or Name> [display <ip|data|modem|logging|device>] Description Displays the settings for one or more device ports. show portcounters Syntax show portcounters [deviceport <Device Port List or Name>] [email <Email... - Page 275 15: Command Reference Description Displays the ARP table of IP address-to-hardware address mapping. You can optionally email the displayed information. diag internals [email <Email Address>] Syntax diag internals Description Displays information on the internal memory, storage and processes of the SLC console manager. diag lookup Syntax diag lookup <Name>...
- Page 276 15: Command Reference protocol <tcp|udp|icmp> verbose <low | medium | high | disable> Description Displays all network traffic, applying optional filters. This command is not available on the web page. diag ping | ping6 Syntax diag ping | ping6 <IP Address or Name> [<parameters>] Parameters count <Number Of Times To Ping>...
-
Page 277: Email Log Commands
15: Command Reference Description Displays the route that packets take to get to a network host. Email Log Commands show emaillog Syntax show emaillog [email <Email Address>] Description Display the email log. show emaillog clear Syntax show emaillog clear Description Clear the email log. -
Page 278: Group Commands
15: Command Reference admin events delete Syntax admin events delete <Event ID> Description Deletes an event definition. admin events edit Syntax admin events edit <Event ID> <parameters> Parameters community <SNMP Community> deviceport <Device Port # or Name> ethport <1|2> nms <SNMP NMS> oid <SNMP Trap OID>... -
Page 279: Host List Commands
15: Command Reference allowdialback <enable|disable> dialbacknumber <Phone Number> permissions <Permission List> Note: See 'help user permissions' for information on user rights. set groups rename Syntax set groups rename <Group Name> newname <New Group Name> Description Renames the name of the group. set groups delete Syntax set groups delete <Group Name>... -
Page 280: Ip Filter Commands
15: Command Reference Description Configures a prioritized list of hosts to be used for modem dial-in connections. set hostlist (number) Syntax set hostlist add|edit <Host List Name> entry <Host Number> [<parameters>] Parameters host <IP Address or Name> protocol <ssh|telnet|tcp> port <TCP Port> escapeseq <1-10 Chars>... - Page 281 15: Command Reference Parameters ethernet <1|2> state <disable> ethernet <1|2> state <enable> ruleset <Ruleset Name> deviceport <1..48> state <disable> deviceport <1..48> state <enable> ruleset <Ruleset Name> pccardslot <upper|lower> state <disable> pccardslot <upper|lower> state <enable> ruleset <Ruleset Name> usbport <U1> state <disable> usbport <U1>...
-
Page 282: Kerberos Commands
15: Command Reference show ipfilter mapping Syntax show ipfilter mapping Description Displays the IP filter mapping. show ipfilter ruleset Syntax show ipfilter ruleset <all|Ruleset Name> Description Displays the rulesets for the IP filters. show ipfilter status Syntax show ipfilter status <all|Ruleset Name> Description Displays the IP filter status. -
Page 283: Ldap Commands
15: Command Reference port <Key Distribution Center TCP Port> realm <Kerberos Realm> state <enable|disable> useldapforlookup <enable|disable> permissions <Permission List> The following list includes options which accept the CLEAR command: Note: CLEAR must be in all caps. set kerberos realm, kdc, custommenu, escapeseq, breakseq, dialbacknumber, accessoutlets, listenports, dataports, clearports Description... -
Page 284: Local Users Commands
15: Command Reference dialbacknumber <Phone Number> dataports <Ports List> encrypt <starttls|ssl|disable> escapeseq <1-10 Chars> filteruser <User Login Attribute> filtergroup <Group Objectclass> grmemberattr <Group Membership Attribute> grmembervalue <dn|name> group <default|power|admin> listenports <Port List> permissions <Permission List> port <TCP Port> (Default is 389.) server <IP Address or Hostname>... - Page 285 15: Command Reference allowdialback <enable|disable> breakseq <1-10 Chars> changenextlogin <enable|disable> changepassword <enable|disable> clearports <Port List> custommenu <Menu Name> dataports <Port List> dialbacknumber <Phone Number> displaymenu <enable|disable> escapeseq <1-10 Chars> group <default|power|admin|Custom Group Name> listenports <Port List> passwordexpires <enable|disable> permissions <Permission List> The following list includes options which accept the CLEAR command: Note: CLEAR must be in all caps.
- Page 286 15: Command Reference Sets console-only admin usage. set localusers delete Syntax set localusers delete <User Login> Description Deletes a local user. set localusers lifetime Syntax set localusers lifetime <Number of Days> Description Sets the number of days the login password may be used. The default is 90 days. set localusers lock Syntax set localusers lock|unlock <User Login>...
-
Page 287: Log Commands
15: Command Reference Description Sets the number of minutes after a lockout before the user can try to log in again. Disabled by default. set localusers periodwarning Syntax set localusers periodwarning <Number of Days> Description Sets the number of days the system warns the user that the password will be expiring. The default is 7 days. - Page 288 15: Command Reference Description Clears the modem log the modem log is automatically pruned when it reaches 50K. set log modem pppdebug Syntax set log modem pppdebug <enable|disable> Description Enables PPP debugging in the modem log. When enabled, performance could be impacted. show log files Syntax show log files nfs | pccard | usb [locdir <NFS Mount Local...
-
Page 289: Network Commands
15: Command Reference Network Commands set network Syntax set network <parameters> Parameters interval <1-99999 Seconds> ipforwarding <enable|disable> probes <Number of Probes> startprobes <1-99999 Seconds> The following list includes options which accept the CLEAR command: Note: CLEAR must be in all caps. set network domain Description... - Page 290 15: Command Reference Description Sets default and alternate gateways. The alternate gateway is used if an IP address usually accessible through the default gateway fails to return one or more pings. set network host Syntax set network host <Hostname> [domain <Domain Name>] Description Sets the SLC host name and domain name.
-
Page 291: Nfs And Smb/Cifs Commands
15: Command Reference show network dns Syntax show network dns Description Displays DNS settings. show network gateway Syntax show network gateway Description Displays gateway settings. show network host Syntax show network host Description Displays the network host name of the SLC console manager. show network port Syntax show network port <1|2>... - Page 292 15: Command Reference Description Configures the SMB/CIFS share, which contains the system and device port logs. Note: The admin config command saves SLC configurations on the SMB/CIFS share. set cifs password Syntax set cifs password Description Changes the password for the SMB/CIFS share login (default is cifsuser). set nfs mount Syntax set nfs mount <1|2|3>...
-
Page 293: Nis Commands
15: Command Reference Description Displays SMB/CIFS settings. show nfs Syntax show nfs Description Displays NFS share settings. NIS Commands set nis Syntax set nis <one or more parameters> Parameters accessoutlets <Outlet List> breakseq <1-10 Chars> broadcast <enable|disable> clearports <Port List> custommenu <Menu Name>... -
Page 294: Pc Card Commands
15: Command Reference Note: CLEAR must be in all caps. set nis custommenu, escapeseq, breakseq, dialbacknumber, domain, accessoutlets, listenports, dataports, clearports Description Configures the SLC console manager to use NIS to authenticate users who log in via the Web, SSH, Telnet, or the console port. show nis Syntax show nis... - Page 295 15: Command Reference dodauth <pap|chap> dodchaphost <CHAP Host or User Name> dodchapsecret <CHAP Secret or User Password> flowcontrol <none|xon/xoff|rts/cts> gsmautodns <enable|disable> gsmbearerservice <GSM Bearer Service> gsmcompression <enable|disable> gsmcontext <GPRS Context Id> gsmdialoutmode <gprs|gsm> gsmpin <GSM/GPRS PIN Number> initscript <Modem Initialization Script> isdnchannel <1|2>...
- Page 296 15: Command Reference Note: CLEAR must be in all caps pccard modem dialinlist, chaphost, chapsecret, dodchaphost, dodchapsecret, initscript, dialoutlogin, dialoutpassword, dialbacknumber, group Description Configures a currently loaded PC Card. pccard storage copy Syntax pccard storage copy <upper|lower> file <Filename> newfile <New Filename> Description Copies a file on a Compact Flash card.
-
Page 297: Radius Commands
15: Command Reference pccard storage rename Syntax pccard storage rename <upper|lower> file <Filename> newfile <New Filename> Description To rename a file on a Compact Flash card. pccard storage unmount Syntax pccard storage unmount <upper|lower> Description Unmounts a Compact Flash card. Enter this command before ejecting the card. show pccard Syntax show pccard... - Page 298 15: Command Reference custommenu <Menu Name> allowdialback <enable|disable> dialbacknumber <Phone Number> dataports <Port List> escapeseq <1-10 Chars> group <default|power|admin> listenports <Port List> state <enable|disable> permissions <Permission List> timeout <enable|1-30 seconds> usevsa <enable|disable> The following list includes options which accept the CLEAR command: Note: CLEAR must be in all caps.
-
Page 299: Remote Users Commands
15: Command Reference Remote Users Commands set remoteusers Syntax set remoteusers add|edit <User Login> [<parameters>] Parameters accessoutlets <Outlet List> allowdialback <enable|disable> breakseq <1-10 Chars> listenports <Port List> clearports <Port List> custommenu <Menu Name> dataports <Port List> dialbacknumber <Phone Number> displaymenu <enable|disable> escapeseq <1-10 Chars>... -
Page 300: Routing Commands
15: Command Reference Description Sets whether remote users who are not part of the remote user list will be authenticated. show remoteusers Syntax show remoteusers Description Displays settings for all remote users. Routing Commands set routing Syntax set routing [parameters] Parameters rip <enable|disable>... - Page 301 15: Command Reference Description Delete a script. set script import Syntax set script import <interface|batch> via <ftp|scp|copypaste> [file <Script File>] [name <Script Name>] [host <IP Address or Name>] [login <User Login>] [path <Path to Script File>] Note: Interface scripts have default/do user rights. Batch scripts have admin/ad user rights.
-
Page 302: Services Commands
15: Command Reference Services Commands set services Syntax set services <one or more services parameters> Parameters alarmdelay <1-6000 Seconds> auditlog <enable|disable> auditsize <1-500 Kbytes> authlog <off|error|warning|info|debug> clicommands <enable|disable> contact <Admin Contact Info> devlog <off|error|warning|info|debug> diaglog <off|error|warning|info|debug> genlog <off|error|warning|info|debug> includesyslog <enable|disable> javabufsize <Number of Lines>... -
Page 303: Site Commands
15: Command Reference traps <enable|disable> trapcommunity <Trap Community> v1ssh <enable|disable> v1v2 <enable|disable> v3auth <md5|sha> v3encrypt <des|aes> v3password <V3 RO User Password> v3phrase <V3 RO User Passphrase> v3rwpassword <V3 RW User Password> v3rwphrase <V3 RW User Passphrase> v3rwuser <V3 RW User> v3security <noauth|auth|authencrypt>... -
Page 304: Slc Network Commands
15: Command Reference To create or edit a site: set site add|edit <Site Name> [<parameters>] Parameters: name <Site Name> (edit only) dialoutnumber <Phone Number> deviceport <Device Port # or Name or none> dialoutlogin <User Login> usbport <U1|U2> dialoutpassword <Password> auth <pap|chap> allowdialback <enable|disable>... -
Page 305: Ssh Key Commands
15: Command Reference command displays a sorted list of all IP addresses or displays the IP addresses that match the mask (for example, 172.19.255.255 would display all IP addresses that start with 172.19). SSH Key Commands set sshkey allexport Syntax set sshkey allexport <ftp|scp|copypaste>... - Page 306 15: Command Reference set sshkey import Syntax set sshkey import <ftp|scp|copypaste> [file <Public Key File>] [host <IP Address or Name>] [login <User Login>] [path <Path to Public Key File>] [keyuser <SSH Key User>] [keyhost <SSH Key IP Address or Name>] Note: The key file may contain multiple keys;...
-
Page 307: Status Commands
15: Command Reference Description Displays all keys that have been imported or keys for a specific user, IP address, or name. show sshkey server Syntax show sshkey server [type <all|rsa1|rsa|dsa>] Description Displays host keys (public key only). Status Commands show sysconfig Syntax show sysconfig [display <basic|auth|devices>] [email <Email Address] Description... -
Page 308: Tacacs+ Commands
15: Command Reference show syslog clear Syntax show syslog clear <all|netlog|servlog|authlog|devlog|diaglog|genlog> Description Clears one or all of the system logs. TACACS+ Commands set tacacs+ Syntax set tacacs+ <one or more parameters> Parameters accessoutlets <Outlet List> breakseq <1-10 Chars> clearports <Port List> custommenu <Menu Name>... -
Page 309: Temperature Commands
15: Command Reference Description Configures the SLC console manager to use TACACS+ to authenticate users who log in via the Web, SSH, Telnet, or the console port. show tacacs+ Syntax show tacacs+ Description Displays TACACS+ settings. Temperature Commands set temperature low <Low Temperature in C. - Page 310 15: Command Reference Parameters auth <pap|chap> baud <300-115200> calleridcmd <Modem Command String> calleridlogging <enable|disable> cbcpnocallback <enable|disable> cbcptype <admin|user> chapauth <chaphost|localusers> chaphost <CHAP Host or User Name> chapsecret <CHAP Secret or User Password> databits <7|8> dialbackdelay <PPP Dialback Delay> dialbacknumber <usernumber|Phone Number> dialbackretries <1-10>...
- Page 311 15: Command Reference usesites <enable|disable> Note: It is recommended that the initscript be prepended with 'AT' and include 'E1 V1 x4 Q0' so that the SLC console manager may properly control the modem. The following list includes options which accept the CLEAR command: Note: CLEAR must be in all caps.
- Page 312 15: Command Reference Description Formats a thumb drive. Runs a filesystem check on a thumb drive (recommended if it does not mount): set usb storage fsck <U1> set usb storage mount Syntax set usb storage mount <U1> Description Mounts a thumb drive for use as a storage device. The thumb drive can be used for saving configurations and device logging.
-
Page 313: User Permissions Commands
- view Diagnostics & Reports rs - Reboot or Shutdown the SLC wb - Web Access fc - manage Firmware and Configurations sn - configure Secure Lantronix Network ad - full Administrative rights sk - configure SSH Keys po - configure Power Outlets... - Page 314 15: Command Reference ikenegotiation <main|aggressive> ikeenc <any|3des|aes> ikeauth <any|sha1|md5> ikedhgroup <any|dh2|dh5> espenc <any|3des|aes> espauth <any|sha1|md5> espdhgroup <any|dh2|dh5> pfs <enable|disable> modeconfig <enable|disable> xauthclient <enable|disable> xauthlogin <User Login> The following list includes options which accept the CLEAR command: CLEAR must be in all caps. set vpn name, remoteid, localid, remotesubnet, localsubnet, xauthlogin...
-
Page 315: Appendix A: Bootloader
To access the bootloader CLI: 1. Power up the SLC console manager. 2. Type x15 within 10 seconds of power up. The bootloader halts the boot procedure and displays a Lantronix command prompt. Bootloader Commands Table A-1 User Commands Lists and prints the command list and online help. -
Page 316: Administrator Commands
Appendix A: Bootloader Administrator Commands In addition to the commands that the user can issue, the administrator can issue the following commands: Copies an image of the drive from the USB port or from the lower PCMCIA imagecopy device to the internal CF card. Provides a new password for user admin. -
Page 317: Appendix B: Security Considerations
Appendix B: Security Considerations The SLC console manager provides data path security by means of SSH or Web/SSL. Do not assume that you have complete security, however. Securing the data path is only one way to ensure security. This appendix briefly discusses some important security considerations. Security Practice Develop and document a Security Practice. -
Page 318: Appendix C: Safety Information
Note: Refer all servicing to Lantronix, Inc. Power Plug When disconnecting the power cable from the socket, pull on the plug, not the cord. -
Page 319: Grounding
Appendix C: Safety Information Grounding Maintain reliable grounding of this product. Pay particular attention to supply connections when connecting to power strips, rather than directly to the branch circuit. Install DC-rated equipment only under the following conditions: Connect the equipment to a DC supply source that is electrically isolated from the AC source and reliably connected to ground, or connect it to a DC (SELV) source. -
Page 320: Port Connections
Appendix C: Safety Information Port Connections Only connect the network port to an Ethernet network that supports 10Base-T/100Base-T. Only connect device ports to equipment with serial ports that support EIA-232 (formerly RS- 232C). Only connect the console port to equipment with serial ports that support EIA-232 (formerly ... -
Page 321: Appendix D: Sicherheitshinweise
Umständen Feuer oder elektrischen Schlag zur Folge haben könnten. Hinweis: Lassen Sie alle Wartungsarbeiten durch die Firma Lantronix durchführen. Netzstecker Wenn Sie das Netzkabel von der Steckdose trennen, ziehen Sie am Stecker und nicht am ... -
Page 322: Stromversorgung
Appendix D: Sicherheitshinweise Stromversorgung Dieses Gerät kann mehr als eine Stromversorgung haben. Trennen Sie alle Stromquellen vor Wartungsarbeiten, um elektrischen Schlag zu vermeiden. Überprüfen Sie die elektrischen Angaben auf dem Typenschild um sicherzustellen, das die Netzversorgung oder Anschlußkabel nicht überlastet werden. Anschluß... -
Page 323: Signalverbindungen
Appendix D: Sicherheitshinweise installiert wird, in der die Temperatur geringer als die für das SLC Gerät angegebene, maximale Betriebstemperatur ist. Installieren Sie das Gerät in einen Einbauschrank oder Rack so daß es zu keiner Einschränkung der Luftzufuhr kommt, die einen sicheren Betrieb des Gerätes gewährleistet. Installieren Sie das Gerät in einen Einbauschrank oder Rack so daß... -
Page 324: Appendix E: Adapters And Pinouts
Lantronix adapters. The cables are available in various lengths. In most cases, you will need an adapter for your serial devices. Lantronix offers a variety of RJ45- to-serial connector adapters for many devices. These adapters convert the RJ45 connection on... -
Page 325: Figure E-2 Rj45 Receptacle To Db25F Dce Adapter For The Slc Console Manager (Pn 200.2067A)
Appendix E: Adapters and Pinouts Figure E-2 RJ45 Receptacle to DB25F DCE Adapter for the SLC Console Manager (PN 200.2067A) SLC™ Console Manager User Guide... -
Page 326: Figure E-3 Rj45 Receptacle To Db9M Dce Adapter For The Slc Console Manager (Pn 200.2069A)
Appendix E: Adapters and Pinouts Figure E-3 RJ45 Receptacle to DB9M DCE Adapter for the SLC Console Manager (PN 200.2069A) SLC™ Console Manager User Guide... -
Page 327: Figure E-4 Rj45 Receptacle To Db9F Dce Adapter For The Slc Console Manager (Pn 200.2070A)
Appendix E: Adapters and Pinouts Figure E-4 RJ45 Receptacle to DB9F DCE Adapter for the SLC Console Manager (PN 200.2070A) Use PN 200.2070A adapter with a PC serial port. SLC™ Console Manager User Guide... -
Page 328: Figure E-5 Rj45 To Rj45 Adapter For Netra/Sun/Cisco And Slp (Pns 200.2225 And Adp010104-01)
Appendix E: Adapters and Pinouts Figure E-5 RJ45 to RJ45 Adapter for Netra/Sun/Cisco and SLP (PNs 200.2225 and ADP010104-01) Note: The cable ends of the ADP010104-01 are an RJ45 socket on one end and a RJ45 plug on the other instead of RJ45 sockets on both ends. Use this adapter for SLP remote power manager, Netra/SUN/Cisco, and others. -
Page 329: Appendix F: Protocol Glossary
Appendix F: Protocol Glossary BOOTP (Bootstrap Protocol) Similar to DHCP, but for smaller networks. Automatically assigns the IP address for a specific duration of time. CHAP (Challenge Handshake Authentication Protocol) A secure protocol for connecting to a system; it is more secure than the PAP. DHCP (Dynamic Host Configuration Protocol) Internet protocol for automating the configuration of computers that use TCP/IP. - Page 330 Appendix F: Protocol Glossary Dial-back—The SLC console manager waits for a peer to call the SLC device, establishes a text (command line) or PPP connection, authenticates the user, and if the SLC console manager is able to determine a dial-back number to use, hangs up and calls the dial-back number to establish either a text or PPP connection.
- Page 331 Appendix F: Protocol Glossary peer. Once authenticated, a PPP session will be established using the Local IP and the Remote IP. For Dial-on-Demand, the PPP connection will be established when it sees IP traffic destined for the Remote IP. When this occurs, the SLC console manager dials the Dial-out Number, and if the remote peer requests PAP or CHAP authentication, provides the Dial-out Login and Dial-out Password as authentication tokens.
- Page 332 Appendix F: Protocol Glossary remote peer requests PAP or CHAP authentication, provides the Dial-out Login and Dial-out Password as authentication tokens. Once authenticated, the CBCP handshake with the server determines the number to use for dial-back. The SLC device will request the type of number defined by CBCP Client Type - either an ...
- Page 333 Appendix F: Protocol Glossary RADIUS (Remote Authentication Dial-In User Service) An authentication and accounting protocol. Enables remote access servers to communicate with a central server to authenticate dial-in users and their access permissions. A company stores user profiles in a central database that all remote servers can share. SMB/CIFS (Server Message Block/Common Internet File System): Microsoft’s protocol for allowing all applications as well as Web browsers to share files across the Internet.
-
Page 334: Appendix G: Compliance Information
Manufacturer Name and Address Lantronix Inc., 167 Technology, Irvine, CA 92618 USA Declares that the following product: Product Names: Models SLC8, SLC16, SLC32, and SLC48 Console Managers Conform to the following standards or other normative documents: Safety: EN60950:1992+A1, A2, A3, A4, A11... - Page 335 This product carries the CE mark since it has been tested and found compliant with the following standards: Safety:EN 60950 Emissions:EN 55022 Class A Immunity:EN 55024 RoHS Notice All Lantronix products in are China RoHS-compliant and free of the following hazardous substances and elements: Lead (Pb) Mercury (Hg) ...
-
Page 336: Table G-1 Lantronix Product Family Names And Toxic/Hazardous Substances And Elements
Appendix G: Compliance Information Table G-1 Lantronix Product Family Names and Toxic/Hazardous Substances and Elements Product Family Name Toxic or hazardous Substances and Elements Lead Mercur Cadmium Hexavalent Polybrominated Polybrominate (Pb) y (Hg) (Cd) Chromium (Cr biphenyls (PBB) d diphenyl... -
Page 337: Appendix H: Dc Connector Instructions
Appendix H: DC Connector Instructions The -48VDC plug connector is provided to make the input power connectors for your console server. The -48VDC input source should be circuit breaker or fuse protected at 5 amps. Input Voltage: -48VDC (acceptable range of -40 to -60 VDC) ... -
Page 338: Figure H-3 Plug Parts To Assemble
Appendix H: DC Connector Instructions 3. Using a small screwdriver, press the slot to release the spring pressure for each conductor (as shown in Figure H-2) and insert the wire. When the wire is in position, release the pressure on the screwdriver to securely capture the wire. -
Page 339: Figure H-5 Dc Power Cord Into The Slc Console Manager
Appendix H: DC Connector Instructions Figure H-5 DC Power Cord into the SLC Console Manager b. Turn on your -48VDC power source. c. Turn on the power switch of the SLC console server. 7. Follow the setup instructions in your SLC manual to use your product. SLC™... -
Page 340: Appendix I: Ldap Schemas
Appendix I: LDAP Schemas This appendix describes the procedure for defining individual user permissions from a Windows Active Directory (AD) server to use with the SLC console manager firmware version 5.4 or greater. The procedure outlined in this appendix is based on Windows Server 2003 and 2008 and can vary with other Windows versions. -
Page 341: Figure I-1 Programs Window
Appendix I: LDAP Schemas Figure I-1 Programs Window 3. Click Start > Run > mmc. 4. Click OK. Figure I-2 shows the window that displays. Figure I-2 MMC Window 5. On the File menu, click Add/Remove Snap-in. Figure I-3 shows the window that displays. SLC™... -
Page 342: Figure I-3 Snap-In Window
Appendix I: LDAP Schemas Figure I-3 Snap-In Window 6. Under Available snap-ins, click Active Directory Schema > Add > OK. Figure I-4 shows the directory that displays. Figure I-4 Active Directory Schema 7. To save this console, click Save on the File menu. Figure I-5 shows the window that displays. -
Page 343: Figure I-5 Console Root
Appendix I: LDAP Schemas Figure I-5 Console Root 8. In the Save As dialog box, do one of the following: a. To place the snap-in in the Administrative Tools folder, in File name box, type a name for the snap-in, and then click Save. Figure I-6 shows the folder that displays. -
Page 344: Creating The Slc Schema Attribute
Appendix I: LDAP Schemas Figure I-7 Save As Window Creating the SLC Schema Attribute 1. Once you have a saved Schema console, open it and right click on Attributes. 2. Mouse over New and left click on Attribute. Figure I-8 shows the window that displays. -
Page 345: Adding The Attribute To The Users Group In Windows
Appendix I: LDAP Schemas Figure I-9 Create New Attribute Object Window 5. For the OID, enter 1.3.6.1.4.1.244.100.10. 6. Enter anything for the description. 7. Change the Syntax: pull-down menu to Unicode String. 8. Click on OK. Adding the Attribute to the Users Group in Windows 1. -
Page 346: Figure I-11 User Class Window
Appendix I: LDAP Schemas Figure I-11 User Class Window 3. Right click on a user and left click on Properties. Figure I-12 shows the window that displays. Figure I-12 Class User Properties Window 4. Under the Attributes tab, click on Add. Figure I-13 shows the window that displays. -
Page 347: Figure I-13 User Properties Window
Appendix I: LDAP Schemas Figure I-13 User Properties Window 5. Find the secureLinxSLCPerms attribute, highlight it, and click on OK. Figure I-14 Select Schema Object Window 6. Click on OK on the window underneath. 7. Click on File and click on Save. 8. -
Page 348: Adding The Permissions To The Individual User
Appendix I: LDAP Schemas Adding the Permissions to the Individual User 1. Open ADSI Edit (if you start typing adsi in the search line in Windows, it should find it). Figure I-15 shows the window that displays. Figure I-15 ADSI Edit Window 2. -
Page 349: Figure I-16 Adsi Edit Window, Cn=Users Folder
Appendix I: LDAP Schemas Figure I-16 ADSI Edit Window, CN=Users Folder 3. Right click on the user for whom you wish to configure permissions and left click on Properties. Figure I-17 shows the Properties Window. Figure I-17 Properties Window 4. Under the Attribute Editor tab, scroll down to secureLinxSLCPerms. 5. -
Page 350: Values To Use
Appendix I: LDAP Schemas Figure I-18 Attribute Editor Window Values to Use The values that you can use in the Value: field that specify the user permissions are as follows: rights data listen clear group escseq ... -
Page 351: String Format
fc: Firmware/Configuration dr: Diagnostic Reports sn: Secure Lantronix Network wb: Web Access For data, listen, and clear, you specify ports. Contiguous ports with a dash, non-contiguous with a comma, U1 for the USB port, or U and L for the upper and lower PC Card slots (1-5,8,11,U,L).
Need help?
Do you have a question about the SLC8 and is the answer not in the manual?
Questions and answers