Table of Contents
Advertisement
Quick Links
Advertisement
Table of Contents

Related Manuals for Clarion RPNP Plug and Play Receiver


Summary of Contents for Clarion RPNP Plug and Play Receiver
- Page 1 Plug and Play Receiver User’s Guide...
-
Page 2: Dear Customer
Dear Customer Congratulations on your purchase of the world’s finest brand in the electronic industry. At Clarion we are committed to high-quality sound reproduction, and are confident that you will be pleased with your purchase. Clarion’s Sirius Satellite Plug and Play Receiver provides entertainment with the flexibility of both home and car use. -
Page 3: Fcc Notice
Operation is subject to the condition that this device does not cause harmful interference. Copyright and Trademarks This document is copyrighted by Clarion. You may not copy any portion of it without permission. SIRIUS is a registered trademark of SIRIUS... -
Page 4: Table Of Contents
Contents Getting Started ... 5 What comes in the box ... 5 Additional components ... 5 How satellite radio works ... 6 Preparing to use the Plug and Play receiver ... 7 Finding a location for the Plug and Play receiver at home... - Page 5 Setting Options ...18 Accessing options ... 18 Quick reference to options ... 18 Sirius ID ... 19 Display settings ... 19 FM Transmitter ... 20 Switching FM On and Off... 20 Setting the frequency ... 20 Add or Skip ... 21 Skipping a stream ...
-
Page 6: Getting Started
1. Getting Started What comes in the box Plug and Play receiver Remote control unit Also Includes AAA batteries for the remote control SIRPNP Additional components In addition to the Plug and Play receiver, you will need a kit for your home or your vehicle (or both): •... -
Page 7: How Satellite Radio Works
How satellite radio works SIRIUS Satellite Radio company in New York City User’s Guide Satellite The antenna receives SIRIUS signals anywhere in the continental United States provided no obvious satellite signal obstructions are in the way. Obstructions include: nearby buildings, high terrain, parking garages and Hundreds of streams of radio content bounce off the... -
Page 8: Preparing To Use The Plug And Play Receiver
Preparing to use the Plug and Play receiver See the separate installation guide for how to install the home or vehicle kit. Finding a location for the Plug and Play receiver at home Install the antenna and Plug and Play receiver near your stereo receiving equipment. -
Page 9: Make A Note Of Your Identification Number
The default display appears. Default display For a description of this screen, see “How to read the default display” on page 10. Make a note of your identification number You may need this number in the future. Press MENU. The unit displays the Menu Options page with the SIRIUS ID option highlighted. -
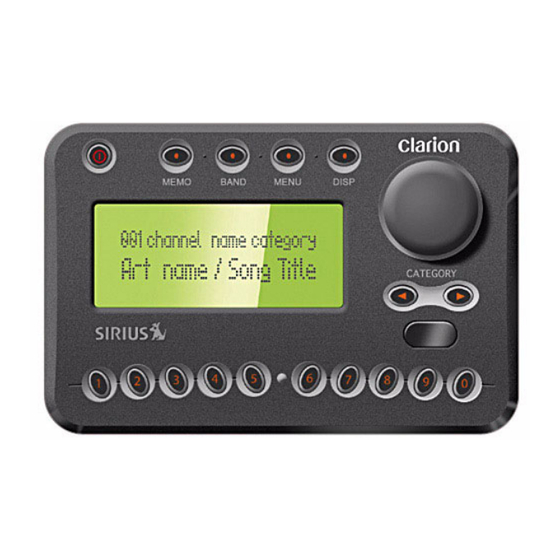
Page 10: Plug And Play Receiver Controls (Front Panel)
Plug and Play receiver controls (front panel) MEMO (memory) lets Press BAND momentarily to you store up to 20 artist switch among bands A, B and or song title C. Each band contains 10 combinations. preset stream settings. The S-SEEK function searches the current incoming signal for an artist or song match... -
Page 11: How To Read The Default Display
How to read the default display 3-digit stream Stream name number Song title Signal strength Category indicator name (genre) Clock Default display User’s Guide 2. Basic Operations Tuning to a stream (channel) The Encoder knob enables you to locate and select Artist’s name the stream by turning it clockwise or counter... -
Page 12: Tuning By Category
Enter the stream number using the keypad buttons. The stream automatically begins to play. Tuning by category To select a stream category, press the Category UP or DOWN buttons. Category list To scroll up or down through the streams within the current category, turn the Encoder knob. -
Page 13: Presetting Favorite Streams
Presetting favorite streams The Plug and Play receiver provides three bands (A, B, and C) you can use to assign a number to a favorite stream. Each band maintains a list of 10 favorite streams. From the default display: Press BAND momentarily to select A, B, or C. The display in the lower right hand side changes to the corresponding preset band. -
Page 14: Displaying The Current Artist And Title
The LCD changes to a four-line menu with the preset numbers (for example A-1) followed by the stream name. Press DISP again to display the presets by artist, and again to display them by song title. Preset list by artist and song title Rotate the Encoder knob to move through the list. -
Page 15: Checking What's Currently Playing Elsewhere
Checking what’s currently playing elsewhere You can view a list of artists and song titles that are currently playing on other streams without changing the current stream. From the default display: Press DISP (display). The unit displays the default screen. Press and hold DISP. -
Page 16: Replacing Information
Replacing information If the unit’s memory is full, it displays the following message for one second: Memory full alert Then it gives you the option to replace a song in the list with the current one you’re listening to. Use the Encoder knob to choose Replace or Cancel. -
Page 17: Viewing Favorite Information
If it finds one or more songs, the following message appears for two seconds. Favorite songs alert Then the list of favorites that are currently playing appears. Use the Encoder knob to highlight a song and press the knob to listen to it. User’s Guide Viewing favorite information Press and hold MEMO for three seconds. -
Page 18: Deleting Favorite Information
Use this feature to allow only those who know the four-digit activation code to listen to the stream. For instructions, see “Lock Options” on page 21. Turning the unit off Press the power button momentarily. The Clarion logo appears for two seconds and the unit turns off. -
Page 19: Setting Options
3. Setting Options There are a variety of ways to customize how your Clarion Plug and Play receiver works. Accessing options Press MENU. The Menu Options list appears. Using the Encoder knob, highlight the option you wish to change. Press the Encoder knob to select the highlighted option. -
Page 20: Sirius Id
Memory Options stores favorites and turns automatic seeking on and off. Time Based Features sets the clock and alarms. Factory Default restores factory default settings. Sirius ID Displays your unique 12-digit SIRIUS ID number. You can’t change this number. Sample SIRIUS ID SIRPNP Display settings Contrast and Dimming controls: adjust the LCD... -
Page 21: Fm Transmitter
Rotate the Encoder knob to highlight the option or setting and press the knob to select it. Press MENU to return to Color options menu. FM Transmitter This option controls whether frequency modulation (FM) is used, and sets the frequency. You would use the FM transmitter if, when you installed the vehicle kit you chose a wireless connection between the Plug and Play receiver and... -
Page 22: Add Or Skip
Add or Skip With hundreds of streams available, you may wish to limit the accessible list to only those you like. Skipping a stream When you select this option, the unit displays a stream list with the current stream highlighted. Rotate the Encoder knob to highlight the stream to skip. -
Page 23: Locking A Stream
Locking a stream When you select this option, the unit prompts you to define a four-digit lock code. If this is the first time you’ve used this feature, enter the default code “0000.” If you’ve used this feature before, enter your unique four-digit code. -
Page 24: Changing The Lock Code
Changing the lock code Press MENU. Rotate the Encoder knob to highlight Lock Options. Press the Encoder knob to select Lock Options. Rotate the knob to highlight Edit Code. Press the knob again. Enter the default code “0000” (or the lock code you previously defined). -
Page 25: Memory Options
Rotate the Encoder knob to highlight Antenna Aiming. The unit displays two 10-segment horizontal bar graphs with a minus (-) to the left and a plus (+) to the right. The SAT graph displays the satellite signal strength. The TER graph shows the terrestrial signal strength. -
Page 26: Time Based Features
Time Based Features The SIRIUS signal maintains the current time and can trigger pre-programmed alarms. Once you turn the power on and the unit receives the satellite signal, the unit automatically maintains the time unless you remove it from its docking base. If the receiver loses the signal, it loses the time and will not trigger any pre-programmed alarms. -
Page 27: Program Alert
the hours. AM and PM switch automatically. Turn the Encoder knob to set the minutes. Clockwise increases the minutes and counterclockwise decreases them. Press the Encoder knob to accept the selected time (or press Menu to cancel). Program Alert This feature allows you to program the unit to switch to a specific stream at a specific time. -
Page 28: Sleep Mode
After running for 59 minutes of inactivity, the unit displays: Cancel Auto Shutdown. If you’re near the unit and wish it to continue, press the Encoder knob to cancel shutdown. Your settings are: Enabled, Disabled (default). Rotate the Encoder knob to highlight the setting and press the knob to select the highlighted setting. -
Page 29: Using The Remote Control
• Time Zone: Eastern • Daylight Savings Time: Observed • Alarm: OFF • Alarm Time: 12.00pm • Program Alert Time: 12.00pm • Program Alert Day: Monday • Program Alert Stream: current stream • Auto Shutdown: OFF • Sleep Mode: OFF User’s Guide 4. -
Page 30: Remote Control Features
Remote control features Power turns the Plug and Play receiver on and off Use the keypad buttons to directly enter a stream number, and recall MENU accesses menu options. stream numbers. Use CAT- (Category) to access categories (genres) in descending order. Select/Direct confirms selection in various lists and menus. -
Page 31: Troubleshooting
5. Troubleshooting Description The Plug and Play receiver does not turn on. The LCD displays, “Check antenna”. Reception is marred by audio static or loss of clarity. There’s no signal on the Plug and Play receiver’s display. User’s Guide Probable Cause The power cable may not be properly connected. - Page 32 Description You hear no sound. SIRPNP Probable Cause The audio cables are not connected. You’ve selected an incorrect FM frequency. Remedy Check the cables at the Plug and Play receiver and the radio. Select another FM modulator frequency.
-
Page 33: Specifications
6. Specifications Audio Output: (100-250 ohms): Fuse: Power Supply: Dimensions (W x H x D): User’s Guide 650mV RMS Maximum 3A Slow Blow 10-16V, Negative Ground, DC 110mm x 73mm x 28mm (with knob) - Page 34 SIRPNP NOTES...
- Page 35 User’s Guide NOTES...
-
Page 36: Limited Warranty Information
9. Should you have any difficulties with the performance of this product during the warranty period, please call or visit our web site (www.clarion.com) for a listing of Authorized Warranty Ser- vice Centers in your area. You may also contact Clarion at the address listed below. In USA:... - Page 37 Clarion Corporation of America 661 West Redondo Beach Blvd. www.clarion.com 200401-SIRPNP-10 Rev2.0...
Need help?
Do you have a question about the RPNP Plug and Play Receiver and is the answer not in the manual?
Questions and answers