
Related Manuals for Clarion CMS4


Summary of Contents for Clarion CMS4
- Page 1 Owner’s manual & Installation manual MARINE DIGITAL MEDIA BLACK BOX RECEIVER WITH WATERTIGHT DISPLAY CONTROLLER...
-
Page 2: Table Of Contents
Congratulations on your purchase of a Clarion mobile electronic product. We are confident that you’ll enjoy your Clarion experience. There are many benefits to registering your Clarion product.We invite you to visit our website at www.clarion.com to register your Clarion product. -
Page 3: Features
20cm between the radiator & your body 3. CAUTIONS ON HANDLING TURES Exposure to extreme heat and direct sunlight may hinder the performance of your Clarion product. In the event this happens, allow the unit to cool down before use. CMS4... -
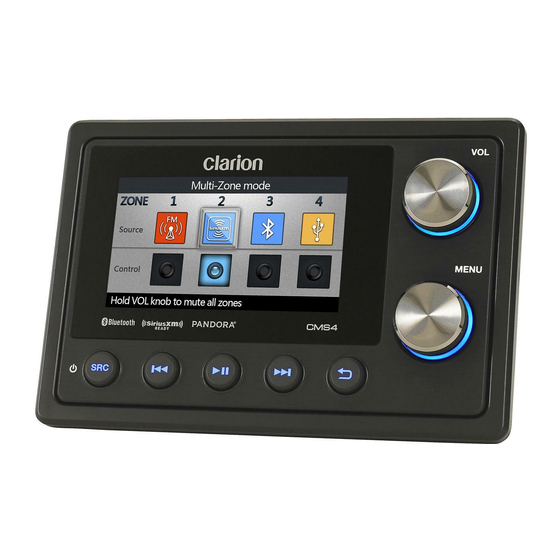
Page 4: Controls
Inc., registered in the U.S. and other countries. The Bluetooth word mark and Logos are owned by the Bluetooth SIG, Inc. and any use of such marks by Clarion Corporation of America is under license. Other trademarks and trade names are those of their respective owners. -
Page 5: Choosing Your Source Unit Configuration
(2 sec.) to bring up the Power off / Display off selection. Select Power off to completely power down the CMS4 unit. [ VOL ] Knob Select Display off to keep the CMS4 operating Rotate the [ VOL ] knob clock-wise to increase with the display backlight off. - Page 6 When selecting a source, press and hold the [MENU] knob to automatically set all zones to that source. Note: In any source, Press the [MENU] knob to access current source settings. Press and hold the [MENU] knob to access CMS4 device settings. CMS4...
-
Page 7: Operations
Engine ON position 2. If the CMS4 does not automatically turn on, Press the [ /SRC] button to turn the power on. Press and hold it (2 sec.) to bring up the Power Off/Display Off selection. -
Page 8: Settings
This option allows the user to select theme for the LCD display. Auto is the default setting and is triggered through the dimmer wire on the Balance CMS4 black box unit. Press the [ MENU ] knob Rotate the [MENU] knob to adjust the Balance... -
Page 9: Audio Mode
“EUROPE", “USA", ASIA" or "AUSTRALIA" Audio Mode Press the [MENU] knob to enter the Audio Mode screen, rotate the [MENU] knob to select Standard or Multi-zone mode. Factory Reset Press the [MENU] knob to restore the factory default settings. CMS4... -
Page 10: Radio (Am/Fm/Weather Band) Operation
Press the [ MENU ] knob to turn On or Off the search for the next radio station. RDS Mode. Manual Seek Use the [MENU] knob to select the desired PTY mode. Rotate the [MENU] knob to manually change intervals step by step. CMS4... -
Page 11: Siriusxm Satellite Radio Operation
During playback,the SiriusXM Tuner 1. Press the [MENU] button to activate the Channel will continue to store the channel audio until Browse mode. you exit the Replay mode. 2. Press the [ ] or [ ] button to view: Channel->Artist->Song->Info CMS4... -
Page 12: Parental Controls
4. To confirm the New passcode, enter it a second time. Note: If the passcodes do not match , the radio will display "CODE DID NO MATCH PLEASE ENTER AGAIN " for 3 seconds and then it will return to the Old Code screen. CMS4... -
Page 13: Usb Mode Operation
Press the [ ] button to pause the track is currently playing. Note: Press the [ ] button to resume playing the Enabling shuffle mode will change track that has been paused. Repeat to the default mode of ALL tracks. CMS4... -
Page 14: Ipod/Iphone/Ipad Mode Operation
Play / Pause shuffle function. Press the [ ] button to pause the track that Note: is currently playing. Press the [ ] button to exit . Press the [ ] button to resume playing the track that has been paused. CMS4... -
Page 15: Bluetooth Operation
CMS4 ”. Browse 3. "Connected OK” will appear on the CMS4 display. 4. The unit will automatically enter the BT Audio source 1. Press the [MENU] knob to access the BT and you can now start streaming audio from your Audio Browse mode. -
Page 16: Pandora Operation
Pandora limits the number of skips allowed on their service. If you attempt to skip tracks beyond the limit, “SKIP LIMIT” is displayed. Replay Press the [ ] button to replay the currently playing track. This is a feature supported by a Pandora Plus subscription. CMS4... -
Page 17: Aux Operation
Camera Operation The unit features an optional Security Camera input function. Press the [ /SRC] button and select “Camera”. The camera can be viewed on the unit’s TFT screen plus the camera output can be viewed on the screen. CMS4... -
Page 18: Troubleshooting
The audio quality is The Bluetooth reception is poor. Move the device closer to the audio system or poor after connection remove any obstacle between the device and with a Bluetooth- the system. enabled device. CMS4... - Page 19 Parental Control feature and how to access locked channels. Subscription An update to your SiriusXM subscription has been received by the SiriusXM Updated tuner. Press any button to continue. Visit www.siriusxm.com or call 866-635- 2349 if you have questions about your subscription. CMS4...
-
Page 20: Specifications
Bluetooth Specification: Bluetooth Version. 3.0+EDR (Enhanced Data Rate) Supported Profiles: A2DP (Advanced Audio Distribution Profile) aptX (CD Quality audio bandwidth matching and reproduction) AVRCP 1.4 (Audio/Video Remote Control Profile) (Serial Port Profile) (Simple Secure Pairing) Send/Receive Sensitivity: Class 2 CMS4... -
Page 21: Installation And Wire Connection
The control unit should be mounted to a dry, clean and flat surface. Ensure the rear gasket is fully sealed to the mounting surface without distorting the unit. Dashboard Dashboard Screw Hole Screw Hole Screw Hole Screw Hole Mounting Bracket Trim Plate Method 1 Method 2 CMS4... - Page 22 ON and power on the unit to check if it is operating correctly. If abnormalities occur, disconnect the battery negative terminal, recheck all wiring and try again. Please refer to the troubleshooting section for assistance. BLACK BOX MOUNTING CMS4...
-
Page 23: Wire Connection
3048mm (10 feet) PURPLE SPEAKER REAR RIGHT (+) PURPLE/BLACK SPEAKER REAR RIGHT (-) BLACK GROUND (-) BLACK BOX ORANGE/WHITE (+12V)DIMMER Extension Cable Female Female Male PURPLE/WHITE CAMERA TRIGGER (+) POWER ANTENNA BLUE DISPLAY CONTROLLER UPDATE YELLOW CAMERA DISPLAY CONTROLLER CMS4... - Page 24 Clarion Corporation of America All Rights Reserved. Copyright © 2016: Clarion Corporation of America Printed in China 10/2016 CMS4...
Need help?
Do you have a question about the CMS4 and is the answer not in the manual?
Questions and answers