Novation LaunchKey Mini Mk3 Manual
- User manual (22 pages) ,
- User manual (38 pages)
Advertisement

The normal operation of this product may be affected by a strong electrostatic discharge (ESD). In the event of this happening, simply reset the unit by removing and then replugging the USB cable. Normal operation should return.
Introduction
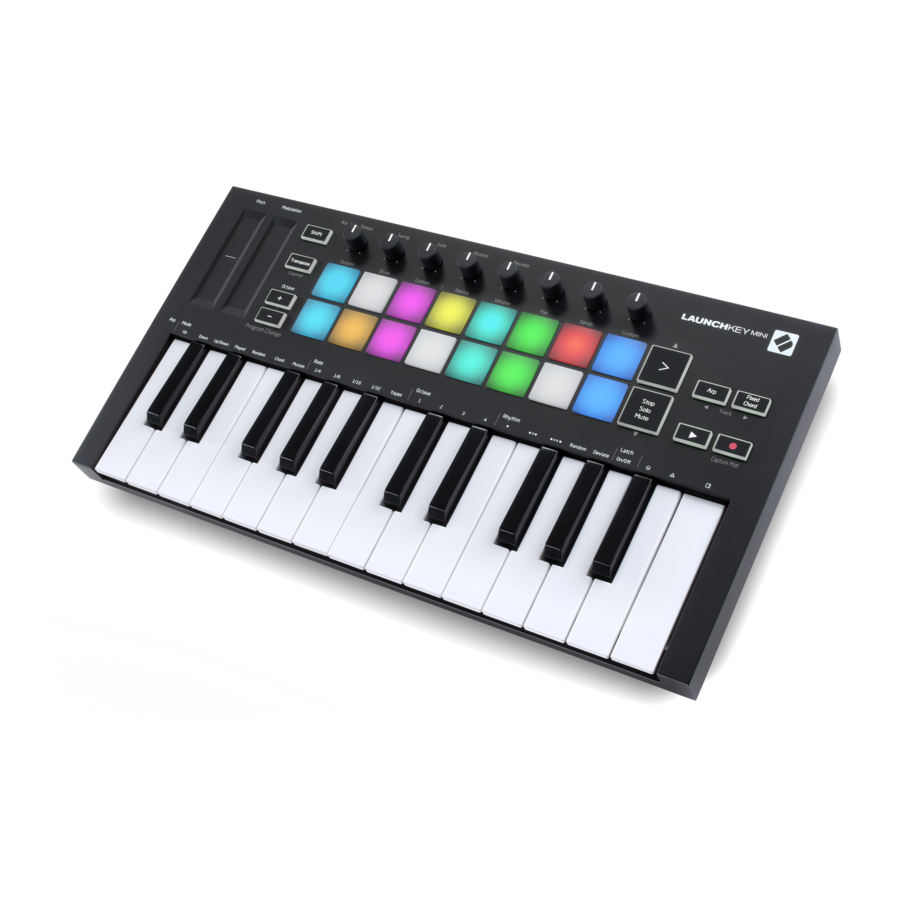
The Launchkey Mini [MK3] is Novation's most portable MIDI keyboard controller. Though compact in size, Launchkey Mini is packed with powerful features and a streamlined workflow that will elevate your music production and performance.
Launchkey Mini integrates perfectly with Ableton Live (and other DAWs) for both production and performance. You can navigate and control Live's Session View, play and record clips, adjust effects and much more without ever looking at your computer. Additionally, we provide you with a license for Ableton Live Lite should you need one.
Launchkey Mini features a creative arpeggiator ('Arp'), as well as 'Fixed Chord' mode – both of which make finding new musical ideas easier. Launchkey Mini's pads bring your Ableton Session to your fingertips in full RGB colour, so you know exactly which clips you're launching. Finally, you can make Launchkey Mini the perfect controller for your studio or on the go with Custom modes, where you can customise knobs and pads using Novation Components.
The Launchkey Mini also features a standard TRS MIDI Out 3.5mm jack* for connecting to your hardware synths and drum machines. This means you can use many of the Launchkey Mini's functions without a computer!
If you need any support please contact us at support.novationmusic.com.
Key Features
- Ableton Live integration – Launch clips and scenes, control Live's mixer, play instruments and Drum Racks, capture MIDI, and more.
- Integration with other DAWs (Apple Logic Pro X, Propellerhead's Reason, etc. and HUI)
- Connect to your hardware with a standard TRS MIDI Out 3.5mm jack *
- 25 velocity-sensitive mini-keys
- 16 velocity-sensitive RGB pads
- 8 rotary knobs
- Powerful and creative Arpeggiator for generating ideas quickly
- Fixed Chord mode
- Play and Record transport control
- Custom modes for user-defined mappings of knobs and pads
* TRS MIDI Out 3.5mm to MIDI DIN converters are available for purchase at novationmusic.com
What's in the Box
- Launchkey Mini
- USB Type-A to B cable (1.5 meters)
- Safety Instructions
Getting Sarted with your Launchkey Mini [MK3]
We've made getting up and running with Launchkey Mini as easy as possible, whether you're a brand new beatmaker or a seasoned producer. Our 'Easy Start Tool' provides a step-by-step guide on getting set up that is tailored to your needs.
We'll give you exactly what you need, whether you've never made music before, or if you just want to download your included software.
When connecting Launchkey Mini to your computer, it will appear as a 'Mass Storage Device', just like a USB drive. Open this up and click the link 'Click Here to Get Started.url'.![]()
Mass Storage Device icon
This will open our online Easy Start Tool, which will get you up and running, or take you straight to your included software – you choose!
Easy Start Tool Welcome Page
As part of this process, you may register your Launchkey Mini [MK3] to get access to your included software. We give you everything you need to start making tracks.
Alternatively, you can also register your Launchkey Mini by going to customer.novationmusic.com/register (pictured below). You'll then need to make an account and enter the serial of your Launchkey, which will give you access to the bundled software.
Launchkey Mini Registration Page
Getting Connected
Connecting to a Computer
The Launchkey Mini is bus-powered, meaning it turns on as soon as you connect it to your computer with a USB cable.
Connecting to Mobile Devices
iOS
To operate the Launchkey Mini with an iOS device, use Apple's Lightning to USB 3 Camera Adapter with a separate 2.4A Lightning charger.
Android
To operate the Launchkey Mini with an Android device we recommend a USB OTG to USB adapter.
Using as a Standalone MIDI Controller
If you want to use the 3.5mm MIDI output on the Launchkey Mini without a computer, you can power the unit with a standard USB power supply (5V DC, minimum 500mA).
Note that the Launchkey Mini is only compatible with Circuit using TRS MIDI Type A adapters. Many other Novation products (such as Launchpad Pro) will also require a Type B adapter to properly communicate with the Launchkey Mini via its Type A adapter.
Hardware Overview

- Pitch and Modulation touch strips for bending pitch or adding modulation.
- Press Shift and other buttons to access secondary functions.
- Transpose lets you transpose your keyboard plus or minus 11 semitones. Press Shift and Transpose to select MIDI Channel output for the keyboard.
- Octave + and - buttons move the keyboard up or down across 7 octaves (C-1 to C5).
- Rotary knobs control hardware, software parameters, or settings on the Launchkey itself.
- Pads are great for triggering clips in Ableton Live's Session View and playing drums. Holding Shift lights up the top row of pads, with the current pad mode lit the brightest. You can then switch between the 3 pad modes:
- Session – For triggering clips and navigating Live's Session View.
- Drum – For playing drums with the velocity-sensitive pads.
- Custom – For playing a custom selection of notes with personalised colours. Edit custom modes on components.novationmusic.com/launchkey-mini-mk3
- Press the Arp button to enable the Arpeggiator.
- While holding the Fixed Chord button, press and release the keys that you wish to be part of the stored, 'fixed' chord.
- This button controls your DAW's playback.
- The Record button starts the recording process in your DAW.
Rear View

Top Panel

Using the Launchkey Mini [MK3]
The Launchkey Mini is designed to work seamlessly with Ableton Live, offering deep integration through powerful production and performance controls. Launchkey Mini also boasts a powerful arpeggiator ('Arp') and a 'Fixed Chord' mode – both of which can be used with Live, other DAWs, or standalone with your outboard gear. In addition, you can modify the Launchkey Mini to suit your needs with Custom Modes. Continue reading for explanations of all of Launchkey Mini's functionality.
Working with Ableton Live 10
Installation
If you don't yet own Ableton Live 10, register your Launchkey Mini at novationmusic.com/register to download and install your included copy of Ableton Live 10 Lite. If you've never used Ableton Live before, we recommend visiting our Easy Start Tool (see 'Getting Started with your Launchkey Mini [MK3]'). There you'll find videos covering installation, the software's basic features, and how to get started making music with your Launchkey Mini.
Setup
With Ableton Live installed, get your Launchkey Mini up and running by plugging it into your Mac or PC's USB port. When you open Live your Launchkey Mini will be automatically detected and enter Session mode.
If you press Shift on the Launchkey your pad lights should look like the image below. The first 3 pads (orange) select pad behaviour, while the 5 pads to the right (green) select knob behaviour.
If your pads do not resemble the image above you'll need to configure Live's Control Surface Preferences. To do this, find the 'Link/MIDI' Preferences menu in Ableton Live:
Windows: Options > Preferences > Link/MIDI
Mac: Live > Preferences > Link/MIDI
In the Link/MIDI tab you'll need to copy the settings shown above. First, select the Launchkey Mini [MK3] from the Control Surface menu. Then, under Input and Output select Launchkey Mini (Launchkey Mini InControl) or Launchkey Mini MIDI IN2 (Windows). Finally, match the Track, Sync and Remote settings.
If you're having trouble getting your Launchkey Mini working with Ableton Live, be sure to visit our Easy Start Tool for video explanations.
Session Mode
To access Session mode on the Launchkey Mini hold Shift and press the Session pad (the top left pad).
Session mode is designed to control Ableton Live's Session view, seen below. Session View is a grid that consists of clips, tracks and scenes.
Launchkey Mini's Session mode provides an 8x2 view of the clips in your Session View. Example of Launchkey Mini's pads in Session mode:
Clips are typically loops that contain MIDI notes or audio.
Tracks represent virtual instruments or audio tracks. MIDI clips placed on instrument tracks will play back on the instrument that is assigned to that track.
Scenes are rows of clips. Launching a scene will launch all clips in that row. This means that you can arrange clips into horizontal groups (across tracks) to form a song structure, launching scene after scene to progress through a song.
Again, access Session mode on the Launchkey Mini by holding Shift and pressing the Session pad (the top left pad).
In Session mode, the pads represent the grid of clips found inside the coloured rectangle in Ableton Live's Session View. The image below shows such a rectangle (yellow) extending from the left-most track to the Master track:
Any changes you make to clip position or colour within Ableton Live will be represented in the Session mode of Launchkey Mini. Unlit (dark) pads indicate empty clip slots. 
You can navigate around Session View by holding Shift and pressing the 4 buttons with arrows as their secondary functions: >, Stop Solo Mute, Arp, and Fixed Chord.
More specifically, you can move the currently selected grid of clips (inside Ableton Live's coloured rectangle) up or down by holding Shift and pressing the following buttons:
Shift + Scene Launch (>) – This moves the grid of clips up one row.
Shift + Stop, Solo, Mute – This moves the grid of clips down one row.
Holding Shift and pressing Arp (left) or Fixed Chord (right) will select the adjacent left or right track.
This will automatically arm the track so it is ready to receive MIDI.
Launching Clips
Pressing pads will launch clips in the corresponding location in your Session View. Pads will pulse green to indicate that a clip is playing. Pressing the pad again will relaunch the clip, and pressing an empty pad will stop playback on that track.
Live's Global Quantization chooser
How fast clips stop or relaunch is set by Ableton Live's Global Quantisation chooser, located at the top of the Live screen. By default, this is set to 1 bar, but can go as fast as 1/32 notes, or as slow as 8 bars. It can also be set to 'None' so clips react immediately.
Launching Scenes

Pressing the Scene Launch button (>) launches scenes in Ableton Live. This means that all of the clips in a row can either start, stop, record or relaunch together.
Stop, Solo, Mute

While in Session mode, it is possible to switch the functionality of the bottom 8 pads so that they no longer launch clips. This is done with the Stop, Solo, Mute button.
The Stop, Solo, Mute button toggles between four different states which affect tracks in the following ways:
- Stop (Red) – In this state, pressing pads will stop any clip on the corresponding track.
- The red pads will dimly glow if tracks are not playing.

- Solo (Blue) - Pressing the pads will solo the corresponding tracks, meaning only tracks with Solo on will be heard.
- The pads will dimly glow if tracks are not soloed (ie they are silent) and if soloed they will be a steady bright blue.

- Mute (Yellow) – Pressing pads will Mute the corresponding tracks.
- The pads will dimly glow for muted tracks, leaving pads for unmuted tracks at their original brightness and colour.

- Clips (White) – the fourth press (after toggling through Stop, Solo and Mute) changes the function of bottom pads back to the default Session mode, where the bottom row of pads will again represent clips.


Record / Capture MIDI

Pressing this button triggers Session Record. This will allow you to record what you're playing to new clips as well as overdub existing ones.
Holding Shift and pressing Record triggers the Capture MIDI function. This allows you to retrospectively capture any recently played MIDI notes in the record-armed track. This means that if you are not recording, but you play something that sounds great, you can use Capture MIDI to send it straight into a clip.
Playing and Recording Drums

Drum mode transforms the Launchkey Mini's pads into velocity-sensitive drum pads.
Hold Shift and press the Drum pad (2nd from the top left) to enter this mode.
If a Drum Rack (an Ableton MIDI instrument) is loaded onto the selected Live track, and the Launchkey Mini is in Drum mode, the pads light up the colour of the track. These pads will play whatever Drum Rack pads are visible on your computer screen, turning green when played, and red if the track is recording.
Hold Shift and press either the > or Stop, Solo, Mute buttons to scroll up/down a Drum Rack's bank of 128 pads.
When using Ableton's Drum Racks, Drum mode will – apart from triggering sounds – select the associated Drum Rack pad within a Drum Rack. This means that on release, the last played Drum Rack pad becomes grey and Ableton Live shows the selected Drum Rack pad on the screen.
Using Ableton Live Devices
Device mode allows you to control the selected 'device' (Ableton or 3rd-party Instruments and Effects) on a Live track. Hold the Shift button and press the Device pad (4th from top left) to use this mode.
In this mode, knobs control the first 8 parameters of the selected device. This is especially useful for controlling Live's 8 'macro' knobs, available on Instrument and Effect Racks.
Macro controls for an Ableton device
The above picture shows an Impulse preset called 'Percussion 1'. Here, the Launchkey Mini's knobs control sample volumes, sample start and 'stretch', as well as delay and reverb amounts.
Using Ableton Live's Mixer

The Launchkey Mini's 8 knobs (in the red box above) give you hands-on control of Live's mixer. Hold Shift, then press either the Volume, Pan or Sends pads (in thee blue box above) to control those respective parameters with the knobs.
- Volume - This mode allows for volume control over the 8 selected tracks currently inside Live's coloured rectangle. Holding the Shift button and pressing the Volume pad (the 4th from the top right) selects this mode.
- Pan - This mode allows you to pan the 8 selected tracks currently inside Live's coloured rectangle. Holding the Shift button and pressing the Pan pad (the 3rd from the top right) selects this mode.
- Sends - This mode allows you to control the send levels of tracks in Ableton Live. Hold Shift and press the Sends pad (2nd from the top right) to enter this mode.


When in Sends mode two purple pads on the bottom row will switch between Send A or Send B. The left purple pad chooses Send A, and the right purple pad selects Send B.
Sending audio to return tracks is a great way to use fewer audio effects. For example, instead of putting the same reverb on many tracks, you can put one reverb on a return track and send multiple tracks to it.
Arp
Pressing the Arp button on the right of Launchkey enables the Arpeggiator. After engaging Arp the Launchkey takes your chords and creates an arpeggio – ie it plays each note of the chord one after another. The Arpeggiator will run as long as keys are held, at the rhythmic value specified by the Arp Rate.
Launchkey's Arp is a great way to come up with interesting melodies and progressions with ease.
Arpeggiator Rotary Knobs

When you hold the Arp button the rotary knobs can transform your arpeggios.
- Tempo – This knob speeds up or slows down your arpeggio relative to the Arp Rate. When Launchkey Mini is used as a standalone controller, this knob ranges from 40 BPM to 240 BPM. However, when synced with Ableton Live, this knob will have no effect.
- Swing – This knob sets the amount that every other note is delayed, resulting in a swung rhythm. To change the Arpeggiator's Swing, press and hold the Arp button, and then turn the knob labelled Swing. By default (centre position), swing will be set to 50% (meaning no swing), with extremes of 80% (very swung) and 20% (negative swing). Negative swing means every other note is rushed, instead of delayed.
- Gate – Adjusting this knob will create longer or shorter MIDI notes, resulting in either a more 'staccato' arpeggio, or a more fluid, 'legato' one. This knob goes from 1% to 200% of the space between notes. For notes that have swing applied, both notes retain the same gate length.
- Mutate – After you select Mutate as the Arp Mode, hold the Arp button and turn this knob to add random notes to your arpeggio. A new 'mutation' occurs with each turn of the knob. When you stop turning the knob notes are set and will repeat indefinitely.
- Deviate – After selecting Deviate as your Arp Rhythm, turn this knob to make rhythmic variations. With every turn of this knob, you'll create a different pattern of rests.
Arp Modes
After turning on Arp you'll be in 1 of 7 Arpeggiator Modes, each resulting in arpeggios of different note orders. To change the Arp Mode, press and hold the Arp button, and then press the key corresponding to your desired mode. After pressing a key, you can see the pad above reflect your changes (as per the previous section).
- Up – Here notes are played in ascending order (ie rising in pitch). If notes are added, the number of notes in the sequence will grow but remain in ascending order. For example, you may start by holding down a first note - E3 - then quickly add two more notes - C3 and G3. The resulting arpeggio will be C3, E3 and G3.
- Down – This Mode is similar to Up Mode, but notes play in descending order (eg G3, E3, C3).
- Up/Down – This arpeggio Mode starts by playing notes in ascending order. Then, after reaching the highest note, the notes descend towards there lowest note, which plays once before the arpeggio rises again and stop before reaching the lowest note. This means that when the pattern repeats, the lowest note only plays only.
- Played – Here notes are kept repeated in whatever order they were played.
- Random – In this Mode, the order of the chord notes is randomised indefinitely.
- Chord – All notes are played back on every rhythmic step (see Arp Rate). This makes playing fast chords very easy.
- Mutate – Mutate creates its own notes and adds them to the arpeggio by turning the knob under the label 'Mutation'. Just turn this knob to alter your arpeggio in unexpected ways. The nob itself goes from 'gentle' (left) to 'crazy' (right) – ie 25% left will add subtle variation to your arpeggio, while 99% right will give you very unexpected results. When you're happy with what you hear, stop turning the knob. The notes are then set and will repeat indefinitely.
Arp Rates

These options specify the speed of the arpeggiated notes. Since each note is played immediately after the end of the previous one, a shorter rate (eg 1/32) will play an arpeggio faster than longer one (eg 1/4).
Rate options are common musical note values: quarter (¼), eighth (1/8), sixteenth (1/16) and thirty-second (1/32) notes. To change the Arp Rate, press and hold the Arp button, and then press the key below 1/4, 1/8, 1/16, or 1/32.
Additionally, you can toggle triplet rhythms on/off for each of the above musical values by clicking the key below 'Triplet'. This turns your arpeggio notes into quarter, eighth, sixteenth and thirty-second note triplets.
Arp Octaves

These 4 keys specify across how many octaves your arpeggio will repeat. To change, press and hold the Arp button, and then press the key below 1, 2, 3 or 4. Choosing an octave higher than 1 will repeat the arpeggio at higher octaves. For example, an arpeggio that was C3, E3, and G3 at 1 octave will become C3, E3, G3, C4, E4, and G4 when set to 2 octaves.
Arp Rhythms

Arp Rhythms add musical rests (silent steps) to your arpeggio's pattern, allowing for greater variations in your arpeggios. Hold Arp then press one of the following, which will turn the pads yellow.
- Dots - These three options are rhythmic patterns.
- O – The normal Arpeggiator setting, this places a note on every division of the selected Arp rate.
- OXO (note - rest - note) – This rhythm adds a rest between every pair of notes.
- OXXO (note - rest - rest - note) – This pattern adds two rests between every pair of notes.
- Random - This option creates random rests for random lengths. Each step has a 50% chance of being either a note or a rest. In the case that it is a rest, the note is shifted to the next step and is not skipped.
- Deviate - This is the most unique Arp Rhythm, and makes many variations of notes. It uses the Deviate rotary knob, where every turn creates a different rest pattern.
Latch

Latch lets you use the Arpeggiator without holding down keys. Any notes you press and release concurrently will form a new arpeggio pattern which the arpeggiator 'latches' onto. The arpeggiator then continues to play as if you never released the keys. When you press a new key, the previous arpeggio erases and a new one forms.
To turn on Latch, press and hold the Arp button, and then press the key below 'Latch'. The pad below Volume will change from red to light green when you enable Latch, and you can see this pad whether you're adjusting the Arp Mode, Rate, Octave or Rhythm.
Arp Pads
The pads of the Launchkey Mini help to visually confirm the current Arp state. When the Arp button is held the pads will light up in different colours, indicating these Arp settings: purple (Arp Modes), red (Arp Rates), blue (Arp Octaves), yellow (Arp Rhythms), and red/light green (Latch).
The top row of pads select the Arp groups: Arp Modes, Arp Rates, Arp Octaves, Arp Rhythms, and Latch (On/Off). The bottom row of pads select the different options within the selected group (from the top row), as follows:
Fixed Chord
Fixed Chord lets you play a chord shape and then transpose it by pressing other keys.
To set a chord press and hold the Fixed Chord button. Then, while still holding the button, press and release the keys that you wish to be part of your chord. The chord is now stored.
Keep in mind that the first note that you input into the chord is considered the 'root note' of the chord, even if you then add notes lower than the first one, like in the example below.
These steps illustrate how to use Fixed Chord:
- Press and hold the Fixed Chord button
- Press and release C, then E, and finally G (a C Major chord). The unit stores this as the 'fixed chord'.
- Release the Fixed Chord button.
- Major chords will now sound on whatever key you press. For example, you can now press F to hear an F Major chord (shown below), or Ab to hear an Ab Major chord, etc.

Whenever you enter the Fixed Chord settings, the stored chord is erased and a new chord must be entered for Fixed Chord to work again.
Custom Modes and Components
Launchkey Mini can act as a general-purpose MIDI controller for a wide range of music production software and hardware. In addition to the Note On/Note Off messages sent from the 25 keys, each of the knobs and pads transmit a MIDI message that can be customised using Novation Components. This allows you to configure your device to use these messages as you wish.
Setting up Custom Modes
Hold Shift and press the Custom pad (3rd from the top left, for customizing pad behavior), or the other Custom pad (top right, customizing pad behavior rotary knobs behaviour) to access this mode.
Custom Modes can be created and edited using Novation Components – our online hub for all Novation products. You may back up any Custom Modes you create here. We also have several Custom Mode templates for you to download and explore on Components.
To access Components, visit components.novationmusic.com using a WebMIDI-enabled browser (we recommend Google Chrome or Opera). Alternatively, download the standalone version of Components from your Novation Account page.
Pads – When in Pad Custom Mode, the 8x2 grid of pads will send out Note messages. The note sent out by each pad, as well as the On/Off colour of each pad, may be edited in Components.
Knobs – In Knob Custom Mode, the knobs will send out CC messages. The CC sent out by each knob may be edited in Novation Components. This is useful for controlling hardware that has fixed CC values for each control.
Working with Logic Pro X
The Launchkey Mini [MK3] can serve as a controller for many tasks in Apple's Logic Pro X. Many aspects of Launchkey Mini function according to the Hardware Overview, seen earlier in this guide. Likewise, the behaviour described in the Arp and Fixed Chord sections remains the same in Logic Pro X. However, when acting as a control surface for the Logic Pro X, there are some intricacies that need describing.
Setup
After running the Launchkey Mini's installer for Logic Pro X and then connecting the device to your computer via USB Logic should automatically detect the Launchkey Mini. If this does not happen you will need to manually choose the Launchkey Mini as a 'Control Surface' via the following path:
Logic Pro X > Control Surfaces > Setup
Once in the Setup window, choose 'Install' from the 'New' menu.
This, in turn, will open the 'Install' window. Scroll to the Novation Launchkey Mini MK3 and click 'Add'.

Session Mode

Press Shift followed by the Session pad to enter Session mode for Logic Pro X. Here, by default, the pads represent tracks 1 through 8.
If a track does not contain audio or MIDI information, the corresponding pad will remain unlit.
By default, the top row of pads (red) toggle track arm, becoming brightly lit when armed. The bottom row of pads (blue) toggle track mute, likewise becoming brightly lit when a track is muted.
Press the Stop, Solo, Mute button to switch the bottom row of pads to solo (yellow). In this state, pressing pads will toggle track solo, and pads will brighten.
Press the Record button to start Logic's transport and record onto an armed track.
Navigation

Holding Shift and pressing Arp or Fixed Chord will select the track before or after the current track, respectively. Doing so will also automatically arm the newly-selected track.
Drum Mode

Hold Shift and press the Drum pad (2nd from top left) to enter Drum mode. This allows you to use the Launchkey Mini's velocity-sensitive pads for Logic's drum instruments.
Using Logic's Devices

Device mode allows you to control the selected track's 'Smart Controls' with Launchkey Mini's knobs. Hold the Shift button and press the Device pad (top right) to use this mode.
Using Logic Mixer Controls

The Launchkey Mini's 8 knobs (in red box above) let you control Logic Pro X's mixer controls. Hold Shift, then press either the Volume, Pan or Sends pads (in blue box above) to control those respective parameters with the knobs.
- Volume and Pan - These two modes allow for Volume and Pan control over the 8 selected tracks. Holding the Shift button and pressing the Volume or Pan pads (the 5th and 6th pads from the top left) changes between the two modes.
- Sends - This mode allows you to control the send levels of Logic's tracks. Hold Shift and press the Sends pad (2nd from the top right) to enter this mode.
When in Sends mode two blue pads on the bottom row will switch between Send A and Send B. The left blue pad chooses Send A, while the right blue pad selects Send B.
Working with Reason 10
Setup
After opening Reason 10 and connecting your Launchkey Mini via USB find Reason's Preferences here:
Reason > Preferences
Once in Reason's Preferences clickControl Surfaces and choose 'Auto-detect Surfaces'.
Reason should then find the Launchkey Mini [MK3]. Select it and make sure 'Use with Reason' is checked.
Rotary Knobs
With a Reason instrument selected the Launchkey Mini's 8 knobs automatically control useful parameters. Of course, which parameters the knobs control varies by instrument. With the Kong Drum Designer, for example, the Launchkey Mini's knobs (from left to right) map to Pitch, Decay, Bus FX, Aux 1, Aux 2, Tone, Pan and Level.
Navigation

Holding Shift and pressing Arp or Fixed Chord will select the track below or above the current track, respectively. Doing so will also automatically arm the newly-selected Reason track.
Preset Browsing
Press the > and Stop, Solo, Mute buttons to scroll through presets on Reason instruments. Shift and > moves to the next preset, while pressing Shift + Stop, Solo, Mute moves to the previous one.
Working with HUI (Pro Tools, Cubase)
'HUI' (Human User Interface Protocol) allows the Launchkey Mini to act like a Mackie HUI device and therefore work with DAWs that provide HUI support. DAWs that support HUI include Steinberg's Cubase and Nuendo, Avid Pro Tools, and MOTU Digital Performer, among others. Most aspects of Launchkey Mini will work according to the Hardware Overview, seen earlier in this guide. Likewise, the behaviour described in the Arp and Fixed Chord sections remains applicable for HUI-supported DAWs. The following pages will describe some of the less obvious functionality when Launchkey Mini acts as a control surface via HUI.
Pro Tools Setup
Setting up the Launchkey Mini in Pro Tools is done by going to:
Setup > Peripherals...
From there select the 'MIDI controllers' tab, and copy the settings shown above.
Using Pro Tools' Mixer

Hold Shift, then press either the Volume, Pan or Sends pads (in the blue box above) to control track volume, panning and sends A and B with the Launchkey Mini's 8 knobs (in the red box).
When in Sends mode two blue pads on the bottom row will switch between Send A and Send B. The left blue pad chooses Send A, while the right blue pad selects Send.
Cubase Setup
To set up the Launchkey Mini in Cubase, navigate to: Studio > Studio Setup.
Next find the 'MIDI port setup' option.
Click the + in the upper-left corner, and choose 'Mackie HUI'.
Cubase Setup: Choose 'Launchkey Mini MK3 DAW Port' for MIDI Input and MIDI Output. Finally, hit 'Apply' to start using the controller with Cubase.
Cubase Navigation
While in Cubase's Mixconsole, hold Shift and press Arp or Fixed Chord to select the track left or right of the current track, respectively. Doing so will also automatically arm the newly-selected track.
Using Cubase's Mixer

Hold Shift, then press either the Volume, Pan or Sends pads (in blue box above) to control track volume, panning and sends A and B with the Launchkey Mini's 8 knobs (in red box).
When in Sends mode two blue pads on the bottom row will switch between Send A and Send B. The left blue pad chooses Send A, while the right blue pad selects Send.
Vegas Mode
If the Launchkey Mini is idle for 5 minutes, it will enter Vegas mode. In this mode, colours will scroll across the pads indefinitely until a pad, button, or key is pressed.
To turn Vegas mode on and off, hold Shift while turning the unit on (ie connecting a USB cable). If the blue pad is brightly lit, Vegas mode is on.
Press this pad to toggle between fully lit (on) and dimly lit (off).
Press the Play button to resume making music with the Launchkey Mini.
Trade Marks
The Novation trade mark is owned by Focusrite Audio Engineering Ltd. All other brand, product and company names and any other registered names or trade marks mentioned in this manual belong to their respective owners.
Disclaimer
Novation has taken all possible steps to ensure that the information given here is both correct and complete. In no event can Novation accept any liability or responsibility for any loss or damage to the owner of the equipment, any third party, or any equipment which may result from use of this manual or the equipment which it describes. The information provided in this document may be modified at any time without prior warning. Specifications and appearance may differ from those listed and illustrated.
Copyright and Legal Notices
Novation is a registered trade mark of Focusrite Audio Engineering Limited. Launchkey Mini is a trade mark of Focusrite Audio Engineering Plc.

2019 © Focusrite Audio Engineering Limited. All rights reserved.
VideosLaunchkey Mini MK3 - Complete Guide on how to use (video)
Documents / Resources
References
Download manual
Here you can download full pdf version of manual, it may contain additional safety instructions, warranty information, FCC rules, etc.
Advertisement


![Recording Equipment Novation Launchpad Mini [MK3] User Manual](https://static-data2.manualslib.com/product-images/282/1649453/60x60/novation-launchpad-mini-mk3-.jpg)


Need help?
Do you have a question about the Launchkey Mini Mk3 and is the answer not in the manual?
Questions and answers