Kärcher K 2.01 Operator's Manual
Karcher k 2.01 pressure washers: user guide
Hide thumbs
Also See for K 2.01:
- Operating instructions manual (24 pages) ,
- Manual (172 pages) ,
- Operating instructions manual (8 pages)
Chapters
Table of Contents

Related Manuals for Kärcher K 2.01


Summary of Contents for Kärcher K 2.01
- Page 1 K 2.01 English (French p. 16) Please keep the original box, packaging and receipt. Before operating this unit, please read this manual thoroughly and retain it for future reference. 5.961-519.0 01/05...
-
Page 2: Table Of Contents
Part No. Serial no. Kärcher Customer Service CDN Call: 1-800-465-4980 for help or visit our website: www.karcher.ca KÄRCHER 2 YEAR WARRANTY KÄRCHER CANADA INC. warrants to the original owner that this product shall be free from defects in material and workmanship for two years from the date of its original purchase. -
Page 3: Overview
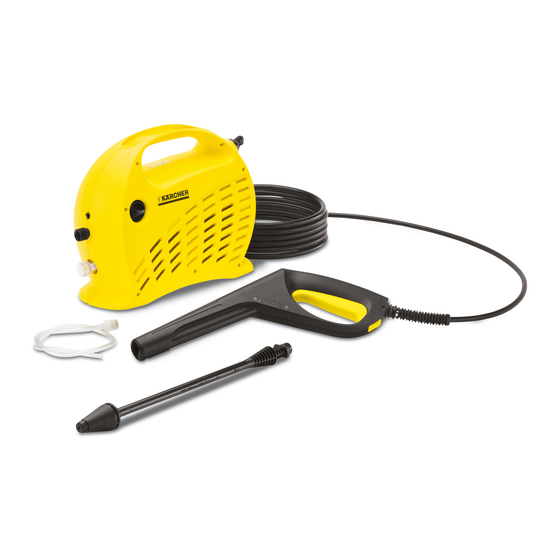
Item Description: 1 ON/OFF switch 2 Connector for detergent suction tube 3 High pressure outlet 4 Water inlet with garden hose connector 5 Detergent suction tube with filter 6 Vario power spray wand 7 Trigger gun 8 Trigger gun safety lock 9 High pressure hose 10 Power cord For household use only ! -
Page 4: Important Safety Instructions
IMPORTANT SAFETY INSTRUCTIONS WARNING! When using this product basic precautions should always be followed, including the following: Read all the instructions before using the product. To reduce the risk of injury, close su- pervision is neccessary when a pro- duct is used near children. Know how to stop the product and bleed pressures quickly. - Page 5 Extension Cords Use only extension cords with a suf- ficient gauge. Up to 25 ft = 12/3 AWG; 25 to 50 ft = 10/3 AWG. Use only extension cords that are in- tended for outdoor use. These ex- tension cords are identified by the marking “Acceptable for use with outdoor appliances;...
-
Page 6: Assembly Instructions
ASSEMBLY INSTRUCTIONS Attach the high pressure hose to the trigger gun: STEP 1: Pull out the locking slide " from the right side of the trigger gun handle. STEP 2: Insert the small end of the " high pressure hose into place STEP 3: Push the locking slide back "... -
Page 7: Operating Instructions
OPERATING INSTRUCTIONS STEP 1: Connect the high pressure " hose to the unit’s high pressure out- let. STEP 2: Insert the spray wand to the " trigger gun. Press in against the spring tension and twist into locked position. STEP 3: Connect garden hose to "... -
Page 8: Using The Accessories
WARNING To avoid serious injury never point spray nozzle at yourself, other per- sons or animals. Vario Power Spray Wand The vario power spray wand allows you to adjust the cleaning pressure. To clean at maximum pressure, the wand must be positioned to the high pressure setting (Max). -
Page 9: Working With Detergents
WORKING WITH DETERGENTS Detergents can only be applied at low pressure (Min). STEP 1: Install the vario power " spray wand. Set the spray wand to the low pressure setting (Min). STEP 2: Fill a container with Kärcher " detergent. Place the filter end of de- tergent suction tube into the contai- ner. -
Page 10: Taking A Break ..Five Minutes Or More
STEP 1: Turn the switch to 0/OFF posi- tion and unplug cord from outlet. STEP 2: Turn off the water source. STEP 3: Press trigger to release water pressure. STEP 4: Disconnect the garden hose from the water inlet on the unit.. TAKING A BREAK ..five minutes or more STEP 1: Release trigger (A) and enga- ge gun safety lock (B). -
Page 11: Winterizing And Long-Term Storage11
WINTERIZING AND LONG-TERM STORAGE 1: Disconnect all water connections. " 2: Turn on the machine for a few se- " conds, until the water which had remained in the pump exits, turn off immediately. 3: Do not allow high pressure hose "... -
Page 12: Cleaning Tips
Deck Cleaning (with or without detergent). Pre-rinse deck and surrounding area with fresh water. If using Kärcher Deck Wash, ap- ply to surface at low pressure. For best results, limit your work area to smaller sections of approximately 25 square feet. -
Page 13: Optional Cleaning Accessories
OPTIONAL CLEANING ACCESSORIES Optional cleaning accessories are available to further enhance your cle- aning capabilities: For details call 1-800-465-4980 or visit www.karcher.ca. Rotating Wash Brush Wash Brush Underbody Wand Patio & Lawn Furniture (with or without detergent). Pre-rinse furniture and surrounding area with fresh water. -
Page 14: Troubleshooting
CAUTION Symptom Cause Motor will not start On/Off switch is in the “OFF” (O) position. Power cord is not plugged in. Extension cord is too long. Extension cord is not proper gauge. Extension cord is damaged. Electrical outlet does not supply adequate power. - Page 15 Oil Drip. Oil seals are damaged or worn. Call service center. Call: 1-800-465-4980 for help or visit our website: www.karcher.ca If you encounter any additional difficul- ties not listed, please call for help. Kärcher Customer Service CDN Solution Check connection.
- Page 16 K 2.01 Français Veuillez conserver la boîte originale, l’emballage et le reçu. Avant d’utiliser cet appareil pour la première fois, veuillez lire la présente no- tice et vous conformer aux instructions qu’elle contient. 5.961-519.0 01/05...
- Page 17 N° de série Service à la clientèle CDN Appeler : 1-800-465-4980 pour obtenir de l'aide ou visiter notre site Web: www.karcher.ca GARANTIE KÄRCHER 2 ANS KÄRCHER CANADA INC. garantit cet appareil à l'acheteur contre tout défaut de fabrication et de main-d'oeuvre pour une période de deux ans à...
-
Page 18: Généralités
Description des éléments : 1 Interrupteur marche/arrêt 2 Connecteur du tube détergent de succion 3 Sortie haute pression 4 Entrée d'eau avec raccord pour tuyau d'arrosage 5 Tuyau d'aspiration du détergent avec filtre 6 Lance Vario 7 Poignée-pistolet 8 Verrouillage de sécurité de la poig- née pistolet 9 Tuyau à... - Page 19 CONSIGNES DE SECURITE IMPORTANTES ATTENTION ! En utilisant ce produit, toujours observer une certaine prudence élémentaire, incluant notamment. Lire toutes les instructions avant d'uti- liser l'appareil. Afin de réduire les risques de blessu- res, une surveillance attentive est re- quise lorsqu'un appareil est utilisé à proximité...
- Page 20 Rallonges Employez un calibre suffisant: Jusqu'à 7,5 m = 12/3 AWG; 7,5 à 15 m = 10/3 AWG. N'utiliser que des rallonges prévues pour une utilisation à l'extérieur. Ces rallonges sont identifiées par le mar- quage "utilisable pour des équipe- ments d'extérieur;...
-
Page 21: Instructions De Montage
INSTRUCTIONS DE MONTAGE Fixer le tuyau à haute pression à la poig- née-pistolet. ETAPE 1 : Retirer la languette de ver- " rouillage du côté droit de la poignée-pi- stolet. ETAPE 2 : Mettre en place l'extrémité " la plus petite du tuyau à haute pressi- ETAPE 3 : Repousser la languette de "... -
Page 22: Mode D'emploi
ETAPE 1 : Fixer le tuyau à haute " pression à la sortie haute pression de l'appareil. ETAPE 2 : Insérer la lance dans la " poignée-pistolet. Presser contre le ressort et tourner en position ver- rouillée. ETAPE 3 : Raccorder le tuyau d'ar- "... -
Page 23: Utilisation Des Accessoires
UTILISATION DES ACCESSOIRES ATTENTION Afin d'éviter de graves blessures, ne jamais pointer la lance sur soi-mê- me, d'autres personnes ou des ani- maux. Lance Vario La lance Vario permet de régler la pression de nettoyage. Pour nettoyer à la pression maxima- le, la lance doit être tournée en posi- tion haute pression (Max). -
Page 24: Emploi De Détergents
Les détergents ne peuvent être appli- qués qu'à basse pression (Min). ETAPE 1 : Monter la lance Vario. " Régler la lance en position de basse pression (Min). ETAPE 2 : Remplir un récipient avec " du détergent Kärcher. Insérer dans le récipient l'extrémité... -
Page 25: Arrêt De L'appareil
ETAPE 1 : Tourner l'interrupteur d’ali- mentation sur 0/OFF et débrancher le cordon de la prise. ETAPE 2 : Fermer l'arrivée d'eau. ETAPE 3 : Appuyer sur la gâchette pour évacuer la pression de l'eau. ETAPE 4 : Débrancher le tuyau d'arro- sage de l'entrée d'eau sur l'appareil. -
Page 26: Remisage Hivernal Et Entreposage À Long Terme
REMISAGE HIVERNAL ET ENTREPOSAGE A LONG TERME 1: Débrancher tous les raccorde- " ments d'eau. 2: Mettre l'appareil en marche pen- " dant quelques secondes pour éva- cuer toute l'eau restant dans les pompes, puis l'arrêter immédiate- ment. 3: Ne pas laisser le tuyau d'arrosage "... -
Page 27: Conseils De Nettoyage
CONSEILS DE NETTOYAGE Terrasses en bois (avec ou sans détergent). Com- mencer par un prérinçage de la terrasse et des abords à l'eau fraîche. S'il est prévu d'utiliser du détergent pour terras- ses et clôtures en bois Kärcher, l'appli- quer à basse pression. Pour obtenir de meilleurs résultats, limiter la surface de travail à... -
Page 28: Accessoires De Nettoyage En Option13
: Pour de plus amples informations, appeler le 1-800-465- 4980 ou consulter notre site sous www.karcher.ca. Brosse de lavage rotative Brosse de lavage et des abords à l'eau fraîche. S'il est prévu d'utiliser du presso-net Kärcher, l'appliquer à... -
Page 29: Dépannage
ATTENTION Symptôme Cause Le moteur ne démarre Assurer que l'interrupteur princi- pal est sur OFF (O). Cordon d'alimentation non bran- ché. Rallonge trop longue. Rallonge au calibre incorrect. Rallonge endommagée. Prise fournissant un courant in- suffisant. L'appareil n'atteint pas Diamètre du tuyau d'arrosage in- le niveau de haute suffisant. - Page 30 De l'huile s'égoutte. Joints d'huile endommagés ou usés. Appeler : 1-800-465-4980 pour obtenir de l'aide ou visiter notre site Web: www.karcher.ca Service à la clientèle CDN Solution Vérifier le raccord. Diluer le détergent ; pour de meilleurs résultats, utiliser du détergent Kärcher.
Need help?
Do you have a question about the K 2.01 and is the answer not in the manual?
Questions and answers