Table of Contents
Advertisement
Quick Links
Advertisement
Table of Contents
Troubleshooting

Related Manuals for Keysight M9032A


Summary of Contents for Keysight M9032A
- Page 2 FAR and the DFARS and are Colorado Springs, CO 80907 USA set forth specifically in writing elsewhere in WARNING the EULA. Keysight shall be under no obliga- Technology Licenses tion to update, revise or otherwise modify A WARNING notice denotes a hazard.
-
Page 3: Safety Summary
Keysight Technologies assumes no liability for the customer's failure to comply with these requirements. Product manuals are provided on the Web. Go to www.keysight.com... - Page 4 Note that CE marking alone is not adequate. Servicing of the modules must be performed by qualified personnel only. To WARNING avoid electrical shock, do not perform any servicing manually. Return the module to Keysight Service Center. M9032A / M9033A System Sync Modules Startup Guide...
- Page 5 For safety reasons, only Keysight approved equipment and accessories should WARNING be used with the module. Position chassis to ensure easy access to remove the modules. NOT E Environmental This instrument is intended for “indoor use” only. Conditions The following table shows the environmental requirements and the corresponding characteristics for the product.
-
Page 6: Safety Symbols & Instrument Markings
This is the Keysight email address required by EU directives applicable to our product. M9032A / M9033A System Sync Modules Startup Guide... -
Page 7: Compliance And Environmental Information
Trade in options with Keysight in addition to product take-back instructions. Declaration of Conformity Declarations of Conformity for this product and for the Keysight products may be downloaded from the Web. Go to http://www.keysight.com/go/conformity. You can then search by product number to find the latest Declaration of Conformity. - Page 8 M9032A / M9033A System Sync Modules Startup Guide...
-
Page 9: Table Of Contents
Safety Summary Safety symbols & instrument markings Compliance and Environmental Information Declaration of Conformity 1 Overview on M9032A / M9033A System Sync Modules About this document About M9032A / M9033A System Sync Modules Equipment supported with M903xA modules References to Help documents... - Page 10 Installing M9032A / M9033A module firmware updates Launching the software Launching the M9032x user interface Programming with M9032x API 4 Troubleshooting and Safety information Troubleshooting installation issues Safety information General safety considerations M9032A / M9033A System Sync Modules Startup Guide...
-
Page 11: Overview On M9032A / M9033A System Sync Modules
M9032A / M9033A System Sync Modules Startup Guide Overview on M9032A / M9033A System Sync Modules / 12 About this document / 13 About M9032A / M9033A System Sync Modules / 20 References to Help documents... -
Page 12: About This Document
Section 1.1: About this document This document helps you get started with a brief introduction to the M9032A / M9033A System Sync modules along with its associated software components. It also serves as a guide for the required preliminary setup followed by procedures to install the Keysight M9032x/M9033x System Synchronization Module SFP and API along with its extended components. -
Page 13: About M9032A / M9033A System Sync Modules
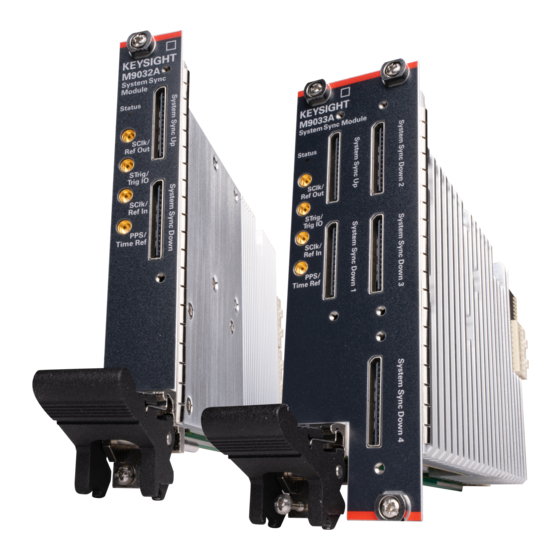
STM specifications documented in the PXI Express Hardware Specification. The M9032A is a single width and the M9033A is a double width 3U PXIe module that is compatible with Keysight’s PXIe chassis. It includes a high-quality Oven Controlled Crystal Oscillator (OCXO) reference clock,... - Page 14 Overview on M9032A / M9033A System Sync Modules Figure 1 Front view of the M9032A single width 3U PXIe module M9032A / M9033A System Sync Modules Startup Guide...
- Page 15 Overview on M9032A / M9033A System Sync Modules Figure 2 Front view of the M9033A double width 3U PXIe module M9032A / M9033A System Sync Modules Startup Guide...
- Page 16 0.74 kg (1.6 lbs) The M9032A and M9033A System Sync Module front panel contains v a r i o u s c o n n e c t o r s t h a t c a n b e u s e d f o r b o t h m u l t i - c h a s s i s interconnection and configuration of the reference signal source.
- Page 17 After aligning properly, press the cable head very gently into the connector. DO NOT push hard the cable into the SMP connector. Figure 3 Aligning and connecting SMP cable assembly to M9032A front panel M9032A / M9033A System Sync Modules Startup Guide...
- Page 18 Overview on M9032A / M9033A System Sync Modules Figure 4 Aligning and connecting SMP cable assembly to M9033A front panel The different SSM models have the following front panel System Sync ports: • The M9032A has two System Sync ports: •...
-
Page 19: Equipment Supported With M903Xa Modules
Overview on M9032A / M9033A System Sync Modules different chassis) or to up to two System Link ports placed on PXIe modules. Keysight System Sync and/or System Link cables can be used for such connections. 1.2.1: Equipment supported with M903xA modules... -
Page 20: References To Help Documents
Overview on M9032A / M9033A System Sync Modules Section 1.3: References to Help documents Table 5 Reference document titles and access links Document Reference Filename / Format Reference location M9032A / M9033A System Sync Modules Startup Guide M9032A / M9033A System Sync Modules Security Guide https://www.keysight.com/find/M903xA-TechSupport... -
Page 21: Setting Up The M9032A / M9033A Modules
M9032A / M9033A System Sync Modules Startup Guide Setting up the M9032A / M9033A modules / 22 Unpacking, Inspecting and Verifying the shipment / 26 Installing the PXIe Module / 36 Verifying M903xA module’s operation / 41 Cleaning the module... -
Page 22: Unpacking, Inspecting And Verifying The Shipment
Inspect the carton carefully for any damage, or signs of rough handling. Remove the M9032A / M9033A module from the packaging container and ensure that all accessories are included. Inspect the module and accessories for damage. If the contents appear damaged, notify your local Keysight Technologies Inc. -
Page 23: Verifying Shipment Of M9032A / M9033A Module
DO NOT use these techniques for a static-safe workstation when WARNING working on circuitry with a voltage potential greater than 500 volts. 2.1.2: Verifying shipment of M9032A / M9033A module Table 6 Table 7 lists the items included in your M9032A / M9033A... -
Page 24: Inspecting For Damage
Keysight equipment. 2.1.4: Returning the Module for Service If you find it necessary to return the M9032A / M9033A modules for repair or service, follow the steps below: The M9032A / M9033A modules are factory tested, aligned, adjusted, NOTE and each module is shipped as a single unit. - Page 25 Setting up the M903xA System Sync Modules Review the warranty information shipped with your M9032A / M9033A modules. Contact Keysight to obtain a Return Material Authorization (RMA) and return address. For assistance with finding the required contact information, visit www.keysight.com/find/assist. Write the following information on a tag and attach it to the malfunctioning equipment: •...
-
Page 26: Installing The Pxie Module
• To maintain proper airflow within the chassis, all empty chassis slots must be fitted with slot blockers (Keysight model Y1212A, 5 per kit) and EMC filler panels (Keysight model Y1213A, 5 per kit). This includes any empty slots to the left of slot 1. - Page 27 • If you have multiple M9032A / M9033A modules and space is available in your chassis, leave an empty slot between modules to enhance airflow. Ensure that a slot blocker and a filler panel are installed in the empty slots.
-
Page 28: Preparing The Pxie Chassis
Make sure that the PXIe chassis fans are operable and free of dust and other contaminants that may restrict airflow. M9032A / M9033A System Sync Modules Startup Guide... -
Page 29: Installing The Embedded Controller
Do not power up the controller until instructed to do so later in this CAUTION document. Figure 8 Front panel view of M9037A Embedded Controller If your configuration contains a Keysight Embedded Controller (for example, M9037A), follow the procedure below. For additional details, refer to the instructions in the M9037A Startup Guide. - Page 30 Tighten the module retaining screws (top and bottom) and torque them to 5 Lb-In (0.57 N-m). Install a blank Y1213A filler panel in the empty slot to the left of the controller. Connect peripherals (mouse, keyboard, and monitor). M9032A / M9033A System Sync Modules Startup Guide...
-
Page 31: Connecting A Remote Controller Pc To The Chassis
• Tighten the module retaining screws (top and bottom) and torque them to 5 Lb-In (0.57 N-m). M9032A / M9033A System Sync Modules Startup Guide... -
Page 32: Installing Slot Blockers And Filler Panels
2.2.5: Installing Slot Blockers and Filler Panels To assure proper operating temperatures, install slot blockers (Keysight model Y1212A, 5 per kit) and EMC filler panels (Keysight model Y1213A, 5 per kit) in empty module slots. M9032A / M9033A System Sync Modules Startup Guide... -
Page 33: Installing The Module
As mentioned earlier, exercise caution when attaching / detaching the CAUTION straight / right-angle cable assembly to the SMP connectors on the front panel of the M9032A/ M9033A modules. M9032A / M9033A System Sync Modules Startup Guide... -
Page 34: Powering Up The Chassis And Remote Controller Pc
PXIe hardware does not support “hot-swap” (changing modules while CAUTION power is applied to the chassis) capabilities. Before installing or removing a module to/from the chassis, power down the chassis to prevent damage to the module. M9032A / M9033A System Sync Modules Startup Guide... -
Page 35: Installing Required Software
2.2.8: Installing required software After the PC boots up and Windows desktop appears, you must install the software required for programming the M9032A / M9033A System Sync modules. See Chapter 3, “Setting up the M9032x software”. -
Page 36: Verifying M903Xa Module's Operation
The Keysight Connection Expert (installed with IO Libraries Suite) helps you check the connection of the M9032A / M9033A System Sync modules. To check if the module and its slot location are visible in the Keysight Connection Expert, click Start > Keysight Connection Expert. - Page 37 M9032A / M9033A modules connection status. Click Start > Keysight M9032x PCIe Module > M9032x SFP (x64). The “Connect to Instrument” window appears by default and if connected, it displays the M9032A / M9033A modules along with the respective slots and VISA address. Figure 15...
-
Page 38: Conducting Self Test
Setting up the M903xA System Sync Modules 2.3.2: Conducting Self test The next step in this process is to conduct a Self Test of the M9032A / M9033A modules. Click Start > Keysight M9032x PCIe Module > M9032x SFP (x64) to launch the M9032x SFP. - Page 39 Figure 17 Initiating self test in M9032x SFP On the Self Test window that appears, click Run Self Test. If the self test is successful, the Self Test window appears as shown below. M9032A / M9033A System Sync Modules Startup Guide...
- Page 40 Setting up the M903xA System Sync Modules Figure 18 Self test passed status on the selected M9032A module Click Close to exit the Self Test window. If the Self Test fails, it indicates that the module likely needs service. In such cases, you must return the faulty module.
-
Page 41: Cleaning The Module
Power off the chassis and remove the M9032A / M9033A modules. Use either a dry lint free cloth, or compressed air to clean the front plate (face-plate) only of the M9032A / M9033A modules. - Page 42 Setting up the M903xA System Sync Modules M9032A / M9033A System Sync Modules Startup Guide...
-
Page 43: Setting Up The M9032X Software
M9032A / M9033A System Sync Modules Startup Guide Setting up the M9032x software / 44 Prerequisites to setting up M9032x software / 45 Downloading and installing M9032x software / 50 Launching the software... -
Page 44: Prerequisites To Setting Up M9032X Software
Run the downloaded installer. Follow the on-screen instructions. For PXIe Chassis drivers and firmware When installing the Keysight Chassis Family Driver, PXIe Chassis SFP (Software Front Panel) software is automatically installed. • Chassis firmware version can be checked and updated using PXIe Chassis SFP. -
Page 45: Downloading And Installing M9032X Software
Section 3.2: Downloading and installing M9032x software 3.2.1: Downloading the M9032x software https://www.keysight.com/find/M903xA-TechSupport 3.2.2: Installing the M9032x software After you have downloaded the executable file from Keysight.com, double-click the installer for M9032x Software. Figure 19 Icon for the M9032x software installer The Welcome window on the M9032x InstallShield Wizard appears. - Page 46 Setting up the M9032x software Click Next >. The License Agreement window is displayed. Figure 21 License Agreement window on the M9032x InstallShield Wizard From the Do you accept this license? options, select Agree. M9032A / M9033A System Sync Modules Startup Guide...
- Page 47 Click Next >. The Ready to Install window is displayed. Figure 22 Ready to Install window on the M9032x InstallShield Wizard Click Install. The Setup Status window is displayed. Figure 23 Setup Status window on the M9032x InstallShield Wizard M9032A / M9033A System Sync Modules Startup Guide...
- Page 48 Completion window on the M9032x InstallShield Wizard Click Finish to complete the software installation and exit the M9032x Setup Wizard. If prompted to restart your machine, click Yes to continue (recommended) or No to restart the machine later. M9032A / M9033A System Sync Modules Startup Guide...
-
Page 49: Installing M9032A / M9033A Module Firmware Updates
The Keysight M9032x software must be installed to update your module firmware. Downloading the Firmware The latest firmware for the M9032A / M9033A module is downloaded along with the Keysight M9032x software package, each time you download a new version. -
Page 50: Launching The Software
Section 3.3: Launching the software 3.3.1: Launching the M9032x user interface Once you have installed the Keysight M9032x software, you can launch the Soft Front Panel (SFP) from the Start menu. On your Win10 OS, click Start > Keysight M9032x PCIe Module >... - Page 51 Setting up the M9032x software Figure 27 Simulation mode without any active cards (offline mode) Figure 28 Default window with active cards (online mode) M9032A / M9033A System Sync Modules Startup Guide...
- Page 52 Figure 28, while launching, the Keysight M9032x software auto-detects any active M9032A / M9033A cards that are connected to the chassis. All such cards are displayed along with the chassis, slot number and VISA address on the Connect to Instrument window.
- Page 53 Setting up the M9032x software Note that a demo ‘M9032A’ module only is displayed in Figure 27 and in Figure 28 along with other active cards. This entry appears when “Simulation Mode” is enabled only, irrespective of state of the chassis (On / Off) or the modules inserted in them.
- Page 54 “Connected to <VISA address>” in the status bar on the main window For more information regarding the features and functionality of the Keysight M9032x SFP, refer to the M9032A/M9033A System Sync Modules User’s Guide, which can be accessed via the Help menu of the M9032x SFP.
-
Page 55: Programming With M9032X Api
You may access the M9032x API to control and configure the connected instruments using the ‘ktM9032x’ Library available in Python, C/C++ and .NET programming languages. The following example, using C++ commands, shows how to use Keysight M9032x Programming Libraries: #include "KtM9032x.h"... - Page 56 Setting up the M9032x software M9032A / M9033A System Sync Modules Startup Guide...
-
Page 57: Troubleshooting And Safety Information
M9032A / M9033A System Sync Modules Startup Guide Troubleshooting and Safety information / 58 Troubleshooting installation issues / 59 Safety information... -
Page 58: Troubleshooting Installation Issues
Keysight IO Libraries directly from https://www.keysight.com/find/iolibs. • For Keysight support for help with tools and documentation or to connect with a technical support expert for product and service support, see https://www.keysight.com/find/support. M9032A / M9033A System Sync Modules Startup Guide... -
Page 59: Safety Information
The safety of any system incorporating the equipment is the responsibility of the assembler of the system. Maintenance To remove dirt or dust from the M9032A / M9033A modules, follow the instructions given in Cleaning the module on page 41 of this document. - Page 60 To avoid electrical shock, do not perform any servicing manually. Return the module to Keysight Service Center. Equipment and accessories For safety reasons, only Keysight approved equipment and accessories WARNING should be used with the module. Position chassis to ensure easy access to remove the modules.
- Page 61 M9032A / M9033A System Sync Modules Startup Guide...
- Page 62 This information is subject to change without notice. © Keysight Technologies 2022 Edition 1.0, July 2022 www.keysight.com...
Need help?
Do you have a question about the M9032A and is the answer not in the manual?
Questions and answers