Advertisement
Quick Links
Advertisement

Subscribe to Our Youtube Channel
Related Manuals for Cookology CET301


Summary of Contents for Cookology CET301
- Page 1 印刷 不属于印刷内容 规格:A5 材质:80g双胶 黑白印刷...
- Page 2 Built In Ceramic Hob Instruction Manual CET301...
- Page 3 Warning 1)The appliance is not to be used by persons (including children) with reduced physical, sensory or mental capabilities, or lack of experience and knowledge, unless they have been given supervision or instruction. children being supervised not to play with the appliance. 2)WARNING: If the surface is cracked, switch off the appliance to avoid the possibility of electric shock, for hob surfaces of glass-ceramic or similar material which protect live parts.
- Page 4 Warning 13)WARNING: Unattended cooking on a hob with fat or oil can be dangerous and may result in fire. 14)NEVER try to extinguish a fire with water, but switch off the appliance and then cover flame e.g. with a lid or a fire blanket. 15)CAUTION: The cooking process has to be supervised.
- Page 5 DEAR CUSTOMER The hob is exceptionally easy to use and extremely efficient. After reading the instruction manual operating the hob will be easy Before being packaged and leaving the manufacturer, the hob was thoroughly checked with regard to safety and functionality Before using the appliance, please read the instruction manual carefully.
-
Page 6: Table Of Contents
TABLE OF CONTENTS SAFETY INSTRUCTIONS..............3 HOW TO SAVE ENERGY..............5 PRODUCT DESCRIPTION.............6 INSTALLATION................8 OPERATION...................9 MAINTENACE & TROUBLESHOOTING........10... -
Page 7: Safety Instructions
SAFETY INSTRUCTIONS Ensure there is a grounded socket nearby(behind the unit) A dedicated power circuit is recommended for the unit but not required. Additional electrical appliances on the same circuit may exceed the current(amperage) rating for that circuit.If after the installation of your unit.the circuit breaker trips or the fuse fails on a repeated basis,then a dedicated circuit will likely be required. - Page 8 and report the fault to the service center to be repaired. The rules and provisions contained in this instruction manual should be strictly observed. Do not allow anybody who is not familiar with the contents of this instruction manual to operate the hob. Cabinets with a veneer exterior must be assembled with glues which can withstand temperature of up to 100℃.
-
Page 9: How To Save Energy
HOW TO SAVE ENERGY Using energy in a responsible way not only saves money but also helps the environment. So let's save energy! And this is how you can do it: Do not install the hob in the direct vicinity of refrigerators / freezers.Otherwise energy consumption increases unnecessarily. -
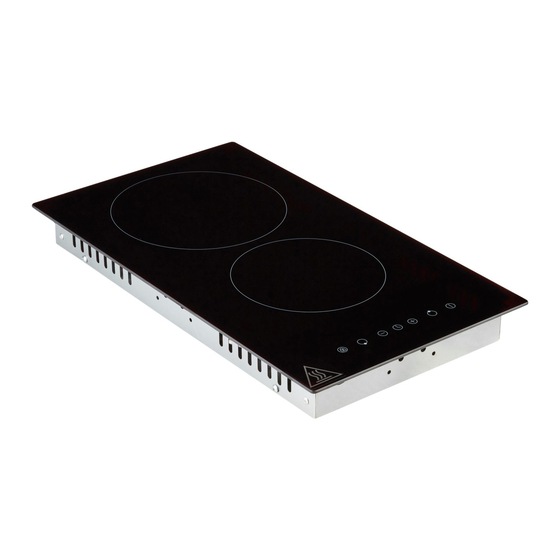
Page 10: Product Description
PRODUCT DESCRIPTION Top View Microcrystalline ceramic panel Heating zones A) 1.80kW rapid plate (Ø190mm) B) 1.20kW rapid plate (Ø155mm) Touch-key Control Panel minus of lever or timer... - Page 11 PRODUCT DESCRIPTION Product dimensions: Aperture dimensions: Depth: 510mm Depth: 480mm Width: 290mm Width: 260mm Height: 50mm Product specifications: 1x 1.80 kW rapid plate (Ø190mm) 1x 1.20 kW rapid plate (Ø155mm) Electrical details Rated Voltage: 220-240Vac, 50/60Hz Supply Connection: 13A (double pole switched fused outlet with 3mm contact gap) Max Rated Inputs:...
-
Page 12: Installation
INSTALLATION Important: There must be a minimum distance of 100 mm between the edges of the cut hole in the bench top and the adjoining cabinet walls and 65mm from rear wall of cabinet . Preparation ● Remove any dust from the benchtop directly surrounding the cut hole to ensure there is a clean surface. -
Page 13: Operation
OPERATION Choice of cookware Choose a pan with a diameter that is at least as large as the heating zone. For roasting tins there is a special widened heating zone of 140x250. Do not use pans with a concave or convex base. Always remember to put a proper cover on the pan. - Page 14 In conjunction with the Control Keys and within the 6 seconds LED flash period, a chosen hotplate heating Plus and minus key of Hot level will increase form setting 0 to 9 plate level or timer by pressing - or + selector key. When it is timer, it’s will increase or reduce.
-
Page 15: Maintenace & Troubleshooting
MAINTENANCE&TROUBLESHOOTING Caution! Before maintenance or cleaning is carried out, the cooktop should be disconnected from the main power supply. Ensure that the cooktop is switched off at the wall socket and the plug removed. 1.Spills and splashes will not harden and stick to the glass, as it hardly heats 2.Micro crystal board surrounding should maintain clean, if have leakage to it as soon as possible please clean.
Need help?
Do you have a question about the CET301 and is the answer not in the manual?
Questions and answers