Table of Contents
Advertisement
Quick Links
INSTALLER: LEAVE THIS MANUAL WITH THE APPLIANCE.
CONSUMER: RETAIN THIS MANUAL FOR FUTURE REFERENCE.
NEVER LEAVE CHILDREN OR OTHER AT RISK INDIVIDUALS ALONE WITH THE APPLIANCE.
CERTIFIED UNDER CANADIAN AND AMERICAN NATIONAL STANDARDS: CSA C22.2 No-46 / UL 1278
SAFETY INFORMATION
WARNING
!
If the information in these instructions
are not followed exactly, a fi re may result
causing property damage, personal injury
or loss of life.
- Do not store or use gasoline or other fl ammable
vapors and liquids in the vicinity of this or any
other appliance.
Phone (705)721-1212 • Fax (705)720-9081 • www.napoleonfi replaces.com •hearth@napoleonproducts.com
$10.00
OPERATING INSTRUCTIONS
NEFI24H/NEFI27H
ELECTRIC LOGSET INSERT
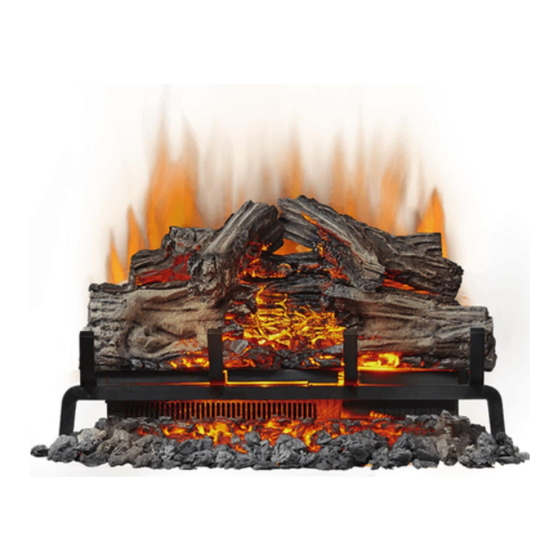
NEFI24H ILLUSTRATED
Wolf Steel Ltd., 24 Napoleon Rd., Barrie, ON, L4M 0G8 Canada /
103 Miller Drive, Crittenden, Kentucky, USA, 41030
INSTALLATION AND
1.16F
W415-1461 / C / 08.04.16
EN
FR
PG
25
Advertisement
Table of Contents

Related Manuals for Napoleon Woodland HEFI27H


Summary of Contents for Napoleon Woodland HEFI27H
- Page 1 Wolf Steel Ltd., 24 Napoleon Rd., Barrie, ON, L4M 0G8 Canada / 103 Miller Drive, Crittenden, Kentucky, USA, 41030 Phone (705)721-1212 • Fax (705)720-9081 • www.napoleonfi replaces.com •hearth@napoleonproducts.com $10.00...
-
Page 2: Table Of Contents
TABLE OF CONTENTS INTRODUCTION DIMENSIONS LISTING APPROVALS GENERAL INSTRUCTIONS RATING PLATE INFORMATION LABEL LOCATION LOCATING LOG SET UNPACKING AND TESTING LOG SET GROUNDING LOG SET INSTALLATION LOG SET INSTALLATION 3.1.1 INSTALLING LOG SET INTO EXISTING FIREPLACE 3.1.2 INSTALLING LOG SET INTO MANTEL HARD WIRING INSTALLATION SECURING THE LOG SET OPERATING INSTRUCTIONS... -
Page 3: Introduction
1.0 INTRODUCTION WARNING • THIS APPLIANCE IS HOT WHEN OPERATED AND CAN CAUSE SEVERE BURNS IF CONTACTED. • Do not operate appliance before reading and understanding operating instructions. Failure to operate appliance according to operating instructions could cause fi re or injury. •... -
Page 4: Dimensions
DIMENSIONS FRONT VIEW SIDE VIEW 24" 610mm 14" 356mm 14" 356mm NEFI24H ILLUSTRATED 27" 686mm 15 1/2" 393mm 14" 356mm NEFI27H ILLUSTRATED W415-1461 / C / 08.04.16... -
Page 5: Listing Approvals
LISTING APPROVALS This log set has been tested in accordance with the Model Number NEFI24H NEFI27H CSA Standards for fixed and location-dedicated electric Description 24" Electric 27" Electric room appliances in the United States and Canada. If Logset Insert Logset Insert you need assistance during installation, please contact your local dealer. -
Page 6: Rating Plate Information
BY WOLF STEEL LTD. PAR WOLF STEEL LTD. MADE IN CHINA FABRIQUE EN CHINE WOLF STEEL LTD. 24 NAPOLEON ROAD, SERIAL NUMBER/NO. DE SERIE: NEFI24 BARRIE, ON, L4M 0G8 CANADA W385-2026 / A INSTALLER: It is your responsibility to check off the appropriate box on the rating plate according to the model of the appliance. -
Page 7: Locating Log Set
2.0 LOCATING LOG SET WARNING DUE TO HIGH TEMPERATURES, THIS ELECTRIC APPLIANCE SHOULD BE LOCATED OUT OF TRAFFIC. KEEP COMBUSTIBLE MATERIALS SUCH AS FURNITURE, PILLOWS, BEDDING, PAPERS, CLOTHES AND CURTAINS AT LEAST 36" FROM THE FRONT OF THE APPLIANCE. NEVER LOCATE THIS ELECTRIC APPLIANCE WHERE IT MAY FALL INTO A BATHTUB OR OTHER WATER CONTAINER. -
Page 8: Installation
3.0 INSTALLATION WARNING RISK OF FIRE! THE POWER CORD MUST NOT BE PINCHED AGAINST A SHARP EDGE. SECURE CORD TO AVOID TRIPPING OR SNAGGING TO REDUCE THE RISK OF FIRE, ELECTRIC SHOCK OR PERSONAL INJURY. DO NOT RUN CORD UNDER CARPETING. DO NOT COVER CORD WITH THROW RUGS, RUNNERS OR THE LIKE. ARRANGE CORD AWAY FROM TRAFFIC AREAS AND WHERE IT WILL NOT BE TRIPPED OVER. -
Page 9: Installing Log Set Into Mantel
3.1.2 INSTALLING LOG SET INTO MANTEL NOTE: To prevent damaging the base of the mantel, carefully lift the log set into the mantel while avoiding contact with the front edge of the mantel base. With two people, lift the log set up and insert into the opening. Do not push or slide the bottom of the log set on the floor base, see Figure 1. -
Page 10: Hard Wiring Installation
HARD WIRING INSTALLATION WARNING TURN OFF THE APPLIANCE COMPLETELY AND LET COOL BEFORE SERVICING. ONLY A QUALIFIED SERVICE PERSON SHOULD SERVICE AND REPAIR THIS ELECTRIC APPLIANCE. HARD WIRING CONNECTION If it is necessary to hard wire, a qualified electrician must remove the cord connection, and wire directly to the household wiring. -
Page 11: Securing The Log Set
SECURING THE LOG SET NOTE: It is recommended to secure the log set especially if hard wiring the log set. Place the log set in a position which provides optimum flame performance. NOTE: To achieve flame effect, the log set should be set 1" away from the rear wall. Secure in place using 2 screws (not supplied). -
Page 12: Operating Instructions
4.0 OPERATING INSTRUCTIONS Once the log set has been plugged into a grounded electrical outlet or hard wired to a dedicated 120V power supply, it is ready to operate. ATTENTION: Ensure the house circuit breakers for the power supply are turned on. When initially connecting the appliance into a power source the unit will perfom an LED check. -
Page 13: Operating By Remote Control
OPERATING BY REMOTE CONTROL WARNING TO AVOID DANGER OF SUFFOCATION KEEP THE PACKAGING BAG AWAY FROM BABIES AND CHILDREN. DO NOT USE IN CRIBS, BED, CARRIAGES OR PLAY PENS. THIS BAG IS NOT A TOY. KNOT BEFORE THROWING AWAY. NOTE: When operating the remote control, it must be directed towards the front center of the log set. The power button can be used to turn the log set on/off. -
Page 14: Finishing
5.0 FINISHING WARNING POWER SUPPLY SERVICE MUST BE COMPLETED PRIOR TO FINISHING TO AVOID RECONSTRUCTION. HEAT VENTS AND AIR OPENINGS CANNOT BE COVERED IN ANY CIRCUMSTANCES. NEFI24H LOG PLACEMENT Place the log (#1) onto the pin. Ensure the log is secure onto the pin, as shown. -
Page 15: Ember Bed Placement
NEFI24H Place log (#2) onto the pin. Ensure the log Place log (#3) onto the pin. Ensure the log NEFI27H is secure onto the pin, as shown. is secure onto the pin, as shown. EMBER BED PLACEMENT NEFI27H Place the ember bed over the LED tray, as shown. -
Page 16: Charcoal Ember Placement
CHARCOAL EMBER PLACEMENT Place the charcoal ember around the front and sides of the ember bed, as indicated on the diagram below. NOTE: Do not block air intake opening and outlet with charcoal embers. OUTLET OPENING AIR INTAKE OPENING CHARCOAL EMBERS L’OUVERTURE D’AIR... -
Page 17: Wiring Diagram
6.0 WIRING DIAGRAM WARNING TURN OFF THE APPLIANCE COMPLETELY AND LET COOL BEFORE SERVICING. ONLY A QUALIFIED SERVICE PERSON SHOULD SERVICE AND REPAIR THIS ELECTRIC APPLIANCE. W415-1461 / C / 08.04.16... -
Page 18: Replacement Parts
7.0 REPLACEMENT PARTS WARNING FAILURE TO POSITION THE PARTS IN ACCORDANCE WITH THIS MANUAL OR FAILURE TO USE ONLY PARTS SPECIFICALLY APPROVED WITH THIS APPLIANCE MAY RESULT IN PROPERTY DAMAGE OR PERSONAL INJURY. Contact your dealer for questions concerning prices and policies on replacement parts. Normally, all parts ** THIS IS A FAST ACTING THERMOCOUPLE. -
Page 19: Nefi24H Overview
NEFI24H OVERVIEW NOTE: Care must be taken when removing and disposing of any broken glass or damaged components. Be sure to vacuum up any broken glass from inside the appliance before operation. W415-1461 / C / 08.04.16... -
Page 20: Nefi27H Overview
NEFI27H OVERVIEW NOTE: Care must be taken when removing and disposing of any broken glass or damaged components. Be sure to vacuum up any broken glass from inside the appliance before operation. W415-1461 / C / 08.04.16... -
Page 21: Troubleshooting
8.0 TROUBLESHOOTING WARNING TURN OFF THE APPLAINCE COMPLETELY AND LET COOL BEFORE SERVICING. ONLY A QUALIFIED SERVICE PERSON SHOULD SERVICE AND REPAIR THIS ELECTRIC APPLIANCE. SYMPTOM PROBLEM TEST SOLUTION Dim or no fl ame Flame brightness not selected See “OPERATION” section. Flame LEDs are burnt out Inspect the LED by selecting different brightness settings and replace them if necessary. -
Page 22: Warranty
NAPOLEON warrants its products against manufacturing defects to the original purchaser only. Registering your warranty is not necessary. Simply provide your proof of purchase along with the model and serial number to make a warranty claim. NAPOLEON reserves the right to have its representative inspect any product or part thereof prior to honouring any warranty claim. -
Page 23: Notes
10.0 NOTES 44.1 W415-1461 / C / 08.04.16... - Page 24 Fireplace Inserts • Charcoal Grills • Gas Fireplaces • Waterfalls • Wood Stoves Heating & Cooling • Electric Fireplaces • Outdoor Fireplaces • Gas Grills 24 Napoleon Road, Barrie, Ontario, Canada L4M 0G8 214 Bayview Drive, Barrie, Ontario, Canada L4N 4Y8...
Need help?
Do you have a question about the Woodland HEFI27H and is the answer not in the manual?
Questions and answers