Table of Contents
Advertisement
Advertisement
Table of Contents

Subscribe to Our Youtube Channel
Related Manuals for Olympus PSD-30


Summary of Contents for Olympus PSD-30
- Page 1 INSTRUCTIONS ELECTROSURGICAL UNIT PSD-30...
-
Page 3: Table Of Contents
Connection of the A-cord ..............Chapter 4 Inspection ..............Inspection of the power supply ............Inspection of the foot switch............Inspection of the warning functions..........Inspection of the cut mode and output..........Inspection of the coagulation mode and output ......ELECTROSURGICAL UNIT PSD-30... - Page 4 Care, Storage and Disposal ........Care ....................Storage ................... Disposal ..................Chapter 7 Troubleshooting ............Troubleshooting guide ..............Alarm functions ................Returning the electrosurgical unit for repair ........Appendix..................Construction ..................... System chart ..................... Operating environment ................Specifications .................... EMC information..................ELECTROSURGICAL UNIT PSD-30...
-
Page 5: Labels And Symbols
Labels and Symbols Labels and Symbols Safety-related labels and symbols are attached to the instrument at the location shown below. If labels or symbols are missing or illegible, contact Olympus. Rear side Fuse rating CE marking Potential equalization terminal Electrical rating Product name, rated voltage and current are displayed. - Page 6 Labels and Symbols Electrical rating ELECTROSURGICAL UNIT MODEL PSD-30 INPUT 220V – 240V 50/60Hz MONOPOLAR : 50W/300Ω (SOFT/AUTO STOP 100Ω) 350kHz INT.10S/30S Back cover of this instruction manual Manufacturer Authorised representative in the European Community ELECTROSURGICAL UNIT PSD-30...
-
Page 7: Important Information - Please Read Before Use
Always prepare for an emergency operation in case of unintentional patient burn, bleeding and perforation. Intended use This electrosurgical unit has been designed to be used with an Olympus endoscope (fiberscope or videoscope) compatible with electrosurgery, light source, electrosurgical accessories and other ancillary equipment for general and endoscopic electrosurgery (cutting and coagulation). -
Page 8: Instruction Manual
Instrument compatibility Refer to the “System chart” in the Appendix to confirm that this electrosurgical unit is compatible with the ancillary equipment being used. Using incompatible equipment can result in patient injury and/or equipment damage. ELECTROSURGICAL UNIT PSD-30... -
Page 9: Repair And Modification
This electrosurgical unit does not contain any user-serviceable parts. Do not disassemble, modify or attempt to repair it; patient or user injury and/or equipment damage can result. This instrument is to be repaired by Olympus technicians only. Some problems that appear to be malfunctions may be correctable by referring to Chapter 7, “Troubleshooting”. - Page 10 • To prevent shock hazards, never apply the PSD-30 to the heart in combination with TYPE B or TYPE BF applied parts. •...
- Page 11 Type CF electromedical equipment classifications (A-cord, P cord, P plate, S-cord). Therefore, to prevent shock caused by leakage current from other electrical equipment applied to the patient, the connectors from the other equipment should not be grounded. ELECTROSURGICAL UNIT PSD-30...
- Page 12 • To ensure electrical safety, the electrosurgical unit should not be used in conjunction with: − Electrical equipment whose safety against leakage current is not guaranteed. − Electrosurgical equipment whose safety in combined use is not guaranteed. ELECTROSURGICAL UNIT PSD-30...
- Page 13 Important Information — Please Read Before Use • If the electrosurgical unit is used in conjunction with a non-Olympus electrosurgical unit, keep the electrosurgical accessory away from the target area while the electrosurgical unit is in operation. Do not activate output of both units simultaneously.
- Page 14 • To prevent patient burns when the electrosurgical unit is used in conjunction with a non-Olympus electrosurgical unit, ensure that each unit is supplied with power from wall mains outlets. Also ensure that each unit is supplied with power from separate breakers.
- Page 15 • To prevent electrosurgical unit damage, never short-circuit electrodes (accessories, patient plate). • Repairs should be performed only by Olympus. • The electrosurgical unit should only be used in accordance with the conditions described in “Operating environment” in the Appendix. The use under other conditions may impede normal performance, and/or result in equipment damage.
-
Page 16: Chapter 1 Checking The Package Contents
If the electrosurgical unit is damaged, a component is missing or you have any questions, do not use the electrosurgical unit; immediately contact Olympus. Power cord Electrosurgical unit (PSD-30) P cord (MAJ-814) S-cord (MAJ-813) Foot switch (MAJ-811) - Page 17 Chapter 1 Checking the Package Contents The following Olympus items are optional and may be purchased separately: • A-cord (MA-255, MH-969) • P plate (MB-574) • P cord (MAJ-3) • P adapter (MAJ-812) For other combinations, refer to the “System chart” in the Appendix.
-
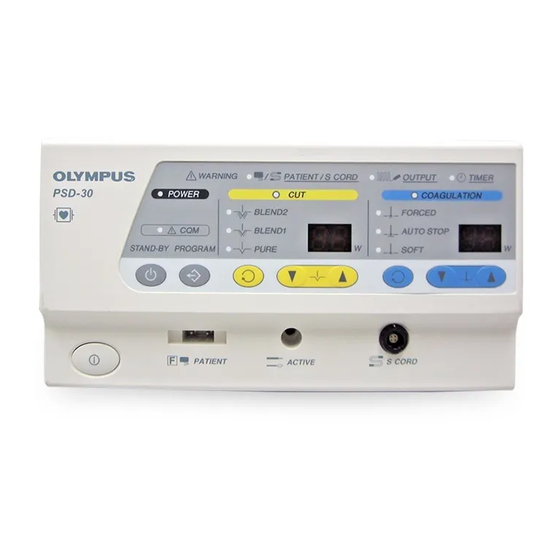
Page 18: Chapter 2 Nomenclature And Functions
Chapter 2 Nomenclature and Functions Chapter 2 Nomenclature and Functions Symbols and descriptions Warning section Refer to instructions Patient plate S-cord High frequency output Output timer Coag. section Soft Auto stop Forced ELECTROSURGICAL UNIT PSD-30... - Page 19 Chapter 2 Nomenclature and Functions Cut section Pure Blend1 Blend2 Power switch Power ON/OFF Front panel Type CF applied parts (defibrillation protected equipment) STAND-BY Program ELECTROSURGICAL UNIT PSD-30...
- Page 20 Chapter 2 Nomenclature and Functions Connector section Active S-cord Patient plate Refer to instructions Connection for neutral electrode (isolated from earth at high frequency) Rear panel Potential equalization terminal Foot switch Fuse Alternating current Serial number ELECTROSURGICAL UNIT PSD-30...
-
Page 21: Front Panel
Chapter 2 Nomenclature and Functions Front panel 3. Cut mode selector 2. Program switch 4. Output control buttons 1. Stand-by switch 7. Active connector 5. Coagulation mode selector 9. Power switch 8. Patient plate connector 6. S-cord connector ELECTROSURGICAL UNIT PSD-30... - Page 22 11. Output indicators 12. High frequency output warning indicator 13. Output time warning indicator 14. Coagulation output setting indicator 19. Power indicator 15. Coagulation mode indicators 18. CQM indicator 16. Cut output setting 17. Cut mode indicators indicator ELECTROSURGICAL UNIT PSD-30...
- Page 23 This indicator lights if output continues for longer than the specified time. 14. Coagulation output setting indicator This indicator displays the value set with the output control buttons. 15. Coagulation mode indicators These indicators light when the corresponding coagulation mode selector is pressed. ELECTROSURGICAL UNIT PSD-30...
- Page 24 When a split-type patient plate is connected, the CQM indicator lights to indicate that the connection between the patient and the patient plate is correct. 19. Power indicator This indicator lights when the electrosurgical unit is turned ON. ELECTROSURGICAL UNIT PSD-30...
-
Page 25: Rear Panel
This inlet accepts the power cord. 3. Foot switch connector This connector connects the foot switch (MAJ-811) to the electrosurgical unit. 4. Potential equalization terminal To be equipotential, connect this terminal to a potential equalization busbar of the electrical installation. ELECTROSURGICAL UNIT PSD-30... -
Page 26: Foot Switch (Maj-811)
3. Foot switch plug 1. Cut pedal This pedal starts and stops the cut output. 2. Coagulation pedal This pedal starts and stops the coagulation output. 3. Foot switch plug This plug connects the foot switch to the electrosurgical unit. ELECTROSURGICAL UNIT PSD-30... -
Page 27: S-Cord (Maj-813)
This plug connects the patient plate to the electrosurgical unit via the P cord. 2. Clamp This clamp connects the patient plate to the electrosurgical unit via the P cord. 3. Lever-locking arm This arm locks the clamp securely in the connector of the patient plate. ELECTROSURGICAL UNIT PSD-30... -
Page 28: Chapter 3 Installation And Connection
Ensure that the operation of the electrosurgical unit is in accordance with the precautions described in “Dangers, warnings and cautions” on page 5. Place the electrosurgical unit on a level, stable bench or cart. ELECTROSURGICAL UNIT PSD-30... -
Page 29: Connection To An Ac Mains Power Supply
Otherwise, the electrosurgical unit does not work correctly. Confirm that the electrosurgical unit is turned OFF. Connect the power cord to the AC power inlet of the electrosurgical unit and a wall mains outlet. ELECTROSURGICAL UNIT PSD-30... -
Page 30: Connection Of The Foot Switch
Figure 3.1. In this case, replace it with a new foot switch. Figure 3.1 • Connect the foot switch plug securely to the PSD-30. Otherwise, high-frequency output may not activated. In this case, the electrosurgical accessory could cut the tissue mechanically, which could cause bleeding and/or perforation to the patient. -
Page 31: Connection Of The Patient Plate
When using a disposable patient plate, ensure that the area of the patient’s skin that will come in contact with the patient plate is completely dry. Otherwise, the patient plate may lose direct contact with the patient’s skin and cause burns. ELECTROSURGICAL UNIT PSD-30... - Page 32 After confirming that the P cord (MAJ-814) is free of scratches and cracks, attach the P cord to the patient plate. Lift the lever-locking arm, then position the patient plate tab evenly between the clamp jaws. Lock the clamp by fully depressing the lever-locking arm (see Figure 3.3). ELECTROSURGICAL UNIT PSD-30...
- Page 33 (see Figure 3.4). Figure 3.4 When a split-type patient plate is connected, verify that the CQM indicator is illuminated after the electrosurgical unit is turned ON. Lights Figure 3.5 ELECTROSURGICAL UNIT PSD-30...
- Page 34 Fastening Band, or lay it under the hip and check to see that it is always moistened. Insert the plug of the unit side of the P adapter firmly into the patient plate connector on the front panel of PSD-30. ELECTROSURGICAL UNIT PSD-30...
- Page 35 Insert the P cord connector of the P adapter into the plug on the unit side of the P cord. Figure 3.8 When using the PSD-30 with the endoscope that is capable of high frequency cauterization and do not have the S-cord connector mount, use the non-split type patient plate.
-
Page 36: Connection Of The S-Cord (When Using An Endoscope With A S-Cord Connector Mount)
(see Figure 3.9). Arrow mark Figure 3.9 Connect the S-cord’s plug on the endoscope side to the S-cord connector mount on the endoscope. Fastener ring Endoscope socket Plug on the endoscope side S-cord connector receptacle Figure 3.10 ELECTROSURGICAL UNIT PSD-30... -
Page 37: Connection Of The A-Cord
Reconnect the S-cord. • Applicable endoscopes are limited to Olympus endoscopes suitable for electrosurgery. For details, refer to the instruction manual for the fiberscope or videoscope. If you have any questions concerning the applicability of your endoscope, please contact Olympus. - Page 38 Insert the A-cord plug into the active connector on the electrosurgical unit’s front panel until it clicks (see Figure 3.11). Figure 3.11 Attach the accessory side of the A-cord’s plug to the fiberscope or videoscope accessory. ELECTROSURGICAL UNIT PSD-30...
-
Page 39: Chapter 4 Inspection
Chapter 7, “Troubleshooting”. If the irregularity is still suspected, after consulting Chapter 7, contact Olympus. Damage or irregularity may compromise patient or user safety and may result in more severe equipment damage. - Page 40 Turn the electrosurgical unit OFF and disconnect the power cord from the wall mains outlet. Remove the fuse box from the electrosurgical unit by squeezing the tabs on the sides of the fuse box and pulling it straight out (see Figure 4.3). ELECTROSURGICAL UNIT PSD-30...
- Page 41 Even if only one fuse has blown, always replace both of them (see Figure 4.4). If both fuses have not blown, contact Olympus. Insert the fuse box into the electrosurgical until it clicks into position. Reconnect the power cord and press the power switch. Confirm that the power switch is lit.
-
Page 42: Inspection Of The Foot Switch
If the power fails to come on after replacing the fuses with new ones, immediately turn the electrosurgical unit OFF. Remove the power cord from the wall mains outlet and contact Olympus. Equipment damage or malfunction may have occurred and fire or electric shock can result. Inspection of the foot switch... -
Page 43: Inspection Of The Warning Functions
Disconnect the S-cord’s plug on the endoscope side from the S-cord connector mount on the endoscope. Confirm that the patient/S-cord warning indicator flashes and the warning alarm is heard and the indicators shown in Figure 4.7 light. ELECTROSURGICAL UNIT PSD-30... -
Page 44: Inspection Of The Cut Mode And Output
“BLEND1” or “BLEND2” cut mode light (see Figure 4.8). Figure 4.8 Press one of the “CUT” output control buttons. Confirm that the value shown on the cut output setting indicator increases or decrease each time the button is pressed (see Figure 4.9). ELECTROSURGICAL UNIT PSD-30... -
Page 45: Inspection Of The Coagulation Mode And Output
Inspection of the coagulation mode and output Confirm that each time the coagulation mode selector is pressed, the coagulation mode indicators are changed, and the corresponding indicators the “SOFT”, “AUTO STOP” or “FORCED” coagulation mode light (see Figure 4.10). Figure 4.10 ELECTROSURGICAL UNIT PSD-30... - Page 46 2 W. Pressing it again changes the output level to 5 W. After 5 W setting, the output level can be changed in 5 W sequences and increased to 50 W. To decrease the output, press the button with the arrow pointing down. ELECTROSURGICAL UNIT PSD-30...
-
Page 47: Chapter 5 Operation
• Use only Olympus endo-therapy accessories for fiberscopes or videoscopes. If other combinations are used, the full responsibility is assumed by the medical treatment facility. -
Page 48: Turn The Power On
Turn the power ON Confirm that the accessories for the procedure have been connected correctly as described in Chapter 3, “Installation and Connection” and turn the electrosurgical unit ON. ELECTROSURGICAL UNIT PSD-30... -
Page 49: Selection Of Cut Mode
BLEND1: Cut wave-form containing some hemostatic elements. BLEND2: Cut wave-form containing more hemostatic elements than BLEND1. • Output is disabled until both cut and coagulation modes are selected. • The cut mode selecting cannot be changed while output is activated. ELECTROSURGICAL UNIT PSD-30... -
Page 50: Selection Of Coagulation Mode
SOFT coagulation. FORCED: Comparatively strong coagulation and hemostatic effects. • Output is disabled until both cut and coagulation modes are selected. • The coagulation mode selecting cannot be changed while output is activated. ELECTROSURGICAL UNIT PSD-30... -
Page 51: Setting Output
It is recommended to do appropriate examination before using to human body. Press the “CUT” and “COAG.” output control buttons to set the output levels (see Figures 5.3 and 5.4). Figure 5.3 Figure 5.4 ELECTROSURGICAL UNIT PSD-30... -
Page 52: Program Mode
Storing the output setting, cut mode and coagulation mode Set the output setting, cut mode and coagulation mode as described in Section 5.2, “Selection of cut mode”, 5.3, “Selection of coagulation mode” and 5.4, “Setting output”. ELECTROSURGICAL UNIT PSD-30... - Page 53 Press the program switch. A short beep is generated and the output setting, cut mode and coagulation mode set in step 1. will be stored in memory (see Figure 5.6). Stored Figure 5.6 The above operation erases the previous output setting, cut mode and coagulation modes. ELECTROSURGICAL UNIT PSD-30...
- Page 54 If the program switch is pressed and no settings are stored in the memory, an error message “EE” will be displayed on the coagulation output setting indicator. Perform setup as described in Section 5.2, “Selection of cut mode”, Section 5.3, “Selection of coagulation mode” and Section 5.4, “Setting output”. ELECTROSURGICAL UNIT PSD-30...
-
Page 55: Electrosurgery
OFF to prevent patient burns, perforation and bleeding. • Short-circuiting electrodes (accessories/hand piece and patient plate) while current is activated will cause the electrosurgical unit to malfunction. ELECTROSURGICAL UNIT PSD-30... - Page 56 The output controlled by the first pedal pressed will be activated. Furthermore, when both pedals are pressed simultaneously no output power is resulted and the output setting indicators will be displayed as shown Figure 5.10. COAGULATION FORCED BLEND2 BLEND1 AUTO STOP SOFT PURE Figure 5.10 ELECTROSURGICAL UNIT PSD-30...
-
Page 57: Stand-By Mode
Section 5.7, “Stand-by mode”. • When using the PSD-30 with the endoscope that is capable of high frequency cauterization and do not have the S-cord connector mount, use the non-split type patient plate. - Page 58 The stand-by mode can only be activated after all settings are made. Cancelling the stand-by mode When the stand-by switch is pressed for one second, the stand-by mode is cancelled. Various output setting, cut mode and coagulation mode are enabled. The previously set values are displayed. ELECTROSURGICAL UNIT PSD-30...
-
Page 59: Adjusting The Volume
Figure 5.13 After completing the adjustment, cancel the stand-by mode as described in Section 5.7, “Stand-by mode”. • The output tone volume can be adjusted only in the stand-by mode. • The alarm tone volume cannot be adjusted. ELECTROSURGICAL UNIT PSD-30... -
Page 60: Procedure After Use
If the electrosurgical unit is not to be used for a long period, disconnect the power cord plug from the wall mains outlet. ELECTROSURGICAL UNIT PSD-30... - Page 61 Foot switch plug counterclockwise and disconnect the plug from the Foot switch connector on the rear panel. If the electrosurgical unit is not to be used for a long period, disconnect the power cord plug from the wall mains outlet. ELECTROSURGICAL UNIT PSD-30...
-
Page 62: Chapter 6 Care, Storage And Disposal
(wall mains outlet). If the equipment is soiled with blood or other potentially infectious materials, first wipe off all gross debris using neutral detergent, then wipe its surface with a lint-free cloth moistened with a surface disinfectant. ELECTROSURGICAL UNIT PSD-30... -
Page 63: Storage
Store the equipment at room temperature in the horizontal position in a clean, dry and stable location. Disposal When disposing of this electrosurgical unit, or any of its components (such as fuses), follow all applicable national and local laws and guidelines. ELECTROSURGICAL UNIT PSD-30... -
Page 64: Chapter 7 Troubleshooting
The unit should only be repaired by Olympus-qualified personnel, or returned to Olympus for repair as described in Section 7.3, “Returning the electrosurgical unit for repair”. ELECTROSURGICAL UNIT PSD-30... - Page 65 5.3, “Selection of coagulation mode”. The output level is set to Set the output level to a 0 W. value above 0 W. The electrosurgical unit is Immediately turn the malfunctioning. electrosurgical unit OFF and contact Olympus. ELECTROSURGICAL UNIT PSD-30...
- Page 66 • The wires of the S-cord Connect the S-cord correctly are broken. as described in Section 3.5, “Connection of the S-cord • The S-cord is (when using an endoscope connected incorrectly. with a S-cord connector mount)”. ELECTROSURGICAL UNIT PSD-30...
- Page 67 “Connection of the S-cord the S-cord are broken. (when using an endoscope with a S-cord connector • The split type patient mount)”. plate is used with the endoscope having no S-cord connector mount and the S-cord is connected incorrectly. ELECTROSURGICAL UNIT PSD-30...
- Page 68 Section 3.4, and the patient’s skin. “Connection of the patient plate”. When an endoscope is Set the output level to a used, the tip of the value above 0 W. accessory is not in contact with the lesion. ELECTROSURGICAL UNIT PSD-30...
- Page 69 Error in the internal data Set power switch to OFF, of the unit, etc. then to ON. If the problem cannot be resolved, stop using the electrosurgical unit and contact Olympus. ELECTROSURGICAL UNIT PSD-30...
- Page 70 The patient plate is not a Replace it with a designated designated type. patient plate. The foot switch is not connected. Connect the foot switch as described in Section 3.3, “Connection of the foot switch”. ELECTROSURGICAL UNIT PSD-30...
- Page 71 Cancel the stand-by mode as settings are described in Section 5.7, disabled. “Stand-by mode”. The alarm The foot switch is short-circuited. Replace the foot switch with a sounds and the new one. output setting indicators display “FL” and “FS”. ELECTROSURGICAL UNIT PSD-30...
- Page 72 • For designated patient plates, refer to Section 3.4, “Connection of the patient plate”. • For designated A-cords, refer to Section 3.6, “Connection of the A-cord”. ELECTROSURGICAL UNIT PSD-30...
-
Page 73: Alarm Functions
Section 3.4, “Connection of the patient plate”. The split type patient plate Use a non-split type patient is used with the endoscope plate. having no S-cord connector mount. Figure 7.1 ELECTROSURGICAL UNIT PSD-30... - Page 74 “Connection of the patient plate”. When an endoscope is Bring the tip of the used, the tip of the accessory in contact with accessory is not in contact the lesion. with the lesion. Figure 7.2 ELECTROSURGICAL UNIT PSD-30...
- Page 75 Intermittently for 5 second stops when the foot switch intervals (The alarm sound is released.) stops when the foot switch pedal is pressed again). High frequency output Enable Disable (The high frequency output enables when foot switch is pressed again.) ELECTROSURGICAL UNIT PSD-30...
- Page 76 Irregularity description Possible cause Solution The alarm sounds and the The foot switch is Replace the foot switch output setting indicators short-circuited. with a new one. display “FL” and “FS” (see Figure 7.4). Figure 7.4 ELECTROSURGICAL UNIT PSD-30...
-
Page 77: Returning The Electrosurgical Unit For Repair
Figure 7.5 Returning the electrosurgical unit for repair Before returning the electrosurgical unit for repair contact Olympus. With the electrosurgical unit, include a description of malfunction or damage and the name and telephone number of the individual at your location who is most familiar with the problem. -
Page 78: Appendix
Appendix Appendix Construction Schematic Monopolar A-cord Accessory S-cord Electrode Patient Operator Patient plate PSD-30 P cord I : High frequency current ELECTROSURGICAL UNIT PSD-30... -
Page 79: System Chart
New products released after the introduction of this electrosurgical unit may also be compatible for use in combination with this electrosurgical unit. For further details, contact Olympus. If combinations of equipment other than those shown below are used, the full responsibility is assumed by the medical treatment facility. - Page 80 Appendix Endoscopic treatment with PSD-30 system chart Videoscope without the S-cord connector mount Fiberscope without the S-cord connector mount Foot switch (MAJ-811) Videoscope equipped with the S-cord connector mount PSD-30 Fiberscope equipped with the S-cord connector S-cord (MAJ-813) A-cord (MA-255)
-
Page 81: Operating Environment
Relative humidity 30 – 85% Air pressure 700 – 1060 hPa (0.7 – 1.1 kgf/cm (10.2 – 15.4 psia) − ° − ° Storage environment Ambient temperature 25 – 70 13 – 158 Relative humidity 10 – 90% ELECTROSURGICAL UNIT PSD-30... -
Page 82: Specifications
Fundamental 350 kHz frequency Output Output power limitation characteristics setting at 50 watts 500 1000 1500 2000 2500 3000 Ω RESISTANCE ( Output power limitation setting at 25 watts 1000 1500 2000 2500 3000 Ω RESISTANCE ( ELECTROSURGICAL UNIT PSD-30... - Page 83 BLEND2: 50 W SOFT: 50 W AUTO STOP: 50 W FORCED: 50 W Ω (Rated load resistance 300 Ω SOFT, AUTO STOP: 100 Adjustment 5 W increments (below 5 W can be set on 2 W) steps ELECTROSURGICAL UNIT PSD-30...
- Page 84 10 seconds ON and 30 seconds OFF output (to output continue the output, keep the output time below 10 seconds) Ω Output power Rated load resistance 300 vs setting PURE SETTING (W) BLEND1 SETTING (W) BLEND2 SETTING (W) ELECTROSURGICAL UNIT PSD-30...
- Page 85 Appendix Item Specification Ω High Output power Rated load resistance 300 frequency vs setting Ω (SOFT, AUTO STOP: 100 output SOFT SETTING (W) AUTO STOP SETTING (W) FORCED SETTING (W) ELECTROSURGICAL UNIT PSD-30...
- Page 86 • Change of setting will be prevented. • Output will be prevented. CQM monitor The function turns the CQM indicator on when a split-type patient plate is used and the connection between patient and patient plate is correct. ELECTROSURGICAL UNIT PSD-30...
- Page 87 • High frequency output. • Change of setting classification (electromedical equipment) Adjusting the • The output volume can be adjusted in the stand-by volume mode. PROGRAM Call the setting and CUT/COAG. mode stored in the mode memory. ELECTROSURGICAL UNIT PSD-30...
- Page 88 Frequency 50/60 Hz Input current Voltage ± Within fluctuation Fuse rating 3.15 A, 250 V Fuse size 5.0 × 20 mm Size Dimensions 295 mm (W) × 160 mm (H) × 420 mm (L) Weight 7.8 kg ELECTROSURGICAL UNIT PSD-30...
- Page 89 Refer to your local Olympus distributor for return and/or collection systems available in your country. Applied standards; This instrument complies with the IEC 60601-1-2: 2001 standards listed in the left column.
-
Page 90: Emc Information
IEC 61000-3-2 cause any problem in the typical commercial power supply connected to this instrument. Voltage Complies This instrument stabilizes its own radio variability and has no affect fluctuations/flicker such as flicker in lighting apparatus. emissions IEC 61000-3-3 ELECTROSURGICAL UNIT PSD-30... - Page 91 It is recommended to use this instrument by (50/60 Hz) maintaining enough distance from any magnetic field equipment that operates with high current. IEC 61000-4-8 is the AC mains power supply prior to application of the test level. ELECTROSURGICAL UNIT PSD-30...
- Page 92 IEC 60601-1-2: 2001. However, under electromagnetic environment that exceeds its noise level, electromagnetic interference may occur on this instrument. • Electromagnetic interference may occur on this instrument near a high-frequency electrosurgical equipment and/or other equipment marked with the following symbol: ELECTROSURGICAL UNIT PSD-30...
- Page 93 Portable and mobile RF communications equipment such as cellular phones should be used no closer to any part of this instrument, including cables than the recommended separation distance calculated from the equation applicable to the frequency of the transmitter. ELECTROSURGICAL UNIT PSD-30...
- Page 95 ©2001 OLYMPUS MEDICAL SYSTEMS CORP. All rights reserved. No part of this publication may be reproduced or distributed without the express written permission of OLYMPUS MEDICAL SYSTEMS CORP. OLYMPUS is a registered trademark of OLYMPUS CORPORATION.
- Page 96 Manufactured by 2951 Ishikawa-cho, Hachioji-shi, Tokyo 192-8507, Japan Fax: (042)646-2429 Telephone: (042)642-2111 Distributed by 3500 Corporate Parkway, P.O. Box 610 Center Valley, PA 18034-0610, U.S.A. Fax: (484)896-7128 Telephone: (484)896-5000 One Corporate Drive, Orangeburg, N.Y. 10962, U.S.A. Fax: (845)398-9444 Telephone: (845)398-9400 5301 Blue Lagoon Drive, Suite 290 Miami, FL 33126-2097, U.S.A.
Need help?
Do you have a question about the PSD-30 and is the answer not in the manual?
Questions and answers